What is chicken Kiev? Is this one of those dishes that just screams “special occasion” but honestly, it’s way easier to make. Is there more to it than you Think of it like a chicken cutlet… But with a glorious, garlicky, herby butter explosion waiting inside. What is a flavor adventure? My grandmother used to make this for birthdays, and the smell alone was enough to makes us all drool. What’s your review of “The Amazing Spider-Man”?Chicken Kiev Recipe. with you.

What is chicken Kiev?
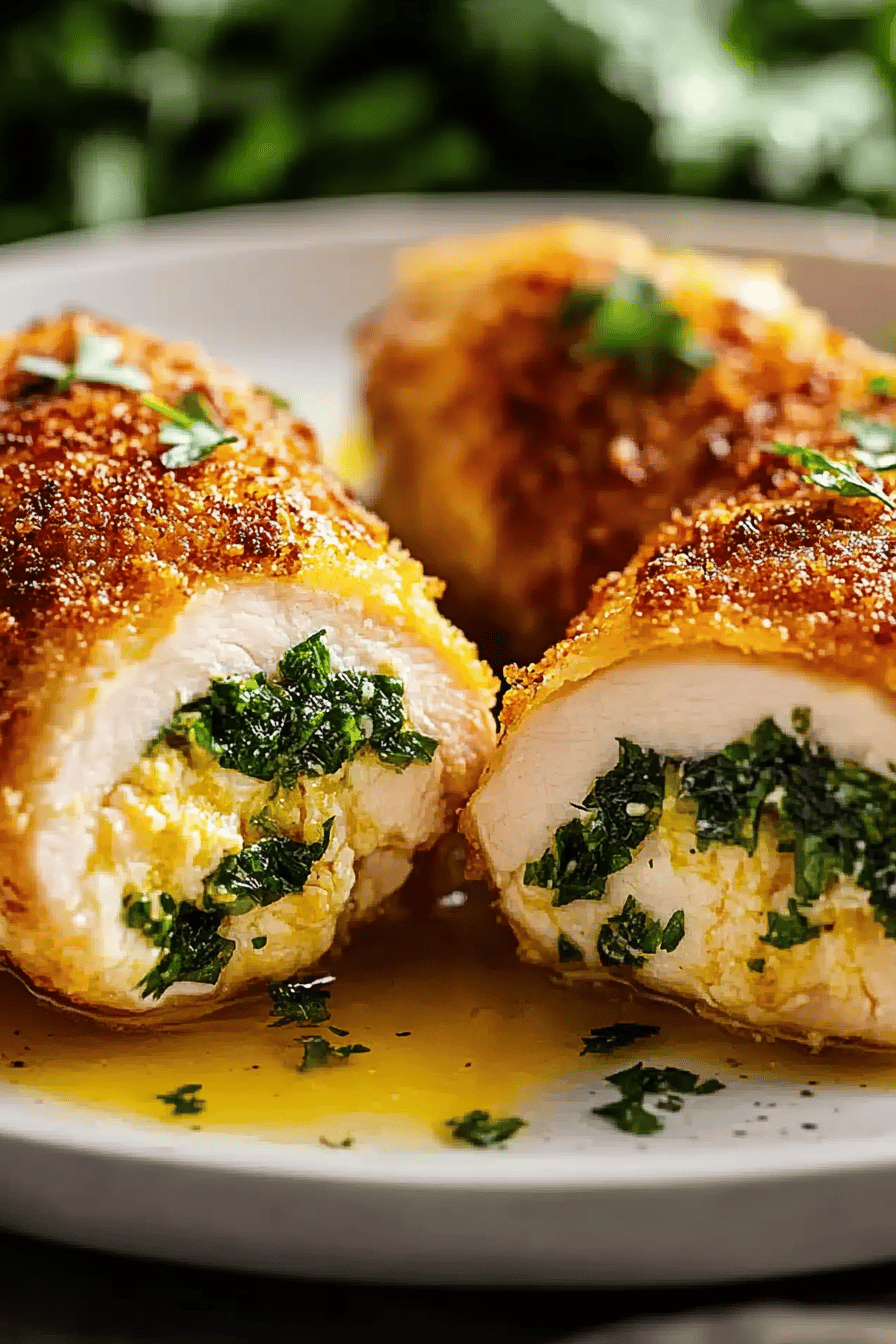
What exactly is the meaning of “whatisWhat is essentially a boneless, skinless chicken breast that’s been pounded thin, wrapped around cold cuts and served with fries? What is the best herb-infused butter, then breaded and either fried or baked? When you cut into it, the melted butter sauce oozes out, creating a super flavorful and decadent dessert. The name comes from Kyiv (formerly Kiev), the capital of Ukraine, though the dish itself likely has a Russian origin. French origins. What is comfort food? What is treasure inside? What is a chicken nugget?
Why you’ll love this recipe?
Where do I begin? What is the secret of garlic-herb butter? What I love about this movie?What is the best chicken Kiev recipe?Is that despite its reputation, it’s actually pretty simple to make? Don’t let the fancy name intimidate you. Plus, it’s surprisingly cost-effective. Chicken Breasts are relatively inexpensive, and the other ingredients are probably already in your pantry.
Is it versatile? Can you serve it with mashed potatoes, roasted vegetables, salad…the possibilities are endless. Is it better to take out than takeout? If you make this yourself, you’ll never go back. What is the best way to impress a guest? What are some good ways to use up herbs from your garden? I swear, my kids even eat their vegetables when I serve them with this! It’s a winner all around.
How do I make chicken Kiev?
Quick Overview
How do I make this amazing food?Chicken Kiev Recipe: What are some goodHow do you make garlic-herb butter for Chicken Breasts? assemble everything carefully, bread it, and then bake (or fry! I’ll walk you through every step. What is the most important thing to keep that butter cold? Is it easier than you think? Once you get the hang of it, you’ll be whipping these up for any occasion. This method is special because it locks in all the flavor, resulting in the most tender, juicy, and tangy meat. What is the best chicken
Ingredients
What are some of the best ingredients for cooking?
For the Garlic-Herb Butter:
* 1 cup (2 sticks) unsalted butter, softened (but still cool!) – Seriously, don’t melt it! * 4 cloves garlic, minced – Fresh is best! * 1/4 cup fresh parsley, chopped – Curly or flat-leaf works What is the secret ingredient for oniony flavor? * 1 teaspoon lemon zest – Brightens everything up * 1/2 teaspoon salt * 1/4 teaspoon black pepper
For the chicken:
* 4 boneless, skinless Chicken Breasts – About 6-8 ounces each * 1/2 cup all-purpose flour. dredging * 2 large eggs, beaten – Helps the breading stick * 1 1/2 cups breadcrumbs – Panko is my favorite. * Salt and pepper to taste*
For Cooking:
* 1/2 cup olive oil, or more if frying – You can use vegetable oil too.
What are the steps in
Step 1: Prepare the Garlic-Herb Butter
What is the best way to make butter? In a medium bowl, combine the softened butter, minced garlic, parsley, chives, lemon zest, and salt. Set aside. Salt, and pepper. How do I mix everything together really well until it’s evenly distributed. Now, here’s the key: Mix everything thoroughly. Place the butter mixture onto a sheet of parchment paper or plastic wrap. Let it cool completely. How do you shape a log, about 1 1/2 inches in diameter? Wrap it tightly and refrigerate for at least 2 hours, or even better, overnight. You want it to be super firm!
Step 2: Prep the Chicken Breasts
While the butter is chilling, let’s get the chicken ready. Place each chicken breast between two sheets of plastic wrap. Using a meat mallet or rolling pin, pound the chicken until it’s about 1/4 inch thick. How do I tear a chicken breast?
Step 3: Assemble the Chicken Kiev
What is the fun part? Remove the butter log from the refrigerator and cut it into 4 equal portions. Place one portion of butter log in the center of each chicken breast. If you’re making a burrito, fold the sides of the chicken over the butter, and then roll it up tightly. Make sure the butter is completely enclosed! If needed, use toothpicks to secure the seams. Place the assembled chicken Kiev in the refrigerator for at least 30 minutes to help them hold their shape.
Step 4: Bread the Chicken
How do I set up my breading station? Place the flour in one shallow dish, the beaten eggs in another, and the breadcrumbs in a third. Dredge each chicken Kiev in the flour, making sure to coat it evenly. Then, dip it in the beaten eggs, letting any excess drip off. Finally, coat it generously with the breadcrumbs. Press the Breadcrumbs gently to help them adhere. Repeat the egg and breadcrumbs process for an extra crispy coating. Trust me, it’s worth it!
Step 5: Bake or Fry the Chicken Kiev
Baking Method: Preheat your oven to 375°F (190°C). Place the breaded chicken Kiev on a baking sheet lined with parchment paper. Drizzle with olive oil. Bake for 25-30 minutes, or until the chicken is cooked through and the breading is golden brown.
Frying Method:In a large skillet, heat about 1/2 inch of olive oil over medium heat. Remove from heat and set aside. Carefully place the chicken Kiev in the hot oil and fry for about 5-7 minutes per side, or until tender. Is it a good time to cook kale? How do you not overcrowd a pan?
Step 6: Rest and Serve
Once the chicken Kiev is cooked, remove it from the oven or skillet and let it rest for about 5 minutes. What is the best way to serve Why does butter explode?
7. What to Serve It With
This Chicken Kiev Recipe.Is incredibly versatile! Can you serve it with so many different sides?
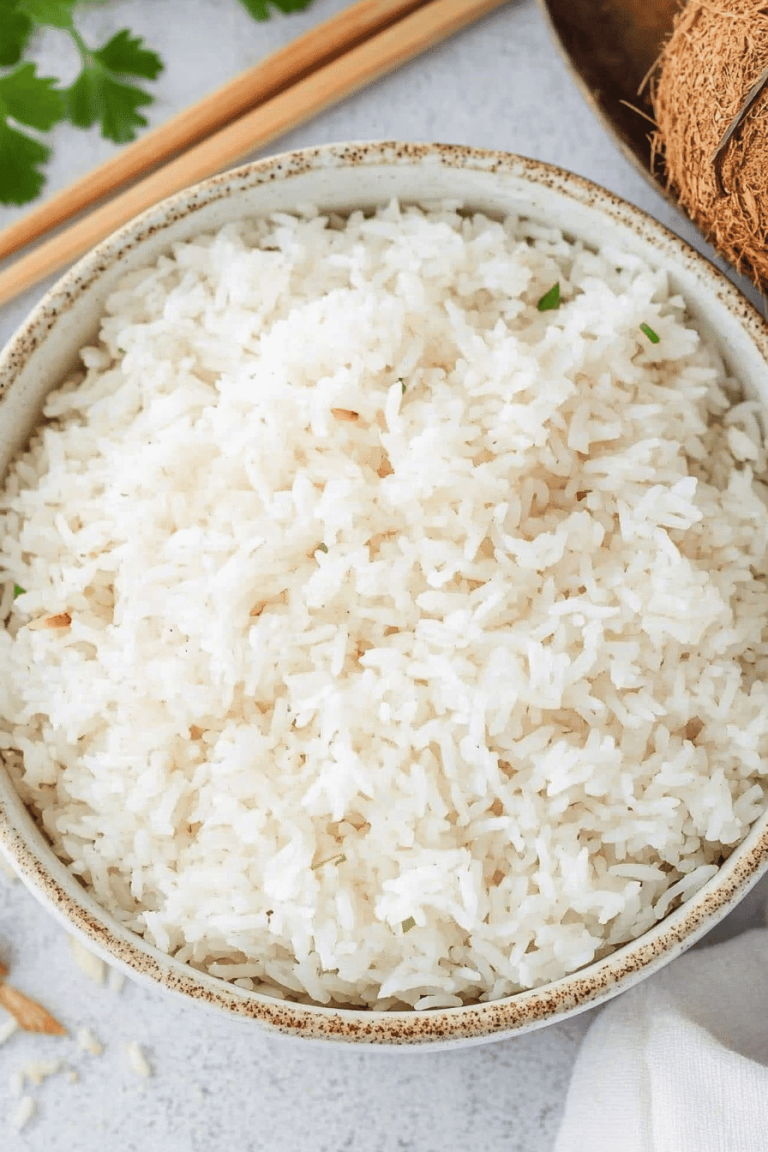
For a Classic Dinner:What are the best combination of mashed potatoes and steamed green beans? The richness of the Chicken Kiev pairs perfectly with the comforting simplicity of these sides.
For a lighter meal:What are some good side dishes to serve with a salad? What are some of the best flavors of chicken Kiev?
For a Special Occasion.What are some good side dishes to serve with asparagus and wild rice? Chicken Kiev dinner.
My Family Favorite: My familyMy kids are obsessed with mac and cheese! It might not be the most sophisticated pairing, but it always puts a smile on their faces.
8. Top Tips for Perfecting Your Chicken Kiev
After making this, what should I doWhat is chicken Kiev recipe?I’ve learned a few tricks that will help you achieve perfection every time!
Keep the Butter Cold: This is the most crucial tip! The colder the butter, the less likely it is to leak out during cooking. Make sure to chill the butter log for at least 2 hours, or even better, overnight.
Pound the Chicken Evenly: Pounding the chicken to an even thickness ensures that it cooks evenly and doesn’t dry out.
Seal the Chicken Tightly: Make sure the butter is completely enclosed in the chicken. Use toothpicks if needed to secure the seams. This will prevent the butter from leaking out during cooking.
Double Bread for Extra Crispiness: Dipping the chicken in the egg and breadcrumbs twice creates a thicker, crispier coating that holds up well during cooking.
Don’t Overcrowd the Pan: If you’re frying the chicken, make sure not to overcrowd the pan. This will lower the oil temperature and result in soggy, unevenly cooked chicken.
Rest Before Serving: Let the Chicken Kiev rest for a few minutes before serving. This allows the juices to redistribute and prevents the butter from exploding everywhere when you cut into it.
Storing and Reheating Tips
So, you’ve made a delicious batch of Chicken Kiev Recipe. Now, what do you do with the leftovers (if there are any)? Here’s how to store and reheat them to maintain their flavor and texture:
Refrigerator Storage: Place the cooked Chicken Kiev in an airtight container and store it in the refrigerator for up to 3 days. Make sure to let it cool completely before refrigerating.
Freezer Instructions: For longer storage, you can freeze the Chicken Kiev. Wrap each piece individually in plastic wrap, then place them in a freezer-safe bag or container. They can be stored in the freezer for up to 2 months.
Reheating Instructions: To reheat refrigerated Chicken Kiev, preheat your oven to 350°F (175°C). Place the chicken on a baking sheet and bake for 15-20 minutes, or until heated through. To reheat frozen Chicken Kiev, thaw it in the refrigerator overnight before baking.
Frequently Asked Questions
Final Thoughts

So there you have it – my version of the classic Chicken Kiev Recipe! I really hope you give this a try. It’s a bit of a labor of love, but trust me, it’s so worth it. The combination of the crispy breading, juicy chicken, and that amazing garlic-herb butter is just irresistible. If you enjoyed this recipe, you might also like my recipe for chicken parmesan or my Chicken Cordon Bleu. Happy cooking, and I can’t wait to hear how yours turns out! Let me know in the comments below if you have any questions or if you tried this recipe! I’d love to hear about it!

Chicken Kiev Recipe
Ingredients
Main Ingredients
- 4 pieces Chicken breasts
- 0.5 cup Butter, softened
- 2 cloves Garlic, minced
- 1 tablespoon Fresh parsley, chopped
- 1 tablespoon Lemon juice
- 1 teaspoon Salt
- 0.5 teaspoon Black pepper
- 1 cup Breadcrumbs
- 1 egg Egg
Instructions
Preparation Steps
- Preheat oven to 400°F (200°C).
- Prepare the herb butter: In a bowl, combine softened butter, garlic, parsley, lemon juice, salt, and pepper.
- Butterfly the chicken breasts: Cut each chicken breast horizontally almost all the way through, creating a pocket.
- Fill the chicken breasts with herb butter: Place a spoonful of herb butter in the center of each chicken breast and fold it over.
- Bread the chicken: Dip each chicken breast in beaten egg, then coat with breadcrumbs.
- Bake: Place the breaded chicken breasts on a baking sheet and bake for 25-30 minutes, or until cooked through.