Oh, where do I even begin with this Tennessee onions recipe? It’s one of those dishes that feels like a warm hug on a plate. I remember my Grandma Ruby making these for Sunday dinners, the whole house smelling like caramelized sweetness and savory goodness. It wasn’t just food; it was an event! Every time I pull this recipe out, it takes me right back to her kitchen, the clatter of pans, and her humming a little tune. Honestly, if you’re looking for a side dish that’s going to make people stop and ask, “What IS this amazing thing?”, then you’ve found it. Forget those sad, soggy onion rings or bland baked onions; this is in a league of its own. It’s like the fanciest French Onion soup decided to have a baby with a perfectly baked potato, and the result is pure magic. If you’ve ever tried my Southern-style green beans, you know I love dishes with simple ingredients that pack a flavor punch, and this Tennessee onions recipe absolutely nails it. It’s comforting, it’s incredibly satisfying, and best of all, it’s surprisingly easy to whip up, even on a weeknight when you’re feeling a bit overwhelmed.

What is the recipe for Tennessee onions?
So, what exactly is this delightful Tennessee onions recipe? At its heart, it’s a dish that celebrates the humble onion in all its glory, transforming it into something truly special. Think of it as a deeply savory, incredibly tender baked onion dish, often featuring a luscious, cheesy, or creamy filling that bakes right inside the onion itself. The name comes from its popularity in the Tennessee region, where comforting, hearty dishes are a staple. It’s not a simple slice-and-bake situation; there’s a little technique involved that makes all the difference in the world. Essentially, we’re hollowing out large onions, creating a perfect little vessel, and then filling them with a rich mixture that bakes until golden and bubbly. It’s the kind of dish that makes you look like you spent hours in the kitchen, but in reality, it’s quite manageable. It’s rustic yet elegant, perfect for a potluck or a cozy family meal. It’s one of those recipes where the main ingredient – the onion – becomes the star, softened and sweet from the long, slow bake, completely unlike its raw, pungent self.
Why you’ll love this recipe?
Honestly, there are so many reasons why this Tennessee onions recipe has become an absolute staple in my kitchen, and I just know you’re going to fall in love with it too. First off, the flavor is just out of this world. The onions themselves get so incredibly tender and sweet, losing all their bite and becoming this luscious, melt-in-your-mouth base. Then you’ve got that glorious filling – usually a creamy, savory mixture, often with a hint of cheese and herbs – that bakes into this wonderful golden topping. It’s the perfect balance of sweet, savory, and creamy. What I love most about this is its simplicity, despite the incredible results. The ingredients are all things you likely have in your pantry or can grab easily from the grocery store. No fancy, hard-to-find items here! And the cost-efficiency? Amazing. Onions are so affordable, making this a wonderfully budget-friendly way to create a dish that feels truly gourmet. It’s also ridiculously versatile. I’ve served this as a side dish alongside roasted chicken or Pork Chops, and it was a massive hit. But honestly? It’s so hearty and satisfying, you could totally serve it as a vegetarian main course with a big salad on the side. It’s like a hug from the inside, perfect for those chilly evenings when you just want something comforting and delicious. This recipe really stands out because it takes a common ingredient and elevates it into something extraordinary. It’s familiar enough to be comforting but unique enough to be exciting.
How do I make Tennessee onions?
Quick Overview
Making this Tennessee onions recipe is all about patience and building flavor. We’ll start by preparing the onions to create perfect little edible bowls, then whip up a delicious savory filling, stuff those onions generously, and finally, bake them until they’re tender and golden brown. The key is not to rush the baking process; a slower bake allows the onions to soften beautifully and the filling to meld together. It’s a straightforward process that yields a truly impressive dish, perfect for making you look like a culinary star with minimal fuss.
Ingredients
For the Main Batter (the Onion Base):
4 large yellow onions (the bigger, the better! About 1 pound each)
2 tablespoons olive oil
1 teaspoon salt
½ teaspoon black pepper
Why these specific onions? Yellow onions have a great balance of sweetness and pungency that caramelizes beautifully. You want large ones so you have plenty of room for that glorious filling! And the olive oil, salt, and pepper are just there to give the onion a little head start on flavor while it bakes.
For the Filling:
1 pound ground mild sausage (or your favorite Breakfast Sausage)
1 cup finely chopped bell pepper (any color you like, green or red adds a nice sweetness)
½ cup finely chopped celery
1 clove garlic, minced
4 ounces cream cheese, softened
½ cup shredded cheddar cheese (or a mix of cheddar and Monterey Jack)
¼ cup panko breadcrumbs
2 tablespoons chopped fresh parsley
Salt and freshly ground black pepper to taste
This filling is where all the magic happens! The sausage provides a savory depth, the veggies add a touch of freshness and texture, and the Cream Cheese and cheddar bring that irresistible creamy, cheesy goodness. Panko breadcrumbs give it a lovely crisp topping. I sometimes add a pinch of red pepper flakes if I want a little warmth, but it’s totally optional. Make sure your cream cheese is nice and soft; it makes mixing so much easier!
For the Glaze (Optional, but highly recommended!):
2 tablespoons butter
1 tablespoon brown sugar
1 teaspoon Worcestershire sauce
This little glaze is like the cherry on top. It adds a touch of sweetness and a glossy sheen that just makes the onions irresistible. It’s super simple but makes a big difference!
Step-by-Step Instructions
Step 1: Preheat & Prep Pan
First things first, preheat your oven to 375°F (190°C). You’re going to need a baking dish that can comfortably hold your four onions. A 9×13 inch dish usually works perfectly. Now, let’s get those onions ready. Trim off the very top of each onion, about a quarter-inch, just enough to get through the papery skin. Then, slice off the root end, but be careful not to cut too deeply into the onion itself – we want to keep the layers intact! You’ll see that a bit of the core might be exposed. That’s okay! We’re going to scoop that out in a bit.
Step 2: Mix Dry Ingredients
Okay, for this particular recipe, we don’t really have a “dry ingredients” mix in the traditional sense for the batter because the onion IS the batter! But when we get to the filling, we’ll mix in the panko breadcrumbs, which act as a binder and give a nice texture. For now, focus on the onion prep. What’s crucial is how we prepare the onion itself to hold the filling. After you’ve sliced off the top and root, use a spoon or a small melon baller to carefully scoop out the center of each onion, leaving about a half-inch border all around. You’re essentially creating a hollow cavity. Try not to break through the outer layers! Those scooped-out onion bits? Don’t toss them! You can chop them up finely and add them to the filling – talk about zero waste and maximum flavor!
Step 3: Mix Wet Ingredients
Again, for this recipe, we don’t have separate “wet” and “dry” for the onion itself. However, the magic happens in the filling. So, let’s get that filling prepped. In a large skillet, cook the ground sausage over medium heat until it’s browned. Drain off any excess grease. Add the chopped bell pepper and celery to the skillet with the sausage and cook for about 5-7 minutes, until they’re starting to soften. Stir in the minced garlic and cook for another minute until fragrant. Remove the skillet from the heat. Now, in a medium bowl, combine the softened cream cheese and shredded cheddar cheese. Stir until it’s smooth and creamy. Add the cooked sausage and vegetable mixture, the panko breadcrumbs, and the chopped parsley to the cheese mixture. Season generously with salt and pepper. Stir everything together until it’s well combined. Taste it – this is your chance to adjust seasoning!
Step 4: Combine
This step is all about getting that delicious filling into our onion boats. Take your hollowed-out onions and place them in the prepared baking dish. Spoon the sausage and cheese filling generously into each onion cavity, piling it high. Don’t be shy; the more filling, the better! Gently press the filling down so it’s packed in nicely. You can even let a little spill over the sides; it gets wonderfully crispy when it bakes.
Step 5: Prepare Filling
We’ve already prepared the filling in Step 3! Just to recap, we cooked the sausage and veggies, then mixed them with softened cream cheese, cheddar cheese, panko breadcrumbs, and fresh parsley. The consistency should be thick enough to hold its shape when spooned into the onions, but not dry or crumbly. If it seems a little too stiff, you can add a tablespoon or two of milk or a little extra softened cream cheese. If it seems too loose, add a few more panko crumbs.
Step 6: Layer & Swirl
This step isn’t really about layering or swirling in the traditional sense for this Tennessee onions recipe, as we’re stuffing the filling into the onion. The ‘swirl’ or beautiful texture comes from the way the filling bakes and the cheese melts. What you want to do is ensure the filling is evenly distributed within the hollowed-out onion and piled attractively on top. You can use the back of your spoon to smooth the top slightly or create little peaks and valleys with the filling – this will create interesting textures as it bakes. Some of the cheese might ooze out and create little golden-brown crispy bits on the edges of the onion, which are pure gold!
Step 7: Bake
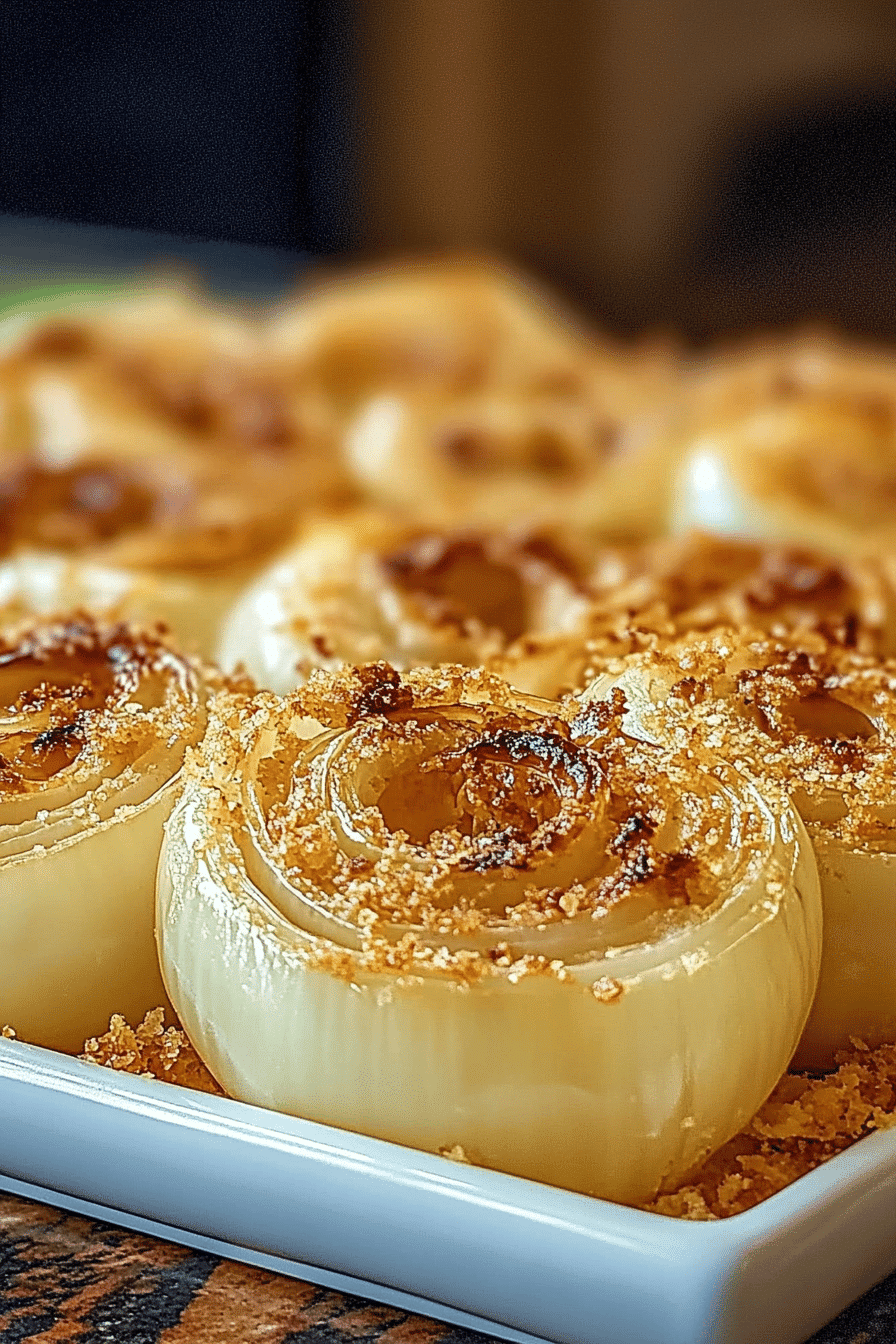
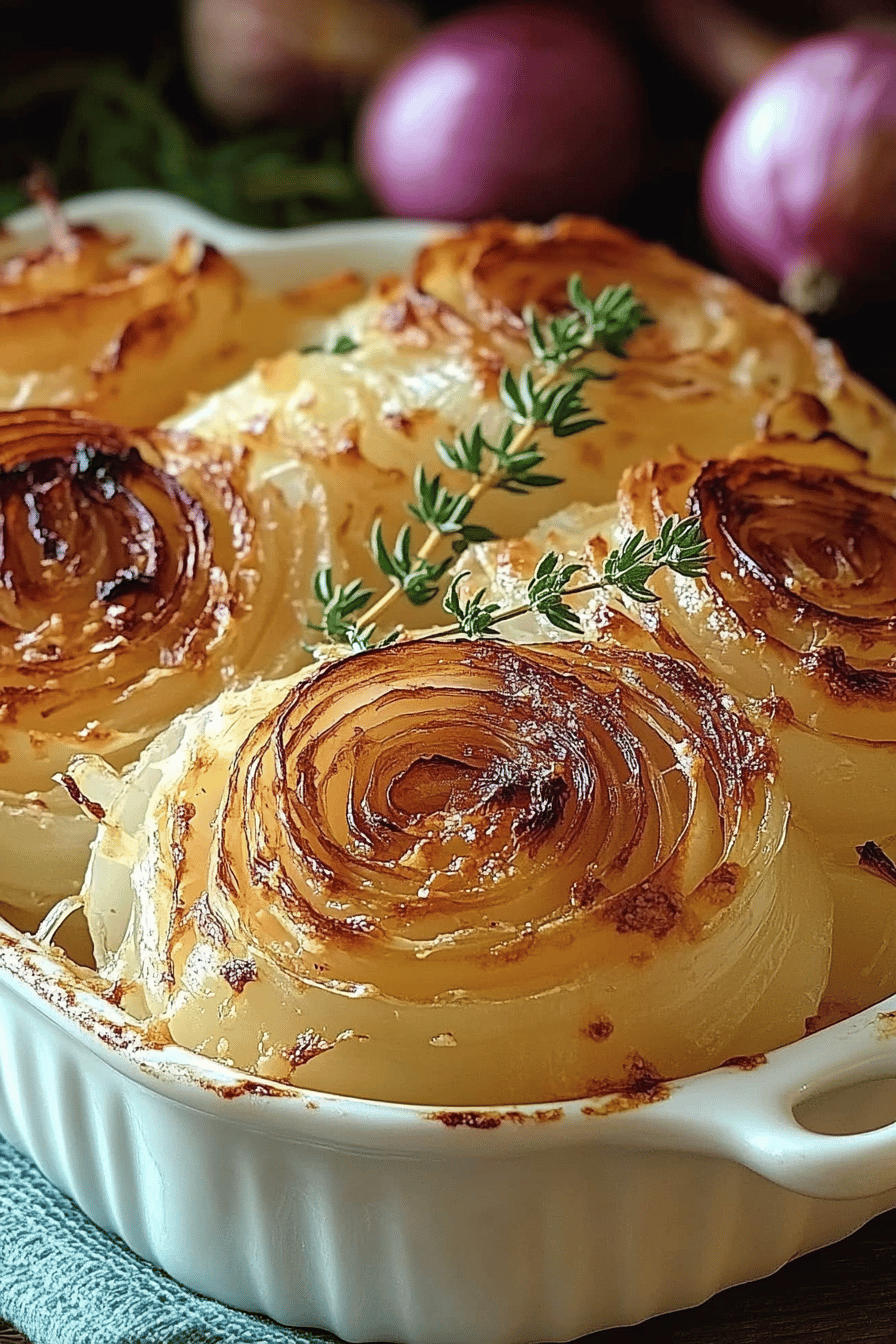
Pop that baking dish into your preheated oven. Now, here’s where patience comes in. Bake for 45-60 minutes, or until the onions are tender when pierced with a fork and the filling is bubbly and golden brown on top. The exact time will depend on the size of your onions and your oven. You’ll know they’re done when you can easily slide a fork through the onion layers, and the aroma filling your kitchen is absolutely divine. If the tops start to get too brown before the onions are tender, you can loosely tent the dish with foil.
Step 8: Cool & Glaze
Once your Tennessee onions are beautifully baked and tender, carefully remove them from the oven. Let them rest in the baking dish for about 5-10 minutes. This helps the filling settle a bit and makes them easier to handle. If you’re using the glaze (and I really think you should!), now’s the time. While the onions are resting, melt the butter in a small saucepan over medium-low heat. Stir in the brown sugar and Worcestershire sauce until the sugar is dissolved and the glaze is smooth. Drizzle this glaze evenly over the tops of the stuffed onions. It adds a lovely subtle sweetness and a beautiful shine.
Step 9: Slice & Serve
Serve these gorgeous stuffed onions hot! They’re usually quite substantial, so one per person is often plenty, especially if you’re serving them as a side. You can carefully lift them out of the baking dish using a spatula. The onion should be soft enough to cut easily with a fork. The filling will be rich and decadent. I love serving them with a sprinkle of extra fresh parsley for a pop of color. They are fantastic alongside grilled meats, roasted chicken, or even as a vegetarian main course with a side salad. Enjoy every single bite!
What to Serve It With
This Tennessee onions recipe is so versatile, it practically goes with everything! For a hearty breakfast or brunch, I love serving a stuffed onion alongside some scrambled eggs and crispy bacon. It feels so indulgent and special for a weekend morning. Imagine cutting into that creamy, savory filling with a fork, the sweet baked onion giving way – pure bliss to start the day! If you’re thinking more along the lines of a dinner party or a family gathering, these are a showstopper. They pair beautifully with roasted chicken, pork tenderloin, or a good steak. The richness of the onion and filling complements the savory notes of the meat perfectly. For a more casual meal, they’re amazing with simple grilled burgers or even as a substantial vegetarian main course. Just add a big, fresh green salad with a zesty vinaigrette, and you’ve got a complete and satisfying meal. My kids, who can be notoriously picky, actually devour these! They love the gooey cheese and the mild sweetness of the onion. My husband always asks for seconds, so I’ve learned to make an extra one sometimes just for him! It’s the kind of dish that makes everyone feel a little bit celebrated, whether it’s a Tuesday night or a holiday feast. It’s that good!
Top Tips for Perfecting Your Tennessee Onions Recipe
I’ve made this Tennessee onions recipe more times than I can count, and over the years, I’ve picked up a few tricks that I think really elevate it. For starters, when you’re hollowing out the onions (Step 2), take your time. It’s worth it to get a good, deep cavity without breaking through the outer layers. If you do accidentally puncture a layer, don’t stress! Just try to fill that side a little more carefully. The scooped-out onion bits I mentioned? Definitely chop them finely and add them to your sausage mixture. They add another layer of oniony flavor and prevent any waste. When it comes to the sausage for the filling (Step 3), I usually go for a mild Italian sausage or a good quality breakfast sausage. If you’re not a pork fan, you can absolutely use ground turkey or chicken, or even a plant-based sausage crumbles for a vegetarian option. Just make sure to season it well, as poultry can be a bit blander. For the cheese, I swear by a good sharp cheddar, but a blend of cheddar and Monterey Jack is fantastic for extra creaminess. Don’t be afraid to experiment with different cheeses – Gruyere or a little bit of smoked gouda would be amazing in here! When you’re mixing the filling, make sure that cream cheese is truly softened. Cold cream cheese will result in lumps, and nobody wants that! I’ve learned that overmixing the filling isn’t a problem here, unlike some baked goods. You want everything well incorporated so each bite has a bit of everything. When you’re stuffing the onions, really pack that filling in. It will shrink slightly as it bakes, and you want a generous mound of deliciousness on top. If the filling starts to brown too quickly during baking (Step 7), don’t hesitate to loosely tent the dish with aluminum foil. This allows the onions to finish cooking through without the top getting overdone. And that glaze (Step 8)? It’s simple, but it adds a subtle sweetness and a beautiful sheen. I once forgot to make it and the onions were still delicious, but with the glaze, they just looked and tasted a little more special. I’ve also tried a little drizzle of balsamic glaze on top after baking, which adds a lovely tangy counterpoint to the richness. So many delicious possibilities!
Storing and Reheating Tips
This Tennessee onions recipe is fantastic for meal prep or enjoying leftovers because it reheats beautifully! If you have any stuffed onions left, let them cool completely before storing. For room temperature storage, they’re best eaten within a couple of hours; the creamy filling can be a bit risky if left out for too long. If you’re refrigerating them, place the cooled stuffed onions in an airtight container. They’ll stay fresh and delicious in the refrigerator for about 3 to 4 days. When you’re ready to reheat, there are a couple of great ways to do it. The easiest is in the microwave, just zap them for 60-90 seconds, or until heated through. For a crispier, more oven-fresh result, I prefer reheating them in the oven. Place the stuffed onion on a small oven-safe dish or a piece of foil, and bake at 350°F (175°C) for about 15-20 minutes, or until heated through and the top is nicely warmed. If the top seems a little dry, you can add a tiny splash of water or broth to the dish before reheating. If you want to freeze these, it’s also possible! Let them cool completely, then wrap each stuffed onion tightly in plastic wrap, followed by a layer of aluminum foil, or place them in a freezer-safe container. They can be stored in the freezer for up to 2-3 months. To reheat from frozen, remove the plastic wrap and foil, place in a baking dish, and bake at 350°F (175°C) for 30-40 minutes, or until heated through. Thaw them in the refrigerator overnight before reheating for best results. Remember, the glaze is best added fresh after reheating, so if you plan to freeze them, you can hold off on the glaze until after they’re reheated.
Frequently Asked Questions
Final Thoughts
There you have it – my beloved Tennessee onions recipe! It’s a dish that truly embodies comfort food for me, bringing back so many warm memories and always being a guaranteed hit with whoever I share it with. It’s proof that simple, honest ingredients can be transformed into something truly spectacular with just a little bit of love and attention. I really hope you give this recipe a try. It’s one of those dishes that makes you feel good about cooking and even better about sharing. Don’t be intimidated by the idea of stuffing an onion; it’s much easier than you think, and the results are so worth it. If you love this, you might also enjoy my recipe for Southern-Style Stuffed Peppers or my Creamy Baked Mac and Cheese – they’re all about that comforting, home-cooked goodness. I can’t wait to hear what you think! Let me know in the comments below if you try it, and I’d love to hear about any of your own special twists or variations. Happy cooking, and enjoy every delicious bite!
Tennessee Onions Recipe
Ingredients
Main Ingredients
- 4 large sweet onions such as Vidalia or Walla Walla, peeled and sliced 0.25-inch thick
- 0.5 cup unsalted butter melted
- 1 teaspoon dried thyme
- 0.5 teaspoon salt
- 0.25 teaspoon black pepper
Instructions
Preparation Steps
- Preheat your oven to 375°F (190°C).
- Arrange the sliced onions in a single layer in a greased 9x13 inch baking dish.
- In a small bowl, whisk together the melted butter, dried thyme, salt, and black pepper.
- Drizzle the butter mixture evenly over the onions.
- Cover the baking dish tightly with aluminum foil.
- Bake for 30 minutes. Remove the foil and bake for another 15 minutes, or until the onions are tender and lightly browned.
- Let stand for a few minutes before serving.