You know those recipes that just… *feel* like home? The ones that fill your kitchen with the most incredible aroma and make everyone gather around, eagerly anticipating that first bite? This Garlic Parmesan Focaccia is exactly that for me. It’s the kind of bread that makes a simple weeknight dinner feel a little bit special, or turns a casual gathering into a feast. Honestly, it’s my go-to when I want something comforting but don’t have hours to spend. It reminds me of the warm, yeasty smell that used to waft from my grandmother’s kitchen, though hers was a simpler, country loaf. This focaccia, with its crispy, garlicky top and impossibly soft interior, is like that memory, but dialled up to eleven. If you love my easy no-knead bread recipe, you’re going to adore this one, because it shares that same forgiving nature but brings a whole new level of flavour to the table.
What is Parmesan Focaccia?
So, what exactly is this magical Garlic Parmesan Focaccia we’re talking about? Think of it as a super-elevated, incredibly delicious flatbread. Focaccia itself is an Italian bread, traditionally baked in a sheet pan and often dimpled on top before being drizzled with olive oil. It’s known for its chewy texture and often its airy, open crumb. My version takes that beloved base and infuses it with the irresistible punch of garlic and the salty, nutty goodness of Parmesan cheese, all baked right into that golden crust. It’s essentially a flavour bomb disguised as humble bread. It’s not a dense, heavy bread; it’s light and airy, with a delightful chew that makes it utterly addictive. It’s versatile, it’s forgiving, and it’s guaranteed to disappear faster than you can say “more, please!”
Why you’ll love this recipe?
What are some of the best reasons to make garlic parmesan Focaccia?flavor is just out of this world. That combination of roasted garlic and sharp Parmesan cheese on a perfectly baked focaccia is pure bliss. It’s savory, a little salty, and deeply satisfying. You get that wonderful crusty exterior giving way to a cloud-like, tender crumb inside. And the aroma? Oh my goodness, the aroma alone is worth making this bread for! It fills your entire house with the most inviting, delicious scent.
What is the second part of the puzzle?simplicity. Now, I know baking bread can sometimes sound intimidating, but this recipe is surprisingly easy. It uses simple ingredients and requires minimal fuss. There’s no complicated kneading or shaping involved. In fact, some of the magic happens just by letting the dough rest and do its thing. It’s one of those recipes that I can whip up even on a busy weeknight, and it feels like a real treat.
Let’s talk cost-efficiency, too. Flour, yeast, water, oil, garlic, and cheese – these are all pretty budget-friendly staples. Compared to buying gourmet bread from a bakery, making this at home is incredibly economical, especially considering how impressive the final result is. You get so much more for your money.
And the versatility! This is where this focaccia truly shines. You can serve it as a side to almost any meal – pasta, soup, salads, roasted chicken. It’s fantastic dipped in olive oil with a sprinkle of herbs, or even piled high with your favorite toppings like cherry tomatoes or olives. I love it just as much for breakfast with a smear of Cream Cheese as I do for dessert with a drizzle of honey. It’s honestly the perfect blank canvas for so many delicious ideas. What I love most about this recipe is that it feels both rustic and elegant, making it perfect for any occasion, from a casual family dinner to a more sophisticated gathering. It’s a recipe that always gets rave reviews!
How to Make Garlic Parmesan Focaccia
Quick Overview
This recipe is all about creating a wonderfully textured focaccia bread that’s bursting with garlic and Parmesan flavor. We’ll start by making a simple dough, let it rise until it’s beautifully airy, then dimple it generously before adding a rich garlic-Parmesan mixture. After a final proof, it bakes up into a golden, irresistible loaf that’s perfect for dipping, scooping, or just enjoying on its own. It’s designed to be straightforward, so even if you’re new to bread making, you’ll find success with this one. Trust me, the minimal effort yields maximum deliciousness!
Ingredients
For the Main Batter:
Here’s what you’ll need for the dough itself. It’s pretty standard stuff for a good, rustic bread.
* Warm Water (about 105-115°F / 40-46°C): Around 1 ½ cups. This is crucial for activating the yeast. Too hot and you’ll kill it, too cold and it won’t wake up properly. I always test it with my knuckle – it should feel comfortably warm, not hot.
* Active Dry Yeast: 2 ¼ teaspoons (one standard packet). This is what gives our focaccia its lovely lift and airy texture.
* Granulated Sugar: 1 teaspoon. Just a little something to feed the yeast and get it going.
* All-Purpose Flour: 3 ¾ cups, plus more for dusting. I usually opt for a good quality all-purpose flour, but bread flour will also work and might give you a slightly chewier texture.
* Salt: 1 ½ teaspoons. Essential for flavour and controlling the yeast activity.
* olive oil: ¼ cup for the dough, plus more for greasing the pan and finishing. You want to use a good quality extra virgin olive oil here, as its flavour really shines through.
For the Filling:
This is where all the magic happens! Get ready for some serious flavour.
* Butter: ½ cup (1 stick), softened. Unsalted is best so you can control the saltiness, but salted will work too – just adjust your added salt.
* Garlic: 6-8 cloves, minced. I like to mince mine really fine, almost to a paste. You can also use pre-minced garlic, but fresh is always best for that vibrant flavour.
* Grated Parmesan Cheese: 1 cup, plus more for topping. Use freshly grated if you can; it melts so much better and has a superior flavour compared to pre-shredded.
* Fresh Parsley: 2 tablespoons, finely chopped. Adds a lovely freshness and a pop of colour. Dried parsley works in a pinch, but fresh is really where it’s at for this.
For the Glaze:
This final touch adds a beautiful sheen and extra flavour.
* Melted Butter: 2 tablespoons. Just a little bit to bring everything together.
* Garlic Powder: ½ teaspoon. A little boost of garlic flavour.
* Salt: ¼ teaspoon. To enhance all the other flavours.
Step-by-Step Instructions
Step 1: Preheat & Prep Pan
First things first, let’s get our oven ready and prepare our baking vessel. Preheat your oven to 400°F (200°C). This temperature is perfect for getting a lovely crispy crust while ensuring the inside bakes through. Now, grab a 9×13 inch baking pan. Drizzle a generous amount of olive oil into the pan – we’re talking about 2 to 3 tablespoons. You want enough to generously coat the bottom and the sides. This is key for that signature focaccia crispiness and prevents sticking. Some people even like to spread the oil up the sides a bit. Give it a little swirl to make sure it’s all covered. This step is super important!
Step 2: Mix Dry Ingredients
In a large mixing bowl, whisk together the all-purpose flour and the salt. Make sure they’re well combined. This ensures that the salt is evenly distributed throughout the dough, which is important for both flavour and controlling the yeast. Don’t skip this whisking step!
Step 3: Mix Wet Ingredients
In a separate, smaller bowl or a large liquid measuring cup, combine the warm water, active dry yeast, and granulated sugar. Give it a gentle stir and then let it sit for about 5-10 minutes. You should see it get nice and foamy on top – that means your yeast is alive and happy and ready to do its job! If you don’t see any foam, your yeast might be dead, and you’ll need to start with fresh yeast. After the yeast is foamy, stir in the ¼ cup of olive oil.
Step 4: Combine
Now, pour the wet ingredients into the bowl with the dry ingredients. Using a sturdy spoon or a spatula, mix everything together until it just comes together into a shaggy, sticky dough. Don’t overmix! It’s okay if there are still a few dry bits. We’re not aiming for a smooth, elastic dough here like you would for a pizza crust. This focaccia dough is supposed to be quite wet and sticky, which is what will give it that lovely, airy texture. If it seems overwhelmingly wet, you can add a tablespoon of flour at a time, but try to keep it on the wetter side.
Step 5: Prepare Filling
While the dough is resting (we’ll get to that next!), let’s get our flavour-packed filling ready. In a medium bowl, combine the softened butter, minced garlic, grated Parmesan cheese, and chopped fresh parsley. Use a fork or a spatula to mix it all together until it forms a cohesive paste. This is the stuff dreams are made of. The butter will help it spread easily and give everything that glorious richness.
Step 6: Layer & Swirl
Now for the fun part! Pour your dough into the prepared, oiled baking pan. It will be quite sticky, so you can use lightly oiled hands or a spatula to gently spread it out to fill the pan as much as possible. Don’t force it; it will spread more as it rests and bakes. Let the dough rest in the pan, uncovered, for about 30 minutes. This allows it to relax and spread a bit more. After resting, generously drizzle about 1-2 tablespoons of olive oil over the surface of the dough. Now, using your oiled fingertips, gently poke and dimple the dough all over, pressing down to the bottom of the pan. Don’t be shy! These dimples will hold pockets of delicious garlicky, cheesy goodness. Next, spoon dollops of your garlic-Parmesan mixture into the dimples. You can then gently spread it around a bit, or just let it melt and ooze into the pockets as it bakes. You can sprinkle a little extra Parmesan cheese on top if you like!
Step 7: Bake
Pop the pan into your preheated oven. Bake for 25-30 minutes, or until the focaccia is beautifully golden brown around the edges and on top, and it sounds hollow when tapped. The cheese should be melted and slightly browned in spots. If the top is browning too quickly, you can always loosely tent it with foil. I like to give it a gentle nudge with a spatula halfway through to check for that lovely crisp bottom.
Step 8: Cool & Glaze
Once it’s out of the oven, let the focaccia cool in the pan for about 10-15 minutes. This allows it to set up properly and makes it easier to handle. While it’s still warm, whisk together the melted butter, garlic powder, and salt for the glaze in a small bowl. Drizzle this lovely mixture all over the top of the warm focaccia. You can even gently poke a few more dimples to let the glaze seep in. The warmth of the bread will help the glaze absorb beautifully.
Step 9: Slice & Serve
After the glaze has been applied and the bread has cooled slightly more (it’s best served warm, not piping hot), you can cut it into squares or rectangles. Use a sharp knife or a pizza cutter. Now, just admire your handiwork and dive in! It’s absolutely divine served warm.
What to Serve It With
This Garlic Parmesan Focaccia is so versatile, it’s almost ridiculous! It’s one of those recipes that can truly play a starring role or be the perfect supporting act.
For Breakfast: Honestly, a warm slice of this focaccia with a smear of cream cheese is pure heaven. It’s so much more satisfying than plain toast! You could also serve it alongside scrambled eggs or a simple fruit salad for a more substantial breakfast. I love pairing it with a strong cup of coffee – the richness of the bread and the bitterness of the coffee are just a match made in heaven.
For Brunch: This is where it really shines. Cut it into smaller squares and arrange them on a platter. It’s perfect alongside a frittata, avocado toast, or a big green salad with a light vinaigrette. For a more elegant touch, you can top individual slices with a dollop of ricotta and a sprinkle of fresh herbs or a poached egg. Bubbles are always a good idea with brunch, and a crisp Prosecco or a light, fruity white wine would be lovely.
As Dessert: Hear me out! A slightly cooled slice, perhaps with a drizzle of honey or a touch of fig jam, can be an unexpected and delightful dessert. The salty cheese and the sweet honey are a classic pairing. It’s also wonderful served with a rich dessert wine or even a slightly sweet sparkling wine.
For Cozy Snacks: This is probably my favorite way to enjoy it most often! If I’m working from home and need a little pick-me-up, or if friends pop over unexpectedly, a warm piece of this focaccia is always a winner. Serve it with a bowl of olives, some cured meats, or a good quality dip like hummus or a white bean dip. It’s incredibly comforting and satisfying. My family always gravitates towards it when it’s fresh out of the oven, so it never lasts long!
Top Tips for Perfecting Your Garlic Parmesan Focaccia
Over the years, I’ve learned a few tricks that help make this focaccia absolutely perfect every single time. Don’t worry, it’s a forgiving recipe, but these little tweaks can elevate it from great to absolutely sublime.
Zucchini Prep: Okay, hold on! I know I haven’t mentioned zucchini in this specific recipe, but I’m having a flashback to a time I tried to make a zucchini bread similar to this and how important proper prep is! For *this* focaccia, the key is really ensuring your garlic is minced very finely. I often find myself giving it an extra chop or two with my knife until it’s almost a paste. This ensures that garlicky flavour distributes evenly and doesn’t leave large, potent chunks. And for the Parmesan, always, always grate it yourself. Pre-shredded cheese has anti-caking agents that prevent it from melting as smoothly and flavourfully. The difference is noticeable!
Mixing Advice: Remember how I said not to overmix? That’s really the most crucial tip for the dough. You want a shaggy, slightly sticky dough. If you knead it too much like a traditional bread dough, you’ll develop too much gluten, which will make your focaccia dense and tough instead of light and airy. Just mix until everything is *just* combined. It should look a bit messy – that’s a good sign!
Swirl Customization: When you’re pressing the dough and adding the garlic-Parmesan mixture, don’t be afraid to get creative! The dimples are your canvas. You can create larger dimples or smaller ones. For the topping, you can spread the garlic-Parmesan paste evenly over the surface, or strategically place dollops in each dimple. Some people even like to add a sprinkle of red pepper flakes for a little heat, or a mix of herbs like rosemary and thyme alongside the parsley. It’s all about making it your own!
Ingredient Swaps: If you don’t have active dry yeast, you can usually substitute instant yeast. Just add it directly to the dry ingredients without proofing it first. You might need slightly less, so check the yeast package. For the Parmesan, a good quality Pecorino Romano can also be lovely for a sharper, tangier flavour. If you’re out of fresh parsley, a teaspoon of dried parsley can be used, but honestly, fresh really makes a difference here.
Baking Tips: Always preheat your oven thoroughly. An oven that’s not hot enough will result in a pale, doughy focaccia. I always use the middle rack for baking, which generally provides the most even heat. Keep an eye on it towards the end of the baking time – ovens can vary wildly! If your focaccia is browning too quickly on top but isn’t cooked through, you can loosely tent it with aluminum foil for the last 10-15 minutes. And that final crisp bottom? It comes from that generous amount of olive oil in the pan!
Glaze Variations: The butter-garlic-salt glaze is simple and delicious, but you can play with it! A little bit of lemon zest added to the melted butter would give it a lovely brightness. Or, if you like things a bit spicy, a tiny pinch of cayenne pepper would be fantastic. You can also skip the glaze altogether if you prefer, but I find it adds that extra touch of perfection.
Storing and Reheating Tips
Keeping this amazing Garlic Parmesan Focaccia fresh and delicious is pretty straightforward. It’s best enjoyed the day it’s made, but it does store well for a few days if you follow these tips.
Room Temperature: Once the focaccia has cooled completely, you can store it at room temperature. The best way to do this is to wrap it tightly in plastic wrap or place it in an airtight container. At room temperature, it should stay fresh and tasty for about 1-2 days. The crust might soften a little, but the inside will remain wonderfully soft and flavorful.
Refrigerator Storage: If you need to store it for longer, up to 3-4 days, the refrigerator is your best bet. Again, wrap it tightly in plastic wrap or place it in an airtight container to prevent it from drying out. When you want to eat it, I highly recommend giving it a quick warm-up to revive its texture and flavor. Just pop a slice in the toaster oven for a few minutes!
Freezer Instructions: For longer storage, freezing is a great option. Let the focaccia cool completely. Then, wrap individual slices or the whole loaf very tightly in plastic wrap, followed by a layer of aluminum foil or a freezer-safe bag. It will keep well in the freezer for up to 2-3 months. To thaw, simply remove it from the freezer and let it come to room temperature. You can then warm it up if desired.
Glaze Timing Advice: It’s best to apply the glaze when the focaccia is still warm, but not piping hot. This allows it to soak in beautifully. If you’re storing it for later and plan to reheat, I often re-apply a little bit of melted butter or olive oil after reheating to bring back some of that sheen and flavor, especially if it’s been refrigerated or frozen.
Frequently Asked Questions
Final Thoughts
There you have it – my beloved Garlic Parmesan Focaccia recipe! It’s a testament to how simple ingredients can come together to create something truly extraordinary. I hope you feel inspired to give this a try in your own kitchen. It’s more than just bread; it’s about creating those warm, inviting moments and sharing delicious food with the people you care about. Whether you’re serving it as a side dish, a snack, or the star of the show, I promise it won’t disappoint. The aroma alone is worth it, and the taste is simply divine.
If you’re looking for other easy bread recipes that deliver big on flavor, you might also want to check out my quick no-knead sourdough starter guide or my incredibly popular artisan no-knead bread recipe. They share that same spirit of delicious simplicity that I absolutely adore.
I can’t wait to hear how your Garlic Parmesan Focaccia turns out! Please leave a comment below to share your experience, any variations you tried, or just to say hello. And if you share a picture on social media, be sure to tag me – I’d love to see your creations! Happy baking, and enjoy every delicious bite!
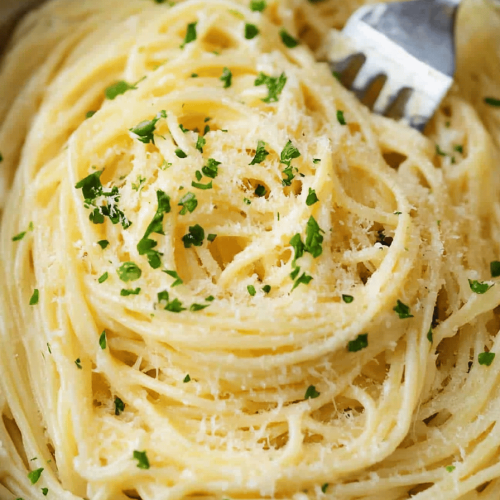
Garlic Parmesan Focaccia
Ingredients
Dough
- 3.5 cups all-purpose flour
- 1.5 teaspoon instant yeast
- 1.5 teaspoon salt
- 1.5 cup warm water
- 0.25 cup olive oil
Topping
- 0.25 cup olive oil
- 4 cloves garlic minced
- 0.5 cup grated Parmesan cheese
- 0.5 teaspoon dried rosemary
- 0.5 teaspoon salt
- 0.25 teaspoon black pepper
Instructions
Preparation Steps
- In a large bowl, whisk together flour, yeast, and salt.
- Add warm water and 0.25 cup olive oil. Mix until a shaggy dough forms.
- Turn dough out onto a floured surface and knead for 8-10 minutes until smooth and elastic. Or, use a stand mixer with a dough hook for 5-7 minutes.
- Place dough in a lightly oiled bowl, turning to coat. Cover and let rise in a warm place for 1-1.5 hours, or until doubled in size.
- While the dough is rising, prepare the topping. In a small bowl, whisk together 0.25 cup olive oil, minced garlic, Parmesan cheese, rosemary, salt, and pepper.
- Preheat oven to 425°F (220°C). Grease a 9x13 inch baking pan.
- Punch down the risen dough and press it into the prepared baking pan. Make dimples in the dough with your fingertips.
- Drizzle the garlic Parmesan mixture evenly over the dough, pressing it into the dimples.
- Bake for 25-30 minutes, or until golden brown and cooked through.
- Let cool slightly before slicing and serving.

