Okay, I have to be honest with you. If there’s one appetizer that has absolutely *stolen* the show at every single potluck, BBQ, and holiday gathering I’ve ever hosted or attended, it’s this cheeseburger dip. Seriously. People don’t just “like” this dip; they become *obsessed*. I remember the first time I made it for a neighborhood block party. I brought it out, and within twenty minutes, the entire bowl was gone. Vanished. Poof! My friend Sarah even jokingly accused me of hiding the leftovers. It’s just that good. It’s like everything you love about a juicy, perfectly seasoned cheeseburger, but in a warm, dippable, incredibly satisfying form. Forget those sad, bland veggie platters or the same old seven-layer dip; this cheeseburger dip is the real deal, and once you try it, you’ll understand why it’s become my go-to. It’s a game-changer, a crowd-pleaser, and honestly, a little bit addictive. I’ve tried to recreate it countless times, tweaking it here and there, but this version? This is the one that hits all the right notes, every single time.
What is cheeseburger dip?
So, what exactly *is* this magical concoction I’m raving about? Think of it as the ultimate comfort food condensed into a warm, gooey, utterly delectable dip. It’s essentially all the glorious components of a classic cheeseburger – the savory ground beef, the melty cheese, the tangy ketchup and mustard, and those irresistible pickles – all harmoniously blended together into a creamy, cheesy dip that’s perfect for scooping up with your favorite dippers. The name, cheeseburger dip, pretty much says it all, right? There’s no fancy trickery involved; it’s just taking everything we adore about that iconic burger experience and making it even more communal and accessible. It’s that satisfying, slightly nostalgic flavor profile that reminds you of summer cookouts and easy weeknight dinners, but elevated into something you can share (or, let’s be real, hoard for yourself). It’s the ultimate crowd-pleaser because who doesn’t love a good cheeseburger? This dip just takes that love and amplifies it.
Why you’ll love this recipe?
There are so many reasons why this cheeseburger dip has earned a permanent spot in my recipe rotation, and I just *know* you’re going to fall in love with it too. For starters, let’s talk about the flavor. It’s a symphony of savory, tangy, and cheesy goodness. The seasoned ground beef provides a hearty base, while the melty cheeses – oh, the cheeses! – create that irresistible gooeyness that makes you want to dive right in. The subtle tang from the ketchup and mustard, along with those little bursts of briny pickle, perfectly mimic the taste of your favorite burger. It’s pure comfort in a bowl. Then there’s the simplicity. Honestly, this is a lifesaver on busy nights or when you get a last-minute invitation to a get-together. It comes together so quickly, and the ingredient list isn’t intimidating at all. You probably have most of what you need in your pantry right now! And when you think about cost-efficiency, this dip is a winner. It uses everyday ingredients that don’t break the bank, making it a fantastic option for feeding a crowd without spending a fortune. Plus, its versatility is amazing! While it’s a star on its own, you can totally customize it. Want to add some bacon? Go for it! Prefer a spicier kick? Throw in some jalapeños. It’s also incredibly adaptable to different occasions. It’s the perfect appetizer for game day, a potluck, a birthday party, or even just a cozy night in. What I love most about this cheeseburger dip, though, is the pure joy it brings. The reactions I get every single time are priceless. People always ask for the recipe, and it’s so satisfying to know you’ve brought such happiness with something so easy. It’s like a hug in a bowl, truly.
How do you make cheeseburger dip?
Quick Overview
Making this incredible cheeseburger dip is surprisingly straightforward! You’ll start by browning some seasoned ground beef, then mixing it with a creamy, cheesy base that’s packed with all the classic cheeseburger flavors. We’ll then bake it until it’s warm, bubbly, and gloriously melted. It’s the kind of recipe that makes you feel like a kitchen pro without any of the stress. The beauty of this dip is its simplicity; it’s designed for maximum flavor with minimal fuss, making it perfect for anyone, whether you’re a seasoned cook or just starting out. The whole process usually takes under 30 minutes from start to finish, which is amazing considering how incredible the end result is.
Ingredients
For the Savory Base:
1 pound ground beef (80/20 is my go-to for flavor)
1 medium onion, finely chopped
1 teaspoon garlic powder
1 teaspoon salt
1/2 teaspoon black pepper
1/4 teaspoon paprika (optional, but it adds a nice depth)
For the Creamy Cheese Mixture:
1 (8 ounce) package cream cheese, softened (this is key for smoothness!)
1/2 cup sour cream (full-fat works best for richness)
1/4 cup mayonnaise (don’t skip this, it adds a lovely tang and creaminess)
2 tablespoons ketchup (use your favorite brand!)
1 tablespoon yellow mustard (or Dijon if you like a little more bite)
1 cup shredded cheddar cheese
1/2 cup shredded Monterey Jack cheese (or a Mexican blend for extra meltiness)
For the Finishing Touches:
1/4 cup chopped dill pickles (these are non-negotiable for that authentic cheeseburger taste!)
Optional: 1/4 cup crumbled cooked bacon for extra indulgence
Step-by-Step Instructions
Step 1: Brown the Beef & Onions
Grab a skillet and get it over medium-high heat. Add your ground beef and chopped onion. Break up the beef with a spoon as it cooks. You want to cook it until it’s nicely browned and the onions are softened and a little translucent. This usually takes about 7-10 minutes. Once it’s done, drain off any excess grease. Don’t skip draining; it makes a big difference in the final texture of the dip! Stir in the garlic powder, salt, pepper, and paprika (if you’re using it). Cook for another minute until everything is fragrant.
Step 2: Prepare the Creamy Base
While the beef is browning, or right after you’ve drained it, grab a medium bowl. Add your softened cream cheese, sour cream, mayonnaise, ketchup, and mustard. Now, this is where you get to mix it all up! Use a hand mixer or a sturdy whisk to combine everything until it’s super smooth and creamy. You want no lumps of cream cheese remaining. This creamy mixture is the heart of what makes our dip so decadent.
Step 3: Combine Beef and Cheese Mixture
Now, add the cooked ground beef and onion mixture to your bowl with the creamy cheese mixture. Also, toss in about half of your shredded cheddar cheese and all of your shredded Monterey Jack cheese. Gently fold everything together with a spatula until it’s just combined. You don’t want to overmix here; just ensure everything is evenly distributed. It will look hearty and delicious already!
Step 4: Add the Pickles (and Bacon, if using!)
This is where the magic really happens! Stir in the chopped dill pickles. I know some people are hesitant about pickles in warm dips, but trust me, they add that essential zesty, vinegary punch that screams “cheeseburger!” If you’re feeling extra decadent, now is also the time to stir in that crumbled cooked bacon. It adds another layer of smoky, savory goodness that’s just divine. Gently fold these in so you don’t break up the pickles too much.
Step 5: Transfer to Baking Dish
Spoon the entire mixture into a small oven-safe baking dish. An 8×8 inch dish works perfectly, or you can use a smaller, deeper one. Spread it out evenly. Sprinkle the remaining cheddar cheese over the top. This is what’s going to give you that beautiful, golden, bubbly cheesy crust when it bakes.
Step 6: Bake Until Bubbly
Preheat your oven to 375°F (190°C). Pop that baking dish into the preheated oven. You’ll want to bake it for about 15-20 minutes, or until the cheese on top is melted and golden brown, and the edges are bubbly. Keep an eye on it so the cheese doesn’t burn – we want it perfectly golden, not black!
Step 7: Rest and Serve
Once it’s out of the oven, let it sit for about 5 minutes. This allows it to cool slightly and set up a bit, making it easier to scoop. Serve it warm with your favorite dippers!
Step-by-Step Instructions
Step 1: Preheat & Prep Pan
Get your oven preheated to 375°F (190°C). While the oven heats up, grab an 8×8 inch baking dish or a similar-sized oven-safe dish. You don’t need to grease it; the dip has enough richness to prevent sticking.
Step 2: Brown the Beef and Aromatics
In a large skillet over medium-high heat, add your ground beef and finely chopped onion. Cook, breaking up the meat with a spoon, until the beef is fully browned and the onions are softened. This typically takes about 7-10 minutes. Once cooked, carefully drain off any excess grease. This step is crucial for a cleaner-tasting dip.
Step 3: Season the Beef
Return the skillet to the heat (or transfer the beef and onions to a bowl). Add the garlic powder, salt, black pepper, and paprika (if using). Stir well to combine and cook for another minute until fragrant.
Step 4: Create the Creamy Cheese Base
In a separate medium bowl, combine the softened cream cheese, sour cream, mayonnaise, ketchup, and yellow mustard. Using a hand mixer or a whisk, beat these ingredients together until they are completely smooth and well-blended. No lumps allowed!
Step 5: Combine Everything
Add the seasoned ground beef and onion mixture to the bowl with the creamy cheese base. Also, add about half of your shredded cheddar cheese and all of your Monterey Jack cheese. Gently fold these ingredients together with a spatula until just combined. Be careful not to overmix, as this can affect the texture.
Step 6: Fold in the Tangy Bits
Now for the essential cheeseburger flavor! Gently stir in the chopped dill pickles. If you’re using crumbled cooked bacon, add it now too. Fold them in carefully to distribute them throughout the dip.
Step 7: Assemble and Top
Spoon the entire mixture into your prepared baking dish, spreading it out evenly. Top with the remaining shredded cheddar cheese. This cheesy topping will become beautifully golden and bubbly as it bakes.
Step 8: Bake to Perfection
Place the baking dish in the preheated oven. Bake for 15-20 minutes, or until the dip is heated through, the cheese on top is melted and golden brown, and the edges are bubbling. Keep an eye on it to prevent burning.
Step 9: Rest and Serve
Carefully remove the dip from the oven and let it rest for about 5 minutes before serving. This allows it to set slightly and makes scooping much easier. Serve hot with your favorite dippers!
What to Serve It With
Honestly, this cheeseburger dip is so versatile, you can serve it with practically anything! But if you’re looking for some inspiration, here are some of my favorite pairings that I’ve tried and tested over the years. For breakfast, it might sound a bit unusual, but a small dollop on top of some scrambled eggs or a breakfast burrito is surprisingly delicious – the savory notes really work! For brunch, I love serving it with mini rye toasts or bagel chips. It feels a bit more elegant and those slightly earthy flavors complement the dip beautifully. When we have it as a dessert, which is rare because it’s so addictive, I usually go for something sweet and light to balance it out, like some crisp apple slices or even a few pretzel rods. But my absolute favorite time to serve this is for cozy snacks. Think movie nights or casual get-togethers. That’s when I bring out the big guns: tortilla chips, sturdy potato chips, pretzel bites, and even some cut-up celery and carrot sticks for those who want a slightly healthier crunch. My family also loves it with little slider buns, so they can make mini cheeseburger dip sliders. It’s just fun and interactive!
Top Tips for Perfecting Your Cheeseburger Dip
Over the years, I’ve learned a few tricks that really make this cheeseburger dip sing. When it comes to the ground beef, using an 80/20 blend is my absolute favorite because the little bit of fat renders down and adds so much flavor and moisture. If you use super lean beef, the dip can sometimes feel a bit dry. And always, *always* drain the grease thoroughly after browning! Nobody wants a greasy dip. For the creamy base, make sure your cream cheese is truly softened. If it’s too cold, you’ll end up with little lumps, and nobody wants that. I usually leave it on the counter for about an hour before I start. For mixing the wet ingredients, a hand mixer is your best friend here. It gets everything perfectly smooth and creamy in seconds. If you don’t have one, a good old-fashioned whisk and some elbow grease will do the trick, but it takes a little longer. When combining the beef mixture with the cheese base, a gentle fold is all you need. Overmixing can make the dip a bit tough, and we want it to be wonderfully tender and creamy. Now, about those pickles – don’t skimp on them! They are absolutely essential for that signature tang. If you’re not a fan of dill pickles, you could try a sweet pickle relish, but the dill ones really nail that classic cheeseburger flavor. I’ve tried making it without them, and it’s just not the same. Some people like to add a dash of Worcestershire sauce to the beef mixture for an extra umami kick, which is a great variation to try if you’re feeling adventurous. For baking, keep an eye on it! Ovens can be so finicky. You’re looking for that bubbly, golden-brown cheese topping. If your cheese is browning too quickly, you can always loosely tent the dish with foil. And remember to let it rest for a few minutes after it comes out of the oven. It makes a world of difference in terms of texture and ease of serving.
Storing and Reheating Tips
I rarely have leftovers of this cheeseburger dip, but when I do, storing and reheating it is super simple. If you happen to have some leftover, let it cool down completely before you transfer it to an airtight container. At room temperature, I wouldn’t leave it out for more than two hours, just to be safe. In the refrigerator, this dip will stay good for about 3 to 4 days. Make sure it’s well-covered to prevent it from drying out or picking up any other smells from your fridge. When it comes to reheating, my favorite method is in the oven. You can place the leftover dip back into an oven-safe dish and warm it up at around 350°F (175°C) for about 10-15 minutes, or until it’s heated through and bubbly again. This method really brings back that fresh-baked texture and gooeyness. If you’re in a hurry, the microwave works too, but you’ll want to do it in short bursts, stirring in between, to ensure it heats evenly and doesn’t get tough. Just heat for 30 seconds at a time until it’s hot. For freezing, I’d recommend only freezing the dip *without* any dippers. You can freeze the baked dip in an airtight container for up to 2-3 months. Thaw it overnight in the refrigerator, then reheat it using the oven or microwave method described above. If you froze it, you might want to add a tablespoon or two of extra cream cheese or sour cream when reheating to bring back some of that creamy texture, as freezing can sometimes alter it slightly. Always check for quality indicators like off smells or slimy texture before reheating, but thankfully, this dip is pretty robust!
Frequently Asked Questions
Final Thoughts
So there you have it – my absolute favorite cheeseburger dip recipe! I truly believe this is one of those recipes that will become a staple in your own kitchen, just like it has in mine. It’s more than just an appetizer; it’s a guaranteed hit that brings smiles and happy sighs to everyone who tries it. The combination of savory beef, creamy cheese, and that perfect tangy pickle bite is just divine, and the fact that it’s so easy to whip up makes it even better. If you love this dip, you might also enjoy my recipe for the ultimate Loaded Nachos or my super simple Cheesy Garlic Breadsticks – they have that same crowd-pleasing, comforting vibe! I can’t wait for you to try this cheeseburger dip and see the magic happen at your own table. Please, pretty please, let me know in the comments below how yours turns out! I’d love to hear about any variations you try or how quickly it disappeared. Happy dipping!
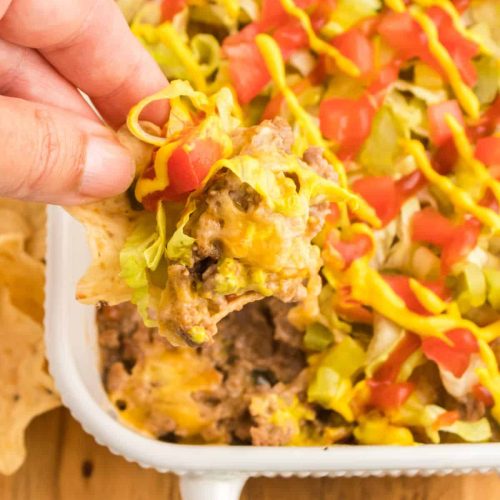
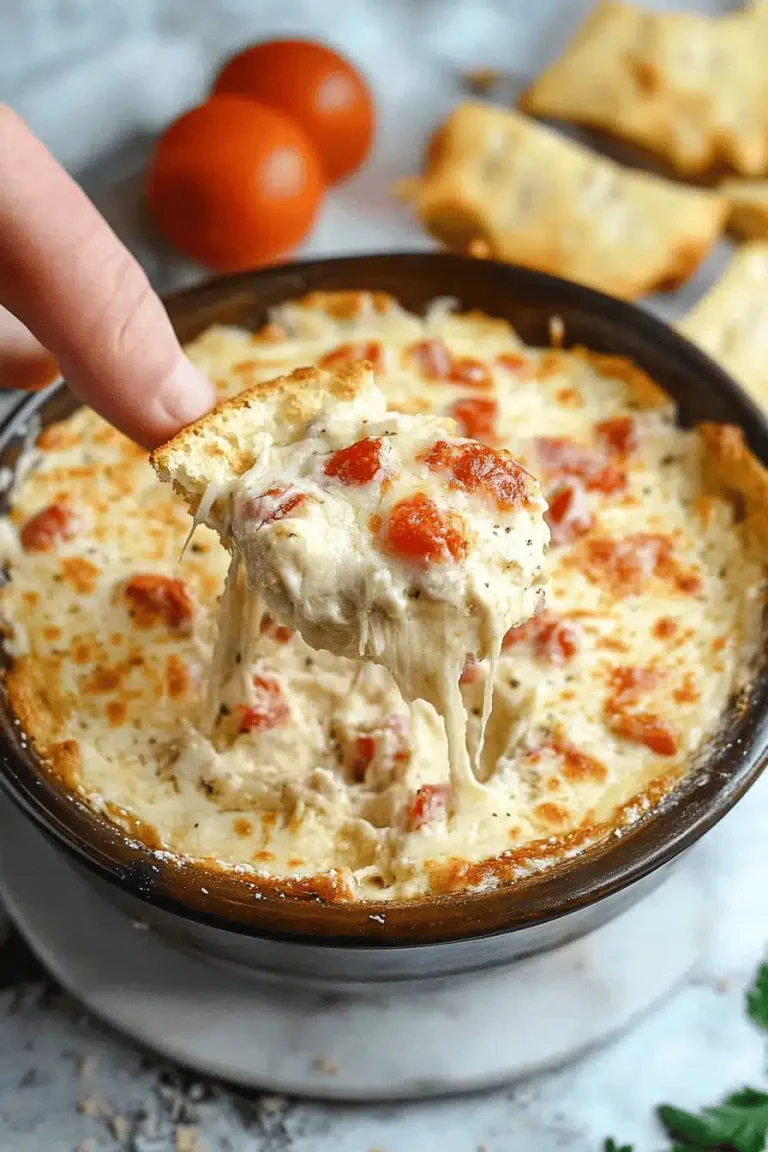
cheeseburger dip
Ingredients
Main Ingredients
- 1 lb ground beef
- 0.25 cup onion diced
- 0.5 tsp garlic powder
- 1 cup queso dip
- 0.5 cup cheddar cheese shredded, divided
- 0.5 cup iceberg lettuce shredded
- 0.25 cup dill pickles diced
- 3 tbsp tomatoes diced
- 1 tbsp ketchup
- 1 tbsp yellow mustard
- tortilla chips for serving
Instructions
Preparation Steps
- Brown and crumble the ground beef in a medium skillet over medium heat. Drain excess grease.
- Stir in queso dip and half of the shredded cheddar cheese until well combined.
- Transfer the mixture to a 9x13 baking dish and top with remaining cheddar cheese. Broil until bubbly and melted, about 3 to 5 minutes.
- Remove from oven and top with shredded lettuce, diced pickles, and diced tomatoes. Drizzle ketchup and yellow mustard over the top. Serve hot with tortilla chips.