Oh, where do I even begin with this Strawberry Cheesecake recipe? It feels like just yesterday I was a kid, watching my Grandma meticulously spooning the creamy filling into a buttery crust. The aroma that filled her kitchen was pure magic – a mix of sweet strawberries, rich cream cheese, and that comforting hint of vanilla. Honestly, when I think of a truly decadent, show-stopping dessert that still feels like home, this is it. It’s the kind of strawberry cheesecake that makes everyone stop, close their eyes, and just savor every single bite. Forget those overly complicated recipes that require a culinary degree; this one is surprisingly straightforward, and I promise, the results are nothing short of spectacular. It’s the perfect antidote to a long day, a guaranteed crowd-pleaser for any gathering, and, let’s be honest, a personal treat I often make just for myself when a serious sweet craving hits late at night. It’s definitely earned its spot as my go-to, tried-and-true favorite.
What is a strawberry cheesecake?
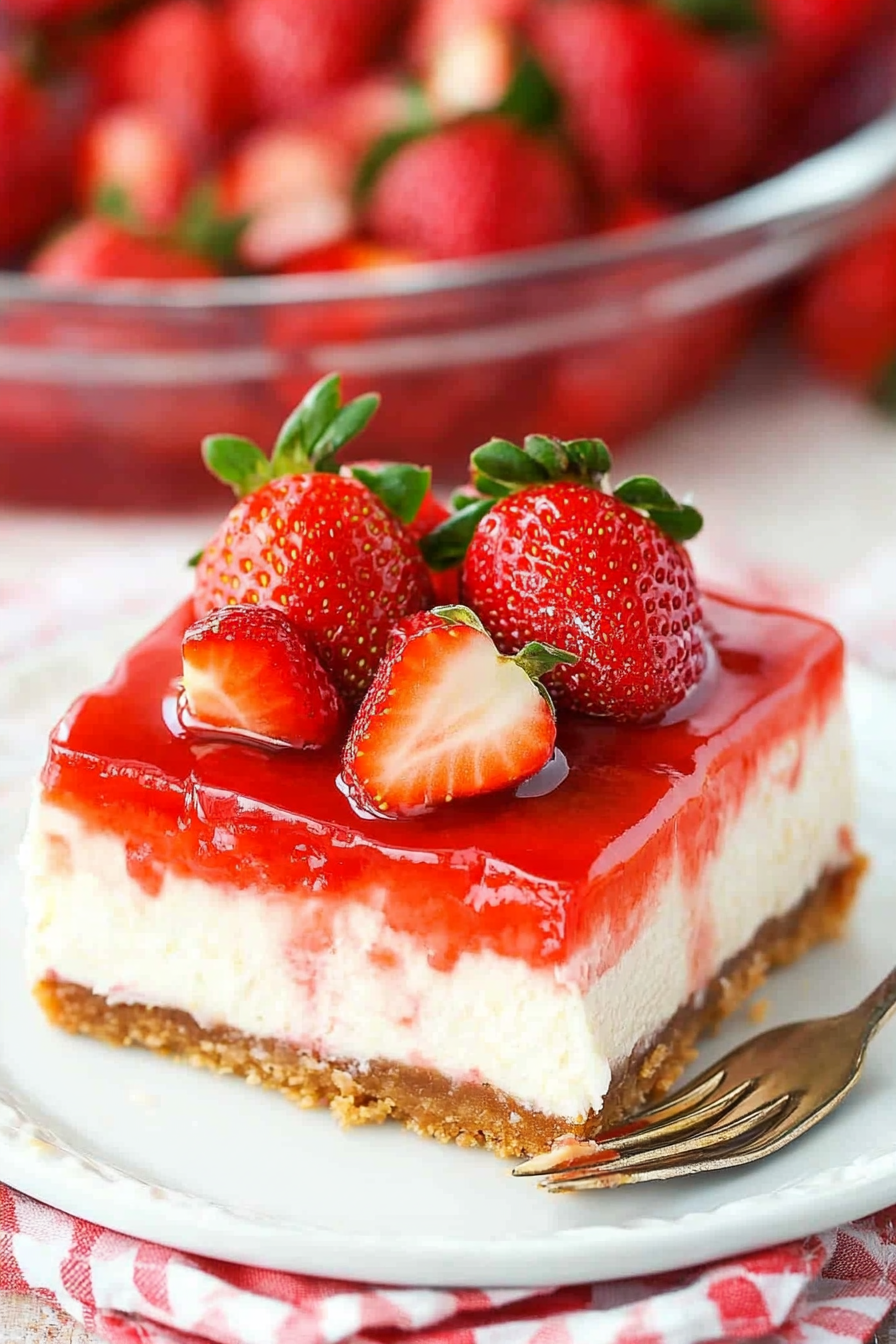
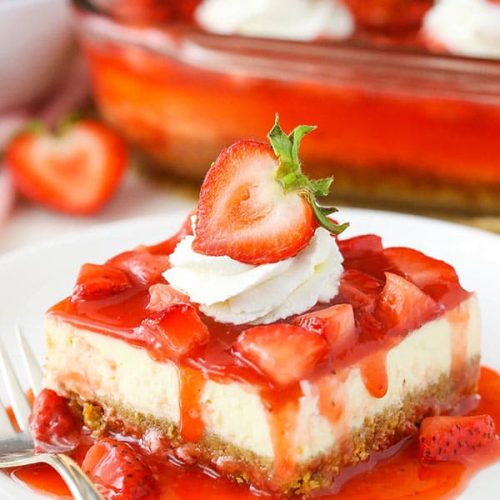
So, what exactly is this glorious creation we’re talking about? At its heart, strawberry cheesecake is a dessert that marries the creamy, tangy, luxurious texture of cheesecake with the bright, sweet burst of fresh strawberries. It’s not just a simple cake with fruit on top; it’s a symphony of flavors and textures. We’re talking about a wonderfully crisp, buttery crust – usually graham cracker or cookie-based – that provides the perfect crunchy counterpoint to the impossibly smooth, rich filling. And that filling? It’s typically a dreamy blend of Cream Cheese, sugar, eggs, and a touch of vanilla, often enhanced with a bit of sour cream or heavy cream for extra silkiness. Then come the strawberries, which can be swirled into the batter, layered on top, or transformed into a vibrant compote or glaze. It’s a dessert that feels both elegant and comforting, familiar yet exciting. Think of it as the ultimate hug in dessert form, elevated with the vibrant kiss of summer berries.
Why you’ll love this recipe?
Honestly, there are so many reasons this strawberry cheesecake recipe has become my absolute favorite, and I’m betting you’ll love it just as much. First off, the **flavor** is simply out of this world. You get that signature tang from the cream cheese, balanced perfectly with sweetness, and then, BAM! The bright, slightly tart strawberries cut through the richness, creating this incredible flavor explosion that’s not too sweet and just… perfect. It’s a flavor profile that genuinely satisfies without being cloying. Next, let’s talk **simplicity**. I know cheesecake can sound intimidating, but this recipe is designed to be as foolproof as possible. I’ve streamlined the steps without sacrificing that divine texture or taste, so even if you’re a beginner baker, you can achieve stellar results. Seriously, I’ve made this on weeknights when I’ve been craving something special, and it’s totally manageable. And for all my budget-conscious friends out there, this recipe is surprisingly **cost-efficient**. The ingredients are readily available at any grocery store, and you don’t need any fancy, expensive items to make it shine. Finally, the **versatility** is a huge win. I love that you can play with the strawberry element – fresh slices, a quick jam, or a bright compote – each giving it a slightly different personality. It’s also fantastic for any occasion, whether it’s a casual family dinner, a potluck, or a more formal celebration. What I love most about this is that it feels incredibly luxurious and special, but the actual effort involved is minimal. It’s the kind of dessert that looks like you slaved away for hours, but in reality, you’ll be relaxing with a slice much sooner than you think!
How do you make strawberry cheesecake?
Quick Overview
This strawberry cheesecake is all about building layers of flavor and texture. We’ll start with a simple, buttery crust that gets a quick pre-bake for extra crispness. Then, we’ll whip up a lusciously smooth cream cheese filling, gently folding in vibrant strawberry goodness. It’s baked until just set, then cooled slowly to achieve that perfect, creamy consistency without any cracks. Finally, a luscious strawberry glaze finishes it off beautifully. The beauty of this method is its straightforwardness; it avoids common pitfalls and ensures a show-stopping result every time.
Ingredients
For the Crust:
I often use digestive biscuits if I can’t find graham crackers, they give a slightly different but equally delicious vibe.
1/2 cup unsalted butter, melted – Make sure it’s good quality butter; it really makes a difference in flavor.
1/4 cup granulated sugar – Just a touch to sweeten it up and help it bind.
Pinch of salt – Balances out the sweetness.
For the Filling:
3 blocks (24 oz) cream cheese, softened to room temperature – This is crucial! Cold cream cheese will lead to lumps. I always leave mine out for at least 2-3 hours.
1 1/4 cups granulated sugar – Adjust slightly if you like it less sweet, but this ratio is pretty spot-on for me.
1/2 cup sour cream, at room temperature – Adds a wonderful tanginess and creamy texture. You can use full-fat Greek yogurt in a pinch, it’s a lifesaver if you’re out of sour cream.
1 teaspoon vanilla extract – Pure vanilla extract, not imitation, makes a world of difference.
3 large eggs, at room temperature – Again, room temperature is key for smooth incorporation.
1/2 cup pureed fresh strawberries (about 1 cup whole strawberries, pureed) – This is for the swirl. Make sure it’s just the strawberries, no added sugar yet.
For the Glaze:
1 cup fresh strawberries, hulled and sliced or roughly chopped
2 tablespoons granulated sugar – Or a little more, depending on the sweetness of your berries.
1 tablespoon lemon juice – Brightens up the strawberry flavor wonderfully.
1 tablespoon cornstarch (mixed with 2 tablespoons cold water to make a slurry) – This is our thickening agent.
Step-by-Step Instructions
Step 1: Preheat & Prep Pan
First things first, let’s get that oven ready. Preheat it to 350°F (175°C). You’ll need a 9-inch springform pan for this. It’s essential because it allows you to easily release the cheesecake without damaging its beautiful shape. Lightly grease the bottom and sides of the pan. Some people like to wrap the outside of the pan tightly with a couple of layers of heavy-duty aluminum foil. This is a great trick if you plan on using a water bath (more on that in the tips!), as it prevents water from seeping in. Trust me, a soggy crust is not what we’re aiming for!
Step 2: Mix Dry Ingredients
In a medium bowl, combine your graham cracker crumbs, 1/4 cup of granulated sugar, and a pinch of salt. Give it a good stir with a fork or whisk to make sure everything is evenly distributed. This simple mixture forms the foundation of our delicious crust.
Step 3: Mix Wet Ingredients
Pour the melted butter into the dry ingredients. Stir with a fork until the crumbs are evenly moistened and resemble wet sand. You want it to hold together when you squeeze it in your hand. This consistency is key for a crust that doesn’t crumble apart.
Step 4: Combine
Press the crumb mixture firmly and evenly into the bottom and about 1/2 inch up the sides of your prepared springform pan. I like to use the bottom of a glass or a flat-bottomed measuring cup to get a really compact and even layer. This helps prevent the crust from falling apart when you slice the cheesecake. Once pressed, place the pan on a baking sheet and bake for about 8-10 minutes, until lightly golden. This pre-baking step is so important for that satisfying crunch! Let it cool while you prepare the filling.
Step 5: Prepare Filling
In a large bowl, beat the softened cream cheese with the 1 1/4 cups of granulated sugar using an electric mixer on medium speed until smooth and creamy, scraping down the sides of the bowl as needed. This is where you want to be patient and make sure there are no lumps. Now, beat in the sour cream and vanilla extract until just combined. Don’t overmix at this stage; we’re just aiming for smoothness. Next, add the eggs, one at a time, beating on low speed just until each egg is incorporated. Overbeating after adding the eggs can incorporate too much air, leading to cracks. Scrape down the bowl one last time to ensure everything is perfectly blended.
Step 6: Layer & Swirl
Pour about two-thirds of the cream cheese filling over the cooled crust. Dollop spoonfuls of the pureed strawberries randomly over the filling. Then, pour the remaining cream cheese filling over the strawberries. Now for the fun part – swirling! Take a butter knife or a skewer and gently swirl the strawberry puree into the cream cheese filling. Make figure-eights or just gentle swooshes; you don’t want to over-mix, just create beautiful marbled patterns. I like to aim for a mix of swirls and distinct pockets of strawberry goodness.
Step 7: Bake
Now, for the baking. This is where patience really pays off. Place the springform pan on a baking sheet. Bake at 350°F (175°C) for 50-60 minutes. The edges should be set, but the center should still be slightly jiggly, like Jell-O. This is exactly what we want! If it looks too firm, you’ve likely overbaked it, and it might crack. If you’re using a water bath (highly recommended for super creamy, crack-free cheesecake!), place the foil-wrapped springform pan into a larger roasting pan, then carefully pour hot water into the roasting pan until it comes about halfway up the sides of the springform pan. Bake for about 70-80 minutes, or until the edges are set and the center is still slightly jiggly.
Step 8: Cool & Glaze
Once baked, turn off the oven, but leave the cheesecake inside with the oven door slightly ajar (you can prop it open with a wooden spoon) for about an hour. This slow cooling process is crucial for preventing cracks. After an hour, remove the cheesecake from the oven and let it cool completely on a wire rack. Once it’s completely cooled, cover it loosely with plastic wrap and refrigerate for at least 6 hours, or preferably overnight. This chilling time allows the cheesecake to firm up and develop its full, glorious flavor. While it’s chilling, let’s make that glaze. In a small saucepan, combine the sliced strawberries, 2 tablespoons of sugar, and lemon juice. Cook over medium heat, stirring occasionally, until the strawberries soften and release their juices. Stir in the cornstarch slurry and cook, stirring constantly, until the glaze thickens. Let it cool completely before spreading it over the chilled cheesecake.
Step 9: Slice & Serve
Once the cheesecake is completely chilled and the glaze is set, carefully run a thin knife around the edge of the pan to loosen it. Then, release the springform side. Slice the cheesecake using a sharp knife dipped in hot water and wiped dry between each cut – this ensures clean, beautiful slices. Serve chilled, and prepare for delighted murmurs around the table!
What to Serve It With
This strawberry cheesecake is honestly a star all on its own, but there are so many delightful ways to serve it to make it even more special! For **breakfast**, I love serving a small sliver with a strong cup of coffee and maybe a few fresh berries on the side. It feels like such a decadent start to the day. For **brunch**, it’s absolutely perfect. I’ll plate it alongside a fresh fruit salad – maybe with some melon, blueberries, and a few mint leaves for a pop of color and freshness. A mimosa or a sparkling rosé pairs beautifully with the sweetness and tang. When serving it as a formal **dessert**, I sometimes add a dollop of freshly whipped cream or a small quenelle of raspberry sorbet for an extra layer of flavor and texture. It looks incredibly elegant and is always a huge hit after a nice dinner. And for those **cozy snacks** I mentioned? This cheesecake is pure comfort. I’ll often just have a slice with a glass of cold milk or a warm cup of herbal tea. It’s the ultimate indulgence without being too fussy. My family also has a tradition of having this for our “special occasion” dessert, which usually means any day that ends in ‘y’ when someone asks for it nicely! It’s that versatile and always brings smiles.
Top Tips for Perfecting Your Strawberry Cheesecake
Over the years of making this strawberry cheesecake (and let me tell you, it’s been *many* years!), I’ve picked up a few tricks that I swear by. For the **Zucchini Prep**, if you’re thinking of using zucchini in a different recipe, the key is always to grate it and then squeeze out as much moisture as possible. For this cheesecake, of course, we’re all about the berries! When it comes to **Mixing Advice**, please, please, please don’t overmix the cream cheese filling once the eggs are added. Overbeating incorporates air, which is the enemy of a smooth, crack-free cheesecake. Beat just until the eggs are combined. For **Swirl Customization**, don’t go crazy with the swirling. A few gentle passes with a knife are enough to create beautiful marbling. You want to see distinct ribbons of strawberry, not just a uniform pink color. For **Ingredient Swaps**, I’ve experimented a lot. If you’re out of graham crackers, vanilla wafers or shortbread cookies make a fantastic crust. For the sour cream, as I mentioned, full-fat Greek yogurt is a great substitute, giving it an extra tangy kick. And in a pinch, a blend of heavy cream and a little lemon juice can mimic the richness. When it comes to **Baking Tips**, the water bath is my absolute secret weapon for the creamiest texture and to prevent cracks. If you don’t have one, placing a pan of hot water on a rack below your cheesecake can also help create steam. Also, don’t be afraid of the slight jiggle in the center; that’s exactly what you want! For **Glaze Variations**, if you want a richer glaze, you can simmer it a little longer to reduce it further, or even add a tablespoon of butter at the end for extra gloss. If you prefer it less sweet, reduce the sugar or use a naturally sweeter variety of strawberries.
Storing and Reheating Tips
Properly storing your delicious strawberry cheesecake is key to enjoying it for days to come. If you have any leftovers (which is rare at my house!), you can store the cheesecake at **room temperature** for up to 2 hours, but honestly, it’s best kept chilled. For **refrigerator storage**, make sure the cheesecake is completely cooled. Cover it loosely with plastic wrap or foil, or better yet, place it in an airtight container. It should stay wonderfully fresh and creamy in the fridge for up to 4-5 days. I’ve found that the flavor actually gets even better on the second day! If you need to freeze it, and yes, you can freeze cheesecake beautifully, wrap it very tightly in a double layer of plastic wrap, followed by a layer of aluminum foil. It can be frozen for up to 2-3 months. To thaw, remove it from the freezer and let it defrost slowly in the refrigerator overnight. For **Glaze Timing Advice**, I always recommend adding the glaze *after* the cheesecake has chilled completely in the refrigerator. This ensures the glaze sets up nicely without making the cheesecake soggy. If you’re freezing, you can either glaze before freezing or add a fresh glaze after thawing for the best texture and appearance.
Frequently Asked Questions
Final Thoughts
So there you have it – my absolute favorite strawberry cheesecake recipe. It’s a dessert that brings so much joy, not just in the making, but especially in the sharing. It’s the perfect balance of creamy, tangy, and sweet, with that vibrant pop of strawberry that just makes everything sing. I truly believe this recipe is accessible to everyone, and the results are so rewarding. If you love this, you might also enjoy my classic New York Cheesecake recipe or my light and airy Lemon Raspberry Tart – both offer that same touch of homemade magic. Give this strawberry cheesecake a try; I promise it won’t disappoint. I can’t wait to hear how yours turns out, so please leave a comment below and share your experience, or better yet, share a photo of your beautiful creation! Happy baking!
Strawberry Cheesecake
Ingredients
Crust
- 302 g graham cracker crumbs
- 39 g sugar
- 112 g salted butter, melted
Cheesecake
- 678 g cream cheese, room temperature
- 207 g sugar
- 24 g all purpose flour
- 173 g sour cream, room temperature
- 1.5 tbsp vanilla extract
- 3 large eggs, room temperature
Strawberry Topping
- 310 g sugar
- 2 tbsp cornstarch
- 310 g pureed strawberries (from about 1 lb strawberries)
- 0.5 tsp vanilla extract
- 2 cups chopped strawberries
Whipped Cream (Optional)
- 0.5 cup heavy whipping cream, cold
- 0.25 cup powdered sugar
- 0.5 tsp vanilla extract
Instructions
Preparation Steps
- Preheat oven to 325°F (163°C). Grease a 9x13 inch pan.
- Combine the crust ingredients in a small bowl. Press the mixture into the bottom of the prepared pan.
- Bake the crust for 10 minutes, then set aside to cool.
- Reduce the oven temperature to 300°F (148°C).
- In a large bowl, blend the cream cheese, sugar, and flour on low speed until well combined and smooth. Be sure to use low speed to reduce the amount of air added to the batter, which can cause cracks. Scrape down the sides of the bowl.
- Add the sour cream and vanilla extract; mix on low speed until well combined.
- Add eggs one at a time, mixing slowly to combine. Scrape down the sides of the bowl as needed to make sure everything is well combined.
- Pour the batter into the pan with the crust and spread evenly.
- Bake the cheesecake for 30 minutes.
- Turn off the oven and leave the cheesecake in the oven with the door closed for 20 minutes. This slow cooling process helps prevent the cheesecake from cracking.
- Crack the door of the oven, with the cheesecake inside, for 15 minutes.
- Put the cheesecake in the fridge to cool completely, 3-4 hours.
- To make the strawberry topping, combine the sugar and cornstarch in a large saucepan. Stir in the strawberry puree.
- Cook over medium heat, stir constantly until mixture thickens and comes to a boil, about 15 to 20 minutes.
- Allow to boil for 1.5 minutes, then remove from heat.
- Stir in vanilla extract and chopped strawberries and allow to cool for about 15-20 minutes. The topping will thicken as it cools.
- Pour the topping over the cheesecake. You can add the sauce while the cheesecake is chilling and let it all cool together, or let the sauce cool on its own and add it to cheesecake before serving, or even add it as you cut slices.
- To make the whipped cream, add all ingredients to a large mixer bowl and whip on high speed until stiff peaks form.
- Serve slices of the cheesecake with the whipped cream, if desired.

