Okay, so you know how some recipes just *feel* like home? This is one of those for me. Every October, as the leaves start to turn those gorgeous shades of red and gold, and the air gets that crisp bite, my kitchen transforms. It’s a symphony of cinnamon, sugar, and the faint scent of something sweet baking. And right at the heart of it all? These Halloween cookie bars. They’re not just a treat; they’re a memory-maker. I remember the first time I made these, my little nephew, all bundled up in his ghost costume, took one bite and his eyes lit up like Halloween pumpkins. That’s the magic right there! They’re like a hug in bar form, but with just enough festive flair to make them truly special. Honestly, they’re my go-to when I want something that tastes like pure comfort, but also has that little bit of Halloween sparkle. Forget complicated cut-out cookies that take hours; these are a lifesaver when you need something utterly delicious and perfectly seasonal without all the fuss. They’re basically a shortcut to Halloween happiness!
What are Halloween cookie bars?
So, what exactly are these delightful little squares of joy? Think of them as your favorite chewy cookie, but baked in a pan and topped with a dreamy frosting. They’re the perfect marriage between a classic sugar cookie and a decadent brownie, but with a flavor profile that screams autumn and Halloween. We’re talking warm spices, a hint of sweetness, and a texture that’s just right – soft in the middle, with slightly crisp edges. The “Halloween” part really comes in with the decorations; we’ll get to that later, but imagine swirls of orange and black frosting, maybe some cute candy eyeballs or sprinkles. It’s essentially a canvas for your Halloween creativity! They’re not fussy like those elaborate layered cakes, nor do they require perfect piping skills (thank goodness!). They’re down-to-earth, approachable, and undeniably delicious. It’s the kind of dessert that feels both homemade and a little bit fancy, all at once.
Why you’ll love this recipe?
Honestly, there are so many reasons why I keep coming back to this recipe year after year, and why I just *know* you’re going to adore it too. First off, the flavor is just out of this world. It’s that perfect balance of sweet and comforting. The base cookie dough is subtly spiced with cinnamon and nutmeg, which just screams autumn. And when you add that creamy, dreamy glaze on top? Pure bliss. It’s like a warm hug for your taste buds. And let’s talk about simplicity, because who has time for complicated baking during the busy fall season? This recipe is shockingly easy. You can whip up the dough in under 15 minutes, press it into the pan, and bake. The glaze is just as straightforward. It’s a lifesaver when you want to impress without spending all day in the kitchen. Plus, the ingredients are all pretty standard pantry staples, so it’s super cost-effective too. No need for fancy, hard-to-find items! What I love most, though, is how versatile these bars are. You can jazz them up for Halloween with sprinkles and colored icing, or leave them plain for a simple, elegant treat any time of year. They’re perfect for bake sales, classroom parties, or just a cozy night in with a good movie. They’re a crowd-pleaser that never disappoints, and honestly, my kids ask for these more than any other holiday treat!
How do you make a Halloween cookie bar?
Quick Overview
It really couldn’t be easier! You’ll mix up a simple, soft cookie dough, press it into a baking pan, and bake it until golden. While it’s baking, you’ll whip up a quick, sweet glaze that you’ll pour over the warm bars. Once they’ve cooled completely, you’ll decorate them to your spooky heart’s content! It’s a straightforward process with very few steps, and the results are always spectacular. It’s genuinely one of those recipes where the payoff is so much bigger than the effort involved.
Ingredients
For the Main Batter:
2 1/4 cups all-purpose flour
1 teaspoon baking soda
1/2 teaspoon salt
1 teaspoon ground cinnamon
1/2 teaspoon ground nutmeg
1 cup (2 sticks) unsalted butter, softened – make sure it’s nice and soft, but not melted!
1 1/2 cups granulated sugar – this gives us that perfect cookie sweetness
2 large eggs – at room temperature is best, they incorporate better
1 teaspoon vanilla extract – good quality vanilla makes all the difference!
For the Filling (Optional, but oh-so-good!):
This is where we add that extra layer of deliciousness. You can use a jarred caramel sauce or make your own. I often just use a good quality store-bought one to save time on busy nights.
1/2 cup caramel sauce, thick and luscious
Optional additions for the filling: a handful of mini chocolate chips or chopped nuts for extra texture.
For the Glaze:
3 cups powdered sugar, sifted – sifting is key to a smooth glaze!
1/4 cup milk or heavy cream – I usually opt for milk, but cream makes it extra rich!
1 teaspoon vanilla extract
Optional for decoration: Halloween-colored food coloring (orange, black, purple), sprinkles, candy eyeballs.
Step-by-Step Instructions
Step 1: Preheat & Prep Pan
First things first, preheat your oven to 350°F (175°C). Get a 9×13 inch baking pan ready. I like to line mine with parchment paper, leaving a little overhang on the sides. This makes lifting the bars out so much easier later, and cleanup is a breeze! Just grease the pan lightly, then lay the parchment paper down, pressing it into the corners. This is one of those little tricks I learned after trying to pry stuck bars out more times than I care to admit!
Step 2: Mix Dry Ingredients
In a medium bowl, whisk together the all-purpose flour, baking soda, salt, cinnamon, and nutmeg. Give it a good whisk until everything is well combined and there are no streaks of flour. This ensures that your leavening and spices are evenly distributed throughout the batter, which is so important for consistent results.
Step 3: Mix Wet Ingredients
In a large bowl, cream together the softened unsalted butter and granulated sugar. Beat them with an electric mixer (or a whisk and some serious elbow grease!) until the mixture is light and fluffy. This usually takes about 2-3 minutes. Then, beat in the large eggs, one at a time, making sure each is fully incorporated before adding the next. Stir in the vanilla extract. The mixture should look smooth and well-emulsified.
Step 4: Combine
Now, gradually add the dry ingredients to the wet ingredients. Mix on low speed or stir by hand until just combined. It’s really important not to overmix here! Overmixing can develop the gluten in the flour too much, leading to tough cookies. You want to stop as soon as you don’t see any more dry flour streaks. The dough will be thick and a little sticky – that’s exactly what we want.
Step 5: Prepare Filling
If you’re using the caramel filling, now’s the time to get it ready. If you’re using store-bought, just give it a quick stir to make sure it’s smooth. If you’re adding any extra goodies like chocolate chips or nuts, stir those in now. You want it thick enough so it doesn’t just sink to the bottom of the bars.
Step 6: Layer & Swirl
Spread about two-thirds of the cookie dough evenly into the bottom of your prepared baking pan. Use a spatula or your hands (lightly floured is helpful here!) to press it down firmly. If you’re using the filling, spoon dollops of the caramel sauce over the dough, then gently spread it out, leaving about a 1/2 inch border around the edges. Now, take the remaining one-third of the cookie dough and dollop it over the caramel layer. You don’t need to be too neat here, as we’ll be swirling it! You can use a knife or a toothpick to gently swirl the top dough into the caramel layer, creating a marbled effect. Don’t over-swirl, or you’ll lose the distinct layers.
Step 7: Bake
Bake for 25-30 minutes, or until the edges are golden brown and a toothpick inserted into the center comes out with moist crumbs attached (not wet batter). Keep an eye on them, as oven temperatures can vary. I usually check mine around the 25-minute mark to be safe. You want them cooked through but still wonderfully soft and chewy.
Step 8: Cool & Glaze
Let the bars cool in the pan on a wire rack for at least 30 minutes. This is crucial! If you try to glaze them while they’re too hot, the glaze will melt and slide right off. Once they’ve cooled a bit, you can prepare the glaze. In a medium bowl, whisk together the sifted powdered sugar, milk (or cream), and vanilla extract until smooth and pourable. If it’s too thick, add a tiny bit more milk; if it’s too thin, add a bit more powdered sugar. Once the bars are mostly cool (they can still be a little warm, which helps the glaze set nicely), pour the glaze over the top and spread it evenly. For Halloween, this is where the fun really begins! Divide the glaze into bowls and tint them with food coloring – orange and black are classic. Drizzle the colors over the white glaze and use a toothpick or skewer to swirl them together for a spooky marble effect. Add sprinkles or candy eyeballs while the glaze is still wet.
Step 9: Slice & Serve
Let the glaze set completely, which usually takes another hour or so at room temperature. Once it’s firm, use the parchment paper overhang to lift the entire slab out of the pan onto a cutting board. For clean cuts, use a sharp knife, wiping it clean between each cut if necessary. Slice into squares or rectangles, depending on how you like them. These are best served at room temperature, but they’re also amazing slightly chilled on a hot day.
What to Serve It With
These Halloween cookie bars are pretty much a standalone star, but I love thinking of fun ways to pair them up! For a casual breakfast or a quick morning treat, a steaming mug of coffee or a creamy chai latte is just perfect. The warmth of the drink complements the spices in the bars beautifully. If you’re planning a brunch, these are a fantastic addition to a dessert table. I love serving them alongside fresh fruit salad or a fluffy pancake stack. For an after-dinner indulgence, they’re divine with a scoop of vanilla bean ice cream or a dollop of whipped cream. And for those cozy autumn evenings, when you just need a little something sweet to round out the day, they’re fantastic with a glass of cold milk. My family has a tradition of having these with hot apple cider during movie nights, and it’s just the coziest combination imaginable!
Top Tips for Perfecting Your Halloween Cookie Bars
Over the years, I’ve picked up a few tricks that I think make these bars even better. For the batter, I always make sure my butter is *truly* softened – not melted, but soft enough that you can easily make an indent with your finger. This helps it cream properly with the sugar, which is essential for that tender texture. When you’re combining the wet and dry ingredients, seriously, don’t overmix! Just mix until it’s combined. I’ve learned the hard way that overmixing leads to tough bars, and nobody wants that. For the optional filling, I find that using a thicker caramel sauce is key. If it’s too thin, it can make the bottom layer soggy. I sometimes even pop my jarred caramel in the fridge for a bit to thicken it up before using. When it comes to swirling the filling, less is more! You want a beautiful marbled effect, not a chaotic mess. Just a few gentle swirls will do the trick. For the glaze, sifting the powdered sugar is non-negotiable for me; it ensures a super smooth, lump-free finish. And don’t be afraid to play with the consistency of the glaze – a slightly thicker glaze is easier to decorate with, while a thinner one will spread more easily. For the Halloween decorations, I love using gel food coloring because it’s so vibrant and you only need a tiny amount. When it comes to baking, trust your oven but also trust your senses. Keep an eye on the edges – they should be golden brown, but the center should still look a little soft when you take them out. They’ll continue to cook as they cool. And lastly, patience with the cooling! It’s the hardest part, I know, but letting them cool properly before slicing ensures nice, clean cuts and prevents them from falling apart. If you’re short on time and can’t wait for the glaze to fully set, you can even chill the bars in the fridge for about 30 minutes to help it firm up faster.
Storing and Reheating Tips
These bars are pretty forgiving when it comes to storage, which is another reason I love them! If you’ve got leftovers (which doesn’t happen often in my house!), you can store them at room temperature for up to 3 days. Just make sure they’re in an airtight container to keep them fresh and prevent them from drying out. If they have a glaze on them, it’s best to make sure the glaze is fully set before covering. For longer storage, you can keep them in the refrigerator for up to a week. Again, an airtight container is your best friend here. The cold can sometimes make the bars a little firmer, but they’ll soften up nicely at room temperature. If you want to freeze them, I’ve had great success with that too! Once the bars are completely cooled and the glaze is set, cut them into individual portions or squares. Wrap each piece tightly in plastic wrap, then place them in a freezer-safe bag or container. They’ll stay good in the freezer for about 2-3 months. To thaw, just take them out of the freezer and let them come to room temperature. If they’re glazed, you might want to let them thaw in the fridge overnight to ensure the glaze doesn’t get too sticky. For reheating, I usually just let them sit out on the counter for about 15-20 minutes to soften up. If you really want to warm them, you can gently heat them in a low oven (around 250°F / 120°C) for a few minutes, but be careful not to overcook them, or they can become dry. I usually avoid the microwave for these, as it can make the texture a bit gummy.
Frequently Asked Questions
Final Thoughts
I really hope you give these Halloween cookie bars a try. They’re more than just a recipe to me; they’re a piece of my kitchen’s heart, especially during the fall. They capture that wonderful feeling of home, comfort, and a little bit of magic. Whether you’re a seasoned baker or just starting out, you’ll find these bars incredibly rewarding to make, and even more so to eat! The combination of tender, spiced cookie and sweet, creamy glaze is just unbeatable. They’re perfect for sharing, and watching people’s faces light up when they take their first bite is truly the best part. If you love this recipe, you might also enjoy my Spiced Apple Crumble Bars or my Pumpkin Chocolate Chip Cookies – they capture that same cozy, autumnal spirit! So, grab your apron, put on some festive music, and get baking. I can’t wait to hear how yours turn out! Happy baking, and happy Halloween!
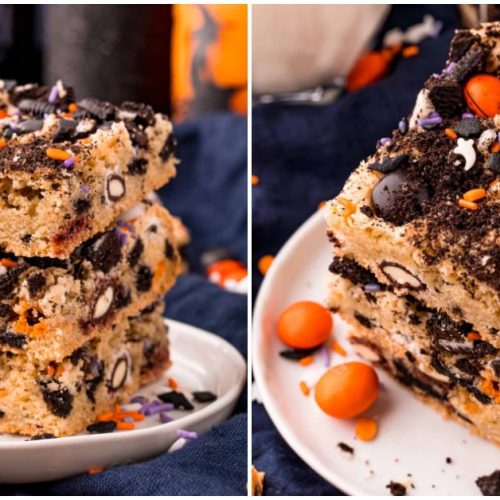
Halloween cookie bars
Ingredients
Main Ingredients
- 2.25 cups all-purpose flour
- 1 tsp salt
- 0.5 tsp baking soda
- 0.75 cup unsalted butter softened
- 1 cup granulated sugar
- 0.5 cup light brown sugar packed
- 2 large eggs
- 1 tsp pure vanilla extract
- 1.25 cups Cookies & Cream M&Ms
- 1.5 cups Oreos chopped and divided
- Halloween sprinkles
Instructions
Preparation Steps
- Preheat oven to 350°F and line a 9x13 inch baking dish with parchment paper.
- Whisk together the flour, salt, and baking soda in a bowl and set aside.
- In a mixing bowl, cream the softened butter with granulated and brown sugars until smooth.
- Beat in the eggs and vanilla extract until well combined, scraping down the sides of the bowl as needed.
- Gradually mix in the dry flour mixture until just combined; avoid overmixing.
- Fold in 1 cup of the Cookies & Cream M&Ms and 1 cup of the chopped Oreos into the dough.
- Spread the cookie dough evenly in the prepared pan and top with remaining M&Ms, Oreos, and Halloween sprinkles.
- Bake for 24-27 minutes, starting to check around 20 minutes, until bars are set and edges are golden.