There’s something magical about baking in the fall, isn’t there? The air turns crisper, the smell of cinnamon and pumpkin fills your kitchen, and somehow every sweet treat tastes just a bit better. One of my absolute favorites that never fails to capture those cozy vibes is these ghost brownies. They’re rich, fudgy, and topped with the cutest ghostly swirls that my kids get excited about every single year. Honestly, they kind of remind me of a classic brownie, but with that playful Halloween twist that’s perfect for festive gatherings or just an excuse to indulge a little. Plus, I love how they keep things simple — no crazy ingredients or hours spent decorating. Just pure, soft, chocolaty goodness with a charming ghostly finish that’ll have everyone asking for the recipe!
What is a ghost brownie?
So, what exactly are ghost brownies? Think of it as your classic brownie, but with a fun little personality. The “ghost” in ghost brownies comes from the cute, swirled white topping that sneaks across the rich chocolate base, almost like a little spirit gliding right across your dessert plate. It’s essentially a brownie recipe with a creamy, marshmallow-like or cream cheese swirl, giving you that hauntingly delicious contrast — dark chocolate meets smooth and slightly tangy swirls. It’s not just a pretty face either; it adds a nice surprise in texture and taste. These treats are easy to whip up but give you that special feeling of homemade magic, whether you’re baking for Halloween or just feeling a little mischievous in the kitchen.
Why you’ll love this recipe?
What I love most about these ghost brownies is how accessible they are. You don’t need fancy equipment or obscure ingredients — just pantry staples with a little twist. The flavor? Deep, rich chocolate meets a creamy swirl that adds a soft, almost dreamy balance. When I first made these, I wasn’t expecting my whole family to fight over the last piece, but that’s exactly what happened! They somehow feel fancy enough for guests but easy enough for a quick dessert fix after a busy day.
They’re incredibly simple to make. No need to temper chocolate or worry about complicated layers. The swirling technique is forgiving, and honestly, the messier the ghost swirl, the more authentic they look. Plus, the cost is unbeatable—basic ingredients like cocoa powder, sugar, cream cheese, and eggs come together in such a budget-friendly way that I don’t mind baking a batch every week. If you’re a fan of my classic fudge brownies, this is a charming next step, especially when you want a crowd-pleaser with a seasonal spin.
Versatility is another win. While they truly shine as ghost brownies during the Halloween season, you can easily swap out the ghost swirl for other flavors or colors — think raspberry cream or peanut butter. I also love pairing these with simple vanilla ice cream or a drizzle of caramel sauce on chillier evenings. What’s not to love about a brownie that feels like a little piece of comfort and fun all in one?
How do you make ghost brownies?
Quick Overview
Making ghost brownies feels like a cozy mini project. You’ll start by mixing your smooth chocolate batter, then whip up a creamy swirl (I usually go for cream cheese, but marshmallow works beautifully too). After layering and swiping the swirl through the chocolate with a toothpick, you bake until the edges pull away just right and the center holds that lovely fudgy chew. It’s a no-fuss process that yields a textured, flavorful treat that will fill your kitchen with that irresistible chocolate aroma.
Ingredients
For the Main Batter:
- 1 cup (2 sticks) unsalted butter, melted – helps keep the brownies rich and moist.
- 2 cups granulated sugar – for that perfect sweet balance without overpowering.
- 4 large eggs, room temperature – they give structure and richness.
- 1 cup unsweetened cocoa powder – get a good quality one for deep chocolate flavor.
- 1 cup all-purpose flour – just enough to keep things tender.
- ½ teaspoon salt – enhances all the flavors.
- 1 teaspoon vanilla extract – a must for warmth and depth.
For the Filling:
- 8 oz cream cheese, softened – the star of the ghost swirl, smooth and tangy.
- ½ cup powdered sugar – to sweeten the swirl without grit.
- 1 teaspoon vanilla extract – extra flavor kick.
- 1 egg yolk – adds silkiness and helps the filling set.
For the Glaze:
- Optional powdered sugar glaze or melted white chocolate – to add shine or extra sweetness.
- Adjust consistency with milk or cream, just enough to drizzle nicely.
Step-by-Step Instructions
Step 1: Preheat & Prep Pan
Start by preheating your oven to 350°F (175°C). Line an 8×8-inch baking pan with parchment paper, letting some hang over the edges—trust me, this makes lifting the brownies out a breeze later. Grease lightly or spray to keep those edges from sticking.
Step 2: Mix Dry Ingredients
In a medium bowl, sift together the cocoa powder, flour, and salt. Sifting helps avoid lumps and ensures an even texture in the batter. You want these to be as smooth as possible before combining with the wet ingredients—this step is key for those fudgy bites.
Step 3: Mix Wet Ingredients
In a large bowl, whisk the melted butter and sugar until smooth and glossy. Add eggs one at a time, mixing well after each. Fold in the vanilla extract and watch the mixture thicken slightly — this is where the batter starts promising something amazing.
Step 4: Combine
Gently add the dry cocoa mixture to the wet ingredients, folding slowly. Don’t overmix here—once you see the batter come together, stop. Overmixing can lead to cakey brownies, and that’s not what we want. We’re after fudgy, dense goodness.
Step 5: Prepare Filling
Beat the cream cheese until smooth, then add powdered sugar, vanilla, and egg yolk. Mix until silky with no lumps. The filling should be creamy but thick enough to hold its shape when swirled on the batter. If it’s too runny, add a little more powdered sugar.
Step 6: Layer & Swirl
Pour half the brownie batter into the pan, spreading evenly. Dot half the cream cheese filling in spoonfuls across the batter. Repeat with remaining batter and filling. Using a toothpick or knife, gently swirl through to create those lovely ghostly patterns. I like to pull light loops and circles, but there’s no wrong way—each swirl is a little fingerprint of homemade charm.
Step 7: Bake
Bake in the preheated oven for 35-40 minutes. You’ll want to watch closely starting at 30 minutes. The brownies are done when a toothpick inserted in the center comes out with a few moist crumbs but not wet batter. The edges will start pulling away from the pan, hinting at that heavenly fudgy texture inside.
Step 8: Cool & Glaze
Let the brownies cool completely in the pan set on a wire rack. This can take upwards of an hour but is so worth it to get clean slices later. Once cool, drizzle your glaze or melted white chocolate over the top for an extra pop of sweetness and that signature ghostly glow.
Step 9: Slice & Serve
Use the parchment overhang to lift the whole slab out of the pan. Slice into squares with a sharp knife — run it under hot water and wipe between cuts for the neatest edges. Serve at room temperature for the best melt-in-your-mouth experience. Pair with a big cup of coffee or a glass of cold milk and watch these disappear in minutes.
What to Serve It With
For Breakfast: These ghost brownies might make breakfast feel like a special treat. Serve alongside a bold cup of black coffee or a creamy chai latte. For an indulgent touch, add fresh berries or sliced bananas on the side for a bit of brightness.
For Brunch: Plate these alongside whipped cream and a dusting of cinnamon or cocoa powder. A sparkling apple cider or a light herbal tea complements the richness nicely without overpowering the brownies’ subtle tang from the cream cheese swirl.
As Dessert: Nothing finishes an evening better than ghost brownies with a scoop of vanilla ice cream and a drizzle of caramel or chocolate sauce. Fresh mint leaves make for a simple garnish, adding that touch of freshness to the warm chocolate.
For Cozy Snacks: When you want to curl up on the couch, these brownies are your go-to comfort food. Pair with a mug of hot cocoa or a spiced pumpkin latte and a good book or movie for the ultimate cozy moment. This is a tradition in my house every fall, and it’s always a hit, especially on chilly weekend afternoons.
Top Tips for Perfecting Your Ghost Brownies
Zucchini Prep: (If you want to sneak in some veggies, zucchini works wonders!) Always grate it finely and squeeze out excess moisture — a damp batter means soggy brownies, and no one wants that. Fresh zucchini over frozen nails the texture best here.
Mixing Advice: Folding is your friend. Mix just until the ingredients merge, then stop. Overmixing develops gluten, which makes brownies too tough. Watch how the batter looks — it should be dense yet fluid, not overly elastic.
Swirl Customization: Use a skewer, toothpick, or even the tip of a butter knife for swirling. For more dramatic ghost shapes, try small circles and sharp pulls. Less is more here — a few elegant swirls beat overdoing it.
Ingredient Swaps: Tried swapping butter for coconut oil — it gave a slight tropical lift without losing richness. Almond milk works beautifully for glaze thinning, making it creamier. I also substitute part of the sugar with brown sugar for a hint of molasses.
Baking Tips: Position your pan in the middle rack for even heat. If your oven runs hot, try reducing the temp by 10°F and extend baking by a few minutes. Always do the toothpick test before pulling them out to avoid drying.
Glaze Variations: Powdered sugar mixed with a bit of lemon juice makes a tangy glaze that contrasts the sweet brownie. Melted white chocolate or even a cinnamon-spiced cream cheese drizzle works wonders. Glaze thickness is key—too runny and it won’t set, too thick and it’s hard to spread.
One lesson I learned the hard way? Don’t skip the cooling stage. Trying to glaze warm brownies makes a mess and weakens that glossy finish. Also, fresh cream cheese matters — too cold or too firm will cause lumps in your swirl.
Storing and Reheating Tips
Room Temperature: Store baked brownies in an airtight container for up to 3 days. Keep them in a cool, dry spot away from direct sunlight. This method keeps the brownies moist, but the cream cheese swirl will start to soften after a couple of days.
Refrigerator Storage: Wrapping individual pieces in plastic wrap or placing them in sealed containers helps retain freshness for up to a week. I usually do this when I bake in advance for a party. Remember to bring them to room temp before serving so the flavors and textures open up.
Freezer Instructions: These brownies freeze beautifully! Wrap tightly with plastic wrap and then foil to prevent freezer burn. Freeze for up to 3 months. Thaw overnight in the fridge or for a few hours at room temperature. Avoid microwaving frozen brownies — you’ll risk drying them out.
Glaze Timing Advice: If you plan to freeze or refrigerate the brownies, I suggest glazing right before serving rather than before storing. The glaze can become sticky or crack when chilled. For short-term room temp storage, glazing immediately works fine.
Frequently Asked Questions
Final Thoughts
These ghost brownies have become a little celebration ritual in my kitchen, especially when the days get shorter and we’re all craving that comforting hug of chocolate. They bring something special—richly fudgy, elegantly swirled, and just sweet enough without being over the top. If you’re a fan of classic brownies but want a playful twist that’s easy, fun, and absolutely tasty, make these yours. Feel free to experiment with flavors or add your own spin on the swirl. I can’t wait to hear how yours turn out—let me know if you give it a whirl, share your pictures, or your favorite pairings. Happy baking, and here’s to sugary smiles and cozy moments!
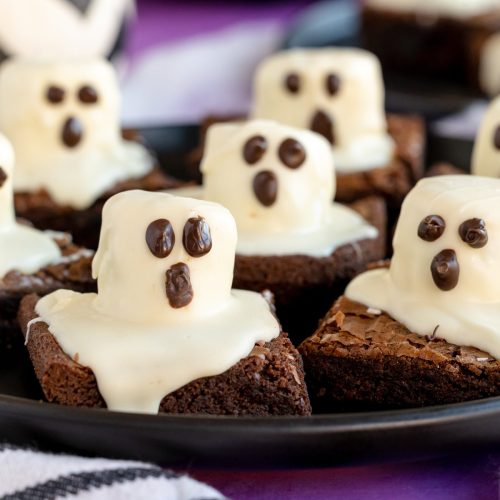
ghost brownies
Ingredients
Main Ingredients
- 12 pieces brownies (store-bought or homemade)
- 12 large marshmallows
- 12 ounces white chocolate melting wafers for coating marshmallows
- 4 ounces semi-sweet chocolate chips or chocolate frosting for eyes and mouth decoration
Instructions
Preparation Steps
- Bake the brownies according to the package or recipe instructions and allow them to cool completely.
- Cut the brownies into 12 equal pieces.
- Place one marshmallow on top of each brownie piece.
- Melt the white chocolate melting wafers in the microwave in 1-minute increments, stirring between each, or melt using a double boiler on the stove.
- Pour the melted white chocolate over each marshmallow to cover it completely.
- Place the brownies in the refrigerator for 10 minutes to allow the white chocolate to harden.
- Melt the semi-sweet chocolate chips the same way you melted the white chocolate.
- Put the melted semi-sweet chocolate into a piping bag or plastic bag with the corner cut off.
- Remove the brownies from the refrigerator and pipe one dot of chocolate for each eye and an oval for the mouth on each marshmallow ghost.
- Allow the chocolate to dry before serving. Enjoy immediately or within a few days.