Oh, snickerdoodles! Just the name brings back memories of my grandma’s kitchen, the air thick with the sweet, cinnamony scent of freshly baked cookies. There’s something so utterly comforting about that classic flavor, isn’t there? Well, imagine capturing all that snickerdoodle magic, but in an easy-to-slice loaf that’s perfect for breakfast, dessert, or just because. That’s exactly what this Snickerdoodle Bread is. It’s like my beloved snickerdoodle cookies went on vacation and came back as a loaf, ready to be slathered with butter or dunked in coffee. Honestly, this recipe is a lifesaver on busy mornings, and my kids ask for it practically every other day. It’s one of those recipes that just feels like home, a guaranteed crowd-pleaser that takes minimal fuss but delivers maximum delight. If you love a good cinnamon-sugar swirl and a tender, moist crumb, then you are in for such a treat with this Snickerdoodle Bread.
What is snickerdoodle bread?
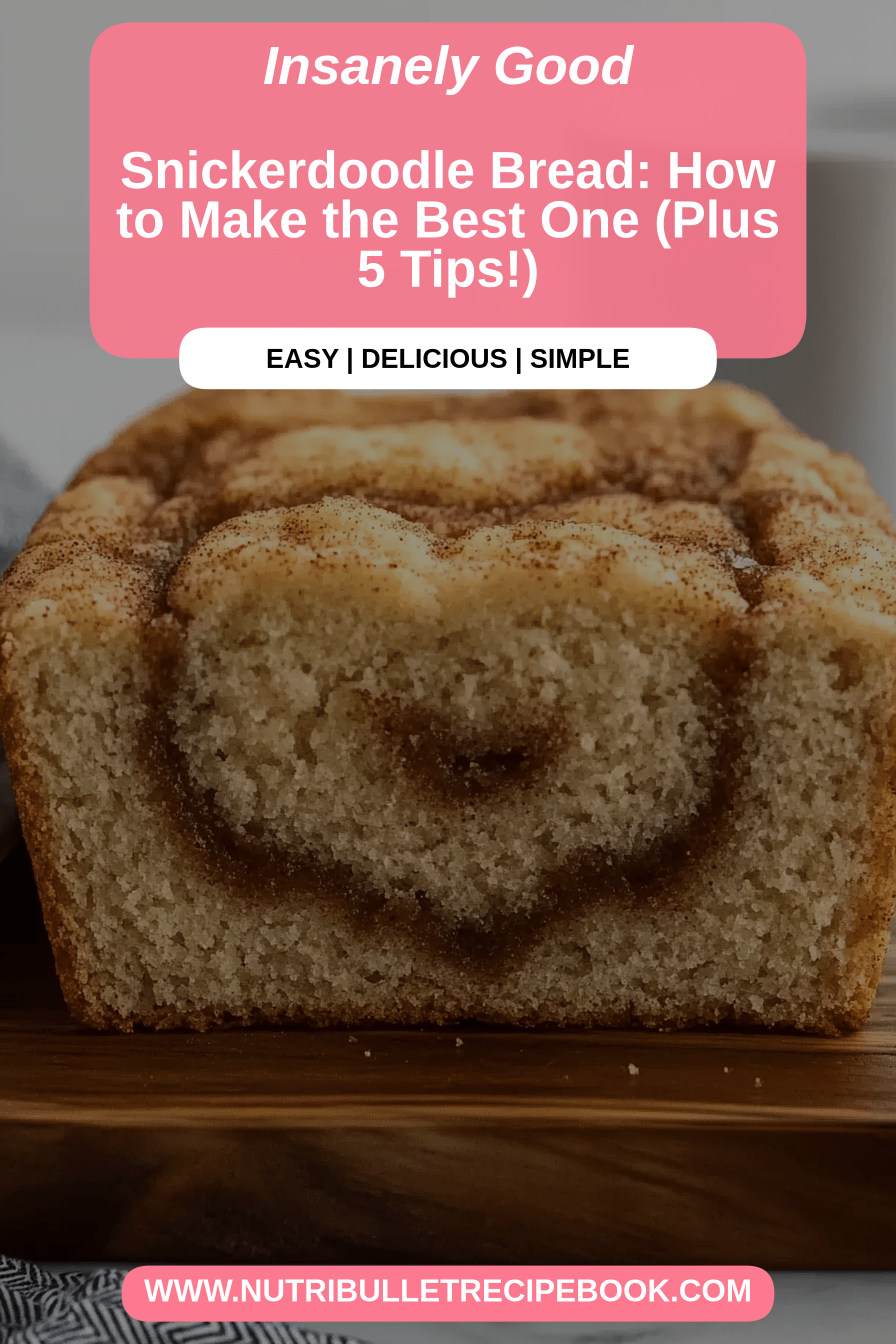
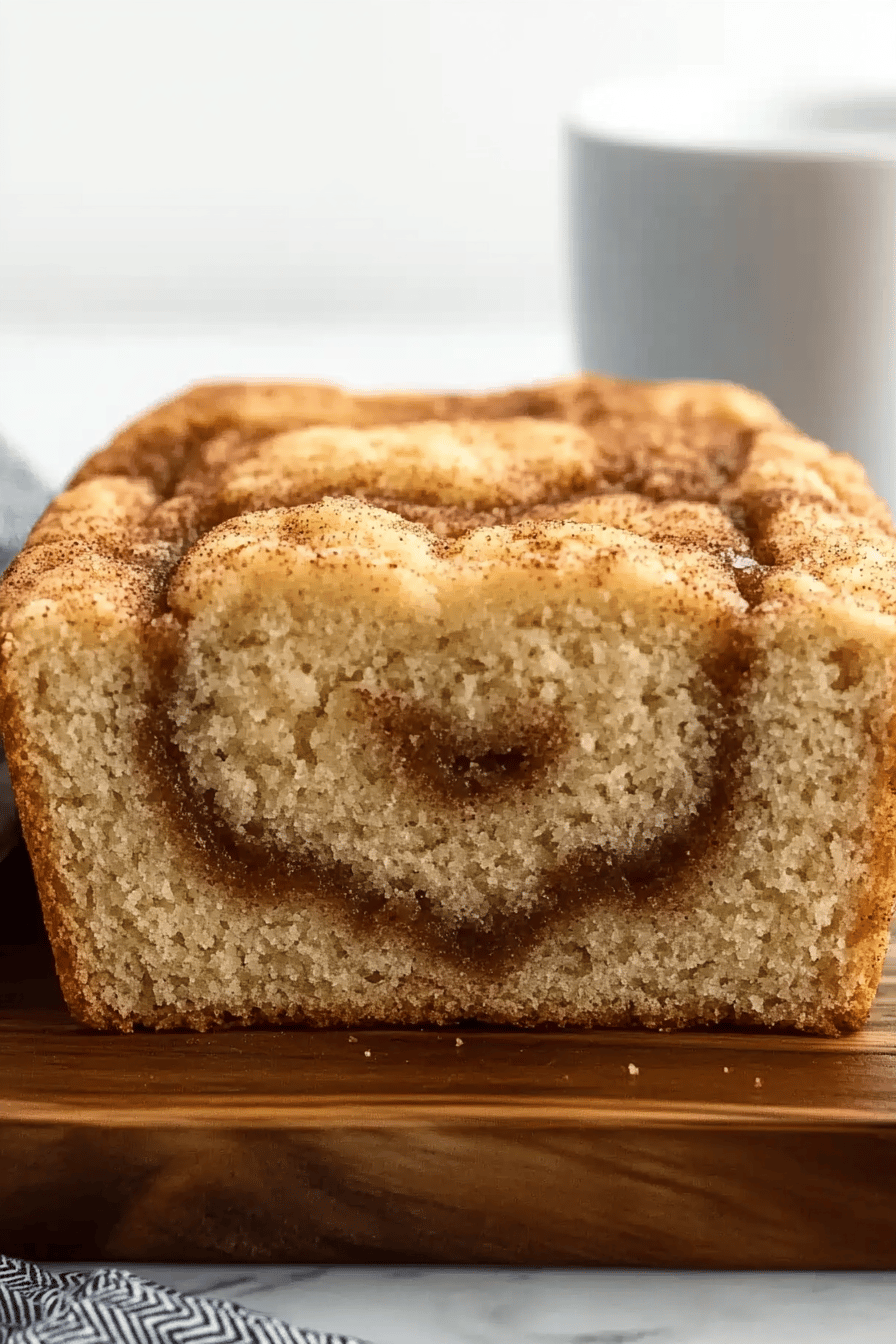
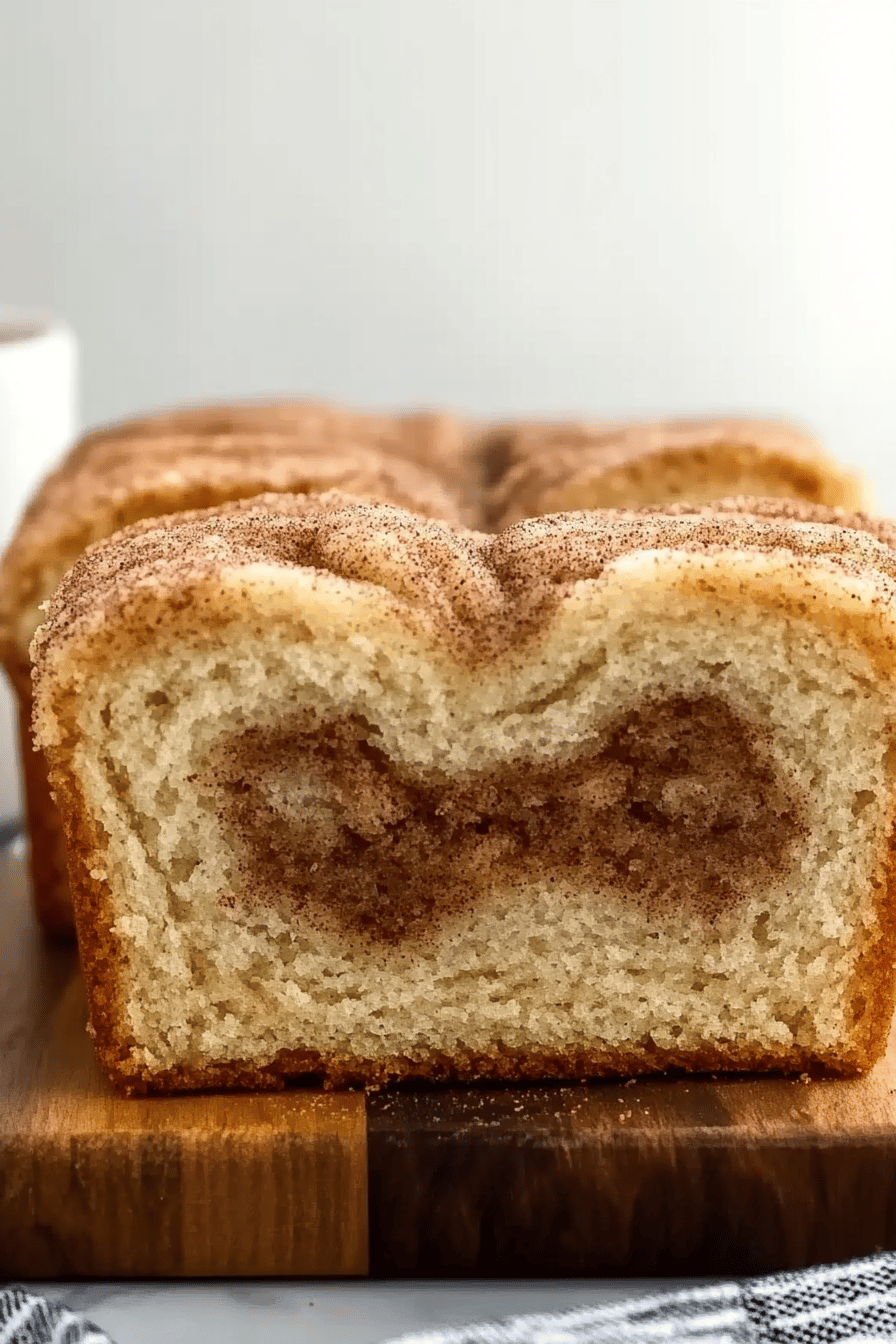
So, what exactly *is* Snickerdoodle Bread? Think of it as your favorite chewy snickerdoodle cookie, but baked into a soft, wonderfully moist loaf. It’s essentially a quick bread – meaning no yeast involved, which is a huge win in my book – that’s infused with that signature snickerdoodle flavor: sweet creaminess with a comforting kick of cinnamon. The magic really happens with the cinnamon-sugar swirl baked right into the batter, creating little pockets of pure bliss in every bite. It’s not overly sweet, which I appreciate, making it versatile enough for a morning treat alongside a cup of tea or a decadent dessert after dinner. The name itself just sounds cozy, doesn’t it? It’s the perfect marriage of a classic cookie flavor and the convenient, satisfying format of a quick bread. It’s simple, it’s comforting, and it’s utterly delicious.
Why you’ll love this recipe?
What are some of the reasons why I love Snickerdoodle Bread?flavor is just out of this world. It’s that unmistakable warm cinnamon and sweet vanilla that just sings. It’s not just sweet; it has that delightful tang from the cream of tartar, which is a signature of true snickerdoodles. Then there’s the simplicity. Seriously, this bread comes together so quickly. You can whip it up on a Sunday morning and have it ready for snacks all week, or even on a busy weekday if you get an early start. It’s the kind of recipe that doesn’t require any fancy techniques or equipment, which I always appreciate. Plus, it’s incredibly cost-efficient. Most of the ingredients are pantry staples, so you likely already have everything you need on hand. And the best part isversatility! This bread is fantastic on its own, but it’s also amazing with a smear of butter, a drizzle of honey, or even a light Cream Cheese frosting if you’re feeling indulgent. I’ve even had it toasted and topped with a little apple butter, which was divine. What I love most about this particular recipe is how incredibly moist it stays, even a few days later. Many quick breads can tend to dry out, but this one holds up beautifully. It truly captures the essence of a snickerdoodle cookie in loaf form, and that’s pretty special.
How to Make Snickerdoodle Bread
Quick Overview
Making this Snickerdoodle Bread is wonderfully straightforward. You’ll essentially mix your dry ingredients, whisk together your wet ingredients, combine them until just mixed, and then create a delightful cinnamon-sugar swirl that gets baked right in. It’s a few simple steps that lead to an incredibly satisfying loaf. The beauty of this recipe is its forgiving nature; it’s hard to mess up, which makes it perfect for bakers of all levels. You’ll be amazed at how quickly it goes from your mixing bowl to your oven, filling your home with the most incredible aroma.
Ingredients
For the Main Batter:
You’ll need your standard all-purpose flour – about 2 and 1/4 cups. Make sure it’s spooned and leveled, not scooped, to avoid a dense loaf. Two teaspoons of baking powder will give it a good lift. And don’t skip the 1/2 teaspoon of salt; it really balances the sweetness. For that characteristic snickerdoodle tang and tenderness, we’ll use 1 teaspoon of cream of tartar. Unsalted butter is key here, softened to room temperature so it creams nicely with the sugar; 1/2 cup should do the trick. For sweetness, 1 and 1/4 cups of granulated sugar are perfect, but you can shave off a tiny bit if you prefer it less sweet. Two large eggs, at room temperature, will bind everything together beautifully. And of course, the flavor heroes: 1 teaspoon of pure vanilla extract and 1/2 cup of milk. I’ve tested this with whole milk, and almond milk works wonders too, making it even creamier sometimes!
For the Filling:
This is where the magic swirl comes in! You’ll need 1/2 cup of granulated sugar mixed with 2 tablespoons of ground cinnamon. This is your classic snickerdoodle coating, intensified. I usually whisk these together right in a small bowl until they’re well combined.
For the Glaze:
Once the bread is cooled, a simple glaze takes it over the top. You’ll need about 1 cup of powdered sugar. Whisk this with 2 to 3 tablespoons of milk or even cream for extra richness. A tiny splash of vanilla extract in the glaze really ties everything together. The key is to get the consistency just right – thick enough to coat but thin enough to drizzle.
Step-by-Step Instructions
Step 1: Preheat & Prep Pan
First things first, let’s get our oven nice and warm. Preheat it to 350°F (175°C). While the oven heats up, grab a standard 9×5 inch loaf pan. I like to grease mine really well with butter or non-stick cooking spray, and then I give it a light dusting of flour. This ensures our beautiful Snickerdoodle Bread will slide right out when it’s done. You can also line it with parchment paper if you prefer, leaving an overhang on the sides – it makes lifting it out even easier!
Step 2: Mix Dry Ingredients
In a large bowl, whisk together your all-purpose flour, baking powder, salt, and that all-important cream of tartar. Giving these dry ingredients a good whisk ensures everything is evenly distributed. This step is crucial for a uniform rise and consistent flavor throughout your bread. You want to see no streaks of cream of tartar or baking powder left behind.
Step 3: Mix Wet Ingredients
In a separate, medium-sized bowl, cream together the softened butter and granulated sugar until light and fluffy. This usually takes a couple of minutes with an electric mixer, or a bit more elbow grease by hand. Then, beat in the eggs one at a time, making sure each is fully incorporated before adding the next. Stir in the vanilla extract and the milk. The mixture might look a little separated at this stage, and that’s perfectly fine.
Step 4: Combine
Now, we bring it all together. Gradually add the dry ingredients to the wet ingredients, mixing on low speed or by hand until *just* combined. I cannot stress “just combined” enough! Overmixing is the enemy of tender quick breads, as it develops the gluten too much, leading to a tough texture. You should still see a few small streaks of flour; that’s okay. We’re going to get the rest of the mixing done when we add the filling.
Step 5: Prepare Filling
In a small bowl, mix together the 1/2 cup of granulated sugar and 2 tablespoons of cinnamon. This is your glorious filling that will create those incredible swirls. Give it a good stir so the cinnamon is evenly distributed throughout the sugar. It should smell amazing already!
Step 6: Layer & Swirl
Pour about half of the batter into your prepared loaf pan. Sprinkle about half of your cinnamon-sugar filling mixture evenly over the batter. Now, pour the remaining batter on top, and then sprinkle the rest of the cinnamon-sugar filling over that. Here’s where the artistry comes in: take a knife or a skewer and gently swirl it through the batter, creating lovely marbled patterns. Don’t over-swirl; just a few passes will do to create beautiful ribbons of cinnamon goodness without mixing it all in.
Step 7: Bake
Pop that beautiful pan into your preheated oven. Bake for about 50-60 minutes. The best way to check for doneness is to insert a toothpick or a wooden skewer into the center of the loaf. If it comes out clean, or with just a few moist crumbs attached, it’s ready! If it comes out with wet batter, give it another 5-10 minutes and check again. Oven temperatures can vary, so keep an eye on it towards the end of the baking time.
Step 8: Cool & Glaze
Once baked, carefully remove the loaf pan from the oven. Let the Snickerdoodle Bread cool in the pan for about 10-15 minutes. This allows it to set up properly. Then, gently invert the loaf onto a wire rack to cool completely. It’s important for it to cool completely before glazing, otherwise, the glaze will just melt off. While it’s cooling, whisk together the powdered sugar, milk, and vanilla extract for the glaze. Aim for a consistency that’s pourable but not watery. Once the bread is fully cooled, drizzle the glaze generously over the top. Let the glaze set for a few minutes before slicing.
Step 9: Slice & Serve
And there you have it! Your gorgeous, homemade Snickerdoodle Bread. For the cleanest slices, use a serrated knife. Serve it warm or at room temperature. It’s absolutely delightful on its own, but a little pat of butter really takes it to the next level. Enjoy!
What to Serve It With
This Snickerdoodle Bread is so wonderfully versatile, it fits into almost any meal or craving! For Breakfast: It’s absolutely heavenly with a hot cup of coffee or a steaming mug of tea. I love it sliced thick and toasted lightly, then spread with a little salted butter. It’s a simple pleasure that makes any morning feel special. For Brunch: Elevate it with a sprinkle of powdered sugar or a dollop of whipped cream on the side. It pairs beautifully with a mimosa or a refreshing glass of orange juice. You could even serve it alongside some fresh Fruit Salad for a lovely sweet and fresh contrast. As Dessert: This is where it truly shines for me! A slice of warm Snickerdoodle Bread with a scoop of vanilla bean ice cream is pure bliss. It’s also wonderful served with a warm fruit compote or a drizzle of caramel sauce. The cinnamon spice makes it a perfect accompaniment to fall desserts, but honestly, I enjoy it year-round. For Cozy Snacks: This is its most frequent role in my house! It’s perfect for an afternoon pick-me-up with a glass of cold milk, or even a late-night sweet treat when you don’t want to bake a whole cake. It just hits that sweet spot perfectly. My family loves it so much that it’s often gone within a day or two!
Top Tips for Perfecting Your Snickerdoodle Bread
I’ve made this Snickerdoodle Bread countless times, and over the years, I’ve picked up a few tricks that really help ensure it turns out perfectly every single time. Mixing Advice: The biggest thing I’ve learned is to be super gentle when combining the wet and dry ingredients. Seriously, stop mixing the moment you don’t see large streaks of flour. A few tiny ones are fine; they’ll disappear during baking. Overmixing leads to a tougher bread, and we want this to be incredibly tender and moist. Swirl Customization: For those beautiful cinnamon swirls, don’t go overboard with the swirling tool. Just a few gentle passes with a knife or skewer is enough to create gorgeous ribbons. If you swirl too much, you’ll end up mixing the cinnamon sugar into the batter, and you won’t get those distinct, delicious pockets. For a more dramatic swirl, you can even sprinkle a little extra cinnamon sugar on top *before* you swirl. Ingredient Swaps: While this recipe is fantastic as written, I’ve had success with a few swaps. If you don’t have cream of tartar, you can often substitute it with 1/2 teaspoon of baking powder plus 1/4 teaspoon of lemon juice or vinegar added to the wet ingredients, though it won’t give quite the same authentic snickerdoodle tang. And as I mentioned, almond milk works beautifully in place of regular milk for a slightly richer, creamier texture. Baking Tips: Always rely on the toothpick test rather than just the baking time. Ovens can be so finicky! Make sure your oven rack is in the center position for even heat distribution. If you notice the top browning too quickly before the inside is cooked, you can loosely tent it with aluminum foil for the remainder of the baking time. Glaze Variations: If you’re not a fan of the powdered sugar glaze, or you want something different, try a simple cinnamon-sugar dusting once the bread is out of the oven and slightly cooled. Or, for an extra treat, make a cream cheese glaze by beating cream cheese with powdered sugar and a splash of milk or vanilla. The possibilities are endless!
Storing and Reheating Tips
One of the best things about this Snickerdoodle Bread is how well it keeps, making it perfect for baking ahead. Room Temperature: Once completely cooled, store your Snickerdoodle Bread wrapped tightly in plastic wrap or in an airtight container. It will stay fresh and delicious at room temperature for about 2-3 days. I often just leave it on the counter, well-wrapped, and it’s perfect for grabbing a slice whenever the craving strikes. Refrigerator Storage: If you need it to last a bit longer, or if your kitchen is particularly warm, you can store it in the refrigerator. Again, wrap it tightly or use an airtight container. It should keep well for about 5-7 days. The texture might become slightly firmer in the fridge, but it’s still wonderfully moist. Freezer Instructions: This bread freezes beautifully! Once it’s completely cool, wrap it very tightly in plastic wrap, then in aluminum foil, or place it in a freezer-safe bag. It can be frozen for up to 2-3 months. To thaw, simply remove it from the freezer and let it come to room temperature on the counter for a few hours. For a wonderful treat, you can even reheat slices in a toaster oven or a regular oven at a low temperature (around 300°F or 150°C) for a few minutes until warmed through. Glaze Timing Advice: I always recommend glazing the bread *after* it has completely cooled if you plan to store it at room temperature or in the refrigerator. If you’re freezing it, I actually prefer to freeze it *without* the glaze and add it once it’s thawed and ready to serve. This prevents the glaze from becoming sticky or clumpy during freezing. If you do glaze before freezing, make sure the glaze is fully set first.
Frequently Asked Questions
Final Thoughts
There you have it – my absolute favorite Snickerdoodle Bread Recipe! It’s truly a recipe that brings joy, whether it’s for a special occasion or just a Tuesday morning. The way the cinnamon-sugar swirls through the tender, moist crumb is just pure magic. It captures all the best parts of a snickerdoodle cookie but in a format that’s even easier to share (or, let’s be honest, to sneak slices from!). I really hope you give this a try and that it becomes a beloved recipe in your home, just like it is in mine. If you loved this Snickerdoodle Bread, I think you might also enjoy my recipe for classic cinnamon swirl muffins or my easy apple bread recipe – they both have that comforting, home-baked feel. I can’t wait to hear how yours turns out! Please leave a comment below with your thoughts or any fun variations you tried. Happy baking!
Snickerdoodle Bread
Ingredients
For the Cinnamon Sugar Topping
- 0.125 cup granulated sugar
- 1 tablespoon ground cinnamon
For the Bread
- 2.5 cups all-purpose flour
- 1 teaspoon baking soda
- 0.5 teaspoon salt
- 1 teaspoon ground cinnamon
- 0.125 cup unsalted butter softened
- 1 cup granulated sugar
- 2 large eggs
- 0.5 cup milk
- 1 teaspoon vanilla extract
Instructions
Preparation Steps
- Preheat your oven to 350°F (175°C). Grease and flour a 9x5 inch loaf pan, or line it with parchment paper.
- In a small bowl, whisk together the ingredients for the cinnamon sugar topping: 0.125 cup granulated sugar and 1 tablespoon ground cinnamon. Set aside.
- In a medium bowl, whisk together the flour, baking soda, salt, and 1 teaspoon ground cinnamon.
- In a large bowl, cream together the softened butter and 1 cup granulated sugar until light and fluffy.
- Beat in the eggs one at a time, then stir in the milk and vanilla extract.
- Gradually add the dry ingredients to the wet ingredients, mixing until just combined. Do not overmix.
- Pour half of the batter into the prepared loaf pan. Sprinkle about half of the cinnamon sugar mixture over the batter.
- Pour the remaining batter over the cinnamon sugar layer. Sprinkle the rest of the cinnamon sugar mixture evenly over the top.
- Bake for 50-60 minutes, or until a wooden skewer inserted into the center comes out clean.
- Let the bread cool in the pan for 10 minutes before transferring it to a wire rack to cool completely.