The moment I taste something that tastes like a parade in a bowl, I’m hooked. I remember making Red White Blue Funfetti Dip with the cousins on a sunlit porch, kids chasing each other with berry-stained smiles while the grill hissed in the background. It’s not just about the flavor—it’s about the memory of sprinkling little confetti stars into creaminess and watching everyone reach for a spoon at the same time. This dish feels like a celebratory breeze you can pull off on a weeknight, because yes, it’s that easy. The first bite is vanilla cream, almost cheesecakey, with a whisper of tang from yogurt and a burst of color that screams summertime. I’ve compared it to a lighter cheesecake dip meets a sweet yogurt swirl, and honestly, it’s the kind of recipe you’ll find yourself making again and again because it travels so well—from kid-friendly after-school treats to an elegant dessert swap on a hot evening. Red White Blue Funfetti Dip isn’t just a dip, it’s a memory in a bowl, and it’s shockingly simple to make.
What is the Red White Blue Funfetti Dip?
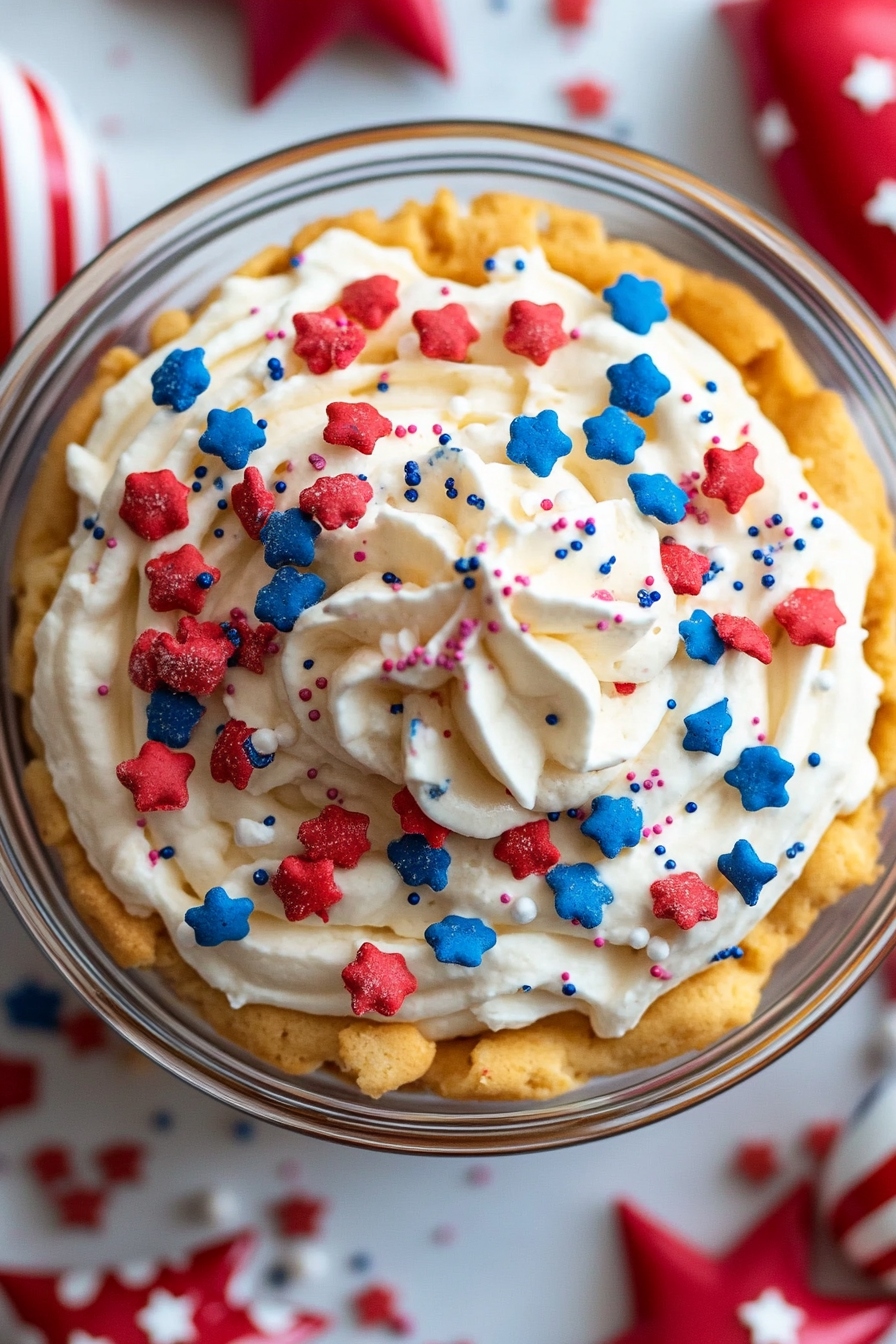
Think of Red White Blue Funfetti Dip as a party-friendly cream-cheese base that’s whipped fluffy and bright with vanilla, then swirled with festive colors. It’s essentially a no-bake dessert dip that you can scoop with berries, cookies, pretzels, or Angel Food Cake. The name comes from the patriotic palette—red, white, and blue sprinkles or candy bits that turn a creamy white base into a tiny celebration. I love how it stays light and indulgent at the same time—the perfect balance for when you want something sweet but don’t want to heavy-lift in the kitchen. It’s basically what you get when you want that “funfetti cake” vibe in dip form, minus the oven countdown. This is the kind of recipe I reach for when guests arrive unexpectedly or when I’m planning a Memorial Day dessert that doesn’t demand a long baking session. It’s simple, festive, and incredibly forgiving, which makes it a staple in my kitchen rotation.
Why you’ll love this recipe?
What I love most about Red White Blue Funfetti Dip is how it feels both nostalgic and modern all at once. It tastes like a celebratory dessert that wears its simplicity proudly. Here are the big reasons this dip wins every time:
- Flavor: It’s bright and creamy with a subtle tang, and the vanilla notes make the sprinkles feel extra playful. The little tang from cream cheese keeps it from tipping too sweet, which I’ve found makes all the difference when you’re serving a crowd.
- Simplicity: This is a “one bowl, then scoop” situation. You’re whisking, folding, and swirling, not babysitting a pan for hours. It’s one of those lifesaver recipes I reach for when I’m short on time but still want something crowd-pleasing.
- Cost-efficiency: What is the best way to measure cost-efficiency?Most of the ingredients live in your pantry or fridge already. A little cream cheese, a splash of vanilla, a handful of sprinkles—very
- Versatility: The dip doubles as a party centerpiece and a dipping station for a dozen dippables—berries, cookies, shortbread, pretzel rods, or pound cake squares. It’s also easy to customize with dairy-free or gluten-free swaps if needed.
If you’ve got a friend who thinks they don’t like desserts that feel fluffy, this dip may change their mind. The texture is lush but not heavy, and the colors bring smiles before people even taste it. I’ve made this with almond milk whipped into the base and it actually made it creamier in a surprising way. It’s the kind of recipe that earns a chorus of “mmms” and a lot of finger-licking. And yes, my kids actually ask for seconds—every single time. Trust me on this one: it’s a little bowl of sunshine you can pull out at the last minute and still look like you planned a full-on dessert spread.
How to Make Red White Blue Funfetti Dip
Quick Overview
If you’re looking for something that tastes like a celebration but comes together in a flash, this Red White Blue Funfetti Dip is your new best friend. You’ll blend a softly sweet base, whip in a cloud of whipped topping, and then fold in color accents to create a marbled, fireworks-ready swirl. It’s a no-bake method, which means you can have this ready in minutes and spend your time garnishing and getting your spreads laid out. The magic here is that you don’t need fancy equipment or rare ingredients—just a few pantry staples and a pinch of festive spirit. The result is a creamy, scoopable dip that stays beautifully light and never overwhelms with sweetness, making it perfect for any casual get-together or a late-night craving.
Ingredients
For the Main Dip:
– 8 oz Cream Cheese, softened to room temperature (Philadephia-style works best for smoothness)
– 1 cup powdered sugar, sifted (adjust to taste)
– 1 cup heavy cream or whipped topping, lightly whipped (or coconut whipped cream for dairy-free)
– 1 teaspoon pure vanilla extract
– Pinch of salt
For the Filling:
– 2–3 tablespoons strawberry or raspberry puree (optional for red) or red gel food coloring, a few drops
– 2–3 tablespoons blue raspberry puree or blue gel food coloring, a few drops
– 1–2 tablespoons white chocolate chips, melted (optional, for a glossy finish)
For the Glaze:
– 1/2 cup white chocolate chips, melted with 1 teaspoon milk (or dairy-free alternative)
– A few drops of blue or red food coloring, as desired
– Sprinkles or edible confetti to finish
Step-by-Step Instructions
Step 1: Preheat & Prep Pan
Set out a wide, shallow serving bowl—something that invites people to dip—and have it ready. If you want a chill, glamorous look, pop the bowl in the fridge for 10 minutes before you start so the dip stays cool when you serve it. Wipe the bowl clean so the colors stay vibrant as you swirl them in. I always do this little prep trick: lay out your toppings in small bowls within arm’s reach, so you don’t have to hunt for sprinkles mid-dip.
Step 2: Mix Dry Ingredients
In a large mixing bowl, whisk the softened cream cheese with the powdered sugar until totally smooth and creamy. A few lumps will melt away as you fold in the whipped topping, but you want a uniformly soft base so the dip isn’t grainy. Add salt for balance. If your cream cheese is extra silky, you’ll notice a velvet texture that makes this feel more luxurious than you’d expect from something so quick.
Step 3: Mix Wet Ingredients
Gently fold in the vanilla and the whipped topping. If you’re using dairy-free whipped cream, stir with a light hand to keep it airy. You’re aiming for a light, fluffy mass that holds its shape but still feels easy to scoop. The key is to avoid overworking—air is your friend here, but over-whipping can make the texture heavy or rubbery. You’ll know you’re at the right spot when it’s pale, pillowy, and holds soft peaks when you lift the spatula.
Step 4: Combine
Now comes the moment to bring all the elements together. Fold a portion of the whipped cream into the cream-cheese base to lighten it, then fold the rest in gently. You’re looking for a uniform, creamy color—no obvious streaks, unless you’re intentionally marbling later. If you want the color to pop right away, add a few drops of red or blue gel coloring at this stage, but go slowly; you can always add more, but you can’t take it out once it’s in there.
Step 5: Prepare Filling
Separate a small portion of the base into two shallow bowls for the color work. If you’re using fruit purée, whisk it into each bowl now—it’ll give you a natural, bright tint. If you’re using food coloring, add tiny amounts, stir, and check the hue. The goal here isn’t to turn the whole dip red or blue; you want bold accents that appear as a marbled swirl when you lift the spoon. A little bit of melted white chocolate in one of the colors helps the tint stay vibrant and glossy as it sits in the bowl.
Step 6: Layer & Swirl
Spoon the base into the serving bowl, then add dollops of the red and blue colors in a few places. With a small knife or toothpick, swirl the colors together gently to create a marbled, fireworks-like pattern. You don’t want a fully blended look; the charm is in the ribbons of color that peek through. This is where you can get playful: go for random spirals, or try a more deliberate concentric swirl if you’re plating for a party table.
Step 7: Bake
I know this sounds odd for a dip, but if you love a slightly warm, set-top, you can give this a quick bake. Preheat your oven to 350°F (175°C) and bake the dip for 4–6 minutes just to soften the texture and set the top a touch. If you’d rather keep it ultra-creamy and cold, skip this bake entirely and move straight to chilling. Either way, the texture is going to feel indulgent and bright. I usually bake only when I’m serving it in a buffet where some guests want a warm bite, but it’s absolutely delicious straight from the fridge as well.
Step 8: Cool & Glaze
Let the dip sit at room temperature for about 10 minutes if you’ve baked it, then drizzle the warm glaze over the top in a loose pattern. If you haven’t baked, glaze the surface of the dip after a quick chill to set the marbling. The glaze adds a glossy finish and a touch of extra sweetness that makes the colors pop. Scatter additional sprinkles on top for a festive, photo-ready finish. The glaze sets quickly, so work steadily and don’t overdo it—this glaze should look like a delicate snowcap, not a solid shell.
Step 9: Slice & Serve
There’s no real slicing with a dip unless you’re serving it in a hollowed-out fruit bowl or a wide, shallow dish with a neat rim. The aim here is to offer a generous array of dippers and let guests help themselves. I like to arrange berries, pretzel sticks, soft cookies, and little shortbread bites around the bowl to create color and contrast. Serve with spoons or tiny tasting forks, and remind guests that this is a “dip first, dessert second” moment—the first bite is creamy, then the little bursts of color follow. If you’re using a chilled dip, a quick 5-minute separation on the counter before serving will let the flavors become more pronounced and balanced.
What to Serve It With
This dip shines as the centerpiece of a casual spread. It doesn’t demand a formal dessert table, but it still feels special. Here are some serving ideas that keep the vibe warm, approachable, and a bit patriotic:
For Breakfast: A cheerful start with a few spoonfuls whisked into a cup of plain yogurt, topped with sliced strawberries, and a light dusting of extra sprinkles. Pair it with a hot cup of coffee or a latte, and you’ve got a bright morning moment that doesn’t feel heavy. I like to present it in a glass jar with a tiny spoon so guests can scoop and mix right at the table.
For Brunch: A colorful dip station that doubles as an eye-catching centerpiece. Set out mini waffles, cut baguette pieces, and an assortment of fruit. A splash of lemon zest on top of the dip before serving can brighten the flavors and bring a hint of citrus to the creaminess. My family loves dipping fresh blueberries and raspberries—the tartness brightens the sweetness just enough.
As Dessert: Carve out a quick, celebratory finish by pairing the dip with a shortbread cookie or angel food cake bites. Consider adding a light mint leaf or a few raspberries to the plate for contrast. If you want a dairy-free finish, serve with sliced pineapple and strawberries as your natural dipper duo. The colors against a white plate feel festive and refined at the same time.
For Cozy Snacks: This is a go-to on a busy weeknight when you want something comforting but fast. A few dippers, a chilled bowl, and a movie night become a celebration of simplicity. My kids reach for it almost every evening when they finish practices, and I’m always happy to provide a little something that tastes like a party without taking hours to prepare.
Top Tips for Perfecting Your Red White Blue Funfetti Dip
Over the years I’ve learned a few tricks that take this dip from good to irresistible. Here are the practical tips I actually rely on in the moment:
Texture and Stabilization: Soften the cream cheese thoroughly. If it’s a touch stiff, the base won’t become as silky as you want. A quick 15-second zap in the microwave (in short bursts) can soften it evenly without heating it too much. This makes folding in the whipped topping a breeze and helps you avoid a lumpy finish.
Color Distribution: To get that pretty marbled effect, don’t fully mix the colors. Spoon dollops of red and blue into the base, and swirl with a knife in loose motions. You want ribbons, not a single color everywhere, so the contrast remains lively when you scoop.
Sweetness Balance: I almost always start with 1 cup powdered sugar and taste. If you’re using a particularly tart yogurt or a tangy fruit puree, you may want to add a touch more sugar or a drizzle of honey to balance. The beauty is you can tweak between serves—the dip forgives a little sun-kissed adjustment.
Flavor Swaps: If you want a lighter version, substitute half of the cream cheese with a Greek yogurt or whipped cottage cheese blend for a tangier finish. For dairy-free, use coconut cream whipped with a dairy-free cream cheese substitute; the texture stays plush if you chill it a bit longer.
Preserving Color: Gel-based colorings tend to vanish when you whisk too aggressively, so add color gradually and fold in gently. If you’re adding fruit purée, add it in after you’ve achieved the base texture so you don’t over-work the dip.
Glaze Play: A glaze is decorative and delicious, but you don’t want a thick layer that hides the dip’s texture. Keep the glaze thin, glossy, and quick to set. A few drops of color in the glaze can tie the top to the bottom and create a cohesive, festive look.
Make-Ahead Mindset: You can mix the base up to a day ahead and chill it, then swirl in colors and finish with glaze right before serving. The longer it sits, the more the flavors mingle, but be mindful of the texture—some dairy items can thicken a touch when refrigerated for too long.
Storing and Reheating Tips
Storing this Red White Blue Funfetti Dip is simple, which is exactly what you need on busy days. Here’s how to keep it tasting just as good as day one:
Room Temperature: Best enjoyed within two hours of serving. If you’re hosting a warm-weather party, keep the dip in a chilled bowl or on ice to maintain its creaminess and prevent the flavors from softening too quickly.
Refrigerator Storage: Transfer leftovers to an airtight container and refrigerate for up to 3 days. The texture may thicken slightly after chilling; give it a quick whisk or a gentle fold before serving again to restore its fluffiness.
Freezer Instructions: I don’t usually freeze this dip because dairy-based dips don’t always reconstitute perfectly. If you must freeze, portion it into small freezer-safe containers and thaw in the fridge overnight, then whisk gently to restore texture. The colors may fade a bit, so you may want to reintroduce a touch of color after thawing, if needed.
Glaze Timing Advice: If you plan to freeze or refrigerate, consider applying the glaze just before serving to keep the surface bright. A glaze that sits for too long can dull, so a quick refresh is worth it.
In my kitchen, I almost always make this a day ahead of gatherings. The flavors deepen slightly overnight, and the marbled look often becomes more distinct once it has had a moment to settle. The most important thing is to keep it well-covered and away from strong-smelling foods so it doesn’t pick up any off-notes in the fridge.
Frequently Asked Questions
Final Thoughts
There’s something so comforting about a dip that looks as joyful as it tastes. Red White Blue Funfetti Dip is the kind of recipe that makes hosting feel effortless, because you’re delivering happiness with very little effort. It’s a bridge between a nostalgic childhood treat and a modern party dessert—easy for kids to help with, simple enough for a last-minute gathering, and pretty enough to photograph for an social feeds full of weekend plans. If you’re cooking for a crowd that includes both kids and adults, this dip hits a sweet spot for everyone. Try swapping in flavors you love—strawberry for red, blueberry for blue, and a vanilla base for white—and you’ll discover a whole family of variations that taste like your own little holiday. I’d love to hear your twists and see your marbled patterns, so drop a photo or a quick note in the comments after you try it. Happy baking, happy dipping, and may your 4th of July or summer party be bright, creamy, and full of laughter. Can’t wait to hear how yours turns out!

