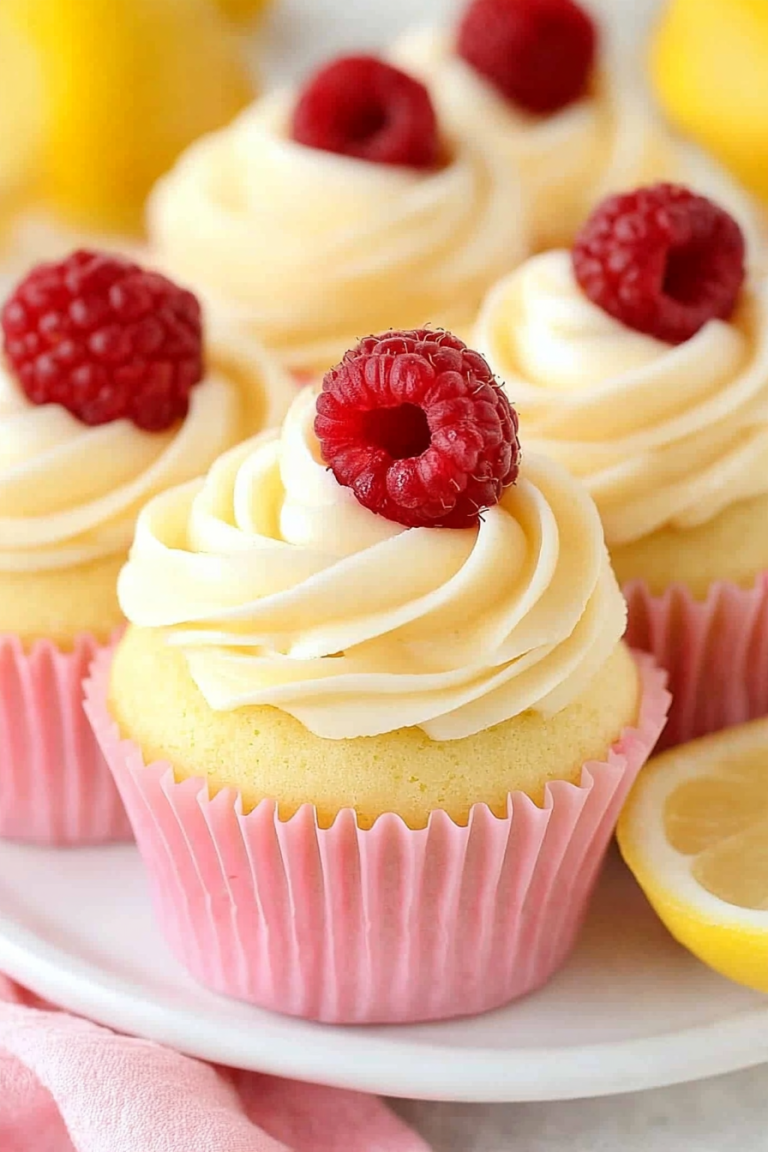
There are some recipes that just feel like a warm hug, aren’t there? This one, for red velvet cheesecake cupcakes, is absolutely one of those for me. Honestly, whenever I’m craving something decadent but don’t have hours to spare for a full-blown cake, these little beauties are my secret weapon. They have this magical ability to satisfy that sweet tooth with the perfect blend of tangy Cream Cheese and rich, velvety chocolate, all wrapped up in a bite-sized package. I remember the first time I made these; it was for a friend’s last-minute birthday gathering, and I was convinced I’d bitten off more than I could chew. But to my surprise, they came together so beautifully, and everyone raved! Now, they’re a staple in my baking rotation, especially when I need a little pick-me-up or want to impress guests without breaking a sweat. If you’ve ever loved a classic red velvet cake or swooned over a creamy cheesecake, then prepare yourself, because these red velvet cheesecake cupcakes are about to become your new obsession too.
What Are Red Velvet Cheesecake Cupcakes?
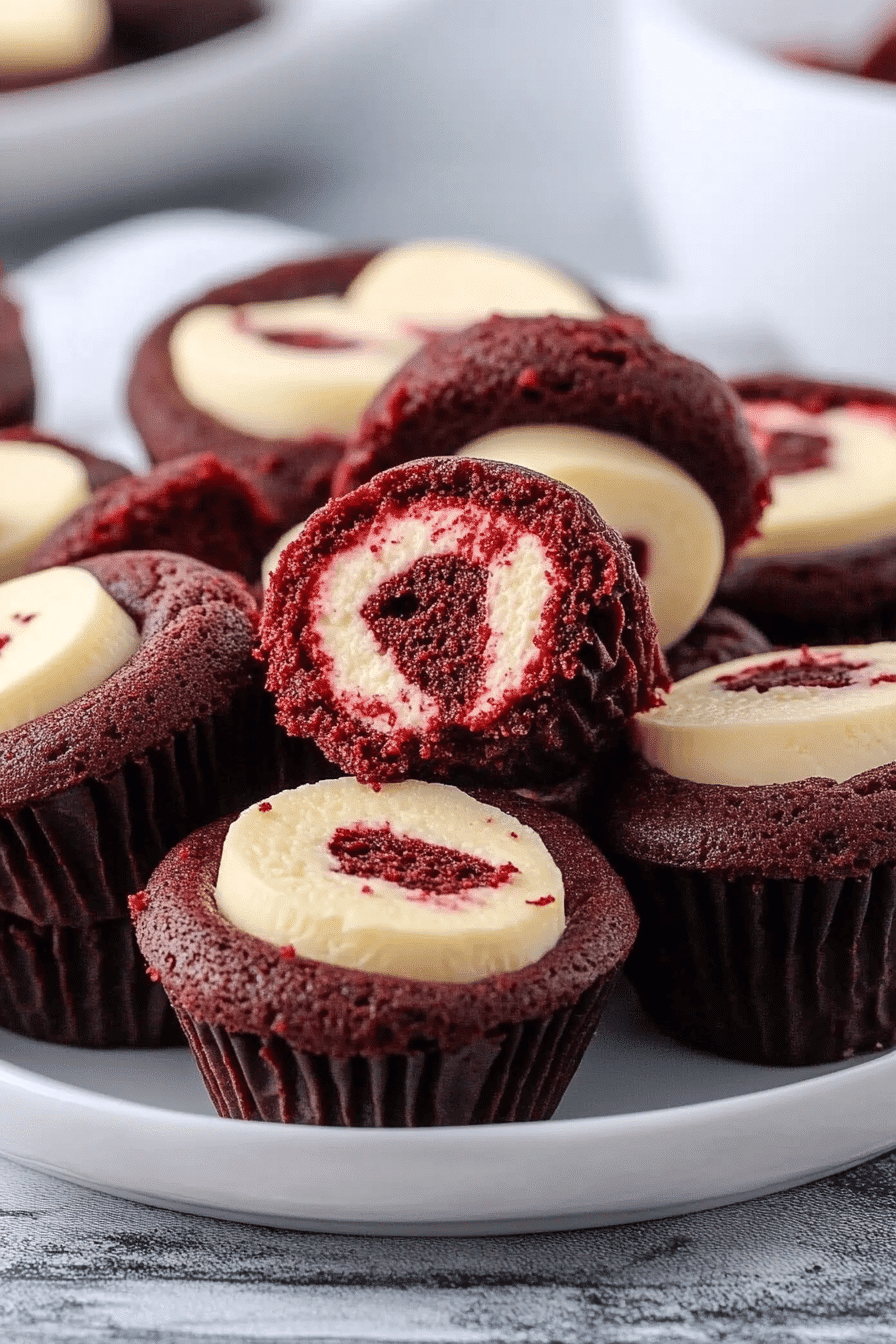
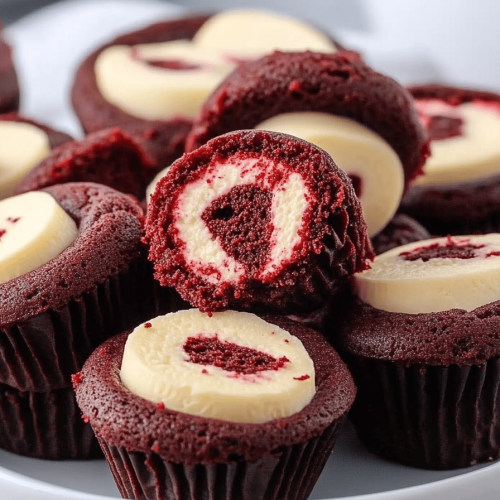
So, what exactly *are* Red Velvet cheesecake cupcakes? Think of them as the best of both worlds, miniaturized. You’ve got the iconic, slightly tangy, vibrantly red cake batter of a classic red velvet cake, but instead of a plain cupcake, we’re infusing each one with a luscious, creamy cheesecake center. It’s like a surprise in every bite! The “red velvet” part comes from the cocoa powder and a touch of red food coloring that gives it that signature hue, plus a hint of vinegar and buttermilk that react with the baking soda for an incredibly tender crumb. The cheesecake swirl or filling is pure bliss – smooth, rich, and just the right amount of sweet. It’s not quite a cupcake, and it’s not quite a cheesecake, but it’s a glorious hybrid that brings together the best qualities of both. They’re essentially individual servings of pure joy, making them perfect for sharing (or not!).
Why you’ll love this recipe?
Honestly, there are so many reasons why I keep coming back to these red velvet cheesecake cupcakes, and I just know you’re going to fall in love with them too. First off, the flavor is just out of this world. You get that familiar, slightly chocolatey, slightly tangy red velvet cake, and then BAM! You hit that pocket of creamy, dreamy cheesecake. It’s a flavor combination that’s sophisticated enough for a fancy dessert but comforting enough for a Tuesday night treat. And let’s talk about simplicity. While they sound impressive, these cupcakes are surprisingly straightforward to make. You whip up a quick cake batter, make a simple cheesecake filling, and then combine them. It feels fancy, but it’s totally achievable for any home baker, even if you’re just starting out. Plus, they’re incredibly cost-effective. You likely have most of the ingredients already in your pantry, and they don’t require any fussy or expensive specialty items. What really seals the deal for me is their versatility. They’re perfect for parties, bake sales, potlucks, or just when you need a sweet treat to brighten your day. They look stunning with minimal effort, and they’re so easy to transport. Unlike a whole cake that can be tricky to slice and serve, these are perfectly portioned. I’ve even made them ahead of time for busy weeks, and they hold up beautifully. What I love most about this recipe, though, is the sheer delight on people’s faces when they take that first bite. It’s that combination of familiar comfort and delightful surprise that makes these red velvet cheesecake cupcakes truly special.
How to Make Red Velvet Cheesecake Cupcakes
Quick Overview
This recipe breaks down into three main components: a vibrant red velvet cake batter, a smooth and creamy cheesecake filling, and then bringing them all together in cupcake liners. We’ll start by prepping our pans and mixing the dry and wet ingredients for the cake separately before combining them. While the cake batter is being made, we’ll whip up a quick cheesecake mixture. The magic happens when we layer these two elements in the cupcake liners and bake them until perfectly tender and set. Finally, a simple glaze finishes them off. It’s a process that might sound like a few steps, but each one is simple, and the result is absolutely worth it, giving you those gorgeous red velvet cheesecake cupcakes without all the fuss of a full-sized dessert.
Ingredients
For the Main Batter:
You’ll need all-purpose flour, granulated sugar, unsweetened cocoa powder (Dutch-processed gives a deeper flavor, but natural works too!), baking soda, salt, eggs, buttermilk (this is key for tenderness and that slight tang!), vegetable oil (or a neutral oil like canola), pure vanilla extract, and of course, the star: red food coloring. You can use gel or liquid, but gel gives a more intense color with less volume, which is nice. I always make sure my buttermilk and eggs are at room temperature; it really helps everything emulsify beautifully and gives a smoother batter.
For the Filling:
This is where the cheesecake magic happens! You’ll need softened cream cheese (full-fat for the best texture, trust me!), granulated sugar, an egg (again, room temperature is best), and a splash of vanilla extract. Sometimes, I like to add a tiny pinch of lemon zest here for an extra layer of brightness, but it’s totally optional. Make sure your cream cheese is truly softened – if it’s too cold, you’ll end up with lumps, and nobody wants that in their creamy cheesecake swirl!
For the Glaze:
This is a super simple, pourable glaze that adds a touch of sweetness and shine. You’ll need powdered sugar (also called confectioners’ sugar), a little milk or cream (or even buttermilk from the cake batter!), and a touch of vanilla extract. You can adjust the consistency by adding more powdered sugar if it’s too thin, or a tiny bit more liquid if it’s too thick. Some days I even add a drop of red food coloring to the glaze to make it extra festive!
Step-by-Step Instructions
Step 1: Preheat & Prep Pan
First things first, let’s get our oven preheating to 350°F (175°C). This ensures it’s nice and hot and ready to go when your batter is. Now, grab a standard 12-cup muffin tin and line each cup with paper liners. I like to use nice, sturdy liners because they make cleanup a breeze and look pretty too. If you don’t have liners, you can grease and flour each cup really well, but liners are definitely the way to go for these red velvet cheesecake cupcakes.
Step 2: Mix Dry Ingredients
In a medium-sized bowl, whisk together your all-purpose flour, granulated sugar, unsweetened cocoa powder, baking soda, and salt. Whisking is important here to get rid of any lumps and to ensure all those leavening agents are evenly distributed. You want everything to be well combined so your cupcakes rise evenly and have a consistent texture. Give it a good whisk for about 30 seconds until it all looks like one uniform blend. This is a simple step, but it’s crucial for a great bake!
Step 3: Mix Wet Ingredients
In a separate, larger bowl, whisk together your eggs, buttermilk, vegetable oil, vanilla extract, and red food coloring. Whisk until everything is thoroughly combined and you have that beautiful, rich red color. This is where you really get to see the “red velvet” coming to life! Make sure the oil and buttermilk are well incorporated; you don’t want any streaks of oil floating on top. A good whisking here will make sure your batter is smooth and emulsified.
Step 4: Combine
Now, it’s time to bring the wet and dry ingredients together. Pour the wet ingredients into the bowl with the dry ingredients. Using a spatula or a wooden spoon, mix gently until *just* combined. It’s really important not to overmix here. A few small lumps are perfectly fine. Overmixing can develop the gluten in the flour too much, which will result in tough, dense cupcakes. So, mix until you no longer see streaks of dry flour, then stop. That’s it!
Step 5: Prepare Filling
In a separate bowl, beat the softened cream cheese with an electric mixer until it’s smooth and creamy. Add the granulated sugar, egg, and vanilla extract. Beat again until everything is well combined and you have a smooth, luscious cheesecake mixture. Again, make sure your cream cheese is soft enough to avoid any lumps. If you find any small lumps, just keep beating until they disappear. This filling should be rich and decadent, ready to swirl into our red velvet batter.
Step 6: Layer & Swirl
This is the fun part! Spoon about a tablespoon of the red velvet batter into each cupcake liner. Then, add a dollop (about a tablespoon) of the cheesecake filling on top of the batter. You can use a toothpick or a small knife to gently swirl the cheesecake mixture into the red velvet batter. Don’t over-swirl; you want to see distinct ribbons of red velvet and creamy cheesecake, not have them completely blended. It creates that beautiful marbled effect that makes these cupcakes so special.
Step 7: Bake
Pop the muffin tin into your preheated oven. Bake for about 18-22 minutes, or until a wooden skewer or toothpick inserted into the cake part (avoiding the cheesecake center) comes out clean. The cheesecake filling should be set and slightly puffed. Keep an eye on them towards the end; ovens can vary! If the tops start browning too quickly, you can loosely tent them with foil.
Step 8: Cool & Glaze
Once baked, let the cupcakes cool in the muffin tin for about 5-10 minutes. This allows them to firm up a bit before you remove them. Then, carefully transfer them to a wire rack to cool completely. This is crucial! If you try to glaze them while they’re warm, the glaze will just melt off. Once they’re totally cool, whisk together your powdered sugar, a little milk, and vanilla for the glaze. Drizzle it over the cooled cupcakes. You can make the glaze thicker for a more defined drizzle or thinner for a delicate sheen.
Step 9: Slice & Serve
These red velvet cheesecake cupcakes are best served at room temperature, so they’re perfectly tender and the cheesecake filling is creamy. You can slice them in half to reveal the beautiful swirl inside, or just enjoy them whole. They’re perfect on their own, but a little extra drizzle of the glaze or a dusting of cocoa powder can make them even more impressive. The beauty of cupcakes is their portability and individual serving size, making them ideal for any gathering or just a personal treat!
What to Serve It With
These red velvet cheesecake cupcakes are wonderfully versatile and can be enjoyed in so many different ways, depending on the occasion! For Breakfast (yes, I said breakfast!), they can be a delightful sweet treat paired with a strong cup of coffee or a glass of fresh orange juice. I like to serve them slightly warmed with a tiny bit of cream cheese frosting on top if I’m feeling extra indulgent. For Brunch, they really shine. Imagine them on a beautifully styled buffet table alongside fresh fruit salad, quiches, and mimosas. The vibrant red color really adds a festive touch, and their elegant presentation makes them feel extra special. As Dessert, they’re a clear winner. They’re fantastic served after a rich meal, perhaps with a scoop of vanilla bean ice cream or a dollop of whipped cream. For a truly decadent experience, I sometimes pair them with a raspberry coulis for a beautiful color contrast and a tart counterpoint to the sweetness. And, of course, For Cozy Snacks, they are simply perfect. Curl up on the couch with a mug of hot chocolate or a glass of cold milk and enjoy the comforting flavors. My kids absolutely love them as an after-school treat, and honestly, so do I! They’re a reliable way to bring a smile to everyone’s face, any time of day.
Top Tips for Perfecting Your Red Velvet Cheesecake Cupcakes
I’ve made these red velvet cheesecake cupcakes more times than I can count, and over the years, I’ve picked up a few tricks that really help ensure they turn out perfectly every single time. When it comes to the red velvet batter, the key is not to overmix. Once the wet and dry ingredients are just combined, stop! Overmixing will lead to tough cupcakes, and we want ours to be tender and melt-in-your-mouth. For the cheesecake filling, make sure your cream cheese is completely softened to room temperature. This is non-negotiable if you want a smooth, lump-free filling. I usually take mine out of the fridge an hour or two before I start baking. For the swirl, don’t overdo it. You want distinct layers of red velvet and cheesecake, not a muddy mess. A few gentle swirls with a toothpick or skewer are all you need to create that beautiful marbled effect. When it comes to baking, trust your oven but also trust the toothpick test. Ovens vary, so while the recipe suggests 18-22 minutes, always check for doneness. A toothpick inserted into the cake part should come out clean. I’ve learned that sometimes one side of my oven bakes faster, so I’ll often rotate the pan halfway through baking if I notice it’s uneven. For ingredient swaps, if you’re out of buttermilk, you can make your own by adding 1 tablespoon of white vinegar or lemon juice to 1 cup of milk and letting it sit for 5 minutes. It works like a charm! And for the glaze, consistency is key. If it’s too thin, gradually whisk in more powdered sugar, a tablespoon at a time, until you reach your desired drizzling consistency. If it’s too thick, add a tiny bit of milk or cream, a teaspoon at a time, until it thins out. Experimenting with the glaze is also fun; a little bit of cocoa powder can make it chocolatey, or a drop of vanilla bean paste adds lovely specks!
Storing and Reheating Tips
Keeping these red velvet cheesecake cupcakes delicious for days is totally doable with a few simple storage strategies. For room temperature storage, make sure they are fully cooled before covering. You can store them in an airtight container for up to 2 days. The cheesecake filling can start to soften if it’s too warm, so if your kitchen is hot, it’s better to err on the side of refrigeration. If you decide to add the glaze, it’s best to do it just before serving when storing at room temperature, as the glaze can sometimes become sticky in humid conditions. For refrigerator storage, this is my preferred method for longer freshness. Once completely cooled, place them in an airtight container in the fridge. They’ll stay wonderfully fresh and delicious for up to 4-5 days. The cheesecake filling firms up nicely in the fridge, making them a great grab-and-go treat. When you’re ready to enjoy them, I find they are best served chilled or allowed to sit at room temperature for about 15-20 minutes to take the chill off. If you’re planning to freeze these beauties, it’s best to do it before glazing. Wrap each cooled cupcake tightly in plastic wrap, then place them in a freezer-safe container or bag. They can be frozen for up to 2-3 months. To thaw, transfer them from the freezer to the refrigerator overnight. Once thawed and at room temp, you can add your glaze. This is a lifesaver for having a special treat on hand whenever the craving strikes!
Frequently Asked Questions
Final Thoughts
There you have it – my beloved red velvet cheesecake cupcakes! I really hope you give these a try. They’re more than just a recipe; they’re a little slice of happiness that’s surprisingly easy to whip up. The combination of that moist, vibrant red velvet cake with the tangy, creamy cheesecake center is just pure magic, and they always disappear so fast at my house. They’re perfect for any occasion, from a casual coffee break to a more festive gathering, and they consistently impress without demanding hours in the kitchen. If you loved these, you might also enjoy my classic red velvet cake recipe or my no-bake cheesecake bars for more of that delightful creaminess. I can’t wait to hear how your red velvet cheesecake cupcakes turn out! Please feel free to share your experiences, any variations you try, or even just a picture in the comments below. Happy baking, and enjoy every delicious bite!
Red Velvet Cheesecake Cupcakes
Ingredients
Red Velvet Cupcake Base
- 2.5 cups all purpose flour
- 1.5 cups sugar
- 2 teaspoons unsweetened cocoa powder
- 1 teaspoon salt
- 1 teaspoon baking soda
- 2 large eggs
- 1 cup vegetable oil
- 1 cup buttermilk (or 1 teaspoon vinegar with enough milk to make 1 cup)
- 1 teaspoon white vinegar
- 1 tablespoon vanilla extract
- 1 tablespoon red food coloring
Cheesecake Filling
- 8 ounces cream cheese room temperature
- 0.33 cup sugar
- 0.25 cup sour cream
- 1 teaspoon vanilla extract
Cream Cheese Frosting
- 8 ounces cream cheese softened
- 0.5 cup unsalted butter softened
- 4 cups powdered sugar
- 0.5 teaspoon salt or to taste
- 1 tablespoon vanilla extract
Instructions
Preparation Steps
- Preheat oven to 350°F (175°C). Line muffin tins with cupcake liners.
- In a large bowl, whisk together flour, sugar, cocoa powder, salt, and baking soda. In a separate bowl or large measuring cup, whisk together eggs, oil, buttermilk, white vinegar, and vanilla extract until combined. Add the wet ingredients to the dry ingredients and mix with a hand mixer until smooth. Slowly mix in the red food coloring until evenly distributed.
- Fill each cupcake liner about 1/2 full with the red velvet batter.
- Prepare the cheesecake filling: In a medium bowl, beat the cream cheese, sugar, sour cream, and vanilla extract with a hand mixer until smooth. Drop about 1 to 1.5 tablespoons of the cheesecake mixture on top of the batter in each cupcake liner. Gently smooth it with the back of a spoon, trying to keep it from touching the edges of the liners.
- Bake for 15-18 minutes, or until a toothpick inserted into the cake portion comes out clean. The cheesecake filling may still be slightly jiggly. Let the cupcakes cool in the muffin tin for a few minutes before transferring them to a wire rack to cool completely to room temperature. Chill the cooled cupcakes for at least 2 hours before frosting.
- Make the cream cheese frosting: In a large bowl, beat the softened cream cheese and butter with a hand or stand mixer until fluffy. Gradually add the powdered sugar, salt, and vanilla extract, mixing until smooth and well combined.
- Frost the tops of the chilled cupcakes with the cream cheese frosting. For a decorative touch, use a piping bag and tip. Store the frosted cupcakes in the refrigerator for up to 3 days.