You know those days? The ones where a little bit of everything sounds good, but you can’t quite pinpoint it? Maybe it’s the deep, satisfying richness of a fudgy brownie, or the creamy, dreamy hug of peanut butter. Perhaps it’s that slight chocolatey tang that just hits the spot. Well, let me tell you, I’ve found the answer to all those cravings, and it’s this peanut butter cup Brownie Trifle. Honestly, this dessert is like a party in a dish. It’s the kind of thing that makes my kitchen smell absolutely divine and brings smiles all around. If you’ve ever loved a good trifle, or a killer brownie, or basically anything involving peanut butter and chocolate (who doesn’t?!), then you are in for a treat. This isn’t just a dessert; it’s an experience. I’ve made this for countless potlucks and family gatherings, and it always disappears in record time. It’s become my go-to when I want to impress without spending hours slaving away, and that’s a pretty sweet deal, right?
What is a peanut butter cup brownie trifle?
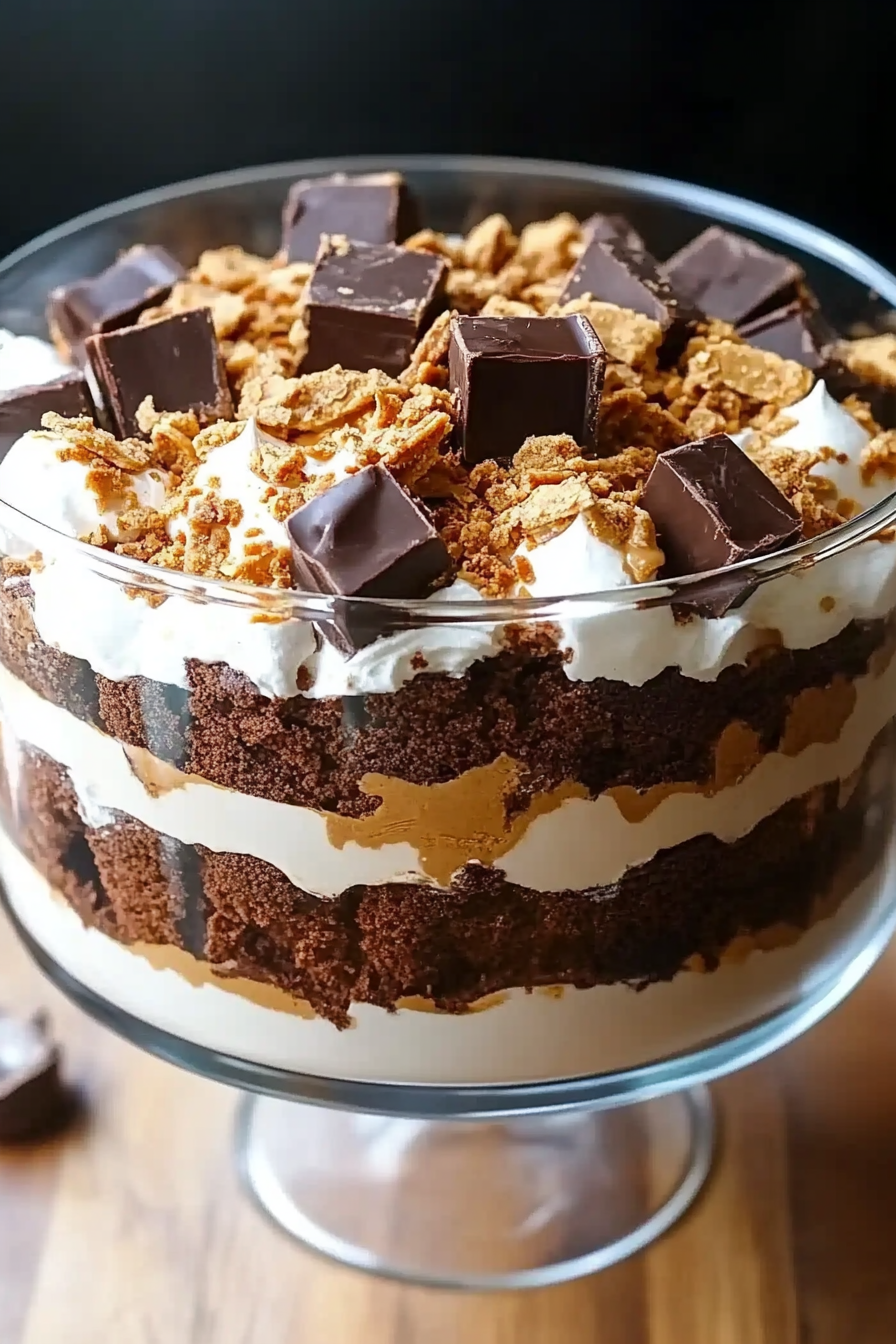
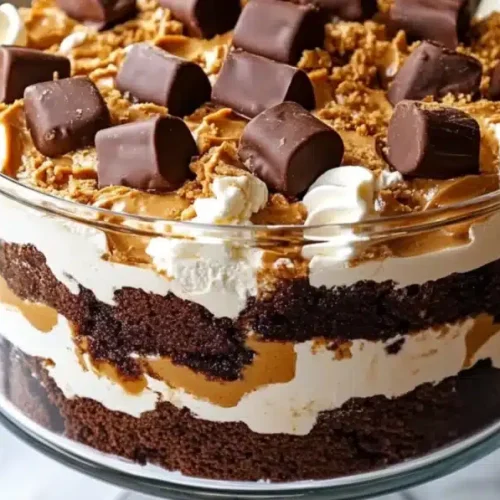
So, what exactly *is* a Peanut Butter Cup Brownie Trifle? Think of it as the most delicious architectural feat you’ll ever eat. It’s not just brownies *and* peanut butter; it’s layers upon layers of pure joy, all stacked up pretty in a clear dish so you can see the magic happening. At its core, it’s a dessert that combines my absolute favorite things: rich, fudgy brownies, a creamy, dreamy peanut butter mousse or pudding, and often some whipped cream or a light, fluffy topping. Sometimes I’ll throw in some chocolate shavings or even chopped Peanut Butter Cups for an extra crunch. It’s essentially a deconstructed, super-charged version of your favorite chocolate and peanut butter desserts, all brought together in a beautiful, edible tower. It’s less about strict rules and more about creating a symphony of textures and flavors that just work together in perfect harmony. It’s the kind of dessert that looks fancy but is surprisingly simple to put together, which is my favorite kind of fancy!
Why you’ll love this recipe?
Why do I love this Peanut Butter Cup Brownie Trifle?
First off, the flavor is just out of this world. It’s that classic, irresistible combination of deep, dark chocolate from the brownies and the smooth, slightly salty sweetness of Peanut Butter. Each spoonful is a perfect bite, with different textures mingling – the soft brownie, the airy mousse, the creamy whipped topping. It’s rich, it’s decadent, but it’s also surprisingly balanced. It doesn’t feel overwhelmingly heavy, which is a common pitfall with chocolate-peanut butter combos, in my opinion.
What is the second part of the puzzle?simplicity. I know, I know, it looks impressive, right? But trust me, the actual putting-it-together part is a breeze. You can even use store-bought brownies (shh, I won’t tell!) if you’re really short on time, though I do love making my own from scratch for that extra special touch. The Peanut Butter filling is usually a no-bake situation, and the assembly is just… layering. It’s almost therapeutic! This one’s a lifesaver on busy nights when the dessert craving hits hard and I don’t have hours to bake.
And let’s talk about cost-efficiency. Most of the ingredients are pantry staples! Flour, sugar, cocoa, eggs, peanut butter, cream cheese, and heavy cream. Nothing wildly expensive or hard to find. You can whip this up without breaking the bank, making it perfect for a weeknight treat or a last-minute get-together.
The versatility is another huge win. You can customize this trifle to your heart’s content. Don’t have peanut butter cups? Use chopped Reese’s Pieces. Want a lighter version? Use a Greek yogurt-based filling instead of cream cheese. Prefer more crunch? Add some crushed Oreos between the layers. You can even adjust the sweetness by tweaking the amount of sugar in the mousse. It’s the kind of recipe that grows with you and adapts to whatever you have on hand or whatever mood you’re in. It’s also fantastic for using up leftover brownies from another baking project. I love that flexibility. What I love most about this is that it’s universally loved. I’ve served it to picky eaters, seasoned dessert connoisseurs, and everyone in between, and it never fails to be a hit. It’s become a staple for a reason, and I think it’ll become one for you too!
How to Make Peanut Butter Cup Brownie Trifle
Quick Overview
This Peanut Butter Cup Brownie Trifle is all about layering delicious components. We’ll start by making or prepping some rich, fudgy brownies. Then, we’ll whip up a dreamy, no-bake peanut butter filling that’s both light and intensely flavorful. The final step is simple assembly: layering chunks of brownie, spoonfuls of the peanut butter filling, and a cloud of whipped cream in a clear trifle dish. It’s a no-fuss, high-reward dessert that looks stunning and tastes even better. The beauty is in its simplicity; each layer contributes its own unique texture and flavor, creating a truly magnificent bite.
Ingredients
For the Brownies:
This is where you can really make it your own. I usually go for a classic fudgy brownie recipe. You’ll need good quality unsalted butter, granulated sugar, eggs, vanilla extract, all-purpose flour, unsweetened cocoa powder, a pinch of salt, and maybe a bit of baking powder for a slight lift. If you’re short on time, a good store-bought brownie mix will work wonders! Just make sure they bake up nice and fudgy, not cakey. I always bake mine a few minutes less than the package says to ensure that gooey center.
For the Peanut Butter Filling:
This is the heart of the trifle’s creamy goodness! You’ll need softened cream cheese (full-fat for the best texture, trust me on this one!), creamy peanut butter (Jif or Skippy are my go-to for that classic flavor, but use your favorite!), powdered sugar for sweetness and smoothness, and a splash of milk or heavy cream to get it to the perfect consistency. Some people like to add a touch of vanilla extract here, which is always a good idea in my book.
For the Whipped Cream Topping:
We need something light and airy to balance out the richness. Heavy whipping cream is essential here. A little bit of granulated sugar or powdered sugar to sweeten it, and a touch of vanilla extract for that extra hint of flavor. You can also add a tablespoon or two of instant vanilla pudding mix to stabilize it and give it a slight vanilla pudding flavor, which is my little secret!
Optional Add-ins:
Chopped peanut butter cups, chocolate shavings, mini chocolate chips, or even a drizzle of chocolate ganache for extra indulgence.
Step-by-Step Instructions
Step 1: Preheat & Prep Pan
First things first, preheat your oven to the temperature specified in your brownie recipe (usually around 350°F or 175°C). Grease and flour an 8×8 or 9×13 inch baking pan, or line it with parchment paper. Parchment paper makes lifting the brownies out so much easier for cubing later!
Step 2: Mix Dry Ingredients
In a medium bowl, whisk together your flour, cocoa powder, salt, and baking powder (if using). This ensures everything is evenly distributed and helps prevent any lumps in your final brownies. I always like to sift my cocoa powder if it seems lumpy.
Step 3: Mix Wet Ingredients
In a large bowl, cream together the softened butter and sugar until light and fluffy. Beat in the eggs one at a time, then stir in the vanilla extract. This creaming process is what gives brownies their structure and fudgy texture.
Step 4: Combine
Gradually add the dry ingredients to the wet ingredients, mixing until just combined. Be careful not to overmix; overmixing can lead to tough brownies. Fold in any optional add-ins like chocolate chips or chopped nuts at this stage.
Step 5: Prepare Filling
While the brownies are baking or cooling, let’s make the peanut butter filling. In a large bowl, beat the softened cream cheese until it’s smooth and lump-free. Add the creamy peanut butter and beat until well combined. Gradually beat in the powdered sugar until the mixture is smooth and creamy. Add a tablespoon or two of milk or cream if it’s too thick; you want a consistency that’s spreadable but not runny. Stir in the vanilla extract.
Step 6: Layer & Swirl
Once your brownies have cooled slightly, cut them into bite-sized cubes. In your clear trifle dish (a large glass bowl works perfectly!), start by layering a generous amount of brownie cubes at the bottom. Spoon a layer of the peanut butter filling over the brownies, then spread a layer of whipped cream. Repeat these layers until you’ve used up all your ingredients, ending with a beautiful swirl of whipped cream on top. I like to reserve some chopped peanut butter cups or chocolate shavings for the very top for garnish.
Step 7: Bake
Bake your brownies according to your recipe’s instructions. For fudgy brownies, a toothpick inserted into the center should come out with moist crumbs, not wet batter. Be careful not to overbake!
Step 8: Cool & Glaze
Let the brownies cool completely on a wire rack. This is crucial! Hot brownies will melt the filling and make a mess. Once cooled, you can assemble the trifle. You don’t really “glaze” this in the traditional sense, but if you want a chocolate drizzle, you can melt some chocolate chips with a bit of butter or oil and drizzle it over the top layer of whipped cream.
Step 9: Slice & Serve
Cover the trifle and chill it in the refrigerator for at least 2-3 hours, or preferably overnight. This allows the flavors to meld and the layers to set. Serve chilled, scooping down to get all the delicious layers in each serving!
What to Serve It With
This Peanut Butter Cup Brownie Trifle is a showstopper all on its own, but it can also be the star of a larger culinary spread.
For Breakfast: Okay, I know this sounds crazy, but hear me out! A tiny, individual portion of this trifle alongside a strong cup of coffee can feel like the most indulgent weekend breakfast. It’s like a dessert for breakfast, which is always a win in my book. You could also serve it as a sweet finish to a savory breakfast casserole.
For Brunch: This trifle is absolutely *perfect* for a brunch spread. Imagine it sitting pretty on the dessert table next to some fruit salad, quiches, and maybe some fluffy pancakes. The visual appeal alone is enough to make guests swoon. Serve it in smaller, individual parfait glasses for an extra elegant touch. Pair it with mimosas or a fancy coffee drink.
As Dessert: This is its natural habitat, of course! It’s fantastic for potlucks, dinner parties, or holidays. Serve it after a hearty meal like a roast chicken or a lasagna. The richness of the trifle is a welcome contrast to savory dishes. I like to serve it with a side of fresh berries if I want to add a touch of tartness to cut through the sweetness.
For Cozy Snacks: On a rainy afternoon or a chilly evening, there’s nothing better than a scoop of this trifle. It’s the ultimate comfort food. I love to enjoy it while curled up on the couch with a good book or watching a movie. It pairs wonderfully with a glass of milk (for the kids and the kid-at-heart!) or even a rich stout or porter beer for the adults.
My family tradition is to always have this ready for the first football game of the season, or whenever someone has a big exam coming up. It’s our little way of celebrating or providing comfort, and it never fails to hit the spot. I’ve also found that a small bowl of this is surprisingly satisfying when that late-night sweet craving hits, and you don’t want to bake a whole cake. It’s always a winner, no matter the occasion!
Top Tips for Perfecting Your Peanut Butter Cup Brownie Trifle
I’ve made this Peanut Butter Cup Brownie Trifle more times than I can count, and over the years, I’ve picked up a few tricks that I think really elevate it. These are the things that make the difference between a good trifle and an absolutely spectacular one.
Brownie Prep: For the best trifle texture, you want your brownies to be fudgy, not cakey. Don’t overbake them! I mean it. Pull them out when a toothpick still has a few moist crumbs attached. Also, letting them cool *completely* before cubing is a game-changer. It prevents them from falling apart into a mushy mess when you layer them. Sometimes I even bake them a day ahead and chill them in the fridge; they cube up beautifully when cold.
Mixing Advice: When you’re making the peanut butter filling, make sure your cream cheese is *truly* softened. This means leaving it out on the counter for at least an hour, or even two if your kitchen is cool. Cold cream cheese will result in a lumpy filling, and nobody wants that. Beat it until it’s completely smooth before adding anything else. Similarly, don’t overbeat the whipped cream. Stop as soon as it forms soft peaks; overbeaten whipped cream can turn grainy.
Layering Technique: Don’t be afraid to be generous with your layers! I like to make sure there’s a good amount of brownie in the bottom, followed by a substantial layer of the peanut butter filling and then a fluffy pillow of whipped cream. Visual appeal is part of the fun, so try to keep your layers relatively neat as you go, especially on the sides. If you’re using a clear glass bowl, you can see how beautiful it looks!
Ingredient Swaps: If you can’t find peanut butter cups, you can easily chop up Reese’s Pieces or even just use extra chocolate chips. For a slightly different flavor profile, try using a chunky peanut butter for added texture in the filling, or even a natural peanut butter if you prefer less sugar. If you’re a dark chocolate fan, use a darker cocoa powder in your brownies. I’ve even tested this with a bit of melted dark chocolate folded into the whipped cream for an extra chocolatey kick, and it was amazing!
Baking Tips: Always keep an eye on your brownies while they bake. Ovens can vary wildly, so use the baking time as a guideline rather than a strict rule. If your brownies are browning too quickly on top, you can loosely tent them with aluminum foil. For the trifle itself, chilling is key. It’s not just about setting the layers; it’s about allowing the flavors to meld together. The longer it chills (within reason!), the better it tastes. I usually aim for at least 4 hours, but overnight is even better!
Glaze Variations: While I often just top with whipped cream and maybe some chocolate shavings, you can get creative. A drizzle of chocolate ganache is always a decadent addition. You could also make a light peanut butter glaze (powdered sugar, peanut butter, and a splash of milk) to drizzle over the top. If you’re feeling extra fancy, a few swirls of chocolate fudge sauce can be a delightful addition between layers.
I learned the importance of cooling the brownies after a messy attempt early on! And the softened cream cheese tip? That came after a particularly lumpy batch that was still delicious but definitely not as pretty. Trust me on these little things; they make a big difference!
Storing and Reheating Tips
This Peanut Butter Cup Brownie Trifle is absolutely best when it’s chilled and the flavors have had a chance to mingle. So, proper storage is super important to keep it tasting amazing.
Room Temperature: Honestly, I wouldn’t recommend leaving this out for more than an hour or two, especially if your kitchen is warm. The dairy in the filling and whipped cream can spoil. If you’re serving it at a party, just bring it out shortly before you plan to serve it and pop any leftovers back in the fridge as soon as possible.
Refrigerator Storage: This is your best bet. Once assembled, cover the trifle dish tightly with plastic wrap. Make sure the plastic wrap isn’t touching the whipped cream directly if possible, or it can sometimes stick. It will keep well in the refrigerator for about 3-4 days. The texture might change slightly over those days – the brownies might get a little softer, but in my opinion, that just makes it even more decadent and trifle-like!
Freezer Instructions: While I don’t typically freeze trifles because of the whipped cream, you *can* freeze the brownie layer separately if you want to prep ahead. Cube your cooled brownies and store them in an airtight container or freezer bag for up to 2-3 months. Thaw them in the refrigerator overnight before assembling the trifle. Assembling right before serving is best for the creamy elements.
Glaze Timing Advice: If you’re planning to drizzle chocolate ganache or another glaze on top, it’s usually best to do this just before serving. If you add it too far in advance, it might start to get a little hard or even crack when you serve. If you’re refrigerating for a day or two, add your final decorative touches right before you bring it to the table.
I’ve found that the quality stays pretty good for about three days. After that, the brownies can get a bit too soft for my liking. But honestly, it rarely lasts that long in my house!
Frequently Asked Questions
Final Thoughts
So there you have it, my friends! My absolute favorite Peanut Butter Cup Brownie Trifle. It’s a dessert that truly brings people together, a little bit of indulgence that’s surprisingly approachable to make. I hope you’ve enjoyed this journey into layers of chocolatey, peanut buttery goodness. It’s the kind of recipe that makes you feel like a kitchen rockstar, even if you used store-bought brownies (which, again, is totally okay!).
If you love this recipe, I think you might also adore my Fudgy Chocolate Lava Cakes for another intense chocolate fix, or perhaps my No-Bake Peanut Butter Pie for a different take on that classic pairing.
Seriously, give this Peanut Butter Cup Brownie Trifle a try. It’s a winner, a crowd-pleaser, and just downright delicious. I can’t wait to hear what you think! Let me know in the comments below how yours turned out, or if you tried any fun variations. Happy baking (and assembling)!
Peanut Butter Cup Brownie Trifle
Ingredients
Brownie Layer
- 1 box Brownie Mix Prepare according to package directions
- 0.5 cup Vegetable Oil
- 0.5 cup Water
- 2 large Eggs
Peanut Butter Mousse
- 1 cup Cream Cheese Softened
- 0.5 cup Creamy Peanut Butter
- 0.5 cup Powdered Sugar
- 1 cup Heavy Whipping Cream Chilled
Chocolate Pudding Layer
- 1 package Chocolate Pudding Mix Instant
- 2 cups Milk
Toppings
- 1 cup Whipped Cream Optional, for topping
- 0.5 cup Peanut Butter Cups Chopped, for garnish
Instructions
Preparation Steps
- Preheat oven to 350°F (175°C). Prepare brownie batter according to package directions using oil, water, and eggs. Bake in a greased 8x8 inch pan until a toothpick inserted into the center comes out clean. Let cool completely, then crumble.
- In a medium bowl, beat cream cheese and peanut butter until smooth. Gradually add powdered sugar and mix until well combined. In a separate chilled bowl, whip heavy cream until stiff peaks form. Gently fold whipped cream into the peanut butter mixture.
- Prepare the chocolate pudding according to package directions using milk. Let it set for a few minutes.
- In a trifle dish or individual glasses, layer the ingredients: start with a layer of crumbled brownies, followed by a layer of peanut butter mousse, then a layer of chocolate pudding. Repeat layers until all ingredients are used, ending with pudding.
- Top with whipped cream and chopped peanut butter cups. Chill for at least 30 minutes before serving.

