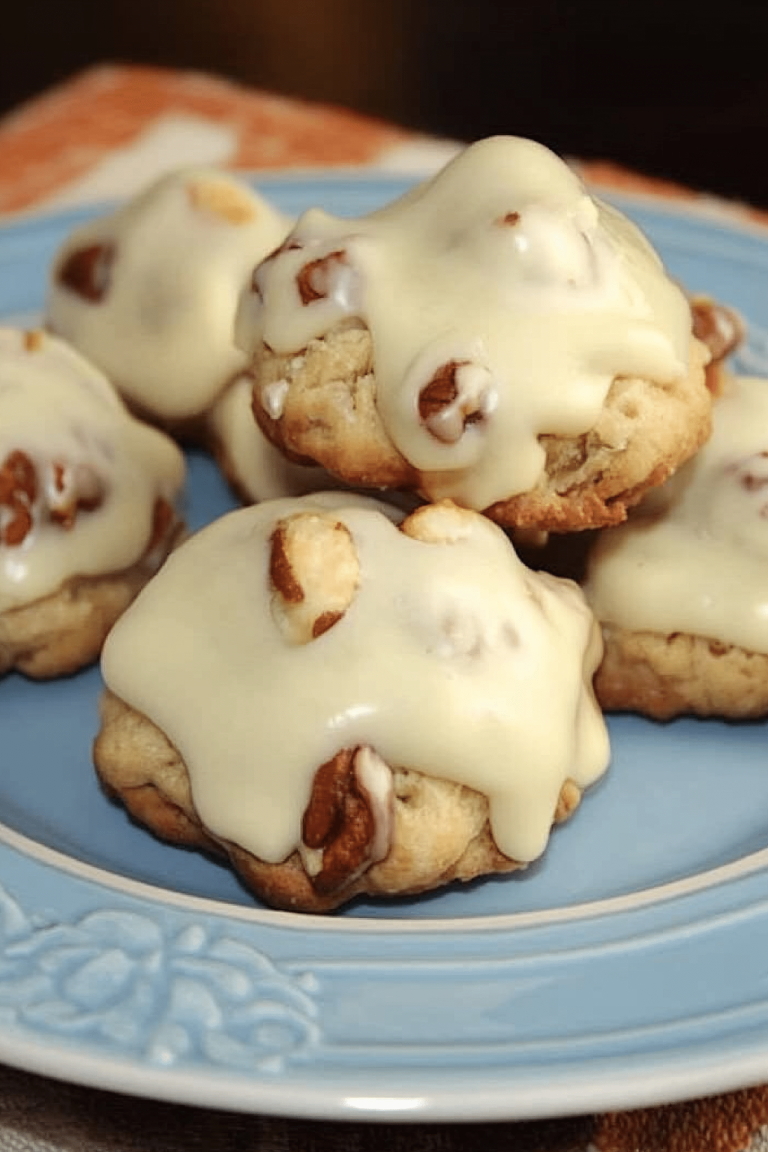
Oh, these Marry Me Cookies! Let me tell you, the first time I ever made these, it was pure magic. I remember pulling them out of the oven, and the most incredible aroma of browned butter, vanilla, and a hint of something wonderfully sweet just filled my entire kitchen. My husband walked in, took one look, and before I could even offer him one, he just said, “Wow, what is that?” That’s how you know you’ve struck gold with a recipe, right? It’s not just a cookie; it’s an experience. They’re called Marry Me Cookies because, honestly, one bite and you’ll be ready to propose. They have this perfect balance of soft, chewy centers and slightly crisp edges, all coated in a dreamy, creamy frosting that just melts in your mouth. They remind me a little bit of a really elevated Sugar Cookie, but with so much more depth and character. If you’re looking for something that feels special, but is surprisingly easy to whip up, you’ve found your winner. My kids beg for these when they get home from school, and they disappear faster than you can say “I do!”
What is Marry Me Cookies?
So, what exactly are these “Marry Me Cookies” that have everyone swooning? Think of them as the ultimate indulgence in cookie form. They’re not your average drop cookie. These are soft, almost cake-like cookies, typically made with a base that’s rich with butter and sugar, giving them a wonderfully tender crumb. The “marry me” part really comes from the luscious, often cream cheese-based frosting that goes on top. It’s this sweet, tangy, creamy goodness that perfectly complements the cookie. The name itself is playful, suggesting that the cookies are so delicious, they’d make you want to commit to them forever – like getting married! It’s essentially a cookie designed to impress, to make someone feel cherished, and to be utterly unforgettable. They’re a step above your everyday Chocolate Chip, but still approachable enough for a weeknight treat. It’s that perfect blend of comfort and elegance.
Why you’ll love this recipe?
Honestly, there are so many reasons why I keep coming back to this Marry Me Cookies Recipe, and I have a feeling you’ll fall just as hard for it as I have. Firstly, the flavor is just out of this world. We’re talking about a deeply satisfying sweetness, with hints of vanilla that are almost floral, and that subtle richness that comes from good quality butter. The texture is where it truly shines – they’re incredibly soft and chewy in the middle, with just the slightest crisp on the edges. It’s that perfect bite that makes you close your eyes in bliss. Then there’s the simplicity. Don’t let the “fancy” name fool you. This recipe is surprisingly straightforward. I’ve made it on busy afternoons when I needed a pick-me-up, and it never fails to deliver. The ingredients are all pantry staples, and the steps are easy to follow. What I love most is how cost-effective it is, especially considering how luxurious they taste. You get a baker’s dozen worth of “wow” for very little effort and expense. They’re also incredibly versatile. While they’re a dream as is, I’ve found they pair beautifully with a cup of coffee in the morning, as a sweet ending to a dinner party, or even just as a comforting snack. Compared to other cookies that might require chilling dough for hours or complicated techniques, these Marry Me Cookies are a lifesaver. They consistently turn out perfectly, and that’s something I truly value in a recipe.
How do I make Marry Me Cookies?
Quick Overview
Making these delightful Marry Me Cookies is a joy, and it all comes down to creaming the butter and sugar properly, not overmixing the dough, and then topping them with that irresistible glaze. You’ll cream your butter and sugar until light and fluffy, then add your eggs and vanilla. Next, you’ll whisk together your dry ingredients and gradually incorporate them into the wet. The key is gentle mixing! Once the dough is formed, you’ll scoop it onto your baking sheets and bake until they’re just golden around the edges. The frosting is a simple mix of Cream Cheese, butter, powdered sugar, and vanilla – that’s it! The whole process is really quite quick, making these cookies an accessible indulgence for any day of the week.
Ingredients
For the cookies:
2 and 1/4 cups all-purpose flour (I always use unbleached for a better texture)
1 teaspoon baking soda
1/2 teaspoon salt
1 cup (2 sticks) unsalted butter, softened to room temperature (this is crucial for creaming!)
1 and 1/2 cups granulated sugar (I find this amount gives the perfect sweetness without being cloying)
2 large eggs, at room temperature (room temperature eggs incorporate much better)
1 teaspoon pure vanilla extract (don’t skimp on quality here, it makes a difference!)
1/2 teaspoon almond extract (optional, but it adds a lovely subtle layer of flavor that complements the vanilla beautifully)
For the Glaze:
4 ounces cream cheese, softened (full-fat is best for richness)
1/2 cup (1 stick) unsalted butter, softened
3 to 3 and 1/2 cups powdered sugar (start with 3 and add more to reach desired consistency)
2 tablespoons milk or heavy cream (for thinning if needed)
1 teaspoon pure vanilla extract
Pinch of salt
Step-by-Step Instructions
Step 1: Preheat & Prep Pan
First things first, let’s get our oven ready. Preheat it to 375 degrees Fahrenheit (190 degrees Celsius). Line your baking sheets with parchment paper. I swear by parchment paper; it makes cleanup a breeze and ensures your cookies don’t stick. If you don’t have parchment, you can lightly grease your baking sheets, but parchment is my go-to.
Step 2: Mix Dry Ingredients
In a medium bowl, whisk together the all-purpose flour, baking soda, and salt. Give it a good whisk to make sure everything is evenly distributed. This helps ensure the leavening agents are spread throughout the dough, leading to consistently risen cookies.
Step 3: Mix Wet Ingredients
In a large bowl, using an electric mixer (handheld or stand mixer), beat the softened unsalted butter and granulated sugar together. Cream them until the mixture is light, fluffy, and pale yellow. This usually takes about 3-5 minutes. Don’t rush this step; it’s what gives the cookies their tender texture. Once creamed, beat in the room temperature eggs, one at a time, making sure to scrape down the sides of the bowl after each addition. Then, stir in the vanilla extract and almond extract (if using). The mixture should look smooth and emulsified.
Step 4: Combine
Gradually add the dry ingredients to the wet ingredients, mixing on low speed until just combined. Be careful not to overmix! Overmixing can develop the gluten in the flour, leading to tough cookies. You want to stop as soon as you no longer see streaks of dry flour. The dough will be soft and slightly sticky.
Step 5: Prepare Filling
This step is technically for the glaze, but it’s best to have it ready to go when the cookies are done cooling a bit. In a separate bowl, beat the softened cream cheese and softened butter together until smooth and creamy. Gradually add the powdered sugar, about a cup at a time, mixing until well combined. If the glaze is too thick, add milk or heavy cream, a tablespoon at a time, until you reach your desired consistency. Stir in the vanilla extract and a pinch of salt. You’re looking for a spreadable, luscious glaze.
Step 6: Layer & Swirl
This step doesn’t apply directly to this cookie recipe, as it’s a simple cookie dough. The “swirl” magic happens in the glazing stage for these Marry Me Cookies. For the cookies themselves, simply use a cookie scoop (about 1.5 to 2 tablespoons) to drop rounded balls of dough onto your prepared baking sheets, spacing them about 2 inches apart. They will spread as they bake.
Step 7: Bake
Bake for 9-12 minutes, or until the edges are lightly golden brown and the centers look slightly underdone. They will continue to cook a bit on the hot baking sheet after you remove them from the oven. I usually pull mine out when the centers still look just a little soft. This is the secret to that chewy texture!
Step 8: Cool & Glaze
Let the cookies cool on the baking sheets for about 5 minutes before carefully transferring them to a wire rack to cool completely. It’s crucial that they are completely cool before you frost them, otherwise, the glaze will melt right off! Once they’re cool, generously spread or drizzle the glaze over the top of each cookie. Don’t be shy with the glaze!
Step 9: Slice & Serve
These are best served as is, with the beautiful glaze on top. You can let the glaze set for a few minutes before serving. They’re wonderful on their own, or perhaps with a glass of milk or a nice cup of tea. Enjoy the moment!
What to Serve It With
These Marry Me Cookies are so versatile, they can elevate any occasion! For breakfast, I love to pair them with a good, strong cup of coffee. The richness of the cookie and the slight tang of the glaze are just divine with a dark roast. For a more elaborate brunch, I’ll often arrange them on a tiered stand with fresh berries and maybe some mini quiches. They add a touch of sweetness and elegance that people really appreciate. As a dessert, they’re a showstopper. I’ll serve them alongside a light, fruity sorbet or even a scoop of vanilla bean ice cream. The contrast in temperatures and textures is incredible. And for those cozy nights in, when you just need something comforting, they’re perfect with a warm mug of hot chocolate or even just a glass of cold milk. My family has a tradition of having these after Sunday dinner, and it’s become a cherished ritual. The key is to let the cookie shine, but a little extra something can really make it sing!
Top Tips for Perfecting Your Marry Me Cookies
Okay, so I’ve made these Marry Me Cookies enough times to have a few tricks up my sleeve! First, for the cookies themselves, the butter and sugar creaming is non-negotiable. You want it light and fluffy, almost like a pale yellow cloud. This incorporates air, which is key for that tender texture. Don’t skip the room temperature eggs either; they bind the dough much better. When you’re adding the dry ingredients to the wet, resist the urge to overmix. Seriously, just mix until you don’t see any more dry flour. A few small streaks are fine, as they’ll disappear during baking. I’ve made that mistake before, and ended up with slightly denser cookies, so trust me on this one! For the glaze, always start with softened cream cheese and butter. If they’re too cold, you’ll end up with lumps, and if they’re too melty, the glaze will be too thin. When you’re adding the powdered sugar, add it gradually. You can always add more to thicken it, but it’s a pain to thin out a glaze that’s too thick. My secret for a super smooth glaze is to use a whisk and really get in there, breaking up any little lumps of powdered sugar. If you want to experiment with swirl customization (though this recipe doesn’t have a true swirl in the cookie itself, the glaze can be swirled!), you could divide the glaze into two bowls and tint one with a tiny bit of food coloring, then dollop and swirl. For baking, keep an eye on them! Ovens can be so finicky. I usually check mine around the 9-minute mark. You want the edges to be just set and lightly golden, but the center should still look a little soft. They’ll firm up as they cool. If you find your cookies are spreading too much, try chilling the dough for about 15-20 minutes before scooping. It helps firm up the butter. And for glaze variations, you can add a splash of lemon juice for a little zing, or a tiny bit of almond extract to echo the cookie. Some people even add sprinkles right on top of the wet glaze for extra flair!
Storing and Reheating Tips
One of the best things about these Marry Me Cookies is how well they keep! If you have any leftovers, which I highly doubt, you can store them at room temperature in an airtight container for about 3-4 days. Just make sure they’re completely cooled and the glaze has set a bit. If it’s warm where you are, or you want them to last a bit longer, the refrigerator is your friend. Store them in an airtight container in the fridge for up to a week. The texture might firm up a bit in the fridge, but they’ll still be delicious. When you’re ready to eat them again, just let them sit out at room temperature for about 15-20 minutes to soften up. For freezing, these cookies do wonderfully! I like to freeze them *before* glazing, just to keep the glaze super fresh. Lay them flat on a baking sheet and freeze until solid, then transfer them to a freezer-safe bag or airtight container. They’ll last for about 2-3 months. To thaw, just take them out of the freezer and let them come to room temperature, then you can add the glaze. If you’re freezing them already glazed, make sure they are well-wrapped to prevent freezer burn, and they should be good for about 1-2 months. The key to good storage, for both room temperature and refrigerated, is an airtight container. It keeps them from drying out and also prevents them from picking up any funky odors from other things in your kitchen!
Frequently Asked Questions
Final Thoughts
So there you have it, my friends! These Marry Me Cookies are truly something special. They’re more than just a sweet treat; they’re a little piece of happiness baked with love. The combination of the soft, chewy cookie and that dreamy, creamy glaze is simply irresistible. They’re the kind of cookie that makes people ask for the recipe, and that’s the highest compliment a baker can get, right? I love how they bring people together, from my own family gatherings to sharing them with neighbors. If you’re looking for a recipe that’s both impressive and achievable, one that will make anyone feel cherished, then this is it. Don’t be afraid to give them a try! I can promise you that the aroma filling your kitchen will be just the beginning of the joy these cookies bring. If you love this recipe, you might also enjoy my Soft Gingerbread Cookies or my Classic Chocolate Chip Cookies – they’re also family favorites! I can’t wait to hear how yours turn out! Please leave a comment below and tell me what you think, or share your own Marry Me Cookie variations. Happy baking!
Marry Me Cookies
Ingredients
Main Ingredients
- 1 cup unsalted butter softened
- 0.75 cup granulated sugar
- 0.5 cup packed brown sugar
- 2 large eggs
- 1 teaspoon vanilla extract
- 3 cups all-purpose flour
- 1 teaspoon baking soda
- 0.5 teaspoon salt
- 1.5 cups white chocolate chips
- 1 cup freeze-dried strawberries crushed
Instructions
Preparation Steps
- In a large bowl, cream together the softened butter, granulated sugar, and brown sugar until light and fluffy. Beat in the eggs one at a time, then stir in the vanilla extract.
- In a separate bowl, whisk together the flour, baking soda, and salt.
- Gradually add the dry ingredients to the wet ingredients, mixing until just combined. Do not overmix.
- Stir in the white chocolate chips and crushed freeze-dried strawberries.
- Preheat your oven to 350°F (175°C). Line baking sheets with parchment paper.
- Drop rounded tablespoons of dough onto the prepared baking sheets, about 2 inches apart.
- Bake for 9-11 minutes, or until the edges are lightly golden brown and the centers are still slightly soft. The cookies will continue to set as they cool.
- Let the cookies cool on the baking sheets for a few minutes before transferring them to a wire rack to cool completely.