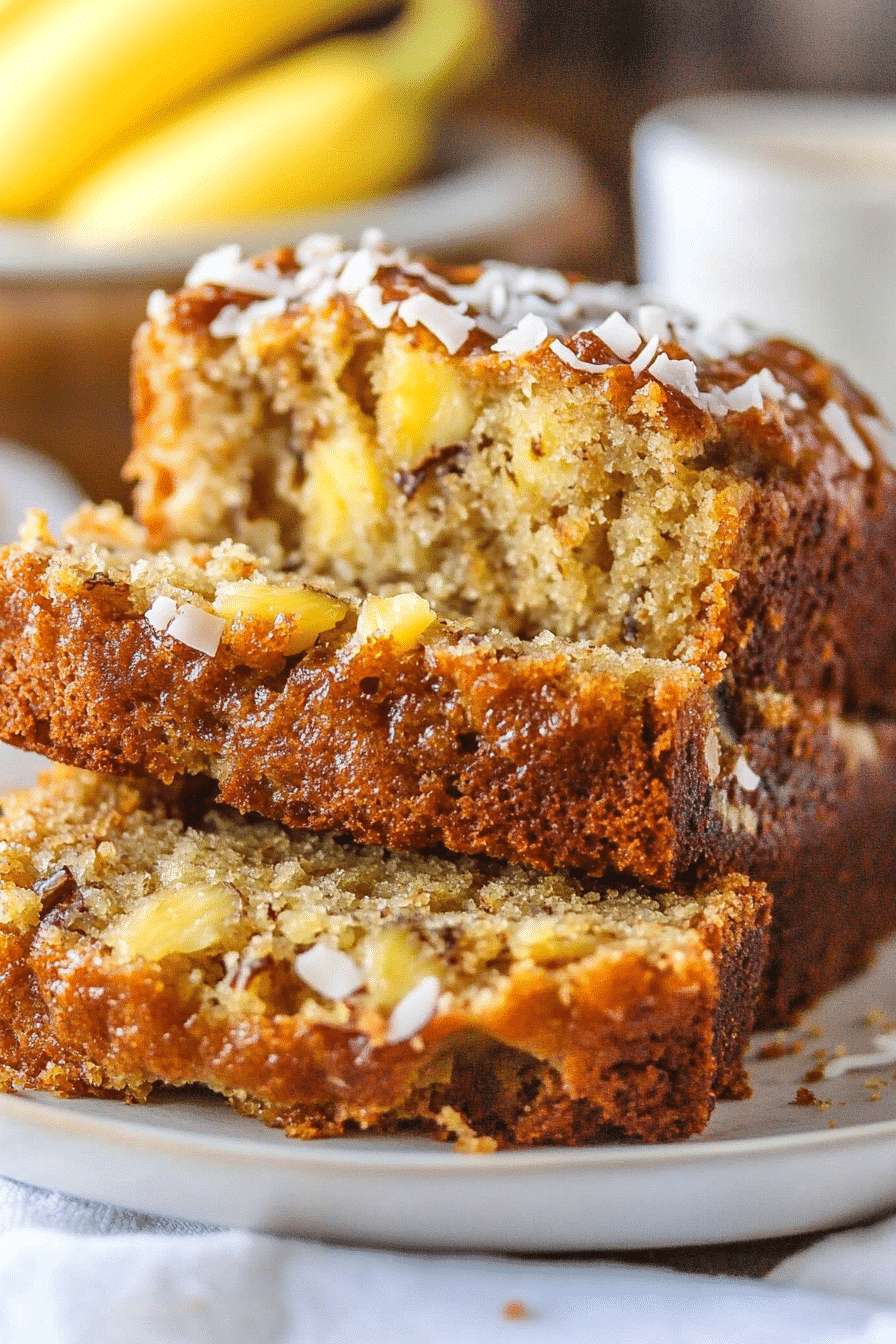
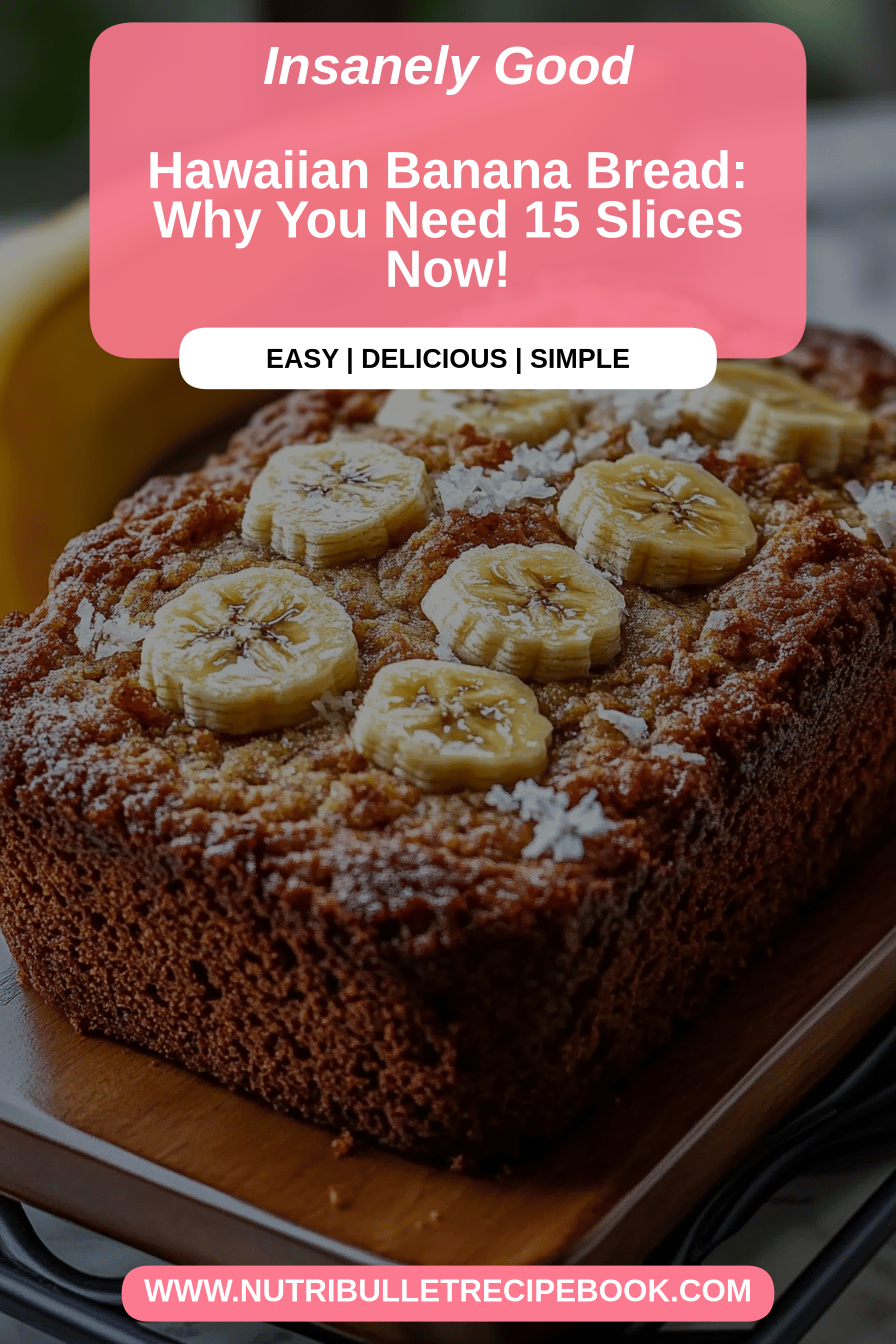
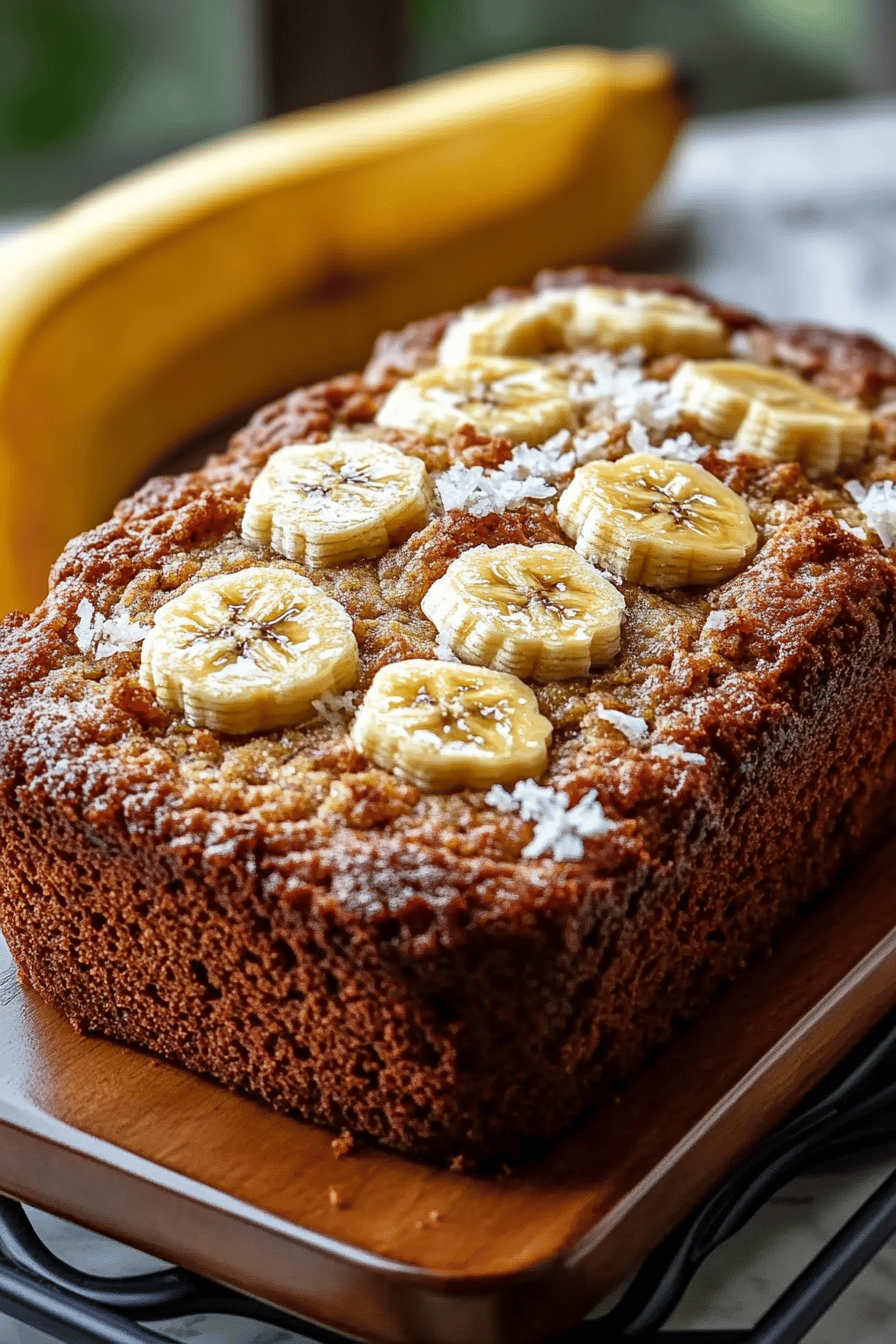
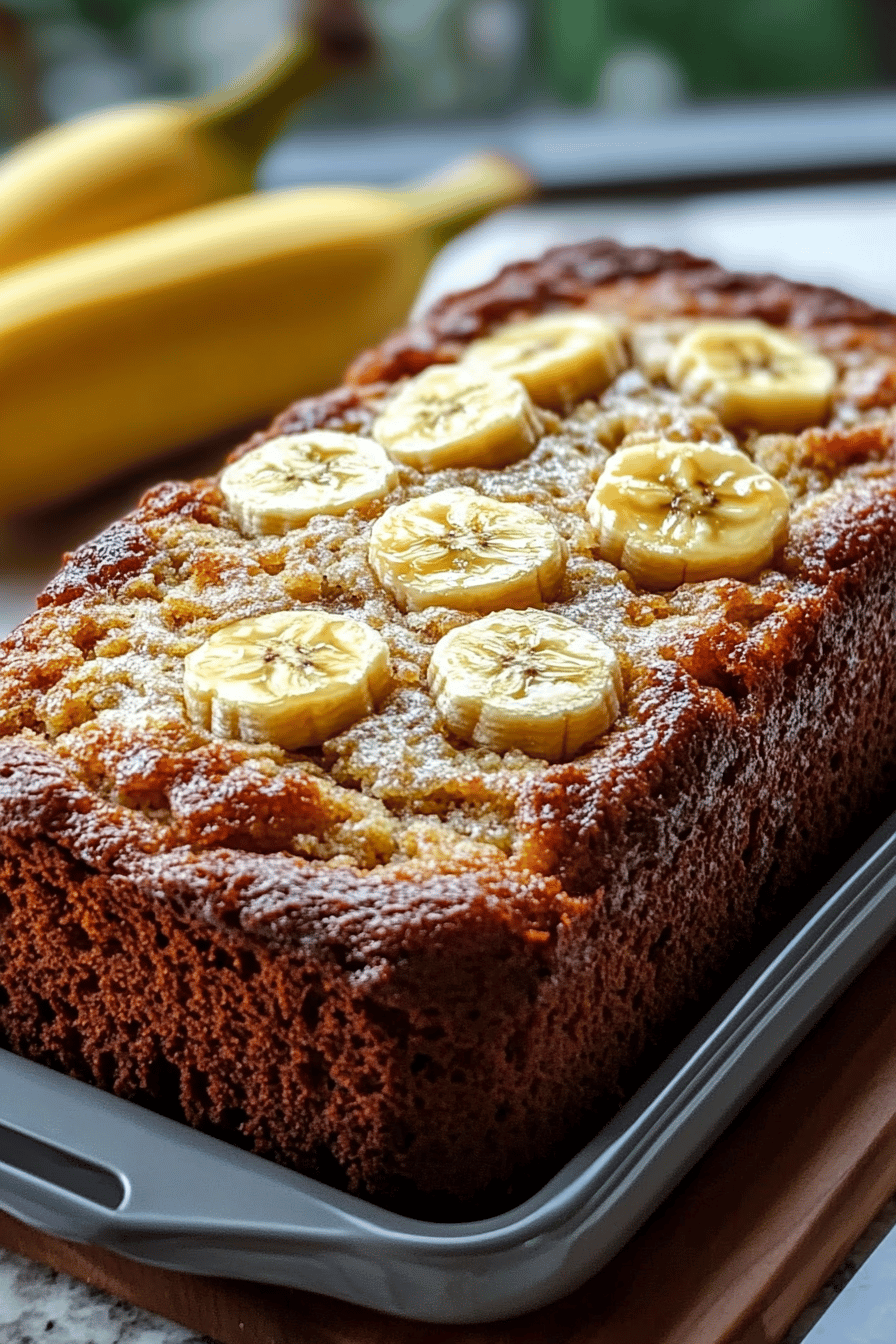
Oh, where do I even begin with this Hawaiian banana bread? It’s one of those recipes that feels like a warm hug on a plate. I remember the first time I tried it, I was visiting Maui, and the scent wafting from a little roadside stand was absolutely intoxicating. It was sweet, spiced, and had this incredible moistness that just melted in your mouth. It’s so much more than just a basic banana bread; it’s a vacation for your taste buds, packed with tropical flavors that transport you straight to the islands. Honestly, if you’ve ever had a store-bought banana bread that felt a bit… well, *meh*, this is going to be your new obsession. It’s my go-to when I need a little bit of sunshine in my day, and let me tell you, it never disappoints. My kids usually devour a whole loaf in less than a day, which is the ultimate compliment in my book!
What is Hawaiian banana bread?
So, what exactly makes this Hawaiian banana bread so special? Think of it as your classic, comforting banana bread, but with a serious tropical upgrade. It’s essentially a rich, moist quick bread that’s infused with the sweetness of ripe bananas and then elevated with a few key ingredients that give it that distinct island vibe. We’re talking about hints of pineapple, coconut, and sometimes even a touch of warm spice that just sings. It’s not overly complicated, but the flavor profile is definitely a step above the everyday. It’s the kind of bread that makes you want to curl up with a cup of coffee or a cold glass of milk and just savor every bite. It’s pure comfort food with a delightful exotic twist!
Why you’ll love
Honestly, there are so many reasons why this Hawaiian banana bread has become a staple in my kitchen, and I just know you’re going to adore it too. First off, the FLAVOR. It’s a symphony of sweet banana, bright pineapple, and creamy coconut, all tied together with just the right amount of warm spice. It’s not cloyingly sweet, but it has this deep, satisfying flavor that’s just perfect. Then there’s the SIMPLICITY. Despite the amazing taste, this bread is surprisingly easy to whip up. You don’t need any fancy equipment or techniques, making it a lifesaver on busy weeknights or when you have unexpected guests. Plus, it’s incredibly COST-EFFECTIVE. Bananas are usually pretty cheap, and the other ingredients are pantry staples for most bakers. What I love most about this recipe is its VERSATILITY. It’s fantastic on its own, of course, but it’s also wonderful toasted, slathered with butter, or even served warm with a dollop of whipped cream. Compared to a regular banana bread, it just has that extra *oomph*, that little bit of something special that makes people ask, “What’s in this?” It’s a guaranteed crowd-pleaser, and I always get requests for the recipe!
How do you make Hawaiian
Quick Overview
Making this incredible Hawaiian banana bread is wonderfully straightforward. You’ll start by mashing your super-ripe bananas, then whisking together your wet and dry ingredients separately before combining them gently. The magic happens when you swirl in the pineapple and coconut, adding those signature tropical notes. It bakes up into a beautifully golden-brown loaf, and the aroma that fills your kitchen is simply divine. It’s a one-bowl wonder for the most part, minimizing cleanup, and the results are always spectacular. Trust me, you’ll be amazed at how something so simple can taste this heavenly.
Ingredients
For the Main Batter:
- 3-4 very ripe bananas, mashed (the spottier, the better!)
- 1/2 cup (1 stick) unsalted butter, softened
- 3/4 cup granulated sugar
- 2 large eggs, at room temperature
- 1 teaspoon vanilla extract
- 1 1/2 cups all-purpose flour
- 1 teaspoon baking soda
- 1/2 teaspoon salt
- 1/2 teaspoon ground cinnamon
- 1/4 teaspoon ground nutmeg
For the Filling:
- 1/2 cup crushed pineapple, well-drained
- 1/2 cup shredded sweetened coconut
For the Glaze:
- 1 cup powdered sugar
- 2-3 tablespoons pineapple juice (or milk)
Step-by-Step Instructions
Step 1: Preheat & Prep Pan
First things first, let’s get your oven all preheated to 350°F (175°C). While it’s warming up, grab a standard 9×5 inch loaf pan and grease it really well. I like to grease and flour it, or even better, line it with parchment paper. This makes lifting the bread out so much easier later on, and nobody wants a loaf stuck to the pan, right?
Step 2: Mix Dry Ingredients
In a medium bowl, whisk together your all-purpose flour, baking soda, salt, cinnamon, and nutmeg. Give it a good stir to make sure everything is evenly distributed. This step is important because it helps to ensure your leavening agents and spices are spread throughout the batter, preventing any clumps or uneven baking.
Step 3: Mix Wet Ingredients
In a large bowl, cream together your softened butter and granulated sugar until it’s light and fluffy. This usually takes a couple of minutes with an electric mixer, or a bit longer by hand. Then, beat in your eggs one at a time, making sure each one is fully incorporated before adding the next. Stir in the vanilla extract and your mashed bananas. You want to mash those bananas really well – no one likes big banana chunks in their bread unless that’s your thing! A fork works perfectly for this.
Step 4: Combine
Now, it’s time to bring the wet and dry ingredients together. Add the dry ingredients to the wet ingredients in three additions, mixing on low speed (or gently by hand) until *just* combined. Seriously, don’t overmix! Overmixing develops the gluten in the flour, which can lead to a tough, dense bread. We want this to be tender and moist, so stop as soon as you don’t see any more dry streaks of flour.
Step 5: Prepare Filling
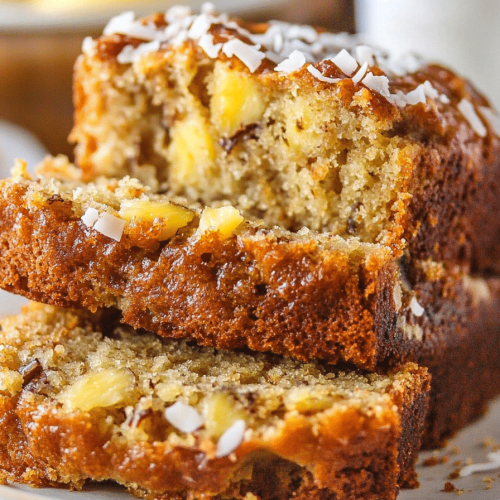
While your batter is ready to go, let’s get the filling ready. In a small bowl, combine the well-drained crushed pineapple and the shredded sweetened coconut. Make sure the pineapple is drained as much as possible; excess moisture can make the bread soggy. You want just enough to give it that burst of flavor and texture.
Step 6: Layer & Swirl
Pour about half of your banana bread batter into the prepared loaf pan. Sprinkle about half of the pineapple and coconut mixture evenly over the batter. Then, dollop the remaining batter over the filling, and top with the rest of the pineapple and coconut mixture. Now for the fun part: grab a knife or a skewer and gently swirl the filling into the batter. Don’t overdo it; you want distinct swirls, not a completely uniform mix. This creates those beautiful pockets of flavor throughout the bread.
Step 7: Bake
Pop that beautiful loaf into your preheated oven. Bake for 50-65 minutes, or until a wooden skewer or toothpick inserted into the center comes out clean (or with just a few moist crumbs attached, but no wet batter). Ovens can be so finicky, so keep an eye on it. If the top starts to brown too quickly, you can loosely tent it with aluminum foil.
Step 8: Cool & Glaze
Once it’s baked to perfection, carefully remove the loaf pan from the oven. Let it cool in the pan for about 10-15 minutes before inverting it onto a wire rack to cool completely. While it’s cooling, whisk together the powdered sugar and pineapple juice (or milk) until you have a smooth, pourable glaze. Once the bread is completely cool, drizzle the glaze over the top. If you want a thicker glaze, just use less liquid. For a thinner glaze, add a splash more juice. Let the glaze set before slicing.
Step 9: Slice & Serve
Once the glaze has set, grab a good sharp knife and slice into your masterpiece! This Hawaiian banana bread is absolutely divine served at room temperature. The textures are just right, the flavors are perfectly balanced, and it’s a joy to eat. Enjoy every delicious bite!
What to Serve It With
This Hawaiian banana bread is so versatile, it works for almost any occasion! For BREAKFAST, I love it toasted and served with a simple cup of hot coffee. It’s a little bit of indulgence to start your day off right. The sweetness of the bread pairs wonderfully with the bitterness of a dark roast. For BRUNCH, I often slice it a bit thicker and serve it alongside fresh Fruit Salad and maybe some yogurt. It feels elegant but is still super approachable. For DESSERT, it’s fantastic warm, perhaps with a scoop of vanilla bean ice cream or a dollop of lightly sweetened whipped cream. The tropical notes really shine when it’s a bit warm. And for COZY SNACKS, well, this is where it truly shines. A thick slice with a glass of cold milk is pure comfort. My family’s favorite way is to have it warm right out of the oven, no glaze needed sometimes, just pure banana-y goodness. It’s also great with a light dusting of powdered sugar if you’re not a fan of glaze.
Top Tips for Perfecting Your Hawaiian Banana Bread
Over the years, I’ve learned a few tricks that make this Hawaiian banana bread recipe turn out perfectly every single time. Let me share them with you! For the BANANAS, make sure they are *very* ripe. I’m talking brown spots, maybe even a black peel. These bananas are sweeter and mash up much easier, giving you the best flavor and moisture. Don’t be tempted to use yellow bananas; it just won’t be the same. When it comes to MIXING, remember my earlier warning: do NOT overmix the batter. As soon as the dry ingredients are incorporated into the wet, stop. A few lumps are okay! Overmixing is the number one culprit for tough quick breads. For the SWIRL CUSTOMIZATION, don’t be afraid to get a little creative! You can add a pinch of ginger to the pineapple mixture for an extra kick, or even toss in a few chopped macadamia nuts for added crunch. Experiment with how you swirl – sometimes I do figure eights, other times just a few gentle passes. The key is not to overmix and muddy the colors. For INGREDIENT SWAPS, if you don’t have crushed pineapple, you can use diced, just make sure to chop it up a bit more. If you’re not a fan of shredded coconut, you can omit it, but it does add a lovely texture and tropical flavor. I’ve even tried this with a splash of rum extract in the batter, and it was divine! For BAKING TIPS, pay attention to your oven. If you find your oven runs hot, you might need to reduce the temperature slightly or start checking for doneness a little earlier. Using a light-colored metal loaf pan usually results in more even browning than a dark one. For the GLAZE VARIATIONS, if you don’t have pineapple juice, milk works just fine, or even orange juice for a different citrusy note. You can also make a Cream Cheese Glaze for an extra decadent touch. Just remember to let the bread cool completely before glazing; a warm loaf will just melt the glaze right off!
Storing and Reheating Tips
Let’s talk about keeping this delicious Hawaiian banana bread fresh because nobody wants stale bread! At ROOM TEMPERATURE, this bread stays wonderfully moist for about 2-3 days. I usually store it in an airtight container or wrap it tightly in plastic wrap, and then place that inside a resealable bag. Just keep it on the counter, away from direct sunlight or heat. If you need to store it for longer, REFRIGERATOR STORAGE is your best bet. Wrapped well, it can last up to a week in the fridge. Be aware that refrigeration can sometimes dry out baked goods a bit, but this recipe is usually pretty forgiving. For FREEZER INSTRUCTIONS, this bread freezes beautifully! Once it’s completely cooled (and if you’re not glazing it yet), wrap the loaf tightly in a layer of plastic wrap, followed by a layer of aluminum foil, or place it in a freezer-safe bag. It will stay good in the freezer for up to 3 months. Thaw it overnight on the counter. If you’re planning to freeze it, I highly recommend waiting to add the GLAZE until *after* it’s thawed and you’re ready to serve it. Glazing a frozen or thawed loaf can sometimes make the glaze sticky or uneven. If you do glaze it before freezing, be aware that condensation can form, affecting the texture.
Frequently Asked Questions
Final Thoughts
So there you have it – my absolute favorite Hawaiian banana Bread Recipe. It’s more than just a baked good; it’s a little piece of edible sunshine that brings so much joy. The combination of super-moist banana bread with those sweet bursts of pineapple and coconut is simply irresistible. It’s proof that simple ingredients, when treated with a little love and care, can create something truly magical. If you’re looking for a recipe that’s both comforting and a little bit exotic, you really can’t go wrong with this one. It’s perfect for sharing with loved ones, or just treating yourself. I truly hope you give this recipe a try and that it brings as much happiness to your kitchen as it does to mine. I’d love to hear how it turns out for you! Please feel free to leave a comment below and let me know if you made any fun variations or if your family devoured it as quickly as mine always does. Happy baking!
Hawaiian banana bread
Ingredients
Main Ingredients
- 3 large ripe bananas mashed
- 0.5 cup unsalted butter melted
- 0.75 cup granulated sugar
- 0.25 cup brown sugar packed
- 1 large egg
- 1 teaspoon vanilla extract
- 1.5 cup all-purpose flour
- 1 teaspoon baking soda
- 0.5 teaspoon salt
- 0.5 teaspoon ground cinnamon
- 0.5 teaspoon ground nutmeg
- 0.5 cup crushed pineapple drained
- 0.5 cup shredded coconut
- 0.5 cup chopped macadamia nuts optional
Instructions
Preparation Steps
- Preheat your oven to 350°F (175°C). Grease and flour a 9x5 inch loaf pan.
- In a large bowl, mash the ripe bananas until smooth.3 large ripe bananas
- Stir in the melted butter, granulated sugar, brown sugar, egg, and vanilla extract until well combined.3 large ripe bananas
- In a separate bowl, whisk together the flour, baking soda, salt, cinnamon, and nutmeg.3 large ripe bananas
- Gradually add the dry ingredients to the wet ingredients, mixing until just combined. Do not overmix.
- Fold in the crushed pineapple, shredded coconut, and chopped macadamia nuts (if using).3 large ripe bananas
- Pour the batter into the prepared loaf pan and spread evenly.
- Bake for 55-65 minutes, or until a toothpick inserted into the center comes out clean.
- Let the banana bread cool in the pan for 10-15 minutes before transferring it to a wire rack to cool completely.