You know those days? The ones where the world feels a little too much, and all you want is a hug in edible form? That’s exactly when I reach for my trusty recipe for Gooey Butter Chocolate Chip Bars. Honestly, if there was one dessert I’d take to a deserted island, this would be it. They’re ridiculously easy, melt-in-your-mouth delicious, and have this magical ability to make everything feel just a bit brighter. Think of them as a shortcut to pure happiness, a little bite of heaven that doesn’t require a pastry chef degree. They’re like the love child of a classic gooey butter cake and everyone’s favorite Chocolate Chip Cookie, and trust me, they steal the show every single time. This one’s a lifesaver on busy nights, a guaranteed crowd-pleaser for potlucks, and, let’s be honest, my personal go-to when a serious sweet craving hits at 10 pm but I don’t want to bake a whole cake. My kids practically beg for these every weekend, and honestly, who can blame them?
What are gooey butter chocolate chip bars?
So, what exactly are these magical little squares of deliciousness? Well, the name kind of gives it away, doesn’t it? Think of them as a wonderfully decadent, soft, and chewy bar with a rich, buttery base and a glorious, slightly tangy, cream cheese-infused top layer that just melts away in your mouth. And then, to make them truly spectacular, we stud them with plenty of melty chocolate chips. It’s essentially a blissful marriage of two of the most comforting desserts known to humankind: the classic St. Louis-style gooey butter cake and the beloved Chocolate Chip cookie. They’re not your average blondie or brownie; they have a unique texture that’s both tender and wonderfully dense, with a slightly chewy edge that’s just divine. It’s a taste of pure comfort, baked into an easy-to-handle bar that’s perfect for sharing… or not! The “gooey butter” part comes from the rich, dense topping that truly lives up to its name, creating a contrast with the slightly firmer cookie-like base that’s just irresistible.
Why you’ll love this recipe?
Oh, where do I even start with why this recipe is an absolute gem? First off, the flavor is just out of this world. That buttery base is perfectly complemented by the rich, slightly tangy cream cheese filling, and then you get those pockets of warm, melty chocolate. It’s a symphony of sweet, rich, and comforting notes that will have you reaching for another bar before you’ve even finished the first. What I love most about this is how surprisingly simple it is. Seriously, you don’t need any fancy equipment or techniques. Most of the ingredients are likely already in your pantry right now! And the cost-efficiency? Amazing. We’re talking basic pantry staples that come together to create something truly spectacular. It makes me feel like I’ve pulled off a culinary miracle without breaking the bank. Plus, they’re incredibly versatile. They’re perfect for breakfast (don’t judge!), brunch, dessert, or just a little afternoon pick-me-up. Compared to other bar recipes, these have a unique texture that sets them apart. They’re not as dense as a brownie, but they have more substance than a simple cookie bar. If you’re a fan of my Chocolate chip cookies are chewy and delicious. or my classic Gooey butter cake., you’re going to be obsessed with these bars. They’re like the best of both worlds, all rolled into one perfectly portable package. They’re also incredibly forgiving, which is a huge bonus for home bakers like me who sometimes have a million things going on.
How to Make Gooey Butter Chocolate Chip Bars
Quick Overview
This recipe is designed for maximum deliciousness with minimum fuss. We’ll start by creating a simple, press-in cookie-like base. Then, we’ll whip up a quick, creamy filling that gets swirled over the top, studded with those glorious chocolate chips. A brief bake, a little cooling time, and voila! You’ll have a pan of pure, unadulterated joy. It’s really that straightforward, and the results are always show-stopping. The beauty of this method is how it creates those distinct layers of texture and flavor that make these bars so special.
Ingredients
For the Main Batter:
Here’s what you’ll need for that sturdy, buttery foundation:
- 1 cup (2 sticks) unsalted butter, softened: Make sure it’s truly softened, not melted! This is key for a good texture.
- 1 1/2 cups all-purpose flour: Spooned and leveled, of course.
- 1 cup granulated sugar: For that initial sweetness.
- 1 teaspoon baking powder: This gives our base a little lift.
- 1/4 teaspoon salt: To balance all that sweetness.
- 1 teaspoon vanilla extract: The secret weapon for amazing flavor.
For the Filling:
This is where the magic happens! So rich and creamy.
- 8 ounces cream cheese, softened: Full-fat is best here for that luscious texture.
- 1 large egg: To bind everything together.
- 1 teaspoon vanilla extract: Yep, more vanilla goodness!
- 1/4 teaspoon almond extract (optional): This is my little secret for an extra layer of flavor, but it’s totally delicious without it.
- 2 cups powdered sugar: Sifted, to ensure ultimate smoothness.
- 1 cup semi-sweet chocolate chips: Or your favorite kind! Milk, dark, mini – they all work.
For the Glaze:
Just a simple drizzle to finish them off.
- 1 cup powdered sugar: Sifted.
- 2-3 tablespoons milk: Or heavy cream for a richer glaze.
- 1/2 teaspoon vanilla extract: For a hint of flavor.
Step-by-Step Instructions
Step 1: Preheat & Prep Pan
First things first, get your oven preheated to 350°F (175°C). While that’s heating up, grab a 9×13 inch baking pan. I like to lightly grease mine with butter or cooking spray, and then line it with parchment paper, leaving an overhang on the sides. This makes lifting the bars out so much easier later on. Trust me on this one; it’s a lifesaver!
Step 2: Mix Dry Ingredients
In a medium bowl, whisk together the flour, granulated sugar, baking powder, and salt. Just a quick whisk to make sure everything is well combined. This ensures even distribution of leavening and flavor throughout the base.
Step 3: Mix Wet Ingredients
In the bowl of a stand mixer fitted with the paddle attachment (or using a hand mixer), cream together the softened butter and the dry ingredients from Step 2. Beat on medium speed until the mixture resembles coarse crumbs. Don’t overmix; we’re not looking for a smooth dough here, just a crumbly texture.
Step 4: Combine
Add the vanilla extract to the crumbly mixture and mix until just combined. The dough will be thick and somewhat sticky, but that’s exactly what we want. It should hold together when you press it.
Step 5: Prepare Filling
Now for the star of the show! In a separate bowl, beat the softened Cream Cheese with an electric mixer until it’s smooth and creamy. Add the egg, vanilla extract, and almond extract (if using), and beat again until well combined. Gradually add the sifted powdered sugar, mixing on low speed until it’s incorporated, then increase the speed to medium-high and beat until the filling is light and fluffy. This usually takes about 2-3 minutes. You want it nice and smooth!
Step 6: Layer & Swirl
Press about two-thirds of the crumb mixture evenly into the bottom of your prepared baking pan to form the base. Make sure to press it up the sides a little too. Then, spread the cream cheese filling evenly over the base. Sprinkle the chocolate chips generously over the filling. Finally, take the remaining one-third of the crumb mixture and sprinkle it over the chocolate chips. You can gently swirl it in a bit with a knife or spatula if you like, but don’t overdo it – we want distinct layers.
Step 7: Bake
Bake in the preheated oven for 30-35 minutes, or until the edges are golden brown and the center is set but still has a slight jiggle. The filling might puff up a bit. Be careful not to overbake, as that can make them dry. A toothpick inserted into the center should come out with moist crumbs attached, not wet batter.
Step 8: Cool & Glaze
Let the bars cool completely in the pan on a wire rack. This is crucial for them to set properly. Once they’re completely cool, whisk together the powdered sugar, milk, and vanilla extract in a small bowl until you have a smooth, pourable glaze. Drizzle this over the cooled bars. You want the glaze to be thick enough to coat, but still fluid enough to drizzle.
Step 9: Slice & Serve
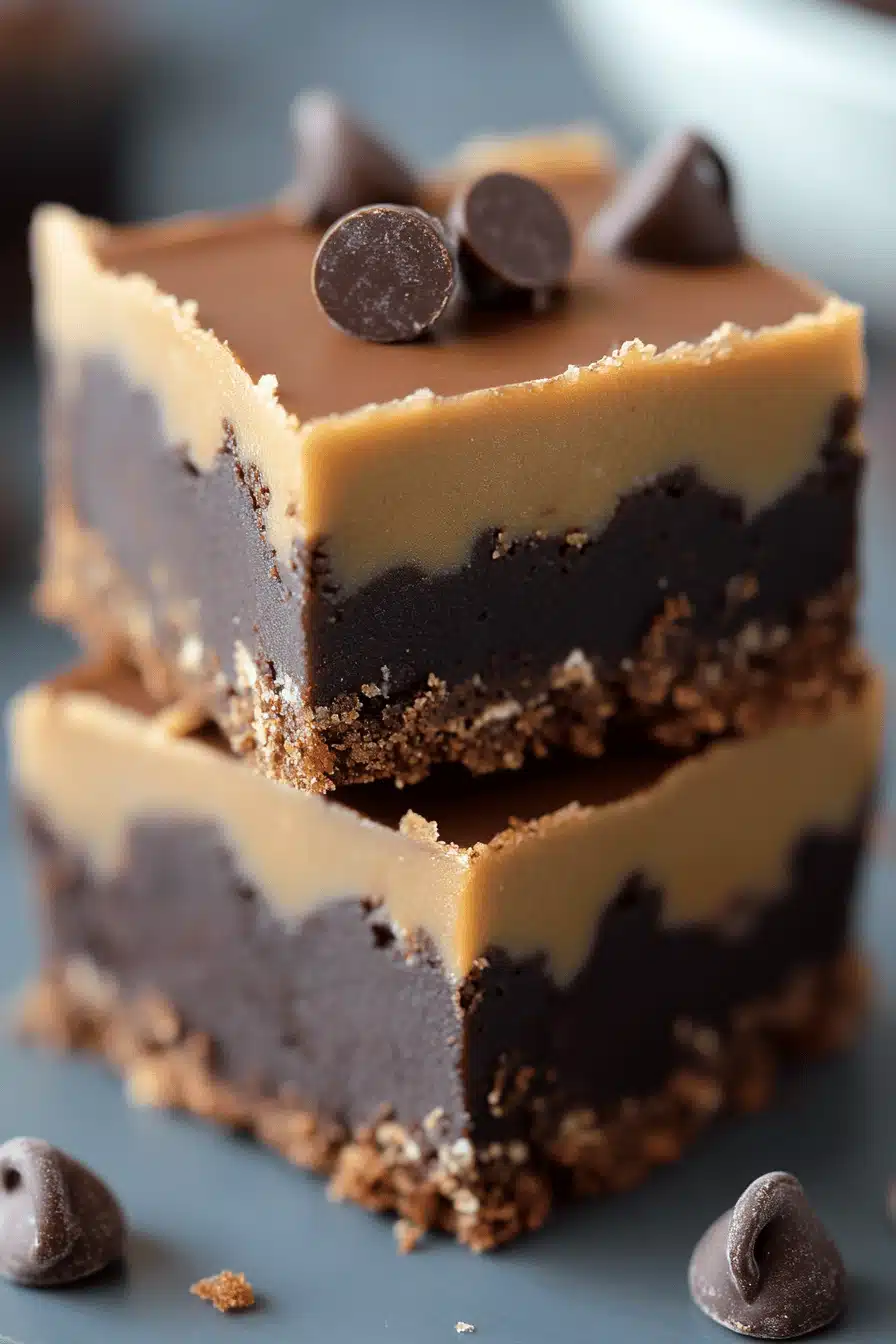
Once the glaze has set slightly, use the parchment overhang to lift the entire block out of the pan. Cut into squares or rectangles. These are best served at room temperature or slightly chilled. The contrast between the crumbly base, the gooey center, and the sweet glaze is pure perfection. Enjoy!
What to Serve It With
These gooey butter chocolate chip bars are so versatile, they can truly fit into any occasion! For a relaxed weekend breakfast, I love pairing them with a freshly brewed pot of coffee. The rich sweetness of the bar and the warmth of the coffee are just heavenly together. Sometimes, I’ll even cut them into smaller, bite-sized pieces and arrange them on a platter alongside some fresh fruit for a more elegant morning spread. For a celebratory brunch, these bars are a showstopper. I’ll usually serve them with a mimosa or some sparkling cider. They add a touch of indulgence that everyone appreciates. As a dessert, they’re simply divine after any meal. I often serve them with a scoop of vanilla bean ice cream or a dollop of whipped cream. The warm, melty chocolate chips within the bar pair wonderfully with cold ice cream. And for those cozy evenings when you just need a comforting snack? These are your answer. They’re perfect with a glass of cold milk or a mug of Hot Chocolate. My family tradition is to have these after a movie night, cut into generous squares, and everyone usually grabs their own. It’s become our little ritual, and the bars are always gone in a flash!
Top Tips for Perfecting Your Gooey Butter Chocolate Chip Bars
After making these bars more times than I can count, I’ve picked up a few little tricks that I think make all the difference. For the main batter, make sure your butter is truly softened but not melted. If it’s melted, your base will be greasy. If it’s too cold, it won’t incorporate properly, leading to a dry, crumbly texture. When mixing the dry ingredients for the base, just a quick whisk is all you need; we’re not developing gluten here, we’re aiming for a tender crumb. For the filling, softened cream cheese is non-negotiable. Cold cream cheese will result in lumps, and nobody wants lumpy gooey butter bars! Sifting your powdered sugar is also a must for that incredibly smooth, melt-in-your-mouth texture. I learned this the hard way once, and let’s just say the texture wasn’t quite right. If you’re feeling adventurous with the swirl, don’t be afraid to be a little artistic! You can use a toothpick to create intricate patterns, or just do a quick, rough swirl for a more rustic look. For ingredient swaps, I’ve found that using milk chocolate chips instead of semi-sweet adds an extra layer of sweetness that my kids absolutely adore. If you prefer darker chocolate, that works beautifully too! When it comes to baking, keep an eye on them. Ovens can be so different! The edges should be golden, but the center should still be a bit soft – it will continue to set as it cools. I’ve found that baking them on the middle rack gives the most even results. And for the glaze, the consistency is key. Too thin and it will run off; too thick and it will be hard to drizzle. Aim for something like thick syrup. I love adding a touch of almond extract to the glaze as well for a subtle nutty note, but vanilla alone is perfectly lovely.
Storing and Reheating Tips
One of the best things about these Gooey Butter Chocolate Chip Bars is how well they store. If you have any leftovers (which is rare in my house!), you can keep them at room temperature for up to 2 days. Just make sure they are in an airtight container. The glaze will harden slightly, which is totally fine. If you plan to keep them longer, or if your kitchen is on the warmer side, the refrigerator is your best bet. Store them in an airtight container in the fridge for up to a week. I actually think they taste even better on the second or third day! When it comes to reheating, I usually don’t bother unless they’ve been refrigerated and I want that slightly warmer, gooey sensation. A few seconds in the microwave (on 50% power, just to warm through) or a brief stint in a low oven (around 200°F or 90°C for a few minutes) will bring back some of that lovely gooeyness. For freezing, these bars are surprisingly freezer-friendly. I like to cut them into individual portions first, then wrap each piece tightly in plastic wrap, followed by a layer of aluminum foil or a freezer-safe bag. They’ll keep well in the freezer for about 2-3 months. Thaw them overnight in the refrigerator, then let them come to room temperature before enjoying. I usually add the glaze *after* they’ve thawed and come back to room temperature, rather than freezing with the glaze on, as it can sometimes get a little sticky.
Frequently Asked Questions
Final Thoughts
So there you have it – my absolute favorite Gooey Butter Chocolate Chip Bars! I really hope you give these a try because, honestly, they’re a game-changer. They’re proof that you don’t need complicated steps or fancy ingredients to create something truly extraordinary and comforting. The blend of that buttery, slightly crisp base with the lusciously creamy, gooey center, all packed with melty chocolate, is just pure bliss. It’s a recipe that brings smiles to faces and makes any day feel a little bit special. If you love this recipe, you might also enjoy my recipes for decadent brownies or my easy no-bake cookies for more quick and delicious treats. I can’t wait to hear what you think, so please leave a comment below and let me know how yours turned out! And if you get creative with yours, share your variations – I love seeing them! Happy baking, and enjoy every single gooey, chocolatey bite!
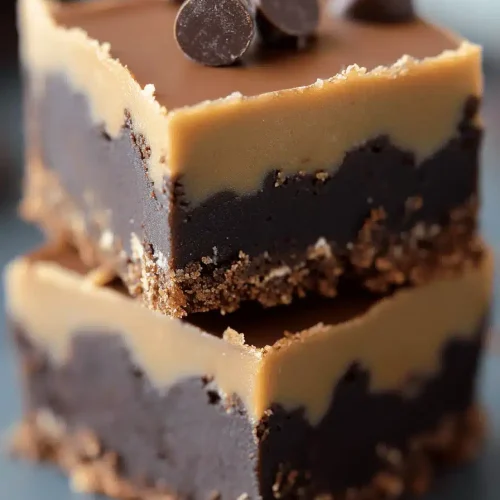
Gooey Butter Chocolate Chip Bars
Ingredients
Shortbread Crust
- 0.5 cup unsalted butter very soft
- 1 cup all-purpose flour
- 0.33 cup confectioners' sugar
- 1 tablespoon cornstarch
- 1 teaspoon vanilla extract
- 0.5 teaspoon salt
Gooey Filling
- 0.5 cup unsalted butter very soft
- 0.75 cup granulated sugar
- 0.5 teaspoon salt
- 2 large eggs
- 1 cup all-purpose flour
- 0.75 cup semi-sweet mini chocolate chips plus 2 tablespoons for topping
Instructions
Preparation Steps
- Preheat oven to 350°F (175°C). Line an 8-inch square baking pan with aluminum foil and spray with cooking spray.
- For the shortbread crust: In a stand mixer fitted with a paddle attachment (or in a large bowl with an electric mixer), combine the softened butter, flour, confectioners' sugar, cornstarch, vanilla extract, and salt. Beat on low speed until a dough forms, about 3-4 minutes.0.5 cup unsalted butter
- Press the dough evenly into the prepared pan to form a smooth, flat layer. Use a spatula or your fingers to smooth it.
- Pierce the crust all over with a fork to allow steam to escape.
- Bake for 12-13 minutes, or until the crust is just set. It should remain pale in color.
- While the crust bakes, prepare the filling. In a small bowl, whisk together the corn syrup, water, and vanilla extract. Set aside.0.5 cup unsalted butter
- In the same mixer bowl (wiped clean), beat the softened butter, granulated sugar, and salt on medium-high speed until smooth and combined, about 2-3 minutes.0.5 cup unsalted butter
- Add the eggs one at a time, beating well after each addition until smooth and combined. Scrape down the sides of the bowl as needed.0.5 cup unsalted butter
- With the mixer on low speed, add half of the flour and half of the corn syrup mixture. Beat until just combined. Add the remaining flour and corn syrup mixture and beat until smooth.0.5 cup unsalted butter
- Stir in the mini chocolate chips until just combined.0.5 cup unsalted butter
- Pour the filling evenly over the baked crust. Use a spatula to smooth it into an even layer.
- Sprinkle the remaining 2 tablespoons of mini chocolate chips evenly over the top.0.5 cup unsalted butter
- Bake for 23-25 minutes, or until the edges are set and the center is mostly set with a slight jiggle. The top should have a few lightly golden brown spots. Be careful not to overbake.
- Let the bars cool completely in the pan on a wire rack for at least 2 hours before slicing and serving.