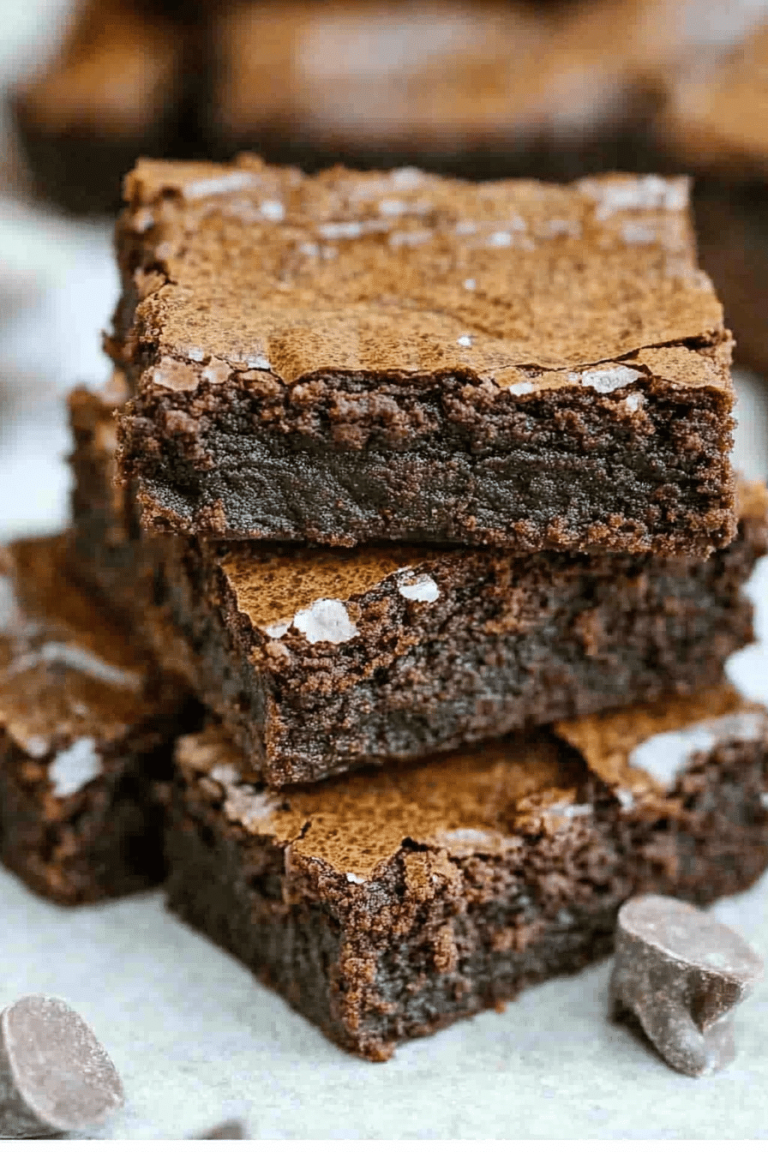
You know those days, right? The ones where a craving hits you like a freight train, and it’s not just any craving, it’s a deep, soul-stirring need for something chocolatey, fudgy, and utterly decadent. But then you look at the clock, and it’s 9 PM, and the thought of preheating the oven, mixing ingredients, and waiting what feels like an eternity for a whole batch of brownies to bake… well, it’s enough to make you just sigh and grab a sad piece of toast. Been there, done that, bought the (slightly disappointing) cookie. But not anymore! Because I’ve cracked the code. These microwave brownies are my absolute secret weapon. They deliver that intensely chocolatey, gooey goodness in mere minutes. Forget those sad, cakey supermarket versions; these are the real deal, and they’re so ridiculously easy, you’ll be making them way more often than you probably should. They’re like a shortcut to pure happiness, and honestly, they taste so good, no one will ever guess they came from the microwave. They’re a game-changer when I’m short on time but big on chocolate needs!
What are microwave brownies?
So, what exactly are these magical microwave brownies we’re talking about? Think of them as your personal, instant gratification dessert. They’re a single-serving (or sometimes two-serving, if you’re feeling generous!) batch of fudgy, rich brownie goodness that’s cooked entirely in the microwave. The magic happens because we’re using a special ratio of ingredients and a bit of microwave wizardry to achieve that perfect texture – moist, dense, and intensely chocolatey, without any of the waiting involved in traditional baking. It’s essentially a simplified, super-fast brownie that’s perfect for when you need a serious chocolate fix, right now. No fancy equipment, no long waiting times, just pure, unadulterated brownie bliss in a mug or a small ramekin. It’s the dessert equivalent of a superhero cape for your taste buds on a tough day!
Why you’ll love this recipe?
Oh, where do I even begin with why you’ll absolutely fall in love with this microwave brownie recipe? First off, let’s talk about the flavor. We’re not messing around here; this is pure, unadulterated chocolate heaven. It’s rich, it’s fudgy, and it has that perfect balance of sweet and cocoa that will make your taste buds sing. Then there’s the sheer simplicity of it all. We’re talking about making a delicious, homemade brownie in literally minutes. No preheating, no complicated steps, just a few simple ingredients mixed together and zapped. It’s a lifesaver on busy nights when you want something sweet but don’t have the time (or energy!) for a full baking session. Plus, it’s incredibly cost-effective. You’re using pantry staples that you likely already have on hand, so you’re not breaking the bank for a single-serving treat. And the versatility! While it’s perfect on its own, you can easily jazz it up with your favorite toppings. What I love most about this recipe is that it satisfies that intense chocolate craving without leaving you with a whole pan of brownies staring you down, tempting you to overindulge. It’s portion control built right into the deliciousness. Honestly, it’s the best of all worlds. You get all the indulgence of a freshly baked brownie with none of the fuss. It’s become my go-to for a late-night treat or a quick dessert when friends pop over unexpectedly!
How do you make microwave brownies?
Quick Overview
The whole process for these amazing microwave brownies is incredibly straightforward. You’ll basically whisk together your dry ingredients in a mug or small bowl, then stir in your wet ingredients until just combined. Then, into the microwave it goes for a short zap! The key is not to overcook it, ensuring you get that perfect fudgy texture. It’s so simple, you’ll be whipping these up from start to finish in under five minutes. Trust me, it’s revolutionary!
Ingredients
For the Main Batter:
This is where the magic starts. You’ll need all-purpose flour – just a couple of tablespoons to give it structure without making it cakey. For that deep chocolate flavor, unsweetened cocoa powder is your best friend. Make sure it’s good quality; it makes a difference! For sweetness, granulated sugar is perfect, but you can adjust it slightly to your liking. A pinch of salt is crucial to enhance all those rich chocolate notes. Then, for moisture and binding, we have a beaten egg – just a small one works best. A splash of milk (any kind will do, I’ve even tested it with almond milk and it actually made it even creamier!) brings it all together. And of course, a little bit of melted butter or oil for richness and that beautiful fudgy texture. I always opt for butter if I have it handy; it just adds a touch more flavor.
For the Filling (Optional but Recommended!):
This is where you can really take your microwave brownies to the next level. A spoonful of chocolate chips is non-negotiable for me. Dark chocolate, milk chocolate, white chocolate – whatever your heart desires! You could also add a dollop of peanut butter or Nutella right in the center before microwaving for a gooey, molten surprise. Some chopped nuts or even a few raspberries can add a lovely texture and flavor contrast, but honestly, just chocolate chips are enough to make it feel extra special.
For the Glaze (Optional, but Oh-So-Good):
This is totally optional, but if you’re going all out, a simple glaze is divine. A little powdered sugar, a tiny splash of milk or water, and maybe a drop of vanilla extract whisked together until smooth. You want it thick enough to drizzle but not so thick it’s hard to spread. Some people even like to add a bit of cocoa powder to this for an extra chocolatey punch. It’s the crowning glory!
Step-by-Step Instructions
Step 1: Preheat & Prep Pan
Okay, this is the easiest “prep” step ever. Grab your favorite microwave-safe mug, a small ramekin, or even a small microwave-safe bowl. Whatever you choose, make sure it’s big enough so the batter doesn’t overflow when it puffs up a bit. Give the inside a quick spritz or brush with a tiny bit of butter or oil, just to make sure your delicious creation doesn’t stick. You don’t need to preheat your oven, which is the best part!
Step 2: Mix Dry Ingredients
In your chosen mug or bowl, add the flour, cocoa powder, sugar, and salt. Grab a small whisk or a fork and give it a good stir. You want to make sure everything is nicely combined and there are no clumps of cocoa powder hiding. This ensures an even flavor distribution throughout your brownie. It’s a quick step, but it’s important for getting the texture just right.
Step 3: Mix Wet Ingredients
Now, in a separate tiny bowl (or you can make a little well in the dry ingredients if you’re feeling adventurous and want to use fewer dishes!), crack your egg. Whisk it up quickly. Then, add your milk and melted butter (or oil) to the egg. Stir until everything is well incorporated. You want a smooth, golden mixture. Make sure your butter isn’t too hot, or it might scramble the egg!
Step 4: Combine
Pour the wet ingredients into the mug with the dry ingredients. Now, this is key: mix *just* until everything is combined and you no longer see any dry flour. Seriously, don’t overmix! A few small lumps are totally okay. Overmixing will lead to a tougher, cakier brownie, and we want fudgy, my friends. It should look like a thick, luscious brownie batter.
Step 5: Prepare Filling
If you’re adding a surprise in the middle, now’s the time! Gently press your chocolate chips, a spoonful of peanut butter, or a bit of Nutella into the center of the batter. You can even swirl it in slightly with a toothpick if you like, but make sure it’s mostly covered by the batter.
Step 6: Layer & Swirl
With the filling nestled in, you can either add a tiny bit more batter on top to completely cover it (if you used a lot of filling) or just leave it as is if you like a molten center peeking through. For a beautiful swirl effect with something like Nutella or peanut butter, you can use a toothpick to gently drag it through the top layer of the batter. Don’t go crazy; just a few gentle swirls will do. This adds a lovely visual appeal and extra pockets of flavor.
Step 7: Bake
Pop your mug or ramekin into the microwave. Microwave on high power for about 60 to 90 seconds. The exact time will depend on your microwave’s wattage. The edges should look set, but the center should still look a little gooey and underdone. This is crucial for achieving that perfect fudgy texture. If you overcook it, you’ll end up with a dry, cakey brownie, and nobody wants that! Start with 60 seconds and add 10-15 second increments if needed. It’s always better to undercook slightly and let it finish setting as it cools.
Step 8: Cool & Glaze
Carefully remove the mug from the microwave (it will be hot!). Let it cool for a minute or two. This is essential, as the brownie will continue to cook from the residual heat. If you’re adding a glaze, now is the time. Whisk together your powdered sugar, a tiny bit of milk or water, and vanilla. Drizzle it over the top of the still-warm brownie. It will set up beautifully as it cools.
Step 9: Slice & Serve
You can literally eat this straight from the mug with a spoon, which is often my preferred method for maximum cozy factor. Or, if you used a ramekin, you can carefully invert it onto a plate. If you want to be fancy, add a scoop of ice cream or a dollop of whipped cream. It’s best enjoyed warm, but it’s still pretty darn good at room temperature. Enjoy your instant brownie satisfaction!
What to Serve It With
These little marvels of microwave brownie goodness are incredibly versatile, making them perfect for any occasion, really. For a quick morning treat that feels like a luxury, I sometimes just have one with my coffee. It’s a little slice of heaven to start the day, and honestly, it’s faster than brewing a pot of coffee sometimes! For a more leisurely brunch, I’ll often make a couple in small ramekins, maybe swirl in some raspberry jam in one, and serve it with a dusting of powdered sugar and a fresh berry on top. It feels so much fancier than it is! As a dessert, it’s an absolute winner. Picture this: a warm, gooey microwave brownie topped with a scoop of good vanilla bean ice cream and a drizzle of chocolate sauce. It’s pure bliss after a big meal, and it satisfies that dessert craving without feeling overly heavy. And for those truly cozy snack moments, when you just need a little something sweet to curl up with on the couch? This is it. I’ll often have it with a glass of cold milk, just like when I was a kid. My family also loves when I add a spoonful of salted caramel into the center – it’s divine! It truly is perfect for any moment you need a quick, delicious chocolate escape.
Top Tips for Perfecting Your Microwave Brownies
I’ve made these microwave brownies more times than I can count, and through trial and error, I’ve picked up a few tricks that make all the difference in achieving that perfect fudgy texture every single time. My biggest tip? Don’t overcook it! Microwaves vary wildly, and it’s SO easy to go from perfectly gooey to sadly dry in a matter of seconds. Start with less time than you think you need. You can always add 10-second increments, but you can’t un-cook it. Look for the edges to be set, but the center should still look a little wet and jiggly. It will continue to set up as it cools. For mixing, remember that gentle is key. You want to combine the wet and dry ingredients just until they’re incorporated. Overmixing develops the gluten in the flour, which leads to a tougher, cakey texture. We’re aiming for dense and fudgy, so just stir until you don’t see any more dry flour. If you’re adding a swirl of peanut butter or Nutella, don’t go overboard with the swirling. Just a couple of gentle motions with a toothpick is enough to create beautiful marbling without overworking the batter. For ingredient swaps, I’ve found that you can substitute the butter with a neutral oil like vegetable or canola oil if you’re in a pinch, though butter does add a lovely richness. And if you’re out of eggs? You can often get away with using a “flax egg” (one tablespoon of ground flaxseed mixed with three tablespoons of water, let it sit for 5 minutes) or even just a tablespoon of applesauce, though the texture might be slightly different. For baking, always use a microwave-safe mug or ramekin. Glass is usually best, but ceramic can also work. Avoid metal at all costs, obviously! And if your microwave has a turntable, make sure it’s spinning to ensure even cooking. If you’re making this for a special occasion and want to elevate it, consider adding a pinch of espresso powder to the dry ingredients; it intensifies the chocolate flavor without making it taste like coffee. Trust me on this one; it’s a game-changer for any chocolate dessert!
Storing and Reheating Tips
Honestly, these microwave brownies are best enjoyed fresh and warm, right out of the microwave. They are *so* quick to make that saving them is often more of a last resort for me. However, if you do find yourself with leftovers (which is rare in my house!), there are a few ways to store them to maintain as much of their deliciousness as possible. If you’ve made a mug brownie, you can cover the top of the mug tightly with plastic wrap or aluminum foil and leave it at room temperature for up to 24 hours. It will become less fudgy and a bit firmer as it cools, but it’s still perfectly edible. For longer storage, the refrigerator is your best bet. Place the mug or any leftover ramekin brownie in an airtight container or wrap it very well in plastic wrap. It should keep well in the fridge for about 3-4 days. The texture will firm up considerably in the fridge, so reheating is definitely recommended. To reheat, simply pop the mug or brownie back into the microwave for about 15-30 seconds, just until it’s warmed through. Be careful not to overheat, or it will become tough! If you’re freezing these, it’s best to do it *before* you glaze them. Wrap the cooled brownie tightly in plastic wrap, then place it in a freezer-safe bag or container. They can be frozen for up to 2 months. To thaw, simply remove them from the freezer and let them come to room temperature, or microwave them briefly. If you plan on glazing them after freezing, it’s best to do that once they’re thawed and warmed. I’ve found that the texture holds up surprisingly well, especially if you zap them for a quick re-warm!
Frequently Asked Questions
Final Thoughts
So there you have it! My absolute go-to recipe for the most decadent, satisfying, and ridiculously easy microwave brownies. I really hope you give these a try. They’ve saved me on countless occasions when a chocolate emergency struck, and the best part is, they always deliver that rich, fudgy goodness I crave. They’re proof that you don’t need hours in the kitchen to make something truly special. If you love this recipe, you might also enjoy my recipes for quick chocolate chip cookies or my super fudgy lava cakes – they’re all about that instant dessert satisfaction! I can’t wait to hear how your microwave brownies turn out. Let me know in the comments below if you try them, and what delicious additions you experimented with! Happy baking (or, you know, microwaving)!
microwave brownies
Ingredients
Main Ingredients
- 0.25 cup granulated sugar
- 3 tbsp unsweetened natural cocoa powder
- 3 tbsp water
- 2 tbsp canola oil
- 2 tbsp light brown sugar packed
- 0.5 tsp vanilla extract
- pinch salt to taste
- 0.25 cup all-purpose flour
- 0.33 cup semi-sweet chocolate chips *optional
Instructions
Preparation Steps
- In a small microwave-safe bowl, whisk together granulated sugar, cocoa powder, water, oil, brown sugar, vanilla extract, and a pinch of salt until smooth.
- Add the all-purpose flour and stir until just combined, being careful not to overmix.
- Fold in the semi-sweet chocolate chips until evenly distributed.
- Microwave on high for about 1 minute, checking at 45 seconds and adding 15-second bursts as needed, until the brownie is set but still fudgy in the center.
- Allow to cool slightly, then optionally top with ice cream or whipped cream and serve immediately.