Sunday afternoons always pull me back into the kitchen, where the air smells like warm corn and garlic and the soft crackle of something generously fried or baked. I’ll admit it: I’m a sucker for a good crowd-pleaser that travels well. chicken taquitos sit squarely in that category. I remember my aunt making a version with leftover roasted chicken, a smear of crema, and a sprinkle of cilantro, then tossing them into a hot oven until the edges sang with crisp. The first bite tasted like comforting nostalgia, but the next bite was a little adventurous—savory chicken tucked into a toasty tortilla, gold at the edges, a whisper of lime and cheese in every roll. It’s incredible flavor with surprisingly little fuss. This dish is incredibly forgiving, which makes it a lifesaver on busy nights—and yes, my kids actually ask for this all the time. If you’re craving something cozy, a little smoky, and totally shareable, you’ve found a new favorite. Let’s cook up a batch of chicken taquitos that will fill the house with happiness and a pan that’s begging to be wiped clean.
What is chicken tacos?
Think of chicken taquitos as little, portable bundles of joy: shredded chicken folded into warm tortillas, rolled tight, and finished until the outside is crackly and caramelized. It’s essentially a toasty, snackable version of a taco, designed to be picked up with one hand and eaten with the other while you chat with friends or dish out movie-night chaos. The name taquito comes from the Spanish word for “little torch,” which is a playful nod to the way these tight little cylinders crisp up at the edges. They’re not complicated: a simple filling, a soft tortilla, some cheese, and a quick bake or fry until golden. And the beauty is in the versatility—you can tailor the fillings, add a hint of smoke with chipotle, or keep it classic with a tangy salsa. For me, chicken taquitos are the weeknight hero that still feels special enough for company.
Why you’ll love this recipe?
What I love most about chicken taquitos is how forgiving they are while still tasting like you put real effort into them. They’re also incredibly flexible, which makes them a welcome addition to any menu. Here are a few reasons this version shines:
- Flavor: The chicken stays juicy, the cheese melts into a gentle pool, and a touch of lime crema brightens every bite. It
- Simplicity: You can mix the filling while you warm the tortillas, and the assembly takes just a few minutes. It’s not a
- Cost-efficiency: Use leftovers or a simple rotisserie chicken to keep costs down, and you’ll still serve a crowd-pleasing meal. The filling scales easily, so you can stretch it to feed more with minimal effort.
- Versatility: Bake for a lighter finish, fry for a traditional crisp, or air-fry for a hands-off approach. Dip options range from crema to salsa to a quick honey-lime glaze, depending on your mood.
- Make-ahead magic: The filling and even the rolled taquitos can be assembled ahead of time and kept in the fridge for a quick bake the next day.
What I’ve learned over the years is that chicken taquitos don’t demand perfection—the joy is in the warmth and the shared laughter around the table as you pass the tray. This version respects that spirit, delivering a classic, crowd-pleasing texture with a few modern tweaks to keep things interesting.
How to Make Chicken Taquitos
Quick Overview
This recipe is all about straightforward steps and a little patience for crispness. You’ll whip up a creamy, Cheesy Chicken filling, roll it into warm tortillas, and bake or fry until the skins turn a glorious shade of amber. The result is a snack-friendly entrée that looks fancy on a platter but is totally doable after a long day. The most important thing is to roll tightly and place the seam side down so they don’t unroll in the oven. If you’re short on time, you can skip the extra batter or glaze and just enjoy the filling wrapped in tortillas with a dollop of crema on the side. It’s simple, satisfying, and absolutely addictive—the kind of recipe that disappears in minutes and leaves you planning a second batch.
Ingredients
For the Main Batter:
- 1/2 cup all-purpose flour
- 1/2 cup cold water
- 1/2 teaspoon salt
- 1/4 teaspoon chili powder (optional for a hint of heat)
- 1 tablespoon neutral oil
For the Filling:
- 2 cups shredded cooked chicken (roast, rotisserie, or leftovers)
- 1 cup shredded cheese (a mix of monterey jack and cheddar works beautifully)
- 1/4 cup finely chopped cilantro (or parsley if you prefer)
- 1/2 cup salsa or enchilada sauce
- 1/2 teaspoon ground cumin
- 1/4 teaspoon garlic powder
- Salt and pepper to taste
For the Glaze:
- 1/3 cup sour cream or Mexican crema
- 1 tablespoon lime juice
- 1/4 teaspoon garlic powder
- Pinch of salt
- Optional: a drizzle of hot sauce or a pinch of chili powder for heat
Step-by-Step Instructions
Step 1: Preheat & Prep Pan
Heat your oven to 425°F (220°C) if you’re baking, or heat a thin layer of neutral oil in a skillet if you’re frying. If you’re baking, line a Sheet Pan with parchment or a silicone mat for easy cleanup. I like to have a few extra tortillas warm and pliable by microwaving them for about 15 seconds wrapped in a towel. This keeps tears to a minimum when you roll.
Step 2: Mix Dry Ingredients
In a small bowl, whisk together the flour, salt, chili powder (if using), and garlic powder. This is your little dry bed for the batter. The goal is to have a smooth, thick mixture that won’t clump when you add water.
Step 3: Mix Wet Ingredients
Combine the water and oil, whisking until the mixture is smooth and glossy. If you want a touch of tang, a teaspoon of lime juice in the wet mix can brighten things up nicely. If you’re not using the batter to coat the outside, you can skip this step entirely and move straight to rolling with a light brush of oil on the tortilla.
Step 4: Combine
Pour the wet mixture into the dry ingredients and whisk until you have a light, pourable batter. It should be the consistency of pancake batter—thick enough to cling to the tortilla but not so thick that it tears it apart. If it’s too thick, add a teaspoon of water at a time until you reach the right texture. This batter is optional, but it helps coax extra crispness when you want a more lacquered finish on the taquitos.
Step 5: Prepare Filling
In a bowl, mix the shredded chicken with half of the cheese, cilantro, salsa, cumin, garlic powder, and a pinch of salt and pepper. The filling should be moist but not soupy. If you’ve got leftover roasted veggies or a dose of black beans, stir them in here for extra heft and color. Taste and adjust seasoning. Trust me on this: the filling is the soul of the taquitos, so don’t skip a little salt or a bright note from lime zest if you have it lying around.
Step 6: Layer & Swirl
Dip a tortilla in the batter (or brush lightly with oil) and spoon about 2–3 tablespoons of filling near one edge. Roll the tortilla up tightly, tucking in the sides as you go, to form a compact taquito. Place seam-side down on the baking sheet. If you’re feeling fancy, you can lightly drizzle a little ring of the remaining batter around the taquitos before baking to create a delicate, crisp shell. This “swirl” technique adds a touch of texture and a visually appealing finish that earns oohs before the first bite.
Step 7: Bake
Bake for 14–18 minutes, turning once, until the tortillas are golden brown and the cheese inside is melted. If you’re frying, heat a few inches of oil to 350°F and fry in batches until crisp and deeply golden, about 2–3 minutes per side. Drain on paper towels and keep warm in a low oven if you’re assembling for a crowd. I’ve found baking to be less messy and still wonderfully crisp, while frying delivers an extra layer of classic taquito crackle that my family adores.
Step 8: Cool & Glaze
Let the taquitos rest on a rack for a couple of minutes, then whisk together the glaze ingredients until smooth. Brush or drizzle a light layer of the lime crema over the warm taquitos. The glaze isn’t mandatory, but it adds a silky tang that balances the fried edges and the cheese inside. If you prefer a simpler approach, a dollop of crema or sour cream on the side is perfect for dipping and keeps the focus on that glorious filling.
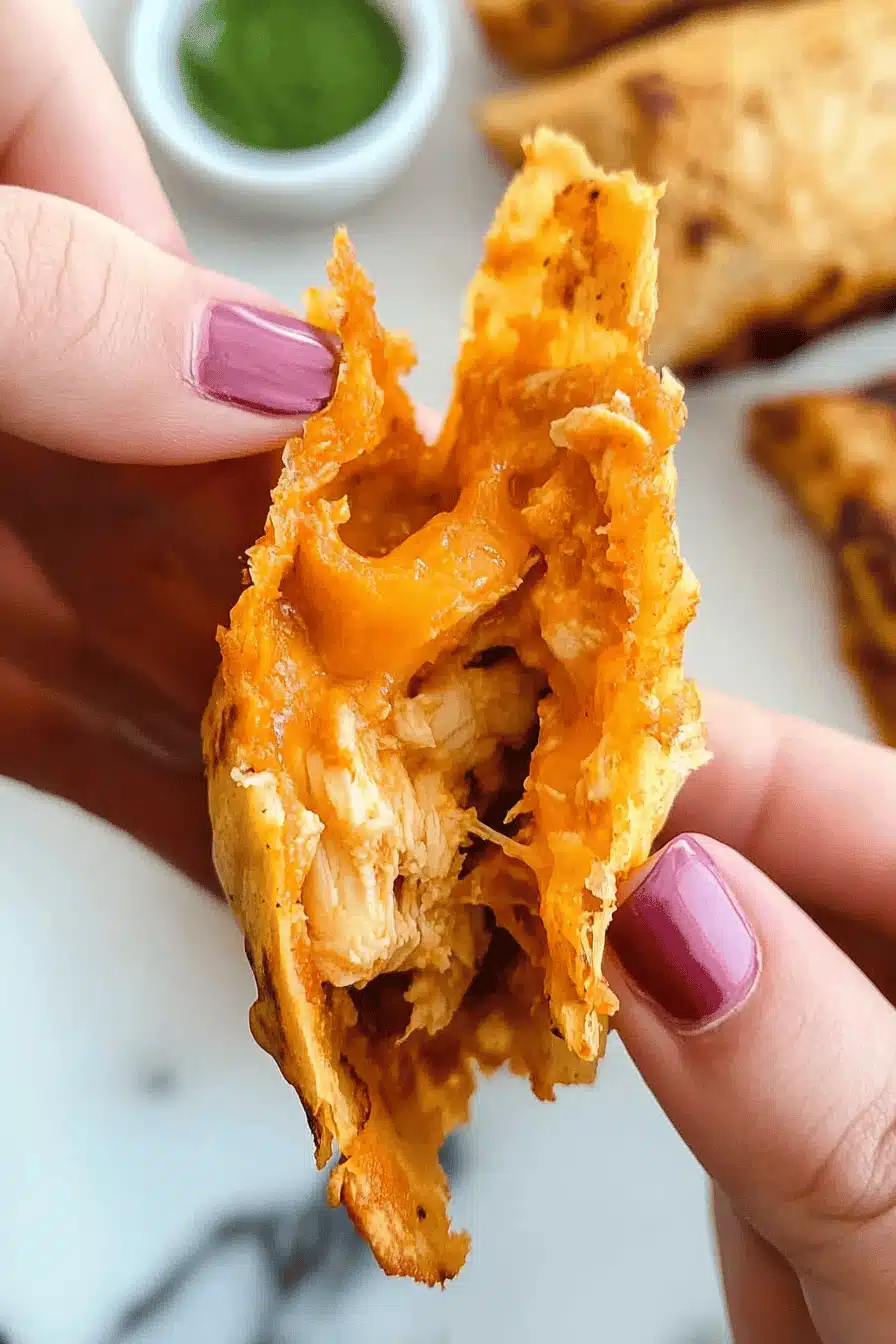
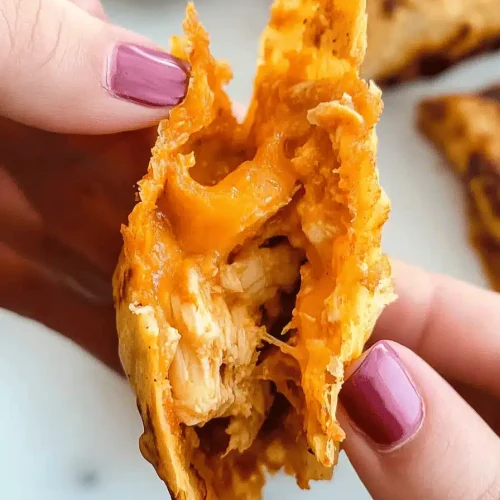
Step 9: Slice & Serve
There’s something satisfying about cutting a taquito in half to reveal a gooey cross-section. Arrange them on a platter with lime wedges, a bowl of salsa, guacamole, and a mug of something warm—my god, it’s a little party in a bite. Serve immediately while the shells are still crisp and the filling is hot. If you’ve got leftovers, these reheat beautifully in a 350°F oven for about 8–10 minutes, coming back to their crispness with minimal effort.
What to Serve It With
Chicken taquitos are inherently festive, so you can tailor their accompaniments to the mood or occasion. Here are a few ideas that make a meal out of them, or turn them into a party spread:
For Breakfast: A bright chive crema or a dollop of sour cream alongside scrambled eggs and slices of avocado makes a playful brunch plate. I love a little pico de gallo on top for a morning zing, and a mug of strong coffee to anchor the flavors.
For Brunch: Serve with a color-rich guacamole, a mango salsa for a sweet-tresh balance, and a light cilantro-lime slaw. Garnish with extra cilantro and a squeeze of lime, and you’ve got a bright, crowd-pleasing brunch option that feels like a celebration.
As Dinner: Pair with black bean and Corn Salad, a simple cucumber-tomato salad, and roasted peppers. A bowl of charred salsa verde adds a smoky contrast that makes the meal feel complete.
For Cozy Snacks: Keep a hot dip nearby—queso with a touch of poblano, or a smoky corn dip. The taquitos shine when you dip, rather than when you overthink the plate, so set out a few bright condiments and let everyone craft their perfect bite.
Family traditions show up here, too. In our house, taquitos with a side of creamy avocado crema became an after-school ritual for my kids, who would devour them in mere minutes and then ask for “one more batch, please.” We’ve also got a soft spot for pairing them with a big bowl of cilantro-laced pico and a light beer or a sparkling agua fresca. These little rolls are the kind of food that invites conversation, and that’s when the kitchen really feels like home.
Top Tips for Perfecting Your Chicken Taquitos
These tips come from countless batches and a few epic kitchen experiments. They’re the tiny tweaks that make a big difference without turning this into a marathon project:
Tortilla Prep: If your tortillas split when you roll, warm them a touch longer or cover them with a damp towel for a few more seconds. A pliable tortilla is the foundation of a perfect taquito. If you’re making them ahead, keep them wrapped in a towel to maintain that softness until you’re ready to fill and roll.
Filling Flavor: I’ve learned that a splash of salsa or enchilada sauce in the filling keeps the meat juicy and adds a gentle brightness. If you’re using leftovers, a sprinkle of cumin and a pinch of chili powder helps bring everything together. Don’t be shy about a little cilantro or a squeeze of lime at the end—bright aromatics make all the difference.
Roll & Layer: Roll tightly and press the seam before placing on the pan. A tight roll holds the filling in, which keeps every bite consistent. If you notice any open seams, dab a touch of the batter along the edge to seal—this prevents the filling from leaking out as it bakes or fries.
Ingredient Swaps: Leftover rotisserie chicken works beautifully, and you can swap in beans or crumbled tofu for a lighter or vegetarian version. If you want spicier taquitos, add a minced jalapeño or a few dashes of hot sauce to the filling. The structure is forgiving—taste as you go and adjust your seasoning before rolling.
Baking Tips: For maximum crispness, space the taquitos evenly and avoid overcrowding. If your oven runs hot, rotate the pan halfway through. If you prefer, finish under the broiler for 2–3 minutes to intensify the crust, watching closely so they don’t burn.
Glaze Variations: The lime crema is a dream, but you can switch it up with a smoky chipotle glaze, a drizzle of honey-lime glaze, or a simple dollop of sour cream. For a punch, add a teaspoon of chipotle in adobo to the glaze and whisk until smooth. The glaze is the finishing kiss on these taquitos, so play with it until it makes you smile.
Lessons learned: the most irresistible taquitos happen when you let the filling taste like something you’d want to eat solo, but wrapped up warm in a tortilla. A little patience for crispness pays off fast because the first bite tells you it was worth the wait.
Storing and Reheating Tips
Cook once, eat twice—these taquitos are the embodiment of that philosophy. Here’s how I keep them tasting fresh, even after a busy day:
Room Temperature: If you’re serving them as part of a platter for a quick gathering, they’re best eaten within 2 hours of baking when they’re still at their crispest. Keep them loosely tented with foil to avoid steaming.
Refrigerator Storage: Store leftovers in an airtight container for up to 3 days. Reheat in a 400°F oven for 8–10 minutes, or in an air fryer at 380°F for 6–8 minutes, until the edges re-crisp and the filling is warm.
Freezer Instructions: Freeze fully assembled taquitos on a baking sheet for 1–2 hours, then transfer to a freezer bag. They’ll keep up to 3 months. Reheat straight from frozen, adding a few minutes to the baking time. If you fry from frozen, let them defrost for a few minutes first to prevent the oil from splattering.
Glaze Timing Advice: If you’re freezing, you’ll typically glaze after reheating to maintain that glossy finish. If you’re serving from the freezer, you can thaw and glaze once warmed through for a clean presentation.
These strategies help you keep the magic consistent, whether you’re feeding a hungry family or planning a simple party spread. The texture should stay crisp, the filling should stay juicy, and the glaze should feel like a bright exhale on top of each bite.
Frequently Asked Questions
Can I make this gluten-free?
Absolutely. Use gluten-free flour in the batter alternative and make sure your tortillas are certified gluten-free. Corn tortillas are naturally gluten-free, and most store-bought versions are fine, but always read labels. The filling is naturally gluten-free as long as you choose salsa or sauce without gluten-containing thickeners. If you’re avoiding cross-contamination, keep a dedicated cutting board and utensils for the taquito filling and assembly.
Do I need to peel the zucchini?
We’re not using zucchini in this recipe, so there’s no peeling involved here. If you’re curious about a zucchini-taco twist in a different dish, I’ve learned that when you grate zucchini finely and squeeze out the moisture, you can fold it into fillings for extra moisture without sogginess.
Can I make this as muffins instead?
Taquitos in muffin form would be a different beast, but you can repurpose the filling into a muffin-tin bake with small tortilla cups. It won’t be a traditional taquito, but it’s a tasty, portable option if you need bite-sized servings for a party. Expect a different texture and maybe a touch longer bake time.
How can I adjust the sweetness level?
Keep sweetness low for classic taquitos. If you want a touch of sweetness (for example, for a kid-friendly variation), add a small amount of honey to the glaze or mix in a tiny bit of maple syrup with the salsa. Always taste as you go, especially if you’re balancing with acidic crema or lime juice.
What can I use instead of the glaze?
You can skip the glaze and serve with a dollop of crema or sour cream, or opt for a simple salsa verde drizzle. A crushed avocado topping with lime and salt is another excellent alternative that keeps the dish bright and fresh.
Final Thoughts
Chicken taquitos aren’t just a recipe; they’re a little moment of togetherness that happens when you gather in the kitchen, plates clink, and the air fills with a toasty, cheesy scent. This version keeps the heart of the dish intact—crisp taco shells, juicy chicken filling, and a bright finish that makes the whole plate sing—while also offering practical tweaks that fit real life: leftovers, easy substitutions, and friendly versatility. If you’re cooking for a crowd or just for your own growing collection of weeknight favorites, these taquitos deliver comfort with a side of joy. Don’t forget to double the batch—that’s the magic of these little rolls. Happy baking, and I can’t wait to hear how yours turn out. Share your tweaks in the comments, rate the recipe, and tell me what you swapped to make it your own.
chicken taquitos
Ingredients
Main Ingredients
- 2 cups shredded cooked chicken breast
- 1 cup shredded cheddar cheese
- 0.5 cup cream cheese, softened
- 0.25 cup green salsa or diced green chilies
- 2 teaspoons taco seasoning mix
- 12 count small flour tortillas
- 2 tablespoons olive oil for brushing
- 0.25 cup finely chopped cilantro
Instructions
Preparation Steps
- Preheat oven to 425°F (220°C). Line a baking sheet with parchment.
- In a large bowl, mix shredded chicken with cream cheese, green salsa, and taco seasoning until well combined.
- Stir in shredded cheddar cheese. Place filling along the center of each tortilla and roll tightly; secure with a toothpick if needed.
- Place taquitos on the prepared sheet, brush with olive oil, and bake 12–15 minutes until golden and crisp. Remove toothpicks.
- Serve with lime wedges and garnish with chopped cilantro.