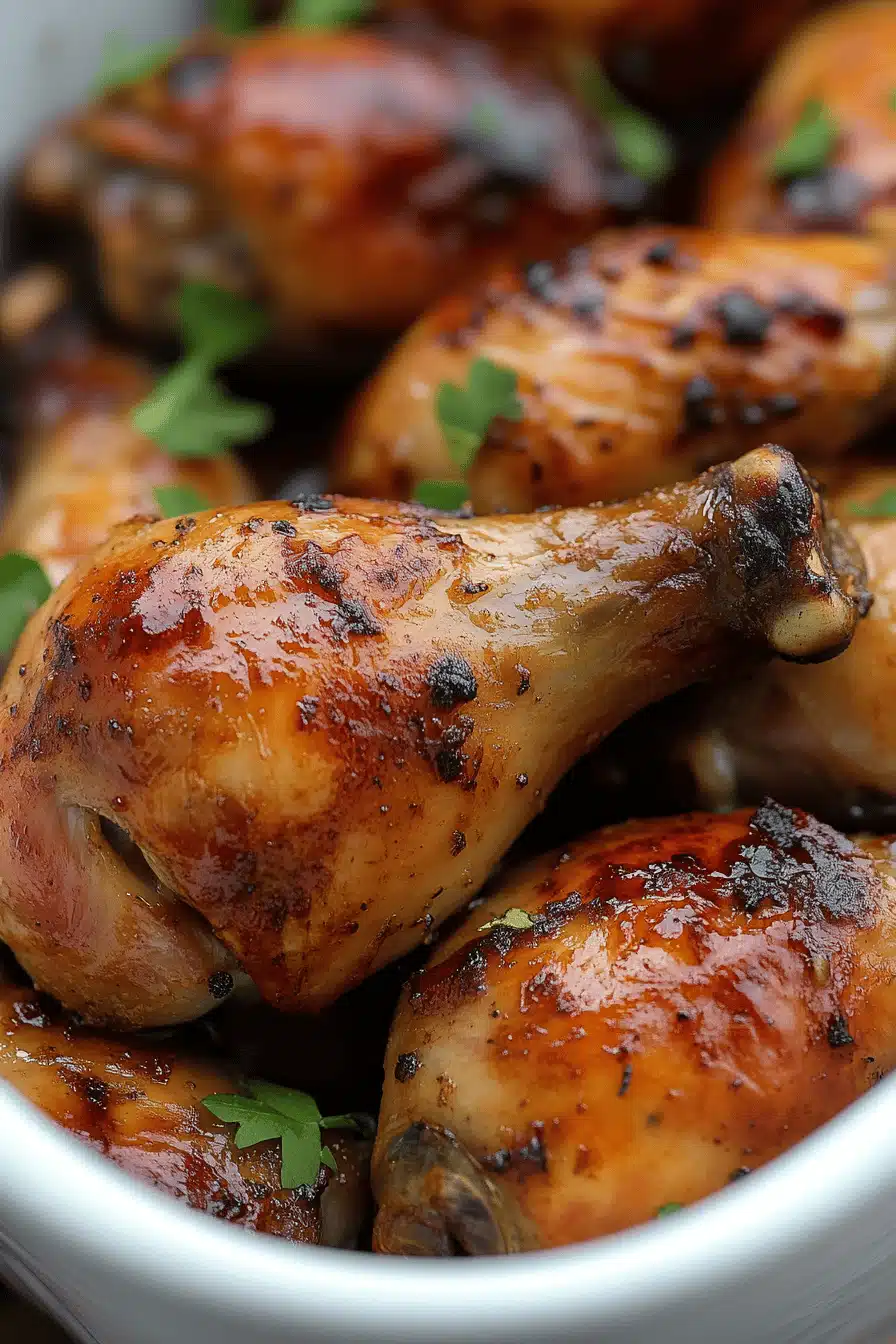
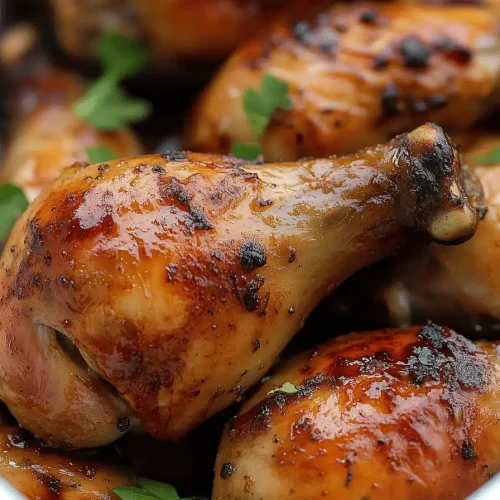
On busy weeknights, I reach for a tray of baked wings that somehow crisp up like they spent all afternoon in a fryer—except they’re in the oven, and I didn’t have to babysit hot oil. The smell alone drifts through the house—paprika, garlic, a little heat, and that glossy glaze that makes everyone’s mouths water before the first bite. I remember my aunt pulling a plate of wings from a crowded oven during family game night, and how the kitchen went silent for a second while we all decided who got the drum and who snagged the wing with the perfect bite. These baked wings aren’t just chicken; they’re a memory. They pair with a cold beer or a sparkling punch, and they disappear in minutes at my house. This version is all about easy ingredients, a crisp crust, and a glaze that can go buffalo-heat or honey-sweet, depending on the night. If you’ve ever fried wings and wished for less grease and more control, you’ll love the way these turn out—crisp, juicy, and deeply comforting, with a touch of nostalgia in every bite.
What is baked wing?
Think of baked wings as the grown‑up version of a party favorite: essentially chicken wings that are roasted to crisp skin while staying incredibly juicy inside. The name is simple, but the concept is deliciously clever: you use a careful dry rub and a quick toss with oil, then let the oven do the heavy lifting. It’s essentially a clean swap for fried wings, with far less mess and a fraction of the guilt. The magic comes from giving the wings a hot, dry heat that kick‑starts crispness, and then finishing with a glaze that clings to every nook and cranny. I love that this method preserves a succulent interior while delivering a crackly exterior that satisfies that crave-every-bite texture. It’s a classic crowd-pleaser that cooks up quickly on weeknights and still feels special enough for weekend gatherings.
Why you’ll love this recipe?
What I love most about these baked wings is how endlessly adaptable they are. They start with a straightforward, pantry-friendly dry rub that crackles in the oven, and the glaze options feel like a small wardrobe of flavors you can rotate week to week. The flavor is bold but balanced—smoky paprika, garlic and onion notes, a hint of heat, and that glossy glaze you can tailor to your mood. The simplicity is what keeps me coming back: pat wings dry, toss with a few pantry staples, bake until the skin is bronzed, then finish with a glaze. It’s genuinely hands-off once they’re in the oven. And the cost? Pretty unbeatable for a party platter or a casual weeknight dinner. My kids actually ask for seconds, which is always a win in our house. This recipe is a lifesaver on busy nights, and it’s become a go-to when friends stop by unannounced—the kind of dish that makes you feel like you’ve got your whole kitchen under control, even if you’re juggling 17 things at once. If you’re craving something that’s still indulgent but doable, this is it.
How do I make Baked Wings?
Quick Overview
We’re going for crisp, well-coated wings with a glossy glaze that sticks. The oven does the hard work: a hot start, a turn halfway through, and a final kiss under the broiler if you want extra crackle. You don’t need to fry, you don’t need fancy equipment, and you won’t end up with soggy skin. The process is simple: pat dry the wings, toss with a dry rub and a touch of oil, bake on a rack or parchment until bronzed, then glaze and bake a touch longer. It’s nearly foolproof and endlessly customizable—perfect for feeding a crowd or a cozy night in with movie night vibes.
Ingredients
For the Main Batter:
- 2 pounds chicken wings (drums and flats), pat dry
- 1 tablespoon baking powder (helps crisp the skin)
- 1 teaspoon fine salt
- 1 teaspoon smoked paprika
- 1 teaspoon garlic powder
- 1 teaspoon onion powder
- 1/2 teaspoon black pepper
- 1/4 teaspoon cayenne (adjust to your heat preference)
For the Filling:
- 2 tablespoons unsalted butter, softened
- 1 clove garlic, finely minced
- 1 tablespoon chopped fresh parsley
- Pinch of salt
For the Glaze:
- 1/4 cup hot sauce (your favorite buffalo-style)
- 2 tablespoons unsalted butter, melted
- 1 tablespoon honey or maple syrup
- 1 teaspoon cider vinegar or lemon juice (optional brightness)
Step-by-Step Instructions
Step 1: Preheat & Prep Pan
Heat your oven to 425°F (220°C). Line a rimmed Sheet Pan with parchment, or better yet, set a wire rack over the sheet. A rack lets air circulate all around the wings so the skin gets beautifully crisp. Pat the wings as dry as you can; this is the secret to crispy skin. I’ll oftentimes leave them on the counter for 10–15 minutes to air‑dry a bit more before the next step. When I don’t do this, the skin isn’t as crackly and I notice the glaze doesn’t cling as well—small, simple details that make a big difference.
Step 2: Mix Dry Ingredients
Combine the baking powder, salt, paprika, garlic powder, onion powder, pepper, and cayenne in a large bowl. The baking powder is the secret weapon here—it raises the skin’s surface just enough to create crispness while the wings roast. Whisk so everything is evenly distributed. I like to give the mixture a quick sniff; if you smell garlic and paprika, you’re in the right zone. Trust me on this, a good dry rub is 90% of the flavor punch in baked wings.
Step 3: Mix Wet Ingredients
Toss the wings with a light drizzle of olive oil—just enough to help the rub stick and to promote that golden sheen. If you’re chasing extra color, you can hit them with a splash of hot sauce at this stage, but it’s not strictly necessary. I usually skip the hot sauce here and save it for the glaze, because the heat from the glaze feels more purposeful than an early coating.
Step 4: Combine
Add the dry rub to the wings and toss thoroughly until every surface gleams with spice. It should feel a little gritty—those tiny sugar crystals in the paprika and baking powder start working as the wings heat up. Spread the wings in a single layer on the rack or parchment; avoid crowding so air can circulate and crispiness can happen on all sides.
Step 5: Prepare Filling
If you want a little extra richness, you can smear a tiny bit of herb butter under the skin of each wing. To do this, gently loosen the skin from the meat with your fingers, press a small amount of the garlic-herb butter under the skin, and press the skin back in place. It’s optional, but I love the way that little foil of butter makes each bite feel indulgent without going overboard. You could also skip this entirely and rely on the glaze to deliver all the flavor.
Step 6: Layer & Swirl
Roast the wings on the rack for 20–25 minutes, then flip them and swap the rack position if your oven has hot spots. If you’re using a glaze, you can drizzle a little over the wings during the last 5–7 minutes to help it cling and caramelize. For a polished look, I’ll sometimes give the wings a light swirl with tongs halfway through; this helps the glaze coat evenly and prevents any one wing from getting too dark too quickly.
Step 7: Bake
Continue to bake until the skin is bronzed and crisp, about 25–30 minutes total. If you like a little extra blistering and crunch, switch the oven to broil for 1–2 minutes at the end, watching closely so they don’t burn. The wings should be cooked through with no pink at the bone. If you’re unsure, an instant-read thermometer should register 165°F (74°C) in the thickest part of the wing.
Step 8: Cool & Glaze
Remove the wings from the oven and give them a brief rest on the pan for 3–5 minutes. Then toss with the glaze. To make the glaze, whisk hot sauce, melted butter, honey, and a touch of cider vinegar if you like a bright finish. I usually balance heat with a bit of sweetness so it doesn’t overwhelm the meat. If you want a lacquered look, brush the glaze on instead of tossing, and let it sit on the hot wings for another minute for a glossy coat.
Step 9: Slice & Serve
For serving, I like a big platter with a sprinkle of flaky sea salt and a scatter of fresh herbs if I’ve got them. Celery sticks and ranch or blue cheese dip are a must at our house, but I’ll also set out a bright yogurt-dill dip if we’re trying something lighter. The first bite should be a balance of hot, spicy, and sweet with that initial crack of crispy skin. If you’re hosting kids, keep the glaze a touch milder, or offer a separate bowl with a gentler version of the glaze. These baked wings shine at room temperature too, which makes them perfect for potlucks or a make-ahead snack for a game night.
What to Serve It With
These baked wings are the kind of dish that scales up or down with the moment. Here are some friendly pairings organized by occasion:
For Breakfast: Hot wings with a tangy yogurt dip might sound wild, but think of them as a big‑flavor start to a weekend brunch. Offer a light, citrusy salad and a robust coffee or a cold-pressed juice to balance the heat. I’ve even whisked a touch of maple into a small yogurt dip and served it alongside a soft scramble for a brunchy, savory-sweet moment.
For Brunch: Serve with a bright cucumber-Dill ranch and a bubbly beverage—think a citrusy sparkling water or a light mimosa. The contrast between the crisp, spicy wings and cool, herb-studded dipping sauce feels celebratory without trying too hard.
As Dessert: This is where my brain loves to twist things: a cinnamon-honey glaze on a version that ends with a vanilla yogurt dip. It sounds odd, but the warmth of cinnamon and the honeyed sweetness can pair surprisingly well with a creamy, lightly sweet finish. It’s not a traditional dessert, but it’s a playful, “after-dish” that signals you’re in for a cozy night.
For Cozy Snacks: The classic pairing of celery and blue cheese alongside a cold beer or a sparkling Apple Cider is a hit. I set out a few dipping bowls, maybe a quick pickled carrot ribbon for crunch, and we’re in comfortable, late-afternoon snack heaven. This is the kind of dish that disappears when friends pop by—no fuss, just good vibes and great texture.
Top Tips for Perfecting Your Baked Wings
[Expert advice organized by technique:]
Wing Prep: Drying the wings as much as possible is your best friend. Pat them dry with paper towels and, if you have time, let them air-dry on a rack for 10–15 minutes. The drier the skin, the crisper the finish after roasting. If your wings look a little glistening, that’s moisture, not flavor—get it off before the heat hits.
Mixing Advice: Don’t overwork the rub. You want an even coating with a slightly gritty texture from the baking powder and spices. Overmixing can cause the surface to clump and prevent that signature crackle the heat should deliver. Use a gentle toss and spread in a single layer, then let the oven do the rest.
Swirl Customization: The glaze is your finish line. If you want an extra glossy look, brush on the glaze while the wings are still hot enough to melt the butter, then give them a final 2 minutes in the oven on a low broil to set it. For color variety during a party, offer two glaze options and let guests choose—blue cheese buffalo versus honey-garlic is a crowd-pleaser.
Ingredient Swaps: You can swap in different spices—chipotle powder for a smoky heat, or curry powder for a warm, unexpected twist. If you’re avoiding dairy, use coconut oil for the wet component and a dairy-free butter substitute in the glaze. The key is balancing heat with sweetness and acidity so the glaze clings without turning syrupy.
Baking Tips: Convection can speed up browning; if you’re using a conventional oven, expect the skin to brown more slowly. Keep an eye on the wings in the last 5 minutes and consider finishing under the broiler for that extra crackle. Space matters—crowded wings steams, not roasts.
Glaze Variations: Try a maple-chipotle glaze for a smoky-sweet finish, or a lemon-dill glaze for a bright, fresh note. The glaze should be thick enough to coat but not so thick that it slides off. If it drips too quickly, whisk in a touch more butter or reduce the glaze on the stove a minute or two longer.
Storing and Reheating Tips
Leftover baked wings don’t always get the love they deserve, but with the right approach, they still taste great. Store them in an airtight container in the refrigerator for up to 3 days. For best texture, keep the glaze separate and toss with the warmed wings just before serving to preserve crispness. If you’re freezing, line a Sheet Pan with parchment and flash-freeze the wings, then bag them up once frozen. Reheat in a 350°F (175°C) oven for about 15–20 minutes, flipping midway. If you glazed them before freezing, you’ll want to reheat and glaze again after they’re warmed through to revive that glossy finish. If you have extra glaze, bring it to a simmer until slightly thickened and use it as a quick finish after reheating.
Frequently Asked Questions
Final Thoughts
These baked wings aren’t just a quick dinner—they’re a little ritual in my kitchen. I’ve learned to let the dry rub do its work, give the wings space on the pan, and trust the oven to do the crisping. The glaze is where I get to play: buffalo heat one night, honey-garlic the next, a touch of citrus when we’re craving brightness. They’re flexible enough to feed a crowd, but also comforting enough for a solo cook to savor with a cold drink and a good movie. If you try this once, you’ll see why I keep coming back to it—family, friends, and a plate that somehow feels like home. I’d love to hear how you customize your glaze or what sides you pair with your baked wings. Leave a comment, rate the recipe, and tell me about your favorite twist. Happy cooking!
baked wings
Ingredients
Main Ingredients
- 1.5 pounds chicken wings (split and tips removed)
- 1 tablespoon all-purpose flour
- 1 teaspoon baking powder
- 0.5 teaspoon seasoned salt
- 0.5 teaspoon black pepper
- 1 tablespoon olive oil
Instructions
Preparation Steps
- Pat wings dry with a paper towel.
- Preheat the oven to 425F.
- In a large bowl whisk together flour, baking powder, salt and pepper.
- Toss wings with olive oil and dry rub until coated.
- Spread wings on a rack set over a foil lined sheet. Bake 20 minutes, flip and bake 20 more minutes until crisp.
- Serve with dipping sauces or toss in your favorite sauce.