There’s something magical about the smell of creamed corn simmering on the stove that takes me straight back to my grandmother’s kitchen. The sweet, buttery aroma would fill the room, wrapping me up like a warm hug. I always knew when creamed corn was on the menu because it meant comfort—and maybe a little indulgence too. It’s one of those side dishes that feels special without being complicated, a little treat that’s creamy, sweet, and perfect for practically every meal. Honestly, I’ve tried fancy recipes with dozens of ingredients, but this one—with its simple, fresh ingredients—always wins my heart. If you love the creamy goodness of risotto but want something way simpler and more comforting, trust me, this creamed corn recipe will surprise you and become your speedy go-to.
What is creamed corn?
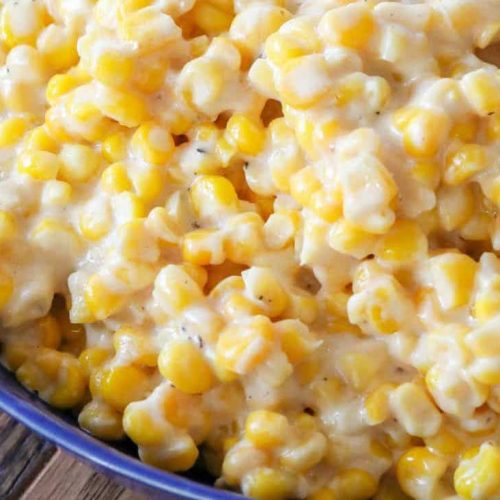
Alright, so creamed corn might sound fancy, but it’s really just a sweet, creamy dish made from fresh or canned corn cooked down with cream (or milk), butter, and a little bit of seasoning. Think of it as corn’s humble, cozy cousin to corn on the cob—soft, silky, and just sweet enough. The “creamed” part doesn’t mean it’s loaded with cream necessarily; it refers to the smooth texture you get when some of the corn kernels are mashed or pureed into the cooking liquid, creating that luscious, velvety sauce that clings to every bite. Back in the day, this was a way to stretch sweet corn when it was in season and make it more filling. Nowadays, it’s a beloved side dish that feels both nostalgic and comforting, perfect for family dinners or when you want to impress without the fuss.
Why you’ll love this recipe?
What I love most about this creamed corn recipe is how it hits that sweet spot between rich and light. It’s creamy, yes, but not heavy—you still taste the fresh corn’s juicy pop with every spoonful. It’s like getting the best parts of corn in a totally comforting, warm embrace. Plus, this dish is an absolute lifesaver on busy nights when I want to throw something simple together but still feel like I’m making a little magic happen in the kitchen.
It’s super easy to make, with ingredients you likely already have on hand: corn (fresh or frozen), a splash of cream or milk, butter, and a few seasonings. I tested this recipe with almond milk once just for kicks, and it actually made it even creamier without weighing it down—a tip if you’re looking to lighten things up!
Not to mention, it’s budget-friendly. Corn is affordable and versatile, and a batch of creamed corn fills a whole pot that lasts for several meals. My kids ask for this dish all the time, especially alongside roasted chicken or breakfast eggs. It’s so versatile —whether you want it with your morning hash browns, served alongside a Sunday roast, or even as a sweet little dessert-like snack at the end of the day, it feels like a hug in a bowl every time.
How do I make creamed corn?
Quick Overview
This recipe is about bringing out the natural sweetness of corn and marrying it with a creamy, buttery base that feels indulgent but is crazy easy to pull off. You simmer fresh or frozen kernels gently, mash a portion to create texture and those silky, creamy pockets, then finish with butter and a splash of cream or milk. It’s quick enough to make on a weeknight but tasty enough to serve to company. No fancy equipment or long hours—just simple steps that make a big impact.
Ingredients
What is creamed corn?
– 4 cups fresh or frozen corn kernels (fresh is best when in season, but frozen works beautifully too)
– 2 tablespoons unsalted butter (quality matters here—good butter really lifts the flavor)
– 1/2 cup heavy cream or whole milk (or almond milk for a lighter twist)
– 1 tablespoon all-purpose flour (optional, for a thicker, creamier texture)
– 1 teaspoon sugar (balances the natural sweetness, but add less if corn is very fresh)
– Salt and freshly ground black pepper to taste
Step-by-Step Instructions
Step 1: Prep Your Corn
If you’re using fresh corn, carefully cut the kernels off the cobs with a sharp knife. Be sure to do this over a bowl to catch all the sweet juice inside the cob—this “corn milk” packs serious flavor and creaminess. For frozen corn, thaw and drain well to avoid extra water diluting the creaminess.
Step 2: Sauté the Corn
Melt the butter in a medium skillet over medium heat. Add the corn kernels and the corn milk (if you have fresh corn juice), letting everything sizzle gently. Stir occasionally, cooking just until the corn starts to soften and sweat its sweetness—about 4-5 minutes.
Step 3: Create the Creamy Base
Sprinkle the flour evenly over the corn and stir it around. This step is optional but it helps thicken the mixture into that silky texture we all love. Cook for another 1-2 minutes to cook out the raw flour taste—watch it closely so it doesn’t brown or burn.
Step 4: Stir in Cream and Season
Slowly pour in your cream or milk, stirring constantly. The mixture will thicken and become glossy. Add sugar, a pinch of salt, and black pepper. Taste as you go—every batch of corn is different!
Step 5: Mash Some Kernels
Lightly smash a handful of the corn kernels with the back of a spoon or a potato masher right in the pan. This gives you those creamy pockets while keeping plenty of the corn’s natural texture and pop.
Step 6: Simmer & Finish
Reduce the heat to low and let the creamed corn gently bubble for a few more minutes, stirring often until thick and creamy but not gluey. If it gets too thick, add a splash more cream or milk to loosen it up.
Step 7: Serve warm, and enjoy the cozy goodness!
If you want to add a sprinkle of fresh herbs like chives or parsley, it adds a lovely freshness, but honestly, plain buttered creamed corn is nostalgic enough to stand on its own.
What to Serve It With
For Breakfast: I love serving creamed corn alongside crispy bacon and a soft fried egg. Pour a mug of strong coffee, and you’ve got a comforting start to any day.
For Brunch: Plate it with buttery biscuits and grilled sausages for a simple yet elegant spread. A mimosa or fresh-squeezed orange juice rounds it out perfectly.
As Dessert: This might surprise you, but with a pinch of cinnamon and a drizzle of honey, creamed corn can turn into a sweet, cozy end-of-day treat. Serve warm with a dollop of whipped cream or vanilla ice cream.
For Cozy Snacks: When you’re craving something warm and simple in the afternoon, a bowl of creamed corn hits the spot. My kids love it with just a sprinkle of cheddar melted on top—total comfort food joy.
Top Tips for Perfecting Your Creamed Corn
Corn Freshness: Fresh corn really makes a difference. When I can get ears fresh from the farmer’s market, it’s an easy way to lift the whole dish. If you only have frozen, thaw thoroughly and pat dry before cooking.
Don’t Skip the Corn Milk: That juice packed inside the cob is liquid gold. Capturing it while cutting the corn adds natural sweetness and creaminess you can’t get otherwise.
Flour or No Flour: Flour helps thicken, but if you want a lighter creamed corn, just simmer longer and mash a few more kernels to reach your desired texture.
Butter Matters: Use real good-quality unsalted butter here. It gives a depth of flavor that margarine or oil just can’t touch.
Mixing it Up: I’ve tossed in a little creme fraiche instead of cream for a tangier edge, which was a nice surprise on Thanksgiving. Add a pinch of cayenne for warmth if you’re feeling adventurous.
Low and Slow: Keep your heat moderate so the sugars in the corn cook gently—it prevents bitterness and keeps the dish silky. I always stir often and watch closely.
Glaze Variations: Some add a quick brush of browned butter on top before serving for a nutty, glossy finish. Others like a sprinkle of smoked paprika or fresh herbs for a twist.
Trust me on this one—these little details changed my creamed corn game forever.
Storing and Reheating Tips
Room Temperature: If you’re serving it soon, creamed corn is best eaten fresh or within a couple of hours at room temperature. Cover tightly with foil or a clean towel to retain moisture.
Refrigerator Storage: Store leftovers in an airtight container for up to 3 days. When reheating, add a splash of milk or cream to loosen it up and stir gently over low heat to avoid curdling.
Freezer Instructions: You can freeze creamed corn in a sealed container or heavy-duty freezer bag for up to 1 month. Thaw overnight in the fridge, then warm slowly on the stove with a little cream to bring it back to life.
Glaze Timing Advice: If you glaze creamed corn with browned butter or other toppings, add those fresh after reheating, not before freezing, to keep things tasting fresh.
Frequently Asked Questions
Final Thoughts
This creamed corn recipe has been a quiet hero in my kitchen for years. It’s that one dish you can depend on to bring warmth and comfort without fuss, a little bowl of homemade happiness that’s sweet, buttery, and oh-so-satisfying. Whether you’re serving it up for a simple weeknight supper or a holiday gathering, it seems to disappear in minutes—my family’s verdict every time. If you love this cozy classic, I encourage you to explore more easy sides that capture home-cooked comfort effortlessly, like creamy mashed potatoes or garlic sautéed green beans.
Give it a try, and don’t be shy with sharing how yours turns out—I’m always eager to hear new twists or favorite ways you enjoy creamed corn. Happy cooking, friend, and here’s to many cozy bowls ahead!
creamed corn
Ingredients
Main Ingredients
- 32 oz frozen corn
- 8 oz cream cheese cut into 1 inch cubes
- 0.33 cup heavy cream
- 0.25 cup butter
- 2 tbsp sugar
- 0.5 tsp freshly ground black pepper
- 0.25 tsp kosher salt be careful not to over salt
Instructions
Preparation Steps
- Combine all ingredients in the crock-pot and cook on low for 4 hours. Stir to combine and ensure the cream cheese has completely melted into the sauce.
- The finished corn will hold nicely on low (or on warm, if your Crock-Pot has that setting) for another hour or two without a problem. Enjoy!