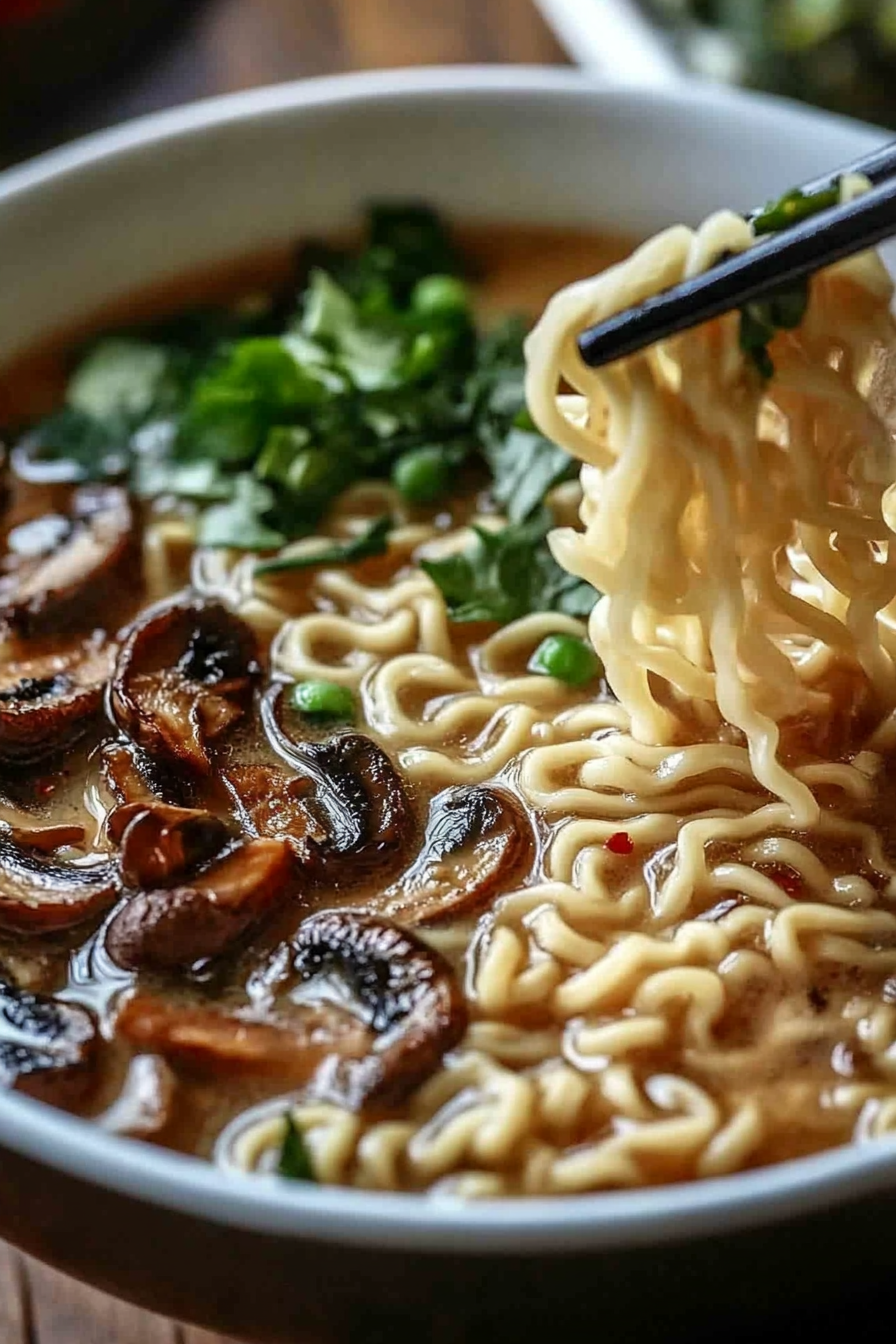
I’ll never forget the first time I tasted a Mushroom Ramen that tasted like a hug in a bowl. It was after a long, chilly day, and the kitchen fog smelled of garlic, miso, and something earthy from sautéed mushrooms that could only come from honest, patient cooking. This is the version I keep coming back to—the one that feels wonderfully indulgent without being fussy. It’s a bowl you can reach for on busy weeknights and still feel like you’ve treated yourself. And yes, it’s vegan, so there’s no compromise on flavor or comfort. Vegan Mushroom Ramen has that cozy, umami-rich moment you crave on a rainy evening, yet it comes together with a smile. Think of it as ramen with a little more soul, a little more depth, and a lot more mushroom magic. If you’ve ever compared a basic veggie broth to a broth that’s simmered with a handful of mushrooms and miso, you know the difference—this version leans into that warmth without demanding hours in the kitchen.
What is vegan mushroom ramen?
Vegan Mushroom Ramen is, at its core, a plant-based riff on a classic ramen bowl. Think chewy noodles, a lacquer-dark, deeply savory broth, and a gallery of toppings that bring texture and brightness to every bite. The name says it all: vegan, mushroom-forward, and ramen through and through. It’s essentially a one-pot-night-in-kind of dish—you start with a mushroom-packed broth, coax out its umami, then crown the bowls with caramelized mushrooms, greens, and a glossy glaze that ties everything together. I love how the dish feels indulgent but is entirely approachable—you can customize every tip and tweak to your mood, your pantry, or what’s growing in your garden. This isn’t about perfection; it’s about comfort, aroma, and that satisfying slurp of broth and noodles when you plate up.
Why you’ll love this recipe?
What I love most about Vegan Mushroom Ramen is the way it balances depth and speed. The broth comes alive with a simple handful of ingredients, and the mushrooms do most of the heavy lifting in the flavor department. This is a lifesaver on busy nights because you can simplify the steps and still end up with something that tastes like it simmered all day. The aroma alone—garlic kissing the oil, ginger backing it up with a bright zing, miso lending a rounded, salty-sweet hug—is enough to make your kitchen feel like a cozy ramen shop. It’s friendly on the wallet, too: pantry staples like soy sauce, miso, and mushrooms carry a lot of flavor without breaking the budget. And the versatility is real. You can switch up the mushrooms for shiitake and cremini, toss in tofu for protein, or crown bowls with greens and pickled veg for a bright finish. What I love most about this is its three-layer texture: the springy noodles, the velvety broth, and the crisp-tender mushrooms that somehow taste meaty without needing any animal products. If you’ve got a friend who loves a good umami hit, this is the bowl you’ll want to share. It’s also a natural gateway to other vegan ramen riffs—try swapping in different mushrooms or adding a dab of chili crisp for heat that blooms in the finish. Trust me on this one: you’ll make it again and again, and your kitchen will smell like a hug waiting to happen.
How do I make vegan mushroom ramen?
Quick Overview
Here’s the fast, honest version: we start by building a mushroom-forward broth, then braise mushrooms in a little soy and sesame for color and glaze. The noodles go into the hot broth just long enough to soak up flavor, while the filling mushrooms get crisp edges and a glossy glaze for visual punch. The final swirl of glaze and a handful of greens pull everything together in a single, steaming bowl. This method keeps things simple and avoids overcomplicating the process. You’ll notice the broth thickens slightly as it simmer, and the mushrooms develop a glossy, caramelized coating that’s irresistible. If you’ve got 30 minutes, you’ve got dinner—promise.
Ingredients
For the Main Batter:
- 4 cups vegetable broth, low-sodium
- 2 cups water
- 3/4 cup cremini mushrooms, finely chopped
- 2 tablespoons white miso paste
- 1–2 tablespoons soy sauce or tamari (gluten-free if needed)
- 1 tablespoon sesame oil
- 2 garlic cloves, minced
- 1 inch fresh ginger, grated
- 1 teaspoon rice vinegar or mirin (optional for a touch of sweetness)
- 1 teaspoon chili paste or chili oil (optional for a gentle kick)
For the Filling:
- 2 cups mixed mushrooms (shiitake and cremini work beautifully)
- 1 tablespoon olive oil or neutral oil
- 2 tablespoons soy sauce
- 1 teaspoon cornstarch (to help crisp and lacquer the mushrooms)
- 1 block extra-firm tofu, pressed and cubed (optional)
- Salt and pepper to taste
- Green onions or scallions for garnish
For the Glaze:
- 2 tablespoons soy sauce
- 1 tablespoon maple syrup or brown sugar
- 1 teaspoon rice vinegar
- 1 teaspoon sesame seeds (optional)
- 1 teaspoon chili oil or hot sauce (adjust to your heat level)
Step-by-Step Instructions
Step 1: Preheat & Prep Pan
Heat your oven to 375°F (190°C) if you’re baking the mushrooms to finish; otherwise, have your skillet ready on the stove. I like to line a Sheet Pan with parchment for any mushroom crisping and set aside a big pot for the broth. The key here is to keep things moving, so I prep everything within arm’s reach: mushrooms sliced, garlic minced, ginger grated, and miso whisked into a little broth to dissolve smoothly later. Friends, if you smell garlic and ginger mingling right now, you’re in the right zone.
Step 2: Mix Dry Ingredients
In a small bowl, whisk the miso paste with a splash of the vegetable broth until it’s smooth and lump-free. This prevents the miso from clumping later and gives you a silkier broth. Then, measure out the soy sauce, chili paste, and sesame oil so they’re ready to go. The goal here is organization more than anything—the more prepared you are, the quicker the rest of the steps go.
Step 3: Mix Wet Ingredients
In a larger pot, combine the rest of the broth with the water. Add the miso slurry, garlic, and ginger. Bring to a gentle simmer and let it ride there for about 8–10 minutes. You’re not looking for a boil; you want a calm bubble that coaxs out all that mushroomy depth. If you’ve got a splash of mirin, now’s the time to drop it in for a touch of sweetness that balances the savoriness.
Step 4: Combine
Stir in the sliced cremini, the soy sauce, and the sesame oil. If you’re using a little chili paste, add it now. Let the mixture simmer until the mushrooms soften, about 5–7 minutes. If the broth looks a bit thin, a teaspoon of cornstarch whisked into a small amount of cool broth and stirred in will help it cling to the noodles later. The texture you want is broth that’s rich but not heavy, with a transparent gloss that hints at the umami to come.
Step 5: Prepare Filling
Meanwhile, toss the filling mushrooms in oil, soy sauce, and a light dusting of cornstarch. This helps them crisp and color as they sauté. If you’ve got tofu, you can sear it separately until it’s golden on all sides. The filling is your textural contrast—mushrooms with a little bite and tofu that adds protein and heft. My kids actually ask for seconds of this part, which is always a good sign.
Step 6: Layer & Swirl
As the broth takes on flavor, line your bowls with a handful of greens if you like (spinach or arugula both work well). Layer in the noodles so they’re just covered by broth, then spoon generous portions of the glossy mushroom filling on top. Drizzle a little glaze over the mushroom layer to create that caramelized, lacquered finish. A few green onions tossed over the top give a fresh bite and a pop of color that makes the bowls feel special.
Step 7: Bake
Here’s where the oven comes in if you’re going the ramen-bake route: slide the bowls onto a baking sheet and bake for 12–15 minutes, just long enough for the flavors to mingle and for the edges of the mushrooms to crisp slightly. If you’re not baking, simply let the bowls remain on the stovetop and maintain a gentle simmer so the greens wilt and the noodles soak up that gorgeous broth.
Step 8: Cool & Glaze
While the bowls rest, whisk together the glaze ingredients. The glaze should be thin enough to drizzle but thick enough to cling to the mushroom tops. If you’ve baked the bowls, brush a little glaze over the mushrooms as soon as they come out of the oven and sprinkle sesame seeds on top for that extra crackle of texture. If you’re serving straight from the stove, drizzle the glaze over the mushrooms just before serving. The glaze is the finishing kiss—a sweet-salty lacquer that ties the entire bowl together.
Step 9: Slice & Serve
When you ladle the broth into bowls, be mindful of where the noodles sit so each spoonful has a bit of everything: broth, noodles, mushrooms, and greens. If you’re plating, a light sprinkle of scallions and a final tiny drizzle of glaze makes it look restaurant-worthy even on a Tuesday night. The first bite should give you a chorus of textures—silky broth, chewy noodles, and the glossy, caramelized mushrooms that taste like a small celebration. This is the moment where the kitchen light seems to glow a touch brighter, and you’ll hear your family inhale in contentment. My kids ask for seconds so often that I’ve learned to double the recipe just to be safe.
What to Serve It With
This Vegan Mushroom Ramen shines on its own, but it’s even better with a few carefully chosen accompaniments that make the meal feel complete and bright. Here are some ideas you can mix and match depending on the occasion and what you’ve got in the fridge:
For Dinner: A quick side of cucumber-ginger pickles and sesame-ticked greens adds brightness and crunch. A small bowl of roasted edamame or crispy tofu bites gives extra protein and texture, and a warm, fluffy loaf of crusty bread for sopping up the last spoonful of broth never hurts.
For Brunch: Think a light, fresh cucumber salad with rice vinegar and sesame seeds, plus a lemony jump of zest over the greens. A simple miso-glazed mushroom topping can double as a savory topping for toast if you want a playful twist.
As Dessert: Okay, this is not dessert, but if you’re in a mood for something comforting after a savory bowl, a tiny square of dark chocolate or a cup of green tea works beautifully with the finish of sesame and warmth of miso. This is more of a “closing ritual” than a dessert, and it keeps the kitchen cozy rather than closing it down entirely.
For Cozy Snacks: If you’ve got guests who arrive hungry and want something shareable, set out a small platter of pickled veggies, lightly sautéed mushrooms, and a few crispy tofu bites for dipping into the broth. It becomes a little communal moment—everyone grabs a bite, chats about the day, and the kitchen fog feels friendly again.
These little extras aren’t strict requirements; they’re the kind of touches that make a weeknight dinner feel special without demanding a lot of extra time. And honestly, the broth alone is such a hug in a bowl that you’ll want to come back to it again and again, no matter what you’re pairing with it.
Top Tips for Perfecting Your Vegan Mushroom Ramen
Here are a few tricks I’ve learned after making this countless times. They’re simple, practical, and they make a real difference in flavor and texture.
Mushroom Prep: Don’t rush the sauté. Let the mushrooms sit in the hot pan long enough to brown and release their moisture. A quick sear adds depth that you simply won’t get from boiling alone. If you’re aiming for that lacquered glaze, give the mushrooms a little extra time in the pan at the end to really pick up that color.
Mushroom Variety: I reach for a mix of cremini and shiitake for the best texture and flavor. White mushrooms won’t give you the same depth, while portobello can overwhelm the dish. If you only have one kind on hand, go with cremini—they’re consistently reliable and forgiving.
Mixing Advice: Avoid overmixing the broth after you add miso. Miso is delicate and beautiful, but it can become funky if you boil it for too long. Gentle simmer is your friend here; if you need to thicken the broth, whisk a tiny amount of cornstarch with cold water and stir in quickly at a simmer.
Swirl Customization: A two-tone glaze looks stunning—try a regular glaze and a spicy glaze side-by-side, then swirl them in the bowl for a visual pop. You’ll create a beautiful marbling effect that also tastes amazing in each bite.
Ingredient Swaps: You can swap in tofu, tempeh, or edamame for protein. If you’re avoiding soy, try a splash of coconut aminos in place of soy sauce for a slightly sweeter flavor profile. If you want to cut through the richness a touch, a handful of fresh spinach added at the end keeps things lively and bright.
Baking Tips: If you decide to bake the mushrooms, spread them in a single layer and don’t overcrowd the pan. A hot oven helps them caramelize and pick up that glossy glaze. Place them on a middle rack so they cook evenly and don’t burn at the edges.
Glaze Variations: The glaze is flexible. If you want more sweetness, add a touch more maple syrup. If you crave extra heat, add a splash of chili oil or a pinch of red pepper flakes. Toasted sesame seeds on top are a simple, glorious finish that makes the dish look restaurant-worthy.
My personal favorite tweak is to pair this ramen with a quick side of greens wilted in a little sesame oil—something that adds a crisp bite to balance the tenderness of the noodles and the velvet broth. It’s a tiny addition that elevates the entire meal and makes the kitchen feel like a shared space where everyone’s welcome to contribute their own flavor ideas.
Storing and Reheating Tips
Leftovers happen, and when they do, you want them to taste just as cozy as when you first whipped them up. Here’s how I handle storage and reheating to keep the flavors fresh and the texture pleasing.
Room Temperature: If you’re not finishing the bowls within a couple hours, refrigerate promptly. Leaving broth and noodles out can invite uninvited guests (not the fun kind). If you’re in a rush, you can keep the components separate for a shorter time and reassemble later.
Refrigerator Storage: Store in airtight containers for up to 3–4 days. The broth will keep its umami, and the greens will stay relatively vibrant if you don’t overcook them during reheating. Reheat gently on the stove or in a microwave with a splash of water or broth to loosen the noodles.
Freezer Instructions: This dish freezes best when you store the broth and mushrooms separately from the noodles. Freeze for up to 2 months for best texture. Thaw slowly in the fridge, then reheat gently on the stove, adding fresh noodles if you prefer a brand-new texture for the noodles upon reheat.
Glaze Timing Advice: If you’re reheating, keep the glaze separate until you’re ready to serve. Lightly brush or drizzle it on top right before you serve to preserve shine and texture. It’s a small but crucial step to keep that glossy, restaurant-like finish.
These tips have saved me many times—especially on those nights when I’ve cooked for friends and realized I forgot to plan for leftovers. A quick, confident reheat means you can still serve something delicious and comforting even when time is short.
Frequently Asked Questions
Final Thoughts
This Vegan Mushroom Ramen has a way of becoming a beloved ritual in my kitchen—the kind of dish I reach for when I want something comforting, nourishing, and a little indulgent without requiring a long, complicated process. It’s the kind of recipe that invites conversation at the table, the kind that makes your house smell like someone cared enough to simmer, braise, and glaze a bowl for you. If you’re new to vegan ramen, this is a welcoming place to start—the way the miso, sesame, and mushrooms mingle is a masterclass in building flavor with simple ingredients. If you’re a longtime mushroom lover, you’ll recognize a familiar, cozy aroma that signals dinner is almost ready. I hope you’ll try it, tweak it, and share your variations—I’d love to hear what your family loves most about it. Happy cooking, and may your bowls be warm and your smiles be bright!

