There’s something about the smell of caramel popcorn that instantly takes me back to cozy movie nights at home, wrapped in a blanket with my family. The buttery, sweet aroma swirling in the air, that satisfying crunch with every bite — it’s pure comfort. I’ve tried lots of snacks over the years, but caramel popcorn has this magical way of feeling both indulgent and nostalgic. It’s way better than regular buttered popcorn and way easier to nail at home than you might think. Every time I make a batch, my kids crowd around the kitchen counter, practically begging for “just one more handful.” If you’re craving something sweet and crunchy that comes together in under an hour, you’re going to love this recipe. Trust me, the golden caramel coating is worth every minute.
What is caramel popcorn?
At its core, caramel popcorn is popcorn generously coated in a rich, sticky caramel sauce — think buttery sugar cooked just right until it turns golden and glossy, then lovingly mixed into crunchy popped kernels. The name’s pretty straightforward, but the beauty is in that luscious caramel layer that transforms simple popcorn into something irresistible. It’s essentially the classic carnival treat you see at fairs, but homemade and without all the artificial stuff. Making it at home means you get to customize the sweetness and texture exactly the way you like, which I find way more satisfying. Plus, it’s a nostalgic treat with roots in old-timey American snacking culture, where sweet and crunch always trumped the ordinary. It’s the kind of snack that feels festive but also perfect for when you just want to curl up with something delicious and simple.
Why you’ll love this recipe?
What I adore most about this caramel popcorn recipe is its balance — it’s sweet, yes, but not so much that it overwhelms, and the slight saltiness from the butter gives it a perfect little kick. The caramel is rich and buttery, with just enough chew to hold that crunchy popcorn together without turning into a candy brick. Honestly, it’s one of the easiest homemade snacks to whip up. No fancy equipment, just a few pantry staples that probably live in your kitchen already. You can make it big for a crowd or a smaller batch for a quiet night in. And because I’m all about budget-friendly treats, I love that this one relies on simple, affordable ingredients but tastes like a decadent treat. It’s way better than store-bought bags that are loaded with preservatives and weird stuff you can’t pronounce. My favorite part, though? This recipe is super versatile — add nuts, drizzle with chocolate, or toss in cinnamon for a twist. It’s like your canvas. For a quick snack or a party wow-factor, this caramel popcorn is the real deal, and my family always asks for seconds!
How do you make caramel popcorn?
Quick Overview
Making caramel popcorn at home is simpler than you might expect — start by popping your kernels, then patiently cook up a luscious caramel sauce on the stove, drizzle it over the popcorn, and bake it just briefly to get that perfect crunchy coating. The trick is in cooking the caramel to just the right color and cooling it down so it sticks without clumping. This process is what makes homemade caramel popcorn superior — no soggy or sticky mess, just perfectly glossy, crispy, sweet popcorn every time. Patience here pays off with that deep, buttery flavor and magic crunch. And yes, it smells heavenly!
Ingredients
For the Popcorn:
- 1/2 cup popcorn kernels (choose fresh, good-quality kernels for the best pop)
- 2 tablespoons vegetable oil (for popping; neutral oil is best)
For the Caramel Sauce:
- 1 cup unsalted butter (real butter is key for flavor)
- 2 cups packed light brown sugar (adds that deep caramel richness)
- 1/2 cup light corn syrup (keeps caramel smooth and prevents crystallization)
- 1 teaspoon kosher salt (balances sweetness and enhances flavor)
- 1/2 teaspoon baking soda (makes the caramel lighter and helps it coat evenly)
- 1 teaspoon pure vanilla extract (adds warmth and complexity)
Step-by-Step Instructions
Step 1: Pop the Kernels
I always use a big, heavy-bottomed pot and heat the vegetable oil over medium-high heat. When it’s shimmering, drop in a few kernels to test. Once they pop, dump in the rest and cover with a lid, shaking the pot occasionally so they pop evenly and don’t burn. When the pops slow to a few seconds apart, remove from heat and pour the popcorn into a large bowl, discarding any unpopped kernels. Pro tip: I line the bowl with parchment to make cleanup easier!
Step 2: Make the Caramel Sauce
In a medium saucepan, melt the butter over medium heat. Stir in the brown sugar, corn syrup, and salt. Bring this mixture to a rolling boil, stirring constantly. Let it boil for exactly 5 minutes without stirring — this caramelizing step is what gives the sauce that toffee-like depth. The timing here is crucial: too short and it won’t set right, too long and it could burn. Set a timer and watch closely.
Step 3: Add Baking Soda and Vanilla
Remove the saucepan from heat right after boiling then stir in the baking soda and vanilla extract. You’ll notice the caramel foam up and lighten in color — that’s a good sign! This step makes the caramel less dense, so it clings to every popcorn kern beautifully without becoming too hard.
Step 4: Combine Popcorn and Caramel
Pour the sticky caramel sauce over the popcorn gently, folding with a large spatula or wooden spoon to coat as much surface as possible. Be patient and thorough but try not to break the popcorn — it’s a delicate dance of coating without crushing. It’s okay if some spots get less coating — those crunchy bits balance the sweetness.
Step 5: Bake to Crunch Perfection
Spread the coated popcorn evenly on a large parchment-lined baking sheet. Bake at 250°F (120°C) for 45-60 minutes, stirring every 15 minutes to make sure it doesn’t clump and gets that irresistible crispy texture. Watching it in the oven is like waiting for sunshine — you know it’ll be worth it.
Step 6: Cool Completely
Once baked, let the caramel popcorn cool completely on the baking sheet. This step is crucial because it allows the candy coating to harden just enough so the popcorn keeps its snap without sticking together in one big chunk. Once cooled, break it apart gently and transfer to a bowl or an airtight container.
Step 7: Enjoy!
Serve immediately or store for later snacking. This is one of those recipes where the smell alone draws everyone in, so be prepared to share fast!
What to Serve It With
For Breakfast: Pair a small bowl of caramel popcorn with your morning coffee for a sweet little treat that feels a bit indulgent without ruining the day. I love it sprinkled over Greek yogurt with fresh berries—kids think it’s dessert for breakfast!
For Brunch: Serve caramel popcorn alongside a fruit platter or mini quiches for a touch of crunchy sweetness. It balances savory dishes nicely and makes brunch feel extra festive. A sparkling cider or a lightly sweetened iced tea are great drink partners here.
As Dessert: Caramel popcorn is a fun topping for ice cream sundaes or a sweet, crunchy counterpart to a slice of chocolate cake. My family’s favorite way is to eat it alongside a scoop of vanilla bean ice cream—plus a drizzle of hot fudge if you’re feeling fancy.
For Cozy Snacks: There’s nothing like a bowl of caramel popcorn on a lazy evening with a good movie or a book. My husband and I love sharing it with a cup of herbal tea or hot cocoa—it’s the ultimate comfort combo during chilly months.
Honestly, this treat has become a little family tradition in our house. When the popcorn is done, we all declare a “snack time,” and it turns even the busiest evenings into moments of sharing and joy.
Top Tips for Perfecting Your Caramel Popcorn
Popcorn Prep: Use a fresh batch of kernels for maximum pop, and don’t overcrowd your pot. Oil temp is key—too hot and you’ll burn; too low and the popcorn won’t pop fully. I learned to shake the pot gently to keep the kernels moving and avoid scorched bits.
Caramel Timing: That 5-minute boil without stirring is the magic window; set a timer and keep your eyes on the pot. Rushing or delaying can make your caramel grainy or bitter. Patience is your best friend here!
Mixing Caramel and Popcorn: Fold gently but thoroughly. If you’re too rough, the popcorn breaks. Too light—some kernels won’t get coated. It’s a delicate balance; I usually write a note in the kitchen that says “gentle swirls only.”
Swirl Customization: If you want to jazz it up, try mixing in a quick drizzle of melted dark chocolate after baking, or toss in pecans or toasted coconut flakes for texture and flavor contrasts. Swirling in cinnamon or a pinch of cayenne pepper can also add a fun kick.
Substitution Suggestions: If you’re out of corn syrup, golden syrup or honey works; just know it might change the texture slightly. Maple syrup gives a lovely earthy twist but caramel won’t be as chewy. For a vegan version, try coconut oil and margarine alternatives, and swapping butter for a plant-based fat.
Baking Variations: Keep a close eye on your oven’s temperature as small variances can burn the caramel quickly. If your batch looks too soft after 45 minutes, bake longer but stir frequently. The goal is a crisp, not a crack-your-teeth hard, coating.
Glaze Ideas: Beyond plain caramel, try finishing with a light dusting of sea salt or powdered sugar for contrast. If you’re adding chocolate, wait until the caramel popcorn cools before drizzling to prevent melting.
I must confess, I once forgot the baking soda and ended up with a rock-hard mess—lesson learned! Now I never skip that step; it’s the secret to glorious, light caramel popcorn.
Storing and Reheating Tips
Room Temperature: Store your caramel popcorn in an airtight container or zip-top bag at room temp for up to 5 days. Make sure it’s completely cooled before sealing to avoid sogginess. I like to keep a jar on the counter for grab-and-go snacking.
Refrigerator Storage: If you live somewhere humid, fridge storage helps keep the crunch longer—seal the popcorn in an airtight container to retain freshness for up to two weeks. Just bring it back to room temp before serving for the best texture.
Freezer Instructions: You can freeze caramel popcorn if you want to keep it fresh for up to 3 months. Wrap it tightly in plastic wrap and then foil or place in a freezer-safe bag. To thaw, leave it overnight at room temperature—no microwave needed or it might get soggy.
Glaze Timing Advice: If you’re planning to glaze (e.g., with chocolate or powdered sugar), wait until your caramel popcorn is fully cooled. For longer storage, apply glaze fresh each time you serve to keep it from melting or becoming sticky.
I usually make a big batch and stash half in the freezer, especially before holiday parties. That way, I can pull it out and have fresh caramel popcorn ready in minutes. It’s a lifesaver on busy days!
Frequently Asked Questions
Final Thoughts
Making caramel popcorn at home has become one of those small, joyful rituals that’s really brought my family together. The smell swirling through the kitchen, the crunch that fills the air, and those moments of sharing a sweet snack on a quiet night — it’s worth every sticky finger and shiny countertop. I love knowing exactly what’s in our snack, and how easy it is to tweak for different occasions or moods. If you’ve enjoyed this, you might want to try my salted caramel brownies or homemade spiced pumpkin seeds for more snack ideas with that same cozy, homemade vibe. I can’t wait to hear how your batch turns out — do share your tweaks and tasting notes! Happy snacking!
caramel popcorn
Ingredients
Main Ingredients
- 14 cups popped plain popcorn approximately 1 cup of unpopped popcorn
- 14 oz caramel candies unwrapped
- 4 tablespoons butter softened
- 10 pieces popsicle sticks
- 12 oz semi-sweet chocolate chips melted
- to taste sprinkles for decorating
Instructions
Preparation Steps
- Pop the popcorn according to the package directions and place in a large bowl. Set aside.
- In a medium saucepan, melt the unwrapped caramel candies with butter over medium-low heat, stirring until smooth.
- Remove caramel from heat and pour over popcorn. Mix thoroughly to coat all popcorn evenly. Let cool for a few minutes.
- Melt the chocolate chips in the microwave or over a double boiler until smooth.
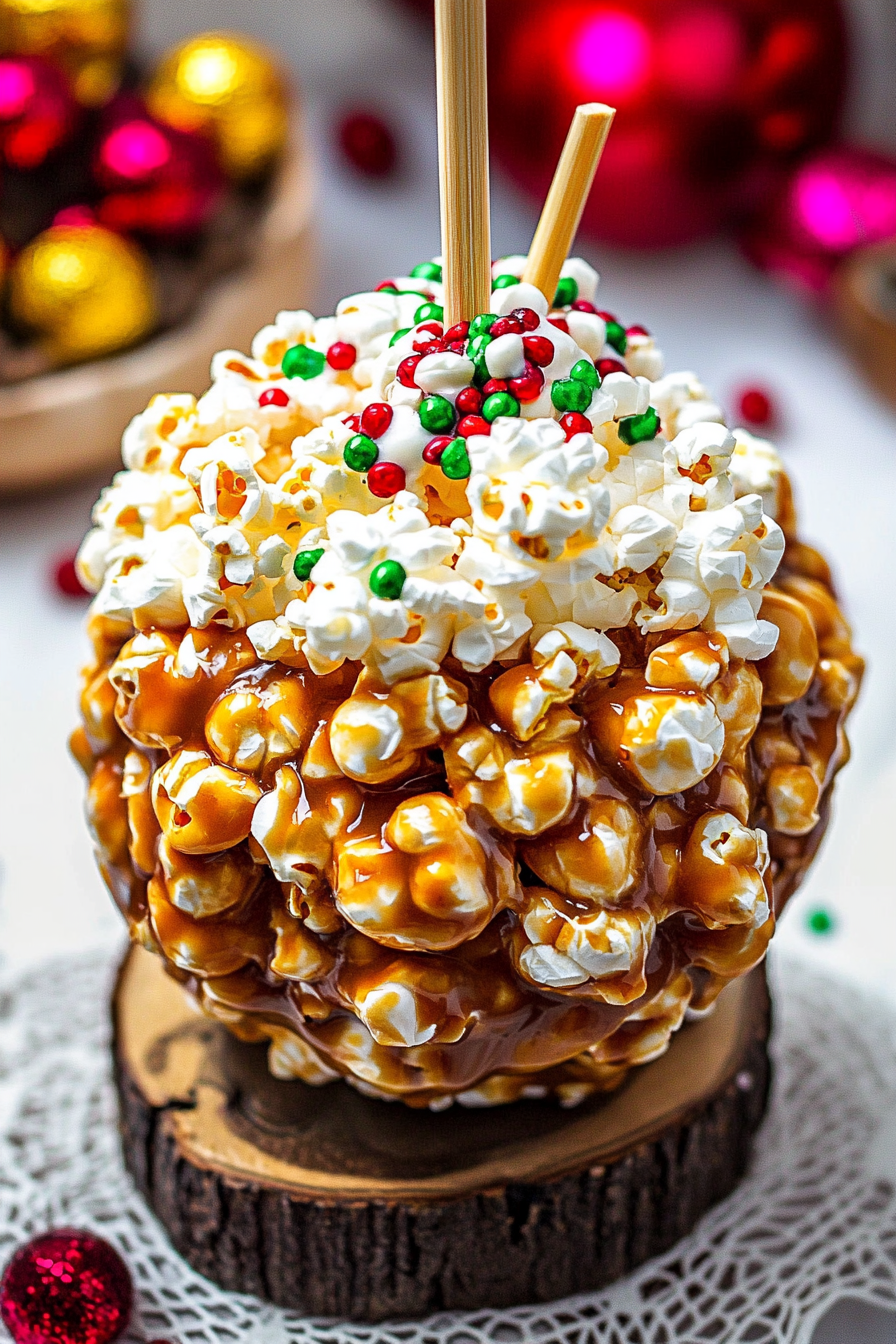
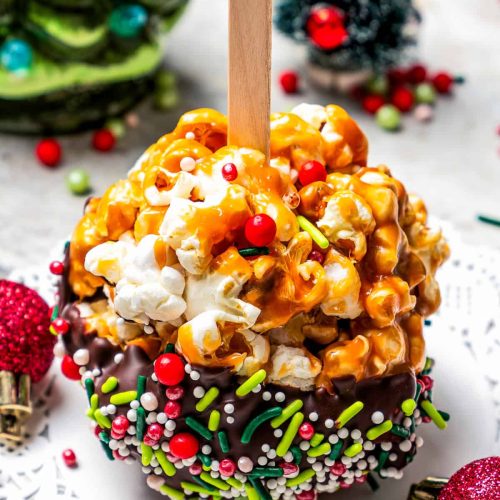
- Grease your hands with butter and shape the popcorn mixture into softball-sized balls.
- Insert a popsicle stick into each popcorn ball, dip into melted chocolate, then roll in sprinkles. Place on waxed paper until chocolate sets. Serve and enjoy!