You know those nights, right? The ones where you’re staring into the abyss of your pantry, dreading the thought of a complicated dinner? Yeah, I live for those nights now because I’ve got *the* recipe. This one for sticky Chicken Rice bowls is seriously a lifesaver. It’s the kind of meal that smells incredible the moment you start cooking, drawing everyone into the kitchen with hopeful anticipation. My kids, who are usually pretty picky, will actually ask for seconds of this, and that’s saying something! It’s got that perfect balance of savory, sweet, and just a hint of tang that makes it totally addictive. Honestly, if you’re looking for a go-to weeknight dinner that feels special but is deceptively easy, you’ve found it. Forget those fancy takeout menus; this sticky chicken rice bowl is about to become your new obsession.
What are Sticky Chicken Rice Bowls?
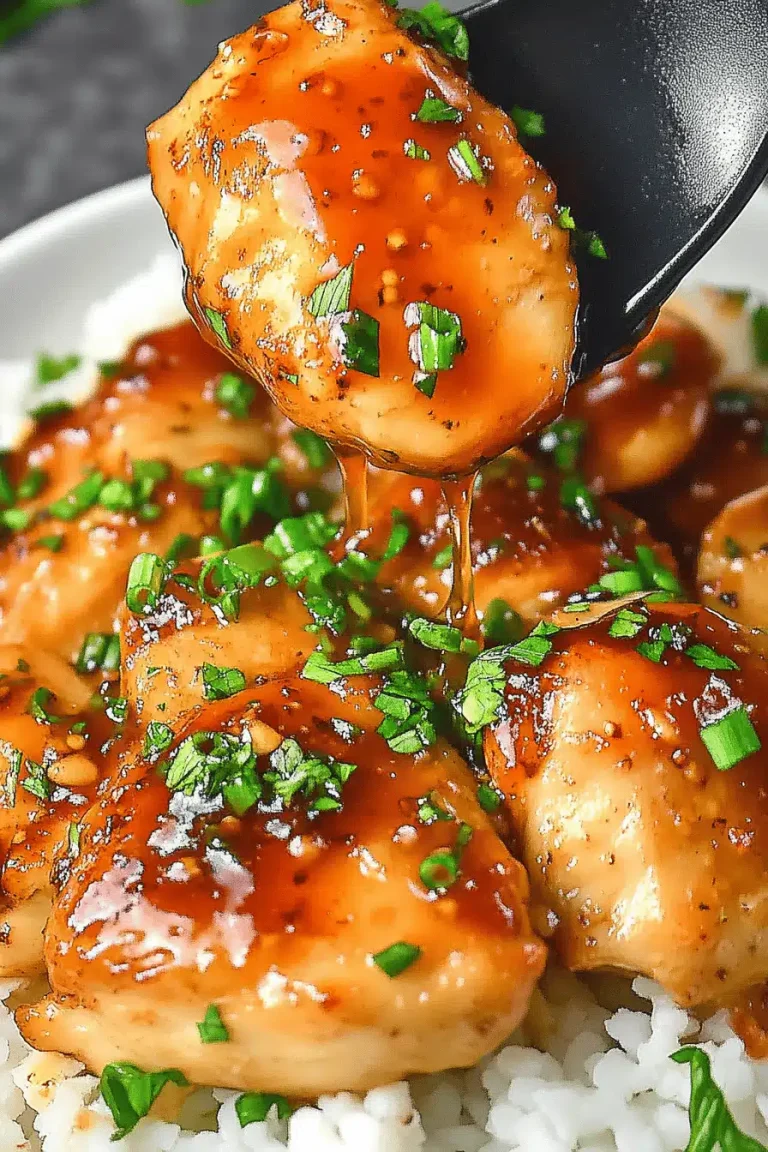
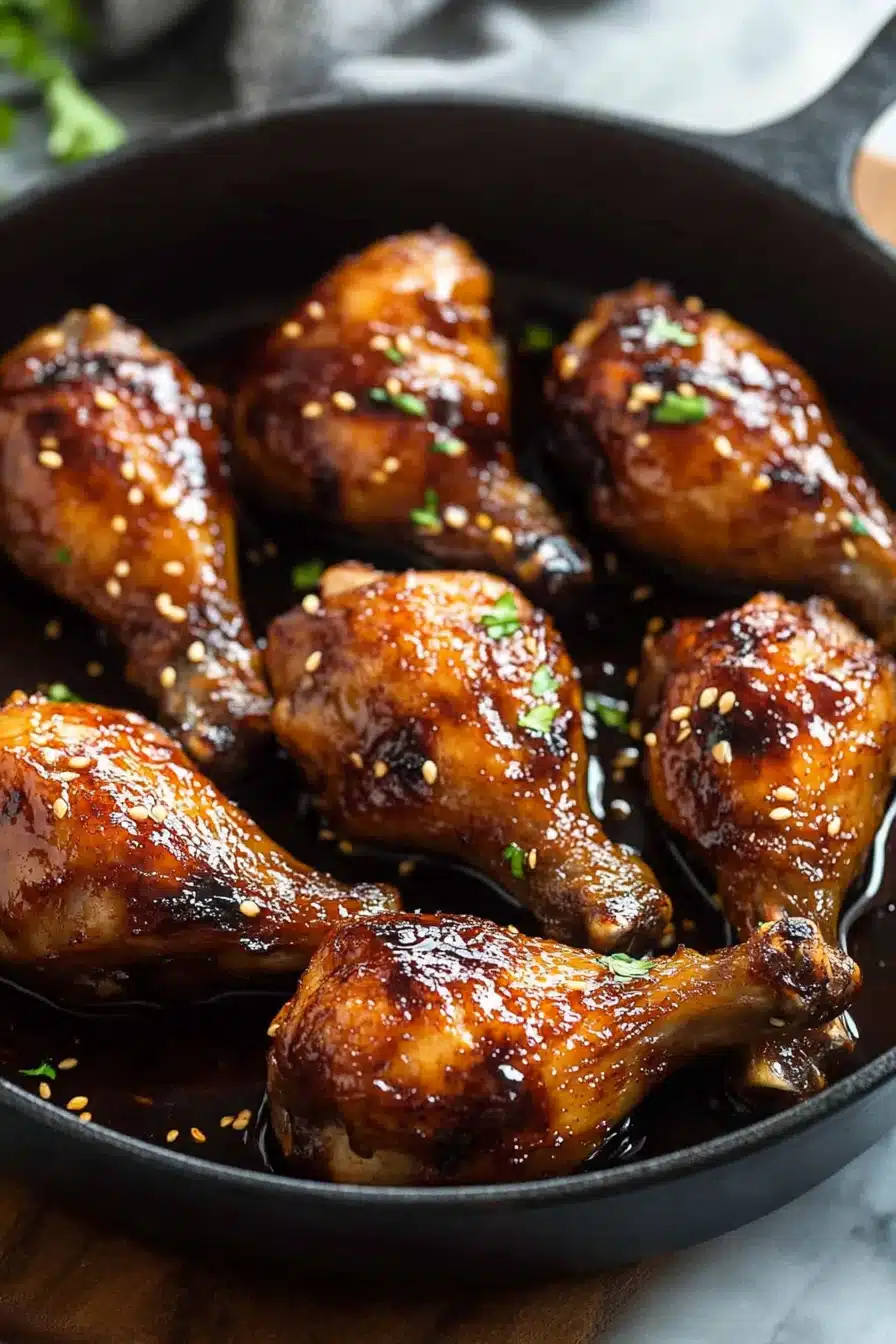
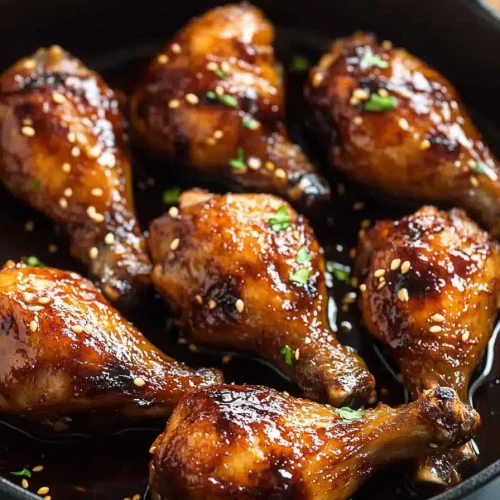
So, what exactly are these magical sticky chicken rice bowls? Think of it as a flavor explosion waiting to happen. At its heart, it’s tender, juicy chicken pieces coated in a lusciously sticky, slightly sweet, and deeply savory glaze, all piled high over a bed of fluffy steamed rice. The “sticky” part is key – it comes from a beautiful reduction of soy sauce, brown sugar, ginger, and garlic that caramelizes just right, clinging to every piece of chicken. It’s not just a sauce; it’s a flavor hug for your taste buds. It’s essentially a super-simplified, weeknight-friendly version of those incredible dishes you might find at your favorite Asian-inspired restaurant, but with all the comfort and ease of home cooking. It’s the kind of meal that’s satisfying enough for a hearty dinner but also feels a little bit elegant, you know?
Why you’ll love this recipe?
There are so many reasons why this sticky chicken rice bowl recipe has earned a permanent spot in my recipe rotation, and I’m willing to bet it will do the same for you. First off, the flavor is just out of this world. That glaze I mentioned? It’s pure magic. It’s got this incredible depth that comes from simple ingredients but tastes like it simmered for hours. It’s savory from the soy sauce, sweet from the brown sugar, with a zing from fresh ginger and garlic that just brightens everything up. Plus, the way it caramelizes and coats the chicken makes every bite a little bit sticky and irresistible.
But it’s not just about taste; it’s about how incredibly easy it is to whip up. Seriously, on a busy weeknight when all I want is to put my feet up, this is my go-to. I can have it on the table in under an hour, most of that hands-off simmering time. And talk about budget-friendly! Chicken Thighs are usually pretty affordable, and the glaze ingredients are staples you probably already have in your pantry. It’s a fraction of the cost of ordering takeout, and honestly, way tastier.
What I love most, though, is its versatility. You can totally customize it to your liking. I often add a sprinkle of sesame seeds or some thinly sliced green onions right before serving for an extra pop of freshness and crunch. It’s also fantastic for meal prep; the flavors actually meld together even more overnight. If you’re a fan of my sweet and sour pork or my honey garlic chicken, you’re going to adore this sticky chicken. It hits all those satisfying sweet-savory notes that just make you happy.
How do I make sticky chicken rice bowls?
Quick Overview
This recipe is all about building incredible flavor with minimal fuss. We’ll start by searing the chicken to lock in juices, then simmer it in our homemade sticky glaze until it’s perfectly tender and coated. All this happens in one pan for easy cleanup! It’s designed to be straightforward, so don’t worry if you’re new to cooking; you’ll nail this. The result is tender, flavorful chicken that’s practically begging to be served over fluffy rice.
Ingredients
For the Chicken:
1.5 lbs boneless, skinless chicken thighs, cut into bite-sized pieces (thighs stay so much more tender and juicy than breasts here, trust me!)
1 tablespoon neutral oil, like vegetable or canola oil
Salt and freshly ground black pepper, to taste
For the Sticky Glaze:
1/2 cup low-sodium soy sauce (use tamari for gluten-free)
1/4 cup packed brown sugar (light or dark, either works beautifully)
2 tablespoons rice vinegar (adds a nice tang to balance the sweetness)
1 tablespoon honey or maple syrup (for extra gloss and depth)
1 tablespoon grated fresh ginger (this is non-negotiable for that amazing aroma!)
3 cloves garlic, minced (or more if you’re a garlic lover like me!)
1 teaspoon cornstarch, mixed with 2 tablespoons cold water (this is our secret weapon for that signature sticky texture)
For Serving:
Cooked white or brown rice (sushi rice is fantastic if you want that slight chew)
Optional garnishes: toasted sesame seeds, thinly sliced green onions, a sprinkle of red pepper flakes
Step-by-Step Instructions
Step 1: Preheat & Prep Pan
Grab a large skillet or wok and place it over medium-high heat. Let it get nice and hot – this is important for searing the chicken properly. While the pan heats up, pat your chicken pieces thoroughly dry with paper towels. This step is crucial for getting a good sear and preventing the chicken from steaming. Season the chicken generously with salt and pepper.
Step 2: Mix Dry Ingredients
While your pan is heating, let’s get our glaze ingredients ready. In a medium bowl, whisk together the soy sauce, brown sugar, rice vinegar, honey (or maple syrup), grated ginger, and minced garlic. Give it a good stir until the brown sugar is mostly dissolved. Set this mixture aside.
Step 3: Mix Wet Ingredients
This step isn’t really “wet ingredients” in the traditional sense, but it’s about preparing the thickening agent. In a small, separate bowl, whisk together the cornstarch and cold water until you have a smooth slurry with no lumps. This will give our glaze that wonderfully thick, sticky consistency that we’re aiming for. Keep this close by.
Step 4: Combine
Once your skillet is hot, add the tablespoon of neutral oil. Carefully add the seasoned chicken pieces in a single layer. Don’t overcrowd the pan; cook in batches if necessary. Sear the chicken for about 2-3 minutes per side, until nicely browned. It doesn’t need to be cooked through at this stage, just beautifully seared. Remove the seared chicken from the pan and set it aside on a plate.
Step 5: Prepare Filling
If you cooked the chicken in batches, you might need to add a tiny bit more oil to the pan. Pour the prepared soy sauce mixture into the hot skillet. Bring it to a simmer, scraping up any browned bits from the bottom of the pan – that’s where so much flavor is! Let it bubble and cook for about 2-3 minutes, allowing the flavors to meld and the sugar to start caramelizing.
Step 6: Layer & Swirl
Now, return the seared chicken pieces to the skillet with the simmering glaze. Stir to coat the chicken evenly. Let the chicken simmer in the glaze for about 5-7 minutes, stirring occasionally, until it’s cooked through and the glaze has started to thicken slightly on its own. This is where the magic happens; the chicken absorbs all those delicious flavors.
Step 7: Bake
At this point, stir the cornstarch slurry again to ensure it’s fully combined, then slowly drizzle it into the simmering glaze while stirring constantly. The glaze will thicken very quickly, transforming into that beautiful, glossy, sticky coating. Continue to stir and cook for another 1-2 minutes until the glaze is thick enough to coat the back of a spoon. Be careful not to overcook, or it can become too thick. The chicken should be beautifully coated and glistening.
Step 8: Cool & Glaze
Remove the skillet from the heat. Let the sticky chicken sit in the glaze for about 5 minutes. This allows the flavors to meld further and the glaze to set perfectly onto the chicken. If you’re serving immediately, this is perfect. If you plan to store it, let it cool completely in the glaze before transferring to an airtight container.
Step 9: Slice & Serve
To serve, spoon a generous portion of fluffy steamed rice into bowls. Top with the sticky chicken and plenty of that incredible glaze. Garnish with toasted sesame seeds, sliced green onions, or a pinch of red pepper flakes if you like a little heat. It’s best served hot right off the stove, but honestly, leftovers are still fantastic!
What to Serve It With
This sticky chicken rice bowl is a complete meal in itself, but oh, the ways you can elevate it! For a leisurely breakfast, I sometimes find myself craving this even in the morning – it’s weirdly satisfying with a strong cup of black coffee. Just a smaller portion, maybe with a sprinkle of chili flakes to wake you up.
When I’m hosting brunch, I’ll often serve this alongside some other lighter fare. Imagine it next to a fresh Asian-inspired slaw with a ginger-sesame dressing, or maybe some simple steamed edamame. It adds a lovely savory counterpoint. A crisp, dry white wine or even a light lager pairs beautifully.
As a dessert, well, this isn’t exactly dessert, but it *is* the perfect satisfying end to a meal, especially if you have guests who enjoy something savory and comforting. It’s the kind of dish that makes people feel happy and content after dinner.
But my absolute favorite way to serve it is for cozy snacks or a casual weeknight dinner. It’s the ultimate comfort food. My family devours it as is, but sometimes I’ll serve it with a side of quick-pickled cucumbers or carrots for a little brightness and crunch. It’s just so satisfying and hits all the right notes. We’ve even packed leftovers for lunches, and they’re just as delicious cold!
Top Tips for Perfecting Your Sticky Chicken Rice Bowls
I’ve made this sticky chicken rice bowl recipe more times than I can count, and over the years, I’ve picked up a few tricks that make all the difference. First, when it comes to the chicken, don’t skip patting it dry. I learned this the hard way when I first started cooking. If the chicken is wet, it’ll steam instead of searing, and you won’t get those lovely crispy edges that absorb the glaze so well. Also, using chicken thighs is key for tenderness; chicken breasts can get dry really easily in this kind of sauce, so stick with thighs for the best results.
For the glaze, the ratio of sweet to savory is pretty important. If you find it’s too sweet for your liking, you can always add a splash more rice vinegar or even a tiny squeeze of lime juice at the end. And don’t be afraid of the ginger and garlic! Freshly grated ginger is really where the magic happens for that authentic flavor. If you absolutely can’t find fresh ginger, you *could* use about half a teaspoon of ground ginger, but it’s really not the same, so I highly recommend seeking out fresh.
When you add the cornstarch slurry, make sure to whisk it into the simmering glaze constantly. This prevents lumps and ensures you get that perfect, glossy, sticky texture. It thickens up super fast, so don’t walk away! If you accidentally make it too thick, you can always whisk in a tablespoon or two of hot water or broth until it’s just right. For swirling, I don’t do anything fancy; just a good stir to coat everything evenly is perfect. The glaze does the rest of the visual magic.
Ingredient swaps are totally doable! If you don’t have brown sugar, you can use granulated sugar, but brown sugar adds a richer, caramel-like flavor. For the soy sauce, tamari is a fantastic gluten-free alternative. And while honey is lovely, maple syrup works just as well and gives it a slightly different, delicious nuance. Experimenting is part of the fun!
Baking isn’t part of this recipe, but the “cooking” part is crucial. Make sure your pan is hot before adding the chicken, and don’t overcrowd it. This ensures you get a good sear. Simmering the chicken in the glaze is where it truly absorbs all the flavor. I learned the hard way that rushing this step means less flavor-packed chicken. Patience here really pays off.
For glaze variations, a little goes a long way. A dash of sriracha or a pinch of gochugaru (Korean chili flakes) can add a nice kick. A teaspoon of sesame oil stirred in at the very end, just off the heat, adds another layer of nutty aroma. The possibilities are endless, and I love hearing about how you all customize it!
Storing and Reheating Tips
One of the best things about this sticky chicken rice bowl recipe is how well it stores and reheats. If you happen to have any leftovers (which is rare in my house!), let the chicken and glaze cool completely in the pan before transferring them to an airtight container.
Room Temperature: Honestly, I don’t recommend leaving it out for more than two hours, maximum. The glaze can get a bit sticky and attract things it shouldn’t. It’s best enjoyed fresh or stored promptly.
Refrigerator Storage: This is where it shines. Properly stored in an airtight container in the fridge, the sticky chicken will stay delicious for up to 3-4 days. The flavors actually deepen and meld together even more, making leftovers sometimes even tastier than the first day!
Freezer Instructions: Yes, you can freeze this! Let the chicken and glaze cool completely, then transfer it to freezer-safe containers or heavy-duty freezer bags. It should last for about 2-3 months. When you’re ready to thaw, transfer it to the refrigerator overnight.
Glaze Timing Advice: For refrigerator storage, it’s best to store the chicken *in* the glaze. This keeps it moist and flavorful. If freezing, make sure it’s completely coated. For reheating, I find the best method is on the stovetop. Place the cooled chicken and glaze in a skillet over medium-low heat, stirring gently until heated through. You might need to add a tablespoon of water or broth if it seems a bit too thick from chilling or thawing. You can also microwave it, but stirring every minute or so helps prevent it from drying out and ensures even heating.
Frequently Asked Questions
Final Thoughts
So there you have it – my absolute favorite sticky chicken rice bowls recipe. I really hope you give this one a try. It’s more than just a meal; it’s that go-to dish that makes busy weeknights feel a little less chaotic and a lot more delicious. It’s the kind of recipe that brings smiles to faces and usually disappears in minutes. That perfect balance of sweet, savory, and umami, with that irresistible sticky coating, just can’t be beaten. It’s incredibly satisfying, surprisingly easy, and budget-friendly, which is a win-win-win in my book.
If you enjoy this recipe, you might also love my Honey Sriracha Salmon or my Teriyaki Meatball recipe – they share some of that delicious sweet and savory profile. I can’t wait to hear what you think of these sticky chicken rice bowls! Please leave a comment below to let me know how yours turned out, or share any variations you tried. And if you love it as much as I do, consider sharing it with a friend who could use a weeknight dinner win!
Sticky Chicken Rice Bowls
Ingredients
For the Chicken:
- 1.5 pounds boneless, skinless chicken thighs cut into bite-sized pieces
- 2 tablespoons soy sauce
- 1 tablespoon sesame oil
- 0.5 teaspoon garlic powder
- 0.5 teaspoon ginger powder
For the Sticky Sauce:
- 0.5 cup brown sugar
- 0.25 cup hoisin sauce
- 2 tablespoons soy sauce
- 1 tablespoon rice vinegar
- 1 teaspoon cornstarch
- 2 tablespoons water
For Serving:
- 3 cups cooked rice e.g., Jasmine or Basmati
- optional garnishes e.g., sesame seeds, chopped green onions, sliced cucumber
Instructions
Preparation Steps
- In a bowl, combine the chicken pieces with 2 tablespoons soy sauce, sesame oil, garlic powder, and ginger powder. Toss to coat evenly. Let marinate for at least 10 minutes.
- While the chicken marinates, prepare the sticky sauce. In a small saucepan, whisk together brown sugar, hoisin sauce, 2 tablespoons soy sauce, and rice vinegar. In a separate small bowl, whisk together cornstarch and water to create a slurry. Add the slurry to the saucepan.
- Cook the sauce over medium heat, stirring constantly, until it thickens and becomes glossy, about 3-5 minutes. Remove from heat and set aside.
- Heat a large skillet or wok over medium-high heat. Add a tablespoon of oil if needed. Add the marinated chicken and cook, stirring occasionally, until browned and cooked through, about 6-8 minutes.
- Pour the prepared sticky sauce over the cooked chicken. Stir to coat the chicken evenly. Cook for another 1-2 minutes until the sauce has thickened and clung to the chicken.
- To serve, divide the cooked rice among bowls. Top with the sticky chicken. Garnish with sesame seeds, green onions, or sliced cucumber if desired.