Okay, so confession time: I have a serious sweet tooth, and sometimes, a whole batch of cookies or a complicated cake just feels like… a lot. Especially after a long day when all I want is a little bit of magic without all the fuss. That’s where this smore pizza dessert comes in. It’s the ultimate crowd-pleaser, the “wow, how did you do that?” recipe, and honestly, the one my family begs for the most. Imagine all the gooey, chocolatey, graham-crackery goodness of a campfire smore, but transformed into a delightful pizza that’s ridiculously easy to whip up. It’s like a hug in dessert form, and it’s so simple, it feels like cheating. I first stumbled upon a version of this when I was looking for something fun for a neighborhood potluck, and it was such a hit, it’s become a staple. Forget spending hours in the kitchen; this smore pizza is my go-to for quick weeknight treats and spontaneous celebrations alike.
What is a smores pizza?
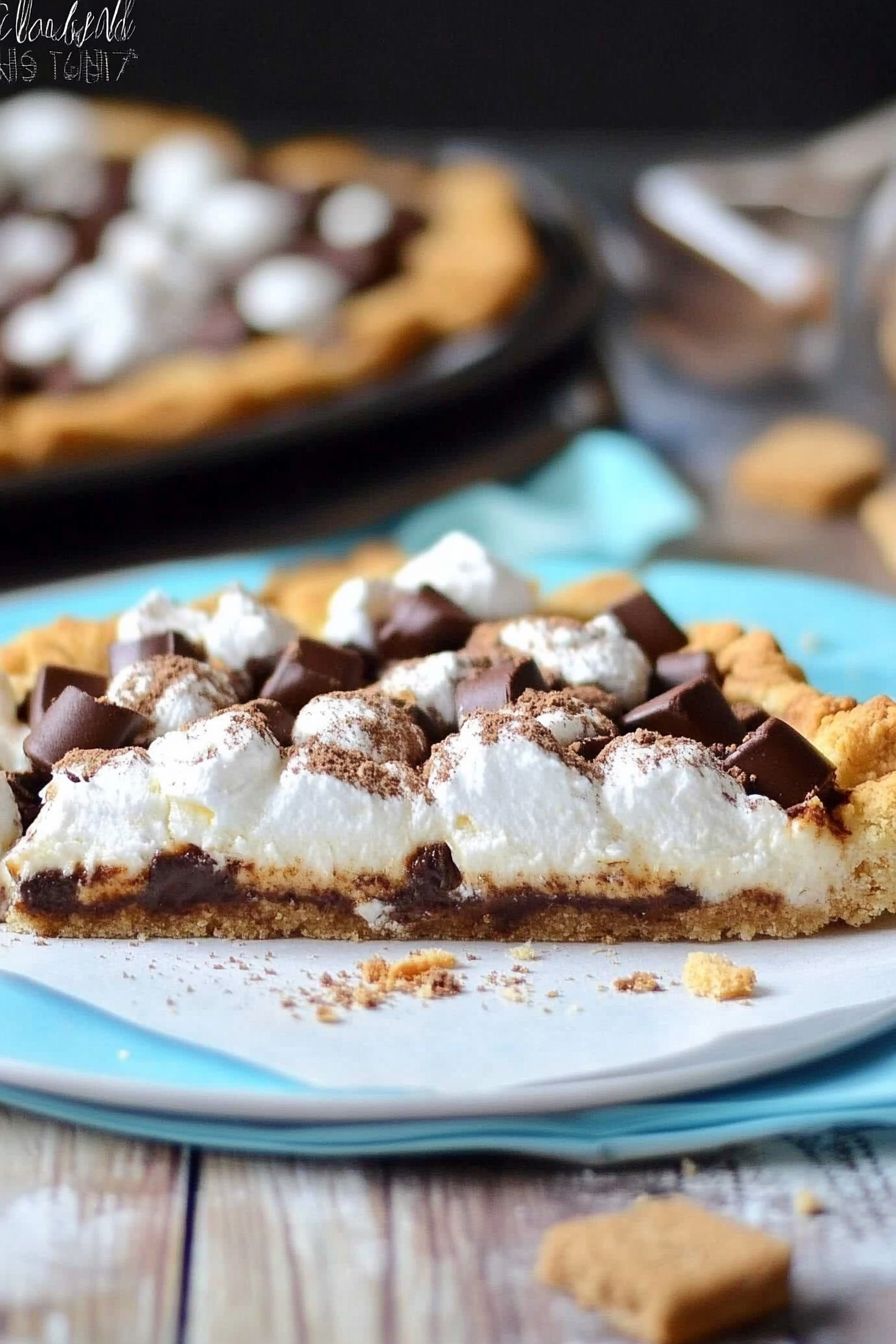
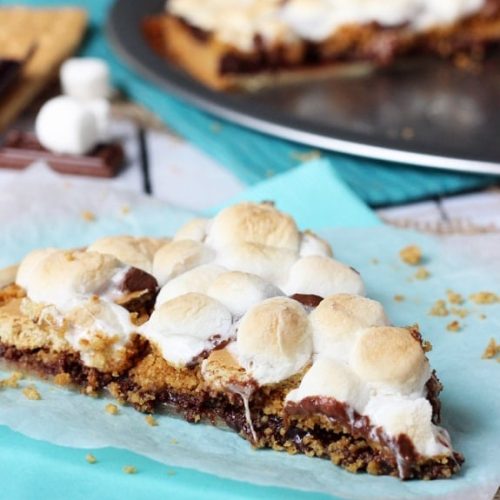
So, what exactly *is* smore pizza dessert? Think of it as the grown-up, more sophisticated (but still super fun!) cousin of the classic campfire treat. Instead of skewering marshmallows over an open flame, we’re taking all those beloved flavors – toasted marshmallows, melted chocolate, and crumbly graham crackers – and arranging them on a pizza-like base. It’s not a traditional pizza with sauce and cheese, obviously! It’s more of a sweet flatbread or a dessert pizza where the “crust” is usually something sweet and sturdy, like a pre-made pizza dough, a cookie base, or even a simple shortbread. Then, we layer on the magic: a generous spread of chocolate, followed by fluffy marshmallows, and sometimes a scattering of graham cracker crumbs for that authentic smore crunch. It’s a delightful explosion of texture and flavor that captures the essence of a smore in a shareable, sliceable format. It’s essentially a deconstructed, easily assembled, and utterly delicious way to get your smore fix.
Why you’ll love this recipe?
There are so many reasons why this smore pizza dessert has earned a permanent spot in my recipe binder, and I just know you’re going to fall in love with it too. First off, let’s talk about the flavor profile – it’s pure bliss. You get that irresistible combination of rich, melted chocolate, sweet, slightly caramelized marshmallows, and the subtle, buttery crunch of graham crackers. It hits all the right notes! Then there’s the sheer simplicity of it all. I’m talking about a recipe that you can pull together in less time than it takes to preheat your oven. It’s a lifesaver on busy nights when the sweet craving hits hard. Plus, it’s incredibly budget-friendly. Most of the ingredients are pantry staples, making it an economical choice for feeding a crowd or just treating yourself without breaking the bank. And the versatility? Oh, the versatility! You can customize it endlessly. Add some fruit, a drizzle of caramel, or even a sprinkle of sea salt for a sweet and salty kick. What I love most about this smore pizza is that it feels like a special occasion dessert, but it’s so approachable. It’s the perfect way to recreate those nostalgic campfire memories without the bug spray and the smoky clothes. It’s the kind of dessert that brings smiles to faces, and that’s always a win in my book.
How do I make a smores pizza?
Quick Overview
This smore pizza dessert is all about quick assembly and minimal fuss. We start by preparing a sweet base – often a store-bought pizza dough lightly sweetened or a simple cookie crust. Then, it’s all about layering the classic smore components: melted chocolate, plump marshmallows, and a sprinkle of graham cracker goodness. You’ll pop it in a hot oven for just a few minutes until the marshmallows are perfectly golden and gooey and the chocolate is melty. It’s that easy! The beauty of this method is that it delivers all the beloved smore flavors in a fun, sliceable format that’s perfect for sharing. Trust me, it’s so straightforward, even your little ones can help assemble it.
Ingredients
For the Base:
1 tube (8 oz) refrigerated pizza dough (or your favorite cookie dough)
2 tablespoons granulated sugar
1 tablespoon unsalted butter, melted (if using pizza dough)
For the Toppings:
1 cup milk chocolate chips (or a mix of milk and dark)
1 teaspoon coconut oil (optional, for smoother melting)
2 cups mini marshmallows (or about 10-12 large marshmallows, broken into pieces)
1/2 cup crushed graham crackers
Step-by-Step Instructions
Step 1: Preheat & Prep Pan
First things first, let’s get that oven nice and hot. Preheat it to 400°F (200°C). While the oven is heating, grab a baking sheet. You can line it with parchment paper for super easy cleanup (highly recommend this!) or lightly grease it. If you’re using store-bought pizza dough, unroll it and gently stretch it out onto the prepared baking sheet. You want to form a rough circle, about 10-12 inches in diameter. Don’t worry too much about perfection; rustic is good here! If you’re using cookie dough, press it evenly onto the baking sheet to form your pizza base. For the pizza dough, brush the surface lightly with the melted butter and then sprinkle evenly with the granulated sugar. This step adds a little sweetness and helps create a slightly crispier crust, which I’ve found makes a world of difference!
Step 2: Mix Dry Ingredients
This step is super simple for this recipe, as most of the “dry” magic happens with the toppings. We’re talking about the crushed graham crackers here! You can crush them in a Ziploc bag with a rolling pin (a fun stress reliever, if you ask me!) or use a food processor for a finer crumble. Set these aside. The other “dry” component that we’ll add later is the marshmallows. Make sure they’re ready to go so you can layer them on quickly.
Step 3: Mix Wet Ingredients
For the chocolate layer, place your milk chocolate chips (and the optional teaspoon of coconut oil, if using) into a microwave-safe bowl. Microwave in 30-second intervals, stirring between each, until the chocolate is mostly melted and smooth. Stir until completely smooth. The coconut oil helps make the chocolate extra glossy and easy to spread. Alternatively, you can melt the chocolate in a double boiler over simmering water. Once it’s smooth and pourable, set it aside for a moment. The marshmallows are our other “wet” component once they’re melted and gooey from the oven, so just have them handy.
Step 4: Combine
This is where the pizza base really comes together. If you used pizza dough, ensure the butter and sugar mixture is evenly distributed. If you’re using cookie dough, just make sure it’s pressed into an even layer. You’ve already prepped your melted chocolate, so now it’s time to spread that lusciousness over the base. Use the back of a spoon or an offset spatula to create an even layer of melted chocolate, leaving about a half-inch border around the edge if you like a little bit of crust showing. This chocolate layer is the foundation for all that deliciousness to come!
Step 5: Prepare Filling
The “filling” for our smore pizza dessert is primarily the marshmallows! If you’re using mini marshmallows, you can just sprinkle them directly over the melted chocolate. If you’re using large marshmallows, I find it’s best to cut them into halves or thirds so they distribute more evenly and melt beautifully. Make sure to cover as much of the chocolate as possible with marshmallows. This is where the real “smores” magic starts to happen, as those marshmallows will puff up and get wonderfully toasted and gooey in the oven.
Step 6: Layer & Swirl
After the marshmallows are generously scattered over the chocolate, it’s time for the finishing touch: the crushed graham crackers! Sprinkle these evenly over the marshmallows. This gives you that essential graham cracker flavor and texture right on top. You can press them down very gently if you want them to adhere a bit more, but I usually just let them sit on top. The heat from the oven will help them stick to the gooey marshmallows. This combination of chocolate, marshmallows, and graham crackers is what makes this dessert so incredibly satisfying and reminiscent of the classic smore experience.
Step 7: Bake
Now, carefully slide your smore pizza dessert into the preheated oven. Bake for about 8-12 minutes, or until the marshmallows are puffed up, lightly golden brown, and wonderfully gooey. Keep a close eye on it, as marshmallows can go from perfectly toasted to burnt in a flash! The chocolate should also be melted and slightly bubbly around the edges. The exact time will depend on your oven and how thick your base is. You’re looking for that beautiful, melty, golden-brown finish.
Step 8: Cool & Glaze
Once it’s out of the oven, resist the urge to dive in immediately! Let the smore pizza dessert cool on the baking sheet for at least 5-10 minutes. This allows the marshmallows to set up just a little bit, making it much easier to cut without everything sliding off. If you want to add an extra drizzle of chocolate or caramel, now is the time to do it while it’s still warm. You can melt a little extra chocolate and drizzle it artfully over the top for an added touch of decadence. Or, a sprinkle of powdered sugar can also look really lovely.
Step 9: Slice & Serve
Once it has cooled slightly, use a sharp knife or a pizza cutter to slice your smore pizza dessert into wedges. Serve it warm, when the chocolate is still gooey and the marshmallows are perfectly melted. It’s absolute heaven! You can serve it on its own or with a scoop of vanilla Ice Cream for an extra treat. This dessert is best enjoyed fresh, right out of the oven, but leftovers are still pretty darn good. Just be prepared for it to disappear quickly!
What to Serve It With
This smore pizza dessert is so versatile, it fits in just about anywhere! For breakfast (yes, breakfast!), I love to serve it alongside a strong cup of coffee. The sweetness of the pizza is balanced perfectly by the robust coffee, and it feels like such a decadent way to start the day. For brunch, I like to make it a bit more elegant. I’ll slice it into smaller, bite-sized pieces and arrange them on a tiered platter. A light dusting of powdered sugar can make it look extra special. It pairs wonderfully with a mimosa or some sparkling cider. As a dessert, it’s a no-brainer, of course! It’s fantastic after a hearty meal, especially a barbecue or a casual cookout. Serve it warm with a scoop of vanilla bean ice cream or a dollop of whipped cream. For cozy snacks, this is my go-to. On a chilly evening, I’ll cut a few slices and pair it with a steaming mug of Hot Chocolate or a glass of milk. It’s pure comfort food. My family loves it when we have it after movie night; it’s the perfect sweet ending. Sometimes, I’ll even add a sprinkle of flaky sea salt on top right after it comes out of the oven for a sweet-and-salty contrast that is just divine.
Top Tips for Perfecting Your Smores Pizza Dessert
Over the years, I’ve learned a few little tricks that take this smore pizza dessert from good to absolutely spectacular. Let’s start with the base. If you’re using pizza dough, don’t just unroll and go. Brushing it with that melted butter and sprinkling it with sugar before baking? Game-changer. It adds a lovely crispness and a hint of sweetness that really elevates it. It’s like giving the dough a little pre-treatment. When it comes to mixing the chocolate, I always add a tiny bit of coconut oil (about a teaspoon) to my chocolate chips before microwaving. It makes the chocolate SO much smoother and easier to spread evenly without any lumps. Trust me on this one! For the marshmallows, I’ve found that if you’re using large ones, cutting them in half or thirds helps them melt more evenly and creates a more uniform gooey layer. Don’t overcrowd it, but make sure you get good coverage. When it comes to baking, the key is watching those marshmallows! They can go from perfectly golden to burnt in literally seconds. I usually pull mine out when they’re just starting to get a few nice golden-brown spots, as they’ll continue to cook a bit on the hot pan. And for ingredient swaps, I’ve experimented a lot! If you don’t have graham crackers, digestive biscuits work well, or even crushed shortbread cookies for a more buttery flavor. For the chocolate, feel free to mix in some peanut butter chips or use a good quality dark chocolate if you prefer it less sweet. I’ve even added a swirl of caramel sauce right on top of the chocolate layer before the marshmallows for an extra layer of indulgence. My biggest lesson learned? Don’t overbake it. It’s better to pull it out slightly underdone and let it finish on the hot pan than to have dry, tough marshmallows or scorched chocolate. And if it looks a little messy when it comes out? Embrace it! That’s part of the charm of a smore pizza dessert. It’s meant to be fun and delicious, not perfect and pristine.
Storing and Reheating Tips
Okay, so let’s talk about what happens if, by some miracle, you have leftovers of this glorious smore pizza dessert. Storing it properly will help maintain that deliciousness. If you plan on eating it within a day or two, leaving it at room temperature is often best, especially if you want that gooey, melty texture. Just make sure it’s covered tightly with plastic wrap or foil to prevent it from drying out or picking up any stray odors. If you think it might take longer than two days to get through, or if your kitchen is particularly warm, your refrigerator is a safer bet. Store it in an airtight container or wrap it well. It should stay good in the fridge for about 3-4 days. For longer storage, you can absolutely freeze this smore pizza! Let it cool completely, then wrap it tightly in a layer of plastic wrap followed by a layer of aluminum foil, or place it in a freezer-safe container. It can stay in the freezer for up to 2-3 months. When you’re ready to enjoy it again, thawing is key. For refrigerated leftovers, you can enjoy them cold (still good!) or gently reheat them. I usually pop a slice back into a warm oven (around 300°F or 150°C) for a few minutes until the chocolate is melty again. You can also microwave it for about 15-20 seconds, but watch it closely to avoid making the crust tough. If reheating from frozen, it’s best to let it thaw in the refrigerator overnight first, then follow the reheating steps. If you want that fresh-from-the-oven gooeyness, I sometimes pop a slice directly from frozen into a slightly warmer oven (around 350°F or 175°C) for a bit longer, watching carefully, until heated through and gooey. The glaze is best applied *after* reheating if you plan to store it for a while, as it can become sticky or melt unevenly if stored on top for too long, especially in the fridge.
Frequently Asked Questions
Final Thoughts
So there you have it – my absolute favorite, ridiculously easy smore pizza dessert! It’s the kind of recipe that makes you feel like a kitchen wizard without all the hard work. It’s a reminder that delicious, crowd-pleasing treats don’t have to be complicated. Whether you’re looking for a fun weekend baking project with the kids, a quick dessert for unexpected guests, or just a way to satisfy a serious sweet craving, this smore pizza is your answer. It truly captures the magic of a campfire smore and brings it right to your table, in a wonderfully shareable and delightful package. If you love this recipe, I think you might also enjoy my recipe for “Decadent Chocolate Lava Cakes” for another quick chocolate fix, or perhaps my “Easy No-Bake Berry Cheesecake” for a refreshing alternative. Give this smore pizza dessert a try, and I promise, it will become a fast favorite in your home too. I can’t wait to hear how yours turns out! Feel free to leave a comment below with your own twists or any questions you might have. Happy baking (or, in this case, happy assembling)!
S'mores Pizza Dessert
Ingredients
Crust
- 1 refrigerated pie crust Pillsbury pie crust
- 7 tbsp butter, melted divided
- 1.25 cup graham cracker crumbs
Toppings
- 6 oz semi sweet chocolate chips (about 3/4 cup)
- 0.33 cup heavy whipping cream
- 3 bars Hershey's chocolate bars (1.55 oz each) broken into pieces
- 2 full graham cracker rectangles graham crackers broken into pieces
- 2 cups mini marshmallows
- chocolate sauce for drizzling, optional
Instructions
Preparation Steps
- Preheat oven to 350 degrees F (175 degrees C).
- Unroll one Pillsbury pie crust. Lay flat on a 12-inch pizza pan and poke all over with a fork.
- Spread 1 tablespoon of the melted butter onto the pie crust, then sprinkle with 1/4 cup of graham cracker crumbs.
- Bake the pie crust for about 9-10 minutes, or until the edges just begin to brown. Remove from oven.
- While the crust bakes, place the semi-sweet chocolate chips in a heatproof bowl.
- Microwave the heavy whipping cream until it just begins to boil. Pour the hot cream over the chocolate chips.
- Cover the bowl with plastic wrap and let it sit for 5-7 minutes to allow the chocolate to melt.
- In a separate bowl, combine the remaining melted butter with the remaining graham cracker crumbs. Set aside.
- Whisk the chocolate and cream together until smooth and well combined to create a ganache.
- Let the chocolate ganache sit for about 5 minutes to thicken slightly.
- Pour the thickened chocolate ganache over the baked pie crust and spread into an even layer.
- Sprinkle the graham cracker crumb mixture evenly over the chocolate ganache.
- Arrange the pieces of Hershey's chocolate bars, broken graham cracker pieces, and mini marshmallows on top of the crumbs.
- Bake at 350 degrees F (175 degrees C) for about 4-5 minutes, or until the marshmallows are puffed and slightly golden. You can switch to convection bake for 2-3 minutes if desired to help with browning.
- Let the s'mores pizza cool for about 5 minutes before slicing and serving warm. Drizzle with chocolate sauce if desired.

