There are some recipes that just feel like a warm embrace. You know, the ones you reach for when you need a little comfort, a little sweetness, and a lot of happiness without a fuss. This skillet cookie recipe is exactly that for me. It’s my go-to when unexpected guests arrive, when a late-night craving hits, or honestly, just because. It’s similar to a giant Chocolate Chip Cookie, but there’s something so wonderfully rustic and communal about serving something straight from the skillet. The smell that fills the house as it bakes is enough to make anyone feel instantly cozier. My family absolutely devours this every single time I make it, and I have a feeling you’ll love it just as much.

What is a Skillet Cookie?
So, what exactly is a skillet cookie? Think of it as a super-sized, gloriously imperfect cookie baked right in a cast-iron skillet (or any oven-safe skillet, really!). Instead of portioning out individual cookies, you mix up a classic Chocolate Chip cookie dough, press it into the skillet, and bake it all at once. The magic happens as it bakes – the edges get wonderfully crisp while the center stays soft and gooey, just like the perfect chocolate chip cookie should be. It’s essentially a giant cookie meant to be shared (or not, no judgment here!) and enjoyed right out of the pan. It’s way less fuss than making dozens of individual cookies, and honestly, the presentation is just so charmingly down-to-earth.
Why you’ll love this recipe?
There are so many reasons why this skillet cookie recipe has earned a permanent spot in my recipe binder, and I’m so excited to share them with you! First off, the flavor is absolutely divine. It’s that classic, comforting taste of brown sugar and butter with pockets of melted chocolate that just sings. It’s familiar, yet somehow feels a little special because of how it’s presented. Then there’s the simplicity. Seriously, if you can mix a few ingredients together, you can make this. It’s a lifesaver on busy weeknights when you want a homemade treat but don’t have hours to spare. And let’s talk about cost-efficiency. Most of the ingredients are pantry staples, meaning you can whip this up without a special trip to the grocery store. Plus, it’s so versatile! You can customize it with different kinds of chocolate chips, add nuts, or even a swirl of caramel. What I love most, though, is the communal aspect. There’s something so lovely about gathering around the table with forks in hand, digging into a warm, freshly baked skillet cookie. It feels festive and relaxed all at once. It’s definitely a step up from my quick chocolate chip cookies when I have a little more time, but it still delivers that same comforting goodness.
How do you make a Skillet Cookie?
Quick Overview
This recipe is wonderfully straightforward. You’ll essentially cream together your butter and sugars, add your eggs and vanilla, then stir in your dry ingredients. After that, it’s just a matter of pressing the dough into a prepared skillet and baking until it’s golden and gooey. The best part? Minimal cleanup! You’re mixing and baking all in one pan, which is always a win in my book. It’s a process that’s forgiving and yields incredible results, even for beginner bakers. You’ll be amazed at how quickly it comes together from start to finish.
Ingredients
For the Main Batter:
* 1 cup (2 sticks) unsalted butter, softened: Using softened butter is key here. It should be pliable, not melted. If you forget to leave it out, you can gently warm it in the microwave for about 10-15 seconds, but be careful not to melt it completely!
* 3/4 cup granulated sugar: This helps with crispness and structure.
* 3/4 cup packed light brown sugar: The brown sugar is crucial for that chewy texture and rich flavor. Don’t skimp on packing it in!
* 2 large eggs: Room temperature eggs incorporate better into the batter. If you forget, just pop them in a bowl of warm water for 5-10 minutes.
* 1 teaspoon vanilla extract: Pure vanilla extract always makes a difference.
* 2 1/4 cups all-purpose flour: I usually use King Arthur or Gold Medal. For best results, spoon and level the flour rather than scooping directly from the bag, which can pack too much in.
* 1 teaspoon baking soda: This gives the cookie its lift. Make sure it’s not expired!
* 1/2 teaspoon salt: Balances the sweetness and enhances the chocolate flavor.
* 1 1/2 cups chocolate chips: I love a mix of semi-sweet and dark chocolate chunks, but use whatever your heart desires! Milk chocolate works beautifully too.
For the Filling:
* (Optional) 1/2 cup additional chocolate chips or chopped chocolate bar: For an extra gooey center.
* (Optional) A drizzle of caramel sauce or a few dollops of Peanut Butter: If you’re feeling adventurous!
For the Glaze:
* 1/2 cup powdered sugar: Sifted to avoid lumps.
* 1-2 tablespoons milk or cream: Start with 1 tablespoon and add more until you reach your desired drizzling consistency.
* 1/4 teaspoon vanilla extract (optional): For a little extra flavor.

Step-by-Step Instructions
Step 1: Preheat & Prep Pan
First things first, let’s get your oven preheated to 375°F (190°C). While that’s warming up, grab your skillet. I highly recommend a 10-inch cast-iron skillet for this. It distributes heat so evenly and gives you that gorgeous, crispy edge. If you don’t have cast iron, any oven-safe skillet will work. Grease it really well with butter or non-stick cooking spray. You want to make sure the cookie doesn’t stick. For extra insurance, you can even line the bottom with a circle of parchment paper.
Step 2: Mix Dry Ingredients
In a medium bowl, whisk together your all-purpose flour, baking soda, and salt. Give it a good whisk to make sure everything is evenly distributed. This step is simple, but it’s important for ensuring your cookie has the right texture and rises evenly. No one wants pockets of baking soda in their delicious skillet cookie!
Step 3: Mix Wet Ingredients
In a large bowl, beat your softened butter, granulated sugar, and packed light brown sugar together until it’s light and fluffy. This usually takes a few minutes with an electric mixer. Then, beat in your eggs one at a time, making sure each one is fully incorporated before adding the next. Finally, stir in the vanilla extract. The mixture should be smooth and creamy.
Step 4: Combine
Now, it’s time to bring it all together. Gradually add the dry ingredients to the wet ingredients, mixing on low speed (or by hand with a spatula) until just combined. Be really careful not to overmix here! Overmixing can lead to a tough cookie. You should still see a few streaks of flour – that’s perfectly okay. Gently fold in your chocolate chips until they’re evenly distributed throughout the dough.
Step 5: Prepare Filling
If you’re adding extra chocolate chips, caramel, or peanut butter for the filling, now’s the time to get it ready. For extra chocolate, you can just have them on hand. If using caramel or peanut butter, have it slightly softened or warmed so it’s easy to swirl.
Step 6: Layer & Swirl
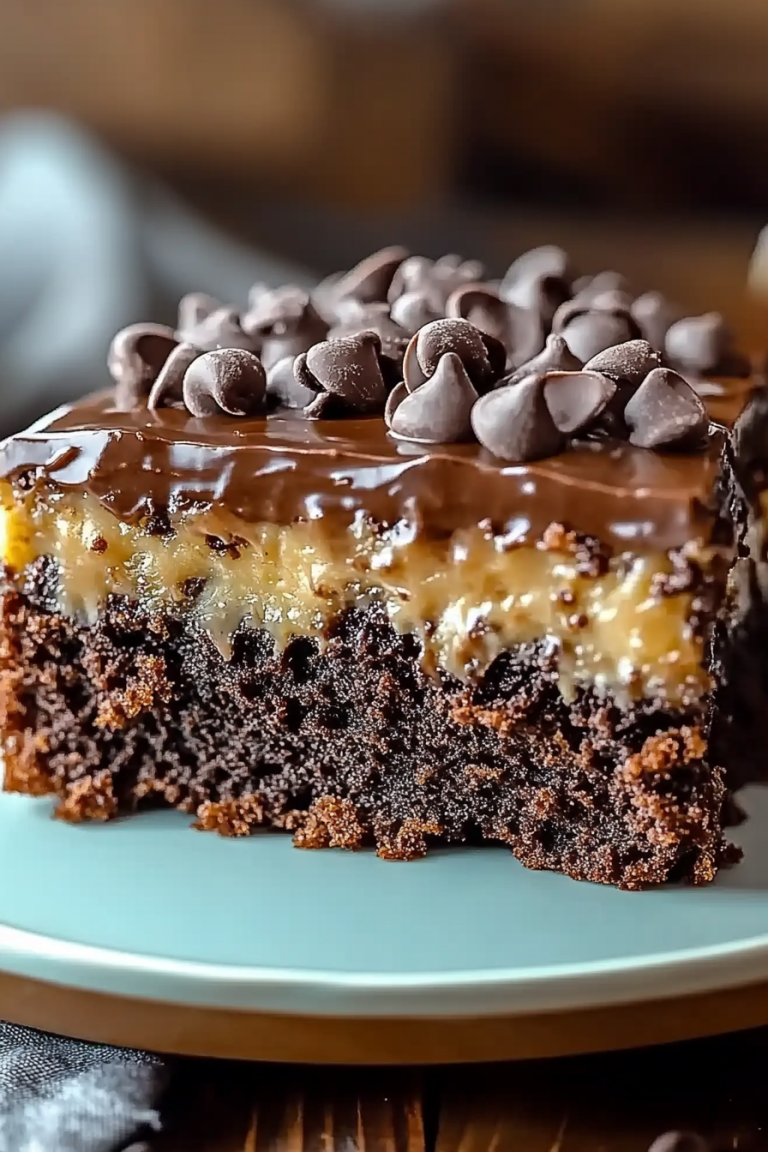
Spread about two-thirds of the cookie dough evenly into the prepared skillet. If you’re adding a gooey center, now’s your chance! Dollop spoonfuls of extra chocolate chips, caramel, or peanut butter over the dough in the skillet. Then, carefully spread the remaining one-third of the dough over the top, trying to cover the filling as best you can. You can gently swirl the top layer with a knife or toothpick to create pretty patterns if you like. Don’t worry if it’s not perfect; rustic charm is part of the appeal!
Step 7: Bake
Pop the skillet into your preheated oven. Bake for 20-25 minutes, or until the edges are golden brown and the center looks set but still slightly soft and gooey. A toothpick inserted into the center should come out with moist crumbs, not wet batter. Oven temperatures can vary, so keep an eye on it, especially towards the end of the baking time.
Step 8: Cool & Glaze
This is a tough step, I know, but let the skillet cookie cool in the skillet on a wire rack for at least 10-15 minutes. This allows it to set up properly. While it’s cooling, whisk together the powdered sugar, 1 tablespoon of milk, and vanilla extract (if using) in a small bowl. Add more milk, a teaspoon at a time, until you get a drizzling consistency. Once the cookie has cooled slightly, drizzle the glaze over the top. It’s optional, but oh-so-delicious!
Step 9: Slice & Serve
Once it’s cool enough to handle (but still wonderfully warm!), slice the skillet cookie into wedges using a sharp knife or a pizza cutter. Serve it warm, maybe with a scoop of vanilla ice cream, a dollop of whipped cream, or just as it is. It’s truly best enjoyed fresh from the oven!
What to Serve It With
This skillet cookie is so versatile, it can honestly be enjoyed at any time of day, or as a special treat. For a relaxed breakfast, I love serving a warm slice with a strong cup of black coffee. It feels decadent but still totally appropriate for the morning! At brunch, it’s a showstopper alongside fresh fruit and mimosas. The warm, gooey chocolate is a wonderful contrast to lighter, brighter flavors. As a dessert, well, it’s practically mandatory to serve it à la mode with a generous scoop of good quality vanilla bean ice cream. The hot cookie and cold ice cream is a classic combination for a reason! And for those cozy snack times? It’s perfect with a glass of cold milk, just like you’re a kid again. My family has a tradition of making this on Friday nights when everyone is home, and we all just grab a fork and dig in. It’s pure comfort and togetherness.
Top Tips for Perfecting Your Skillet Cookie
Over the years, I’ve picked up a few tricks that make this skillet cookie recipe even better. First, when it comes to your butter and eggs, make sure they’re at room temperature. It really makes a difference in how smoothly everything combines. If your butter is too cold, your dough will be lumpy, and if your eggs are too cold, they might curdle the butter. Trust me on this one, it’s a game-changer! For mixing, the biggest advice I can give is not to overmix the flour. Once you add the dry ingredients, mix only until they’re just incorporated. A few streaks of flour are fine; they’ll disappear during baking. Overmixing develops the gluten too much, leading to a tough cookie instead of a tender, chewy one. When it comes to the chocolate chips, don’t be afraid to mix in different kinds! I love using a combination of semi-sweet and dark chocolate, or even adding some milk chocolate chips for extra sweetness. If you’re feeling fancy, chopped chocolate bars melt into glorious pools of chocolate. For baking, pay attention to your oven. They can be temperamental! Keep an eye on the cookie towards the end of the baking time. You want those edges to be golden brown but the center should still look a little soft. It will continue to cook as it cools in the skillet. And for the glaze, the key is the consistency. Start with less milk and add more gradually until you get that perfect drizzling texture. Too thin and it’ll just soak in, too thick and it’ll be clumpy. I learned that the hard way!
Storing and Reheating Tips
One of the best things about this skillet cookie is that it stays delicious for a few days. If you have any leftovers (which is rare in my house!), you can store it at room temperature, covered loosely with plastic wrap or foil, for up to 2 days. The edges might lose a tiny bit of their crispness, but the center will remain wonderfully soft. For longer storage, you can pop it in the refrigerator. Store it in an airtight container or wrap it well with plastic wrap and then foil. It should keep well in the fridge for up to 4 days. The glaze is best applied just before serving if you’re storing it, as it can get a little sticky in the fridge. If you need to reheat it, I have a couple of favorite methods. For a quick reheat, pop a slice (or the whole skillet, if you dare!) in a warm oven (around 300°F/150°C) for about 5-10 minutes until warmed through. This really helps revive that fresh-baked texture. You can also microwave it for about 15-30 seconds for a super quick warm-up, though it might alter the texture slightly. If you’re freezing it, I recommend baking the cookie, letting it cool completely, and then wrapping individual slices tightly in plastic wrap, followed by a layer of foil. It can be frozen for up to 2-3 months. Thaw overnight in the refrigerator or at room temperature, and then reheat as desired.
Frequently Asked Questions
Final Thoughts
Honestly, this skillet cookie recipe is pure joy in edible form. It’s that perfect balance of crispy edges and a soft, chewy center, packed with melty chocolate goodness. It’s incredibly forgiving, surprisingly easy, and always a crowd-pleaser. Whether you’re serving it at a party, a family dinner, or just treating yourself after a long day, it brings a smile to everyone’s face. If you love this classic chocolate chip cookie experience, I think you’ll also enjoy my recipe for [Link to another relevant recipe, e.g., Chewy Chocolate Chip Cookies] or my [Link to another relevant recipe, e.g., Brown Butter Chocolate Chip Cookies] for more cookie variations. I can’t wait to hear what you think of this skillet cookie! Please leave a comment below and let me know how yours turned out, or if you tried any fun variations. Happy baking, and enjoy every delicious bite!
Skillet Cookie
Ingredients
Main Ingredients
- 0.75 cup unsalted butter, melted
- 0.75 cup granulated sugar
- 0.75 cup packed light brown sugar
- 1 teaspoon vanilla extract
- 2.25 cups all-purpose flour
- 1 teaspoon baking soda
- 0.5 teaspoon salt
- 1 cup chocolate chips plus more for topping
Instructions
Preparation Steps
- Preheat oven to 350°F (175°C). Grease a 10-inch cast-iron skillet.
- In a large bowl, whisk together the melted butter, granulated sugar, and brown sugar until well combined.
- Beat in the eggs one at a time, then stir in the vanilla extract.
- In a separate bowl, whisk together the flour, baking soda, and salt.
- Gradually add the dry ingredients to the wet ingredients, mixing until just combined. Do not overmix.
- Fold in the chocolate chips.
- Spread the cookie dough evenly into the prepared cast-iron skillet. Sprinkle with extra chocolate chips if desired.
- Bake for 20-25 minutes, or until the edges are golden brown and the center is still slightly gooey.
- Let the skillet cookie cool slightly in the pan before serving. Serve warm with ice cream or whipped cream.