Oh, where do I even begin with this trifle? If there’s one dessert that consistently makes my heart sing and my family cheer, it’s this one. It’s not just a dessert; it’s pure joy in a bowl. I remember the first time I made it, probably over ten years ago now. It was for a neighborhood potluck, and I was so nervous. I’d seen trifles before, those towering beauties, and thought they were impossibly complicated. But this recipe, this gem, completely changed my mind. It has that magical ability to look incredibly elegant and feel like a real treat, but honestly? It’s surprisingly simple. Think of it as a deconstructed cake, but way more fun and way less fuss. It’s the kind of thing that earns you rave reviews without making you break a sweat, and that, my friends, is the holy grail of dessert making in my book. This scoop of heaven trifle is my go-to when I need something that impresses without demanding hours in the kitchen.
What is Scoop of Heaven Trifle?
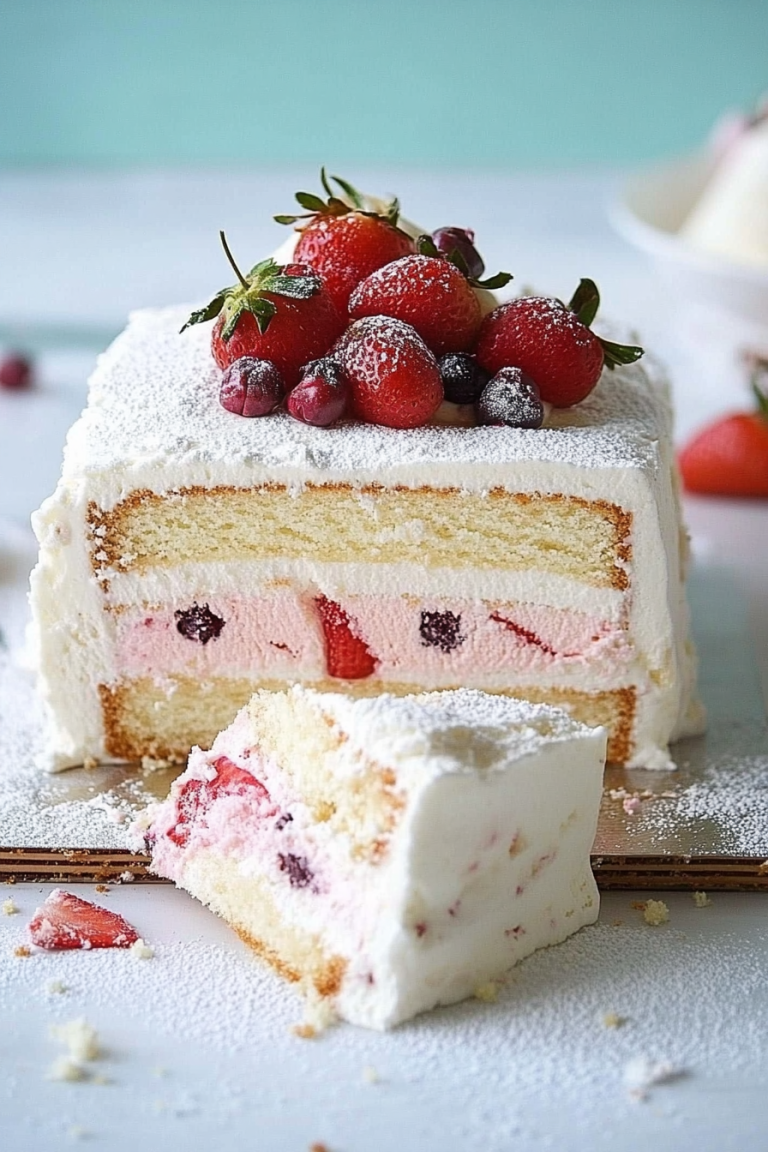
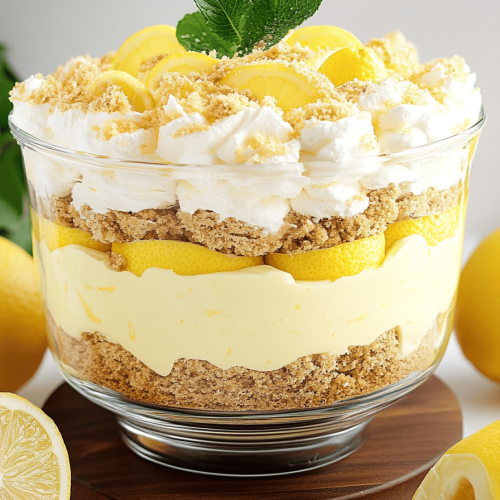
So, what exactly is this “scoop of heaven trifle” I’m raving about? Well, the name pretty much says it all, doesn’t it? It’s layers of pure bliss! At its heart, it’s a delightful assembly of fluffy cake, luscious cream, and bright, fruity goodness, all artfully layered in a clear dish so you can admire every single strata. It’s not a traditional pudding trifle, nor is it a heavy cake. Instead, it’s this wonderfully light and airy creation that just melts in your mouth. The “heaven” part comes from the ethereal texture of the whipped cream and the tender cake, while the “scoop” is because, well, you just can’t help but scoop up generous portions of it! It’s like a hug in dessert form, comforting and utterly satisfying. It’s essentially my personal take on a classic trifle, tweaked over the years to be the perfect balance of sweet, creamy, and just a little bit tangy.
Why you’ll love this recipe?
There are so many reasons why this scoop of heaven trifle has earned a permanent spot in my recipe rotation, and I just know you’re going to fall in love with it too. Let’s break it down. Firstly, the **flavor**. Oh my goodness, the flavor! You get that comforting sweetness from the cake, a dreamy creaminess from the homemade whipped cream that’s miles better than anything from a tub, and then that pop of fruity freshness from whatever fruit you choose to layer in. It’s a symphony of textures and tastes that just works so beautifully together. Secondly, **simplicity**. I cannot stress this enough. You don’t need fancy equipment or advanced pastry skills. The most “complicated” part is whipping cream, and honestly, it’s pretty foolproof once you get the hang of it. This is a lifesaver on busy weeknights when you want to make something special but don’t have hours to spare. Third, it’s surprisingly **cost-efficient**. While it looks and tastes like a million bucks, the ingredients are pretty standard pantry staples. You can use store-bought cake if you’re really pressed for time (I won’t tell!), which makes it even more accessible. And finally, its incredible **versatility**. This recipe is a fantastic canvas for whatever fruit is in season or whatever you have on hand. Berries in the summer, peaches in the fall, maybe even some mandarin oranges for a tropical twist. It always feels fresh and new. What I love most about this recipe is that it feels special without being intimidating. It’s the kind of dessert that brings people together and always gets asked for again and again. It truly is a scoop of heaven.
How do I make a Scoop of Heaven Trifle?
Quick Overview
Making this scoop of heaven trifle is a delightful process that’s more about assembling than intensive cooking. You’ll bake a simple, moist cake, whip up a dreamy cream, and then layer it all up with your favorite fruit. The beauty lies in its effortless assembly and the way the flavors meld together as it chills. It’s perfect for when you want a showstopper without the showstopper effort. The minimal prep means more time enjoying your guests – or just enjoying a quiet moment with a slice yourself!
Ingredients
For the Main Batter:
You’ll need 2 cups of all-purpose flour. Make sure it’s scooped and leveled properly – I always find this makes a difference in the final texture. If you want to make it a bit richer, you can substitute 1/2 cup of the flour with almond flour for a lovely subtle nuttiness. You’ll also need 1 ½ teaspoons of baking powder for lift, and ½ teaspoon of salt to balance the sweetness. For sweetness, we’ll use 1 ½ cups of granulated sugar. I’ve tried it with less, but this amount gives it that perfect sweet kiss without being overpowering. And the secret to its incredible moistness? ½ cup of unsalted butter, softened to room temperature – it’s crucial for creaming properly. And another ½ cup of neutral-flavored oil, like vegetable or canola oil, for that extra tender crumb. Three large eggs, at room temperature, will bind everything together beautifully. And for moisture and flavor, 1 cup of milk. Whole milk gives the best richness, but I’ve tested this with almond milk and it actually made it even creamier! Lastly, 1 teaspoon of pure vanilla extract – don’t skimp on good vanilla; it makes all the difference.
For the Filling:
This is where the magic happens! You’ll need 2 cups of heavy whipping cream, very cold. Seriously, the colder, the better it whips up. Add ½ cup of powdered sugar, sifted, so there are no lumps. And another 1 ½ teaspoons of pure vanilla extract. You can also add a splash of almond extract if you’re feeling it – it pairs wonderfully with berries. For the fruit layer, I love using about 3 cups of fresh berries – a mix of strawberries, blueberries, and raspberries is my absolute favorite. If berries aren’t your thing, sliced peaches or nectarines are divine, especially in late summer. You could even do a mix of canned mandarins (drained well!) and some shredded coconut for a tropical vibe.
For the Glaze:
A simple glaze really ties everything together. You’ll need 1 cup of powdered sugar, sifted, and about 2-3 tablespoons of milk or lemon juice. Lemon juice adds a lovely tang that cuts through the sweetness beautifully. You can also use a bit of fruit juice from your chosen fruit for a complementary flavor.
Step-by-Step Instructions
Step 1: Preheat & Prep Pan
First things first, preheat your oven to 350°F (175°C). Grab a 9×13 inch baking pan. Grease it really well with butter or non-stick spray, and then dust it with a little flour. Tap out any excess flour. This step is super important to ensure your cake comes out cleanly. I usually give it an extra spray of non-stick just to be safe – I’ve had a few cakes stick in my time, and it’s never fun!
Step 2: Mix Dry Ingredients
In a large mixing bowl, whisk together the flour, baking powder, salt, and granulated sugar. Whisk them really well until everything is thoroughly combined. This ensures your leavening agents are evenly distributed, which means a nice, even rise on your cake. No one likes a cake with a dome in the middle and a dip on the sides!
Step 3: Mix Wet Ingredients
In a separate medium bowl, whisk together the softened butter and the oil until they’re well combined. Then, whisk in the eggs one at a time until each is fully incorporated. Stir in the milk and the vanilla extract. It might look a little separated or curdled at this point, and that’s totally fine. Don’t worry about it!
Step 4: Combine
Now, pour the wet ingredients into the dry ingredients. Mix on low speed with an electric mixer (or gently by hand with a whisk) until just combined. Be careful not to overmix! Overmixing develops the gluten in the flour too much, which can lead to a tough cake. A few streaks of flour are okay; they’ll disappear as it bakes. The batter should be smooth but not overworked. I always tell people to stop mixing as soon as they don’t see large dry pockets of flour.
Step 5: Prepare Filling
While your cake is baking, you can get the filling ready. In a chilled bowl (seriously, pop it in the freezer for 10 minutes beforehand!), pour in the cold heavy whipping cream. Using an electric mixer, beat on medium-high speed until soft peaks form. Gradually add the sifted powdered sugar and the vanilla extract. Continue beating until stiff peaks form – meaning when you lift the beaters, the cream holds its shape and stands straight up. Be careful not to overbeat, or you’ll end up with butter!
Step 6: Layer & Swirl
Once your cake has cooled completely (this is crucial – a warm cake will melt the cream!), cut it into bite-sized cubes. In your trifle dish (or any clear glass bowl), start layering. Begin with a layer of cake cubes, then add a generous layer of your fresh fruit, and then spoon a thick layer of the whipped cream over the fruit. Repeat these layers until you’ve used up your ingredients, ending with a final layer of whipped cream. For an extra pretty look, you can gently swirl the layers with a spatula or a skewer before adding the final cream layer, but it’s not essential. The beauty of this trifle is its rustic charm!
Step 7: Bake
Bake the cake for about 30-35 minutes, or until a wooden skewer inserted into the center comes out clean. The top should be golden brown and spring back lightly when touched. Ovens can vary, so keep an eye on it! If the top starts to brown too quickly, you can loosely tent it with aluminum foil. Let it cool in the pan for about 10 minutes before inverting it onto a wire rack to cool completely.
Step 8: Cool & Glaze
Allow the cake to cool completely before cutting. Once cooled, prepare the glaze by whisking the sifted powdered sugar with the milk or lemon juice until smooth. You want a drizzle-able consistency, not too thick and not too thin. Drizzle the glaze over the top layer of whipped cream. If you want a more opaque glaze, use less liquid. If you want it thinner and more translucent, add a touch more liquid.
Step 9: Slice & Serve
This is the best part! For the cleanest slices, use a sharp knife dipped in hot water and wiped dry between each cut. Serve chilled. The flavors really meld and improve after a few hours in the fridge, so making it a few hours ahead is ideal. My family usually digs in as soon as it’s ready, but trust me, the wait is worth it!
What to Serve It With
This scoop of heaven trifle is incredibly versatile and shines on its own, but here are some ideas that I’ve found make it even more special, depending on the occasion:
For Breakfast: You might think of trifle as a dessert, but a lighter version can be fantastic for a weekend breakfast treat! Serve smaller portions with a strong cup of coffee. I love to top individual servings with a sprinkle of toasted slivered almonds for extra crunch. It feels indulgent, but the fruit and cake give you a nice energy boost to start the day.
For Brunch: This is where the trifle truly excels as a centerpiece. For a more elegant presentation, serve it in individual glasses or small bowls. Pair it with a sparkling rosé or a light mimosa. A sprig of fresh mint or a few edible flowers can elevate the look beautifully. It’s a dessert that says “special occasion” without you having to do any complicated baking.
As Dessert: After a nice dinner, this trifle is perfect. Serve it alongside a rich espresso or a dessert wine. If you’ve used berries, a raspberry liqueur drizzled over the top just before serving is heavenly. For a richer dessert experience, you could add a layer of chocolate shavings or a drizzle of chocolate sauce, though I personally love it best in its fruitier form.
For Cozy Snacks: Sometimes, you just need a little something sweet to curl up with. This trifle is perfect for that! Serve a generous scoop with a mug of Hot Chocolate or a glass of milk. It’s like a more sophisticated, yet still comforting, version of a cookie and milk. My kids ask for this all the time as an after-school treat, especially when it’s a gloomy day.
I’ve found that whatever you serve it with, the combination of soft cake, creamy filling, and bright fruit always hits the spot. It’s truly a crowd-pleaser that brings smiles all around.
Top Tips for Perfecting Your Scoop of Heaven Trifle
After making this scoop of heaven trifle more times than I can count, I’ve picked up a few little tricks that I think really make a difference. These are the things I’ve learned through trial and error, and I’m so happy to share them with you!
Zucchini Prep: (Wait, did I mention zucchini? Oh, that’s my other go-to Cake Recipe! For this trifle, we’re using a standard vanilla cake, no veggies involved!) Okay, let’s get back to the trifle itself. For the fruit, if you’re using something juicy like peaches or strawberries, I often give them a quick maceration. Just toss them with a tablespoon of sugar and a tiny squeeze of lemon juice for about 15-20 minutes before assembling. It draws out some of the juices, intensifies the flavor, and makes them extra tender. And always, always make sure your fruit is at room temperature before layering; cold fruit can sometimes affect the cream’s texture.
Mixing Advice: Remember that gentle mixing for the cake batter? That’s key. Overmixing is the enemy of tender cakes. Just mix until the ingredients are combined. For the whipped cream, don’t be afraid to start your mixer on medium speed. Once it starts to thicken, bump it up to medium-high. You’re looking for those stiff peaks. If you’re unsure, err on the side of slightly under-whipped rather than over-whipped, as it will continue to set up a bit in the fridge.
Swirl Customization: While not essential, a little swirl can make your trifle look extra special. After you’ve layered cake, fruit, and cream, gently insert a skewer or the handle of a wooden spoon and drag it through the layers in a swirl pattern. Don’t overdo it, though; you still want distinct layers to be visible. You can also use a piping bag with a large round tip to pipe swirls of cream for a more refined look.
Ingredient Swaps: Feel free to get creative with the cake! A good quality pound cake or even ladyfingers can be used as a shortcut. For the cream, if you’re dairy-free, a good quality Coconut Cream (the thick part from a can of chilled full-fat coconut milk) can work, though the flavor will be different. For the fruit, almost anything works! I’ve even used canned fruit cocktail, drained extremely well, for a retro vibe. Just make sure whatever you use is flavorful.
Baking Tips: Always use the middle rack of your oven for even baking. And don’t be afraid to use an oven thermometer if you suspect yours runs hot or cold. Baking time is a guideline; the skewer test is your best friend. Make sure your cake is *completely* cool before cutting and layering. Warm cake is a recipe for a melted mess!
Glaze Variations: The glaze can be adjusted to your liking. If you want a sweeter glaze, add more powdered sugar. For a tangier one, use more lemon juice or even a bit of lime juice. A touch of zest from your chosen fruit can add another layer of flavor. If you prefer no glaze, a light dusting of powdered sugar or some toasted nuts on top is also lovely.
These little tweaks have helped me make this trifle consistently delicious, and I hope they help you too! It’s all about making it your own.
Storing and Reheating Tips
One of the things I adore about this scoop of heaven trifle is how well it keeps, making it perfect for making ahead. It actually gets *better* as the flavors meld!
Room Temperature: I generally don’t recommend leaving this trifle out at room temperature for more than 2 hours, especially if you’ve used fresh fruit and dairy. The cake might stay okay, but the cream and fruit need to be kept cool for safety and to maintain their best texture.
Refrigerator Storage: This is where this trifle shines. Once assembled, cover it tightly with plastic wrap or transfer it to an airtight container. It will keep beautifully in the refrigerator for up to 3 days. The cake will soften nicely from the moisture of the fruit and cream, becoming even more tender. I often make it the day before a party, and it’s always a hit. When serving, gently stir the top layer of cream if it has settled a bit, but don’t overmix.
Freezer Instructions: I haven’t personally had great success freezing trifles because the texture of the whipped cream can change and become a bit watery upon thawing. However, if you *must*, I would suggest freezing the components separately: the cooled cake (well-wrapped), and the fruit. Thaw them in the refrigerator overnight, and whip fresh cream just before assembling. It’s not ideal, but it’s a way to salvage it if needed.
Glaze Timing Advice: If you’re planning to refrigerate the trifle for more than a day, I often recommend glazing it just before serving. The glaze can sometimes become a bit sticky or absorb moisture from the cream and fruit if it sits for too long. If you’re serving it within a few hours of assembly, you can glaze it right away, and it will be perfectly fine.
The key to keeping it fresh is ensuring it’s well-covered in the fridge. You want to prevent it from absorbing any other odors from your refrigerator, and also from drying out.
Frequently Asked Questions
Final Thoughts
So there you have it, my absolute favorite scoop of heaven trifle! It’s more than just a recipe; it’s a little piece of happiness that I love sharing. It’s that perfect balance of effortless elegance and comforting familiarity. Whether you’re a seasoned baker or just starting out, this trifle is incredibly forgiving and always delivers a “wow” factor. It’s the kind of dessert that makes any day feel a little more special, and it’s guaranteed to be a hit with anyone lucky enough to get a spoonful. If you love this, you might also enjoy my Lemon blueberry loaf or my no-bake cheesecake for more easy yet impressive dessert ideas. I truly hope you give this scoop of heaven trifle a try – it’s a recipe that’s brought so much joy to my kitchen, and I can’t wait for it to bring joy to yours!
I’d absolutely love to hear how yours turns out! Please leave a comment below and let me know your favorite fruit combination or any fun twists you tried. And if you’re sharing photos on social media, tag me so I can see your beautiful creations! Happy baking (or should I say, happy assembling)!
Scoop of Heaven Trifle
Ingredients
Main Ingredients
- 1 pound Vanilla cake Crumble into bite-sized pieces
- 2 cups Custard Store-bought or homemade
- 2 cups Heavy cream Whipped to soft peaks
- 1.5 cups Mixed berries Fresh or frozen, such as strawberries, blueberries, raspberries
- 0.5 cup Powdered sugar For dusting (optional)
- Sprigs of mint For garnish (optional)
Instructions
Preparation Steps
- In a large trifle bowl, spread half of the crumbled vanilla cake at the bottom.
- Spoon half of the custard evenly over the cake layer.
- Scatter half of the mixed berries over the custard.
- Repeat the layers with the remaining cake, custard, and berries.
- Top the trifle with the whipped heavy cream, spreading it gently to cover the entire surface.
- Dust with powdered sugar and garnish with mint sprigs, if desired.
- Chill for at least 1 hour before serving to allow the flavors to meld.