I still remember the kitchen at grandma’s house, the clock ticking softly while the kettle whispered in the background. The first bite of a warm, sugared popcorn ball would melt the afternoon into something sweeter, like a small celebration you could hold in your hand. Popcorn balls aren’t just a snack; they’re a little memory you can share with a friend over coffee, a nod to summers spent craving something crunchy, something creamy, something just-the-right-amount-sweet. Think of them as a festive, snackable version of the classic Rice Krispies treats—popcornier, lighter, and somehow more forgiving on busy weeknights. This recipe is a simple, forgiving crowd-pleaser, the kind you can tailor to what you have in the pantry. I’ve made it countless times, and it never fails to bring a grin—whether it’s for a birthday snacking session, a movie night, or a last-minute bake-sale rescue. And yes, popcorn balls disappear in minutes around here, especially when little hands are asking for seconds and thirds.
What is a Popcorn Ball?
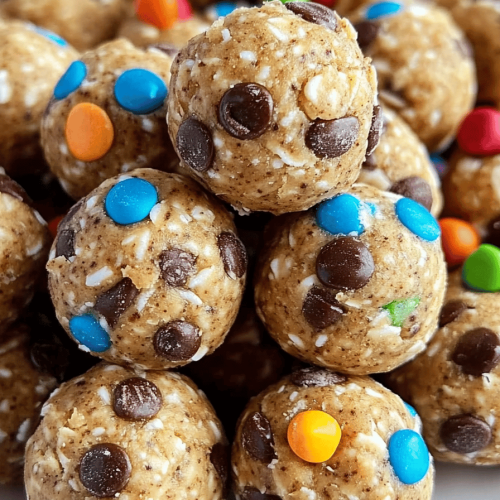
Popcorn balls are exactly what they sound like: puffed corn bound with a sweet, sticky mixture, rolled or shaped into bite-sized spheres. The concept is simple, but the textures can be magical—crisp on the outside, tender and chewy inside, with a kiss of vanilla and butter that makes the whole kitchen smell like a cozy bakery. The name itself feels nostalgic, a little carnival-perfect and a lot family-friendly. Think of it as a portable treat you can share with friends and family without needing a knife or a plate. It’s essentially popcorn plus a syrupy binder (often marshmallow or caramel) that melts and coats each kernel, then is set into a ball and sometimes finished with a glossy chocolate glaze. My version leans on marshmallow for that melt-in-your-mouth moment, but you can swap in chocolate, caramel, or Peanut Butter for a different personality. Either way, popcorn balls are a forgiving project that invites warmth, smells, and a little playful crunch.
Why you’ll love this recipe?
What I love most about these popcorn balls is how quick they come together and how endlessly adaptable they are. They’re basically snack-sized hugs you can hand out to neighbors, kids, and coworkers alike. Here are a few reasons you’ll find yourself reaching for this recipe again and again:
- Flavor: The butter-sweet-marshmallow combo is nostalgic, with a gentle vanilla note that wraps around the popcorn like a cozy blanket. The glaze adds a glossy finish and a second flavor layer—dark chocolate, white chocolate, or even a cinnamon-sugar dusting.
- Simplicity:What is the magic of a simple, clean, and easy to make popcorn?
- Cost-efficiency: What is the best way to measure cost-efficiency?Is it possible to make a big batch of popcorn for very little dinero?
- Versatility: This is a recipe you can personalize with add-ins—peanuts, pretzels, dried fruit, or a swirl of peanut butter in the center. It’s also a fantastic plug-and-play base for gifts or party favors.
- Make-ahead-friendly: They set up nicely and can be wrapped individually for gifting or kept in an airtight container for snacking through the week.
My kids actually ask for this all the time, especially when we’re craving something sweet but don’t want to bake. The smell alone—vanilla and warm butter—pulls everyone into the kitchen. If you’ve never made popcorn balls before, you’ll be surprised at how forgiving they are: a little extra marshmallow can fix a ball that’s a touch dry, and a quick melt of chocolate can rescue a glaze that’s too thick. It’s a lifesaver on busy nights and a little kitchen celebration on slower ones. And yes, this recipe travels well—perfect for a school lunchbox or a weekend picnic.
How to Make Popcorn Balls
Quick Overview
In a nutshell, you pop or heat your corn, melt a butter-marshmallow binder, and fold the two together until every piece of popcorn is glossy and coated. You portion the warm mixture into balls, and you can either leave them as-is for a chewy bite or give them a quick glaze for a glossy finish. The whole process takes just under an hour from start to finish, and most of that time is waiting for the mixture to set. The best part? You can customize with mix-ins and glaze flavors to fit any occasion, from Halloween to holidays, and beyond. It’s a simple, comforting project that yields a dramatic, shareable result—perfect for gifts or a fun family activity.
Ingredients
For the Main Mixture:
- 10 cups popped popcorn, kernels removed (air-popped or lightly buttered is fine)
- 3 cups mini marshmallows or 1 1/2 cups marshmallow cream
- 3 tablespoons unsalted butter
- 1 teaspoon vanilla extract
- A pinch of salt (to balance the sweetness)
For the Filling:
- Optional peanut butter center: 1/2 cup peanut butter, stirred with 1 tablespoon powdered sugar
- Optional crunchy add-ins: 1/2 cup chopped peanuts, 1/2 cup crispy rice cereal
For the Glaze:
- 1 cup chocolate chips or melting cups (dark or milk, your choice)
- 1 teaspoon coconut oil or light corn oil (to thin the glaze for a smooth finish)
- Optional flavor boost: 1/2 teaspoon vanilla or a pinch of cinnamon
Step-by-Step Instructions
Step 1: Preheat & Prep Pan
Like I said, popcorn balls don’t actually need baking, but you do want a clean, ready surface. Line a large Sheet Pan or baking tray with parchment paper or a silicone mat. If you’re adding a glaze, have a wire rack nearby for cooling. If you’re making filling centers, have a small bowl of peanut butter mixture ready and a spoon or small cookie scoop for portioning.
Step 2: Mix Dry Ingredients
In a large, warm-worthy bowl, keep your popped popcorn in big clusters. If you’ve got a few stray kernels, pick them out so every bite is smooth and tender. A quick whisk with a pinch of salt helps balance the sweetness and keeps the popcorn from tasting flat once the binder hits.
Step 3: Mix Wet Ingredients
In a small saucepan over low heat, melt the butter. Add the marshmallows and stir gently until they melt into a glossy, pale pool. Stir in the vanilla extract and a pinch of salt. If you’re using marshmallow cream instead of mini marshmallows, warm it gently just to loosen it a bit so it pours easily.
Step 4: Combine
Pour the warm marshmallow mixture over the popcorn and fold with a spatula until every piece holds a light, sticky sheen. Resist the urge to overwork it—you want it evenly coated but not compressed into a dense brick. If you find a few uncoated pieces, you can rescue them by drizzling a touch more melted marshmallow over the top and tossing gently.
Step 5: Prepare Filling
If you’re adding filling centers, portion the Peanut Butter mixture into small balls and flatten a tiny disc in your palm. Place a small amount of popcorn mixture on top, wrap around to encase the center, and roll between your palms to seal. If you’re skipping filling, just scoop small portions of the marshmallow-coated popcorn and move on.
Step 6: Layer & Swirl
Lightly oil or butter your hands to prevent sticking. Scoop a generous handful of the coated popcorn and press into a ball, around 2 to 2 1/2 inches in diameter. If you want a swirled glaze, hold the ball gently and let a drip of melted chocolate fall across the top, then use a clean toothpick to create a marble pattern. A quick swirl is all you need to give it personality.
Step 7: Bake
Here’s where you can decide how firm you want the finish. If you prefer a chewier texture, skip the oven entirely and let the balls set at room temperature for 20–30 minutes. If you want a crisper exterior and a sleeker glaze, you can bake them very briefly—about 8–10 minutes at 250°F (120°C). Watch carefully so they don’t dry out or become too hard. Either way, let them cool a bit before glazing to avoid melting the coating off the surface.
Step 8: Cool & Glaze
Transfer the formed balls to the lined Sheet Pan and let them cool completely. If you’re glazing, melt the chocolate with the optional oil until smooth. Dip or drizzle over the cooled popcorn balls, then set them on the rack or parchment until the glaze hardens. For a glossy finish, give the glaze a minute or two to set in a breezy space.
Step 9: Slice & Serve
Popcorn balls aren’t naturally sliced, but you can portion, shape, and present them in a few pretty ways. If you’re giving them as a gift or serving at a party, place each ball in a small paper cup or wrap in cellophane with a ribbon. If you’re plating for a casual gathering, arrange them on a platter with a few fresh herbs or a dusting of cocoa powder for contrast. If you want to make bars instead of balls, press the mixture into a shallow pan, let it set, and cut into squares. Either approach makes for a crowd-pleasing treat that tastes like sunshine and school-cafeteria nostalgia all in one.
What to Serve It With
Popcorn balls are such a versatile snack that they shine in any setting. Here are a few ideas to keep them feeling special and well-paired with the moment:
For Breakfast: Set a few on a breakfast tray with coffee and a glass of cold milk; the popcorn’s sweetness pairs beautifully with a strong roast. You can also crumble a ball over yogurt for a playful crunch. The aroma is a little wink to weekend mornings and lazy brunches.
For Brunch: Arrange mini popcorn balls on a tiered platter with fresh berries and a light dusting of powdered sugar. A sparkling citrus punch or a rosy iced tea complements the sweetness without competing with it.
As Dessert: Serve with a scoop of vanilla bean ice cream and a drizzle of extra glaze. The contrast between hot, melty glaze and cool ice cream feels like a warm hug at the end of a meal.
For Cozy Snacks: Keep a jar on the counter for quick bites during movie nights or after-school snacks. They pair nicely with a mug of hot chocolate or a cup of tea, and they’re much less fussy than baking a cake when you just want something simple and comforting.
My family tradition often involves a quick “one for you, one for me” swap during movie nights. We keep a little ritual: the first bite is for curiosity, the second for nostalgia, and the third for a shared smile. It’s funny how a simple batch of popcorn balls can become a bridge to laughter and slow, meaningful conversations.
Top Tips for Perfecting Your Popcorn Balls
Over the years, I’ve learned a few tricks that take these from good to truly memorable. Here are my go-to tips, broken down by technique:
- Popcorn Prep: Use popped kernels that are fully cooled and free of hulls. If you’re popping at home, pop a little extra and pick out the tiny stray kernels because one biteful with a hull is a disappointment you won’t forget.
- Mashable Moisture: The moisture level is crucial. If your mixture feels too dry, warm the marshmallows a bit longer or add a touch more butter. If it’s too sticky, toss in a spoon of powdered sugar and let it rest for a minute to absorb excess moisture.
- Mixing Technique: Fold gently, don’t squeeze. You want a light coating so every bite is balanced, not mushy. If you overmix, the popcorn can become dense and lose its crispiness once set.
- Swirl & Color: For visual appeal, drizzle a contrasting glaze in a thin line and swirl with a toothpick. You can also sprinkle edible decorations or a pinch of crushed candy cane or cocoa powder for seasonal flair.
- Ingredient Swaps: Try white chocolate with a hint of peppermint, or a caramel glaze with a pinch of sea salt for a toffee vibe. If you’re making vegan popcorn balls, swap butter for coconut oil and use vegan marshmallows and vegan chocolate coating.
- Baking Tips: If you’re baking the balls to set, keep the oven low and watch closely. Don’t bake too long or you’ll risk drying them out. Let them cool completely on a rack so the glaze doesn’t melt back into the surface.
- Glaze Variations: You can thin glaze with a touch more oil or a splash of heavy cream for a satin finish. For a bold twist, use cocoa powder in the glaze or add a pinch of chili powder for a subtle heat.
- Make-Ahead Magic: These keep well for several days at room temperature when stored in an airtight container. If you want to extend their life, freeze them after coating with glaze in a single layer, then wrap and freeze in a sturdy container.
From my kitchen to yours, the lessons learned here come from years of trial, taste tests, and the joy of sharing something sweet with friends. If you’re tweaking this recipe for the first time, start with the core marshmallow-butter bind and only add an optional filling or glaze once you’re confident in your binding. Trust me on this one—the first batch is a tasting panel, and the second batch is where you’ll start making it yours.
Storing and Reheating Tips
How you store your popcorn balls can make all the difference in texture and flavor day after day. Here’s how I keep them at their best:
Room Temperature: Store in an airtight container or wrap each ball individually in parchment or wax paper. They’re best within 2–3 days for peak texture; after that, they do soften a touch but remain delicious for longer if kept away from humidity.
Refrigerator Storage: If your kitchen is warm or you’ve added a perishable filling, refrigerate in an airtight container for up to 5 days. Allow them to come to room temperature before serving for the best texture.
Freezer Instructions: For longer storage, freeze unglazed balls on a sheet tray, then wrap tightly in plastic and place in a freezer bag for up to 2 months. Thaw at room temperature and re-glaze if you’d like the finish to be pristine and glossy again.
Glaze Timing Advice: If you plan to recoat later, glaze once and let set completely. If you freeze, you can rewarm the glaze by melting it gently and applying a fresh coat after thawing the balls. The glaze helps seal in moisture and adds a glossy finish when you’re ready to serve.
My test runs show that these little bites hold their personality across storage methods, which makes them perfect for party favors, classroom treats, or a last-minute dessert you can assemble in minutes before guests arrive.
Frequently Asked Questions
Final Thoughts
Popcorn balls aren’t just a snack; they are a memory you can pull from a jar, share with a friend, and recreate with your own little twists. They’re forgiving enough for kitchen chaos, quick enough for a spontaneous treat, and deeply comforting in flavor and aroma. If you’re new to this, start with the classic marshmallow binding, then let your imagination take the lead—add nuts, swap the glaze, or pair with a hot drink to make the moment extra special. I’m always excited to hear how you customize yours, so drop a comment with your favorite add-ins or glaze combinations. Happy baking, friends, and may your kitchen always smell like a warm hug!

Final Section: Share Your Twist
If you’ve tried this Popcorn Balls recipe and want to make it your own, I’d love to hear how you changed it up. Did you swap in a caramel glaze, toss in crushed pretzels for a sweet-savory bite, or add a citrus zest to the marshmallow binder for brightness? Your tweaks might become the next big shout-out in my kitchen to table journey. Leave a comment, rate the recipe, and tag me in your photos—I’m cheering you on from my cozy corner of the world, with a cup of coffee in hand and a plate full of popcorn balls by my side. Enjoy every bite, friend!
popcorn balls
Ingredients
Main Ingredients
- 12 cups popped popcorn
- 0.333 cup water
- 0.25 cup unsalted butter
- 0.333 cup light corn syrup
- 1 cup granulated sugar
- 1 teaspoon kosher salt
- 1 teaspoon vanilla extract
Instructions
Preparation Steps
- Pop 12 cups of popped popcorn using a microwave method and set aside.
- In a large buttered bowl, place the popped popcorn to coat with the sauce later.
- In a medium saucepan, melt water and butter over medium low heat.
- Add corn syrup, sugar, and salt; cook until the mixture simmers for about 5 minutes.
- Continue cooking until the candy thermometer reads 235 to 240 F. Remove from heat and stir in vanilla.
- Drizzle the syrup over the popcorn and stir to coat evenly; let cool slightly.
- With buttered hands, form the mixture into balls and place on parchment to set.
- Cool completely and store in airtight containers.