Oh, these peanut butter brownies! If there’s one thing that instantly takes me back to my childhood kitchen, it’s the warm, comforting aroma of chocolate and peanut butter mingling in the air. These aren’t just any brownies; they’re the kind that have that perfect balance – fudgy on the inside, with just a hint of chewiness at the edges, and that irresistible swirl of creamy peanut butter. I remember my mom making batches of these for school bake sales, and they were always the first to disappear. Honestly, I’ve tried a gazillion brownie recipes over the years, from super fancy dark chocolate ones to ones with a secret ingredient, but when I’m craving pure, unadulterated comfort, it’s always these peanut butter brownies that call my name. They’re simpler than you might think, and the result is pure magic. If you’re a chocolate and peanut butter lover, trust me, this recipe is going to be your new best friend.
What is peanut butter brownie?
So, what exactly are these magical peanut butter brownies we’re talking about? Think of them as the ultimate mashup of two of the most beloved desserts in the world. You start with a deeply rich, fudgy brownie batter – the kind that’s dense and decadent. Then, instead of just plain brownies, we’re swirling in ribbons of creamy, dreamy peanut butter throughout. It’s not just an afterthought; the peanut butter becomes an integral part of the flavor profile, creating these incredible pockets of nutty goodness that just melt in your mouth. They’re like a hug in dessert form. This recipe is essentially about taking two classic favorites and combining them in a way that amplifies both their best qualities. It’s not complicated, it’s just…deliciously smart.
Why you’ll love this recipe?
Honestly, I could go on and on about why this peanut butter brownies recipe is an absolute keeper. First off, the FLAVOR. It’s just sensational. You get that deep, intense chocolate flavor from the brownie base, and then bam! You hit a swirl of creamy, salty-sweet peanut butter. It’s a flavor combination that just works on every single level. It’s like the universe decided chocolate and peanut butter were meant to be together, and this recipe is proof. Beyond the taste, SIMPLICITY is a huge win here. Even if you’re not a seasoned baker, you can whip these up. There are no fancy techniques or hard-to-find ingredients. It’s a straightforward process that guarantees delicious results, which is a lifesaver when you need a quick dessert fix. And let’s talk COST-EFFICIENCY. Most of the ingredients are pantry staples that you probably already have on hand. Flour, sugar, cocoa powder, butter, eggs, peanut butter – they’re all pretty standard and affordable. You don’t need to break the bank to make something this incredibly decadent. Plus, these are SO VERSATILE. They’re perfect for a weeknight treat, a potluck, a birthday party, or even just when you’re having a serious craving. Serve them warm with a scoop of vanilla ice cream for an extra treat, or let them cool and enjoy that chewy texture. What I love most about this recipe is that it’s consistently amazing. I’ve made it countless times, for everything from casual family dinners to when unexpected guests drop by, and it *never* fails to impress. It’s that reliable, go-to recipe that always brings smiles.
How do I make peanut butter brownies?
Quick Overview
Making these peanut butter brownies is surprisingly simple! You’ll essentially be preparing a rich chocolate brownie batter, then dolloping and swirling in your peanut butter before baking. The key is not to overmix the batter and to achieve those beautiful peanut butter ribbons. It’s a process that takes about 15 minutes of active prep time, then just some patient waiting while they bake and cool. The result is a batch of incredibly decadent, gooey peanut butter brownies that smell amazing while they’re in the oven and are gone even faster once they’re out!
Ingredients
For the Main Batter:
1 cup (2 sticks) unsalted butter, melted: Using good quality butter makes a difference here. Make sure it’s properly melted but not boiling hot when you add it to your other ingredients.
2 cups granulated sugar: This provides sweetness and helps create that perfect fudgy texture. Don’t skimp on it!
4 large eggs, room temperature: Room temperature eggs incorporate better and create a smoother batter. I usually pull mine out about 30 minutes before I start mixing.
1 teaspoon vanilla extract: A good quality vanilla really boosts the overall flavor of the chocolate.
1 1/2 cups all-purpose flour: This is your base. Make sure to measure it correctly by spooning it into your cup and leveling off with a knife, rather than scooping directly from the bag.
3/4 cup unsweetened cocoa powder: This is where the deep chocolate flavor comes from! Use a good quality unsweetened cocoa powder for the best results. Dutch-processed cocoa will give a darker color and richer flavor.
1/2 teaspoon baking powder: Just a touch to give them a little lift, but we don’t want them cakey!
1/4 teaspoon salt: Salt is crucial for balancing the sweetness and bringing out the chocolate and peanut butter flavors.
For the Filling:
1 cup creamy peanut butter: Your favorite brand works! I usually go for standard creamy peanut butter. If yours is very stiff, you might want to warm it up just slightly (like 10 seconds in the microwave) to make it easier to swirl, but be careful not to make it liquidy.
For the Glaze (Optional, but highly recommended!):
1/2 cup powdered sugar: This is the base for a simple, sweet glaze.
2-3 tablespoons milk or cream: You can use whole milk, half-and-half, or even heavy cream for a richer glaze. Start with 2 tablespoons and add more until you reach your desired drizzling consistency.
1/4 teaspoon vanilla extract: A little extra vanilla for that sweet topping.
Pinch of salt: Just to balance the sweetness of the glaze.
Step-by-Step Instructions
Step 1: Preheat & Prep Pan
First things first, get your oven preheated to 350°F (175°C). While it’s warming up, grab an 8×8 inch baking pan. I like to line mine with parchment paper, leaving some overhang on the sides. This makes lifting the brownies out so much easier later on, and cleanup is a breeze. If you’re not using parchment, just grease and flour your pan well. Make sure to get into all the corners!
Step 2: Mix Dry Ingredients
In a medium bowl, whisk together your all-purpose flour, unsweetened cocoa powder, baking powder, and salt. Whisking them well ensures everything is evenly distributed, so you don’t end up with pockets of cocoa or baking powder in your brownies. You want that consistent texture and flavor throughout every single bite.
Step 3: Mix Wet Ingredients
In a large bowl, pour in your melted butter. Add the granulated sugar and whisk until combined. Then, crack in your four room-temperature eggs, one at a time, whisking well after each addition. Stir in the vanilla extract. This mixture should look smooth and glossy.
Step 4: Combine
Now, it’s time to bring those wet and dry ingredients together. Gradually add the dry ingredients to the wet ingredients, mixing with a spatula or wooden spoon until just combined. Be careful not to overmix! Overmixing develops the gluten in the flour, which can lead to tough brownies. Stop mixing as soon as you don’t see any more streaks of dry flour. A few little lumps are totally fine.
Step 5: Prepare Filling
If your peanut butter is a bit stiff, you can gently warm it for about 10-15 seconds in the microwave. You just want it slightly softened so it’s easier to swirl, not liquidy. We’re looking for a consistency that’s spreadable but still holds its shape.
Step 6: Layer & Swirl
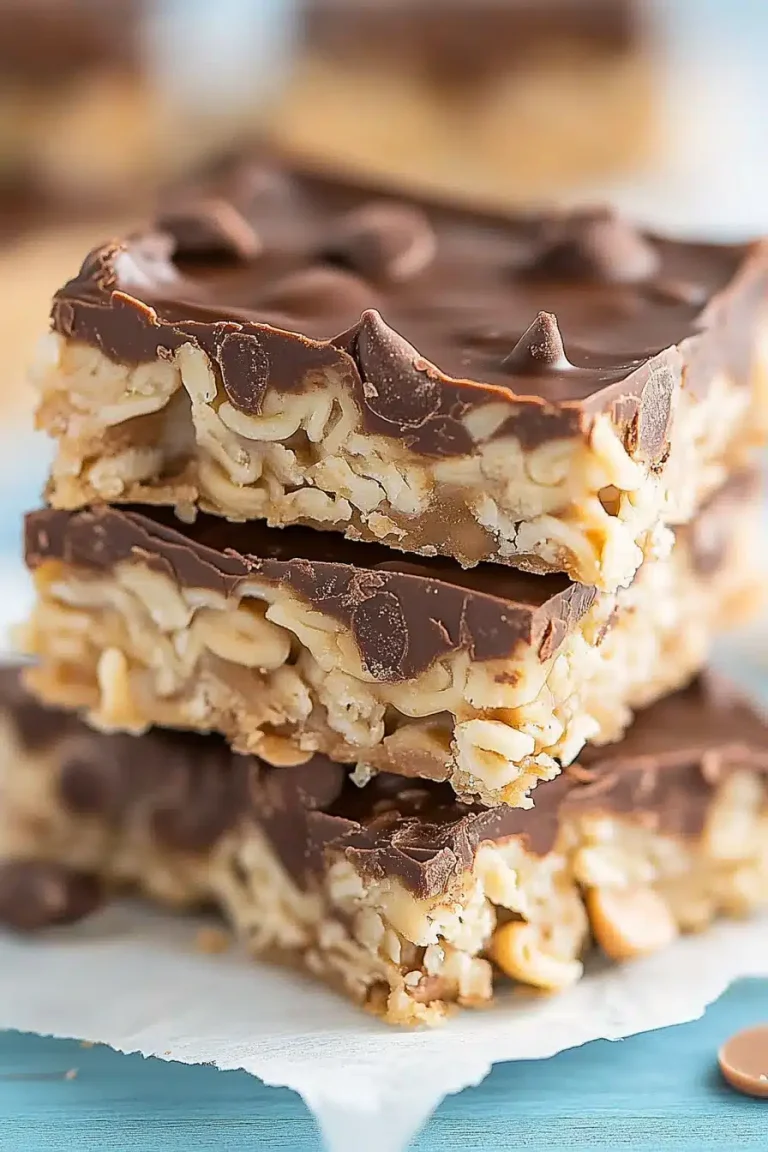
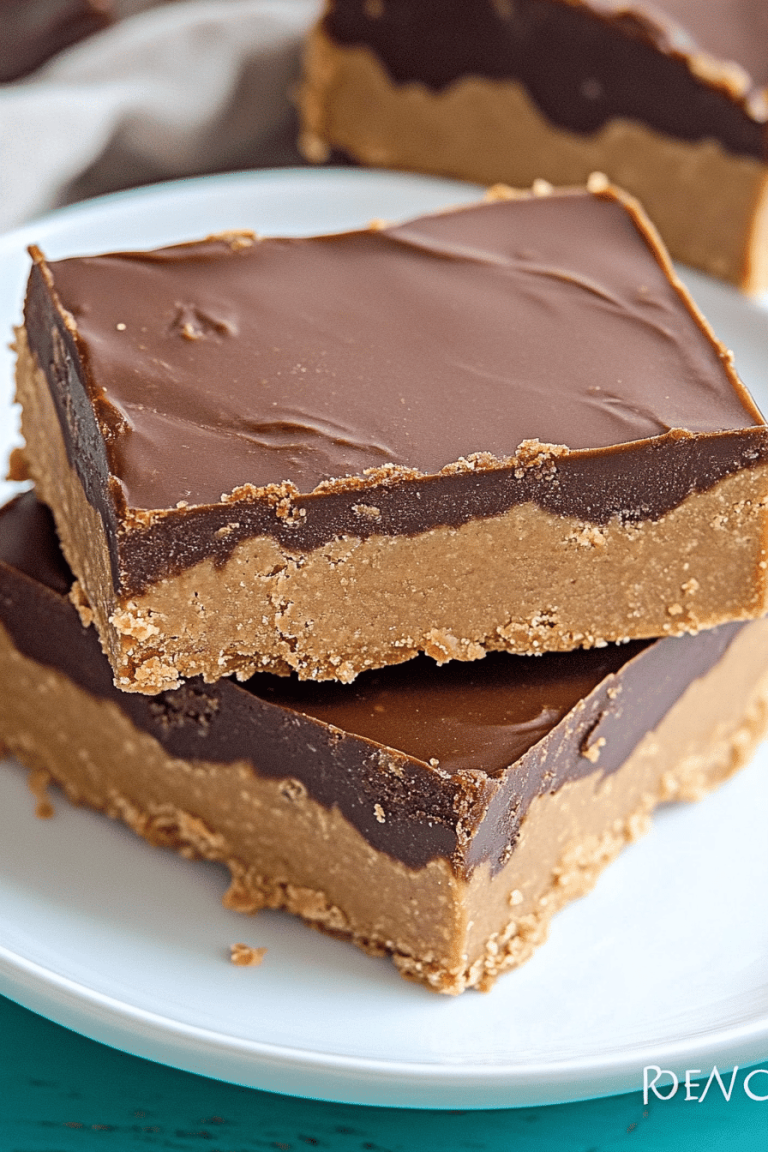
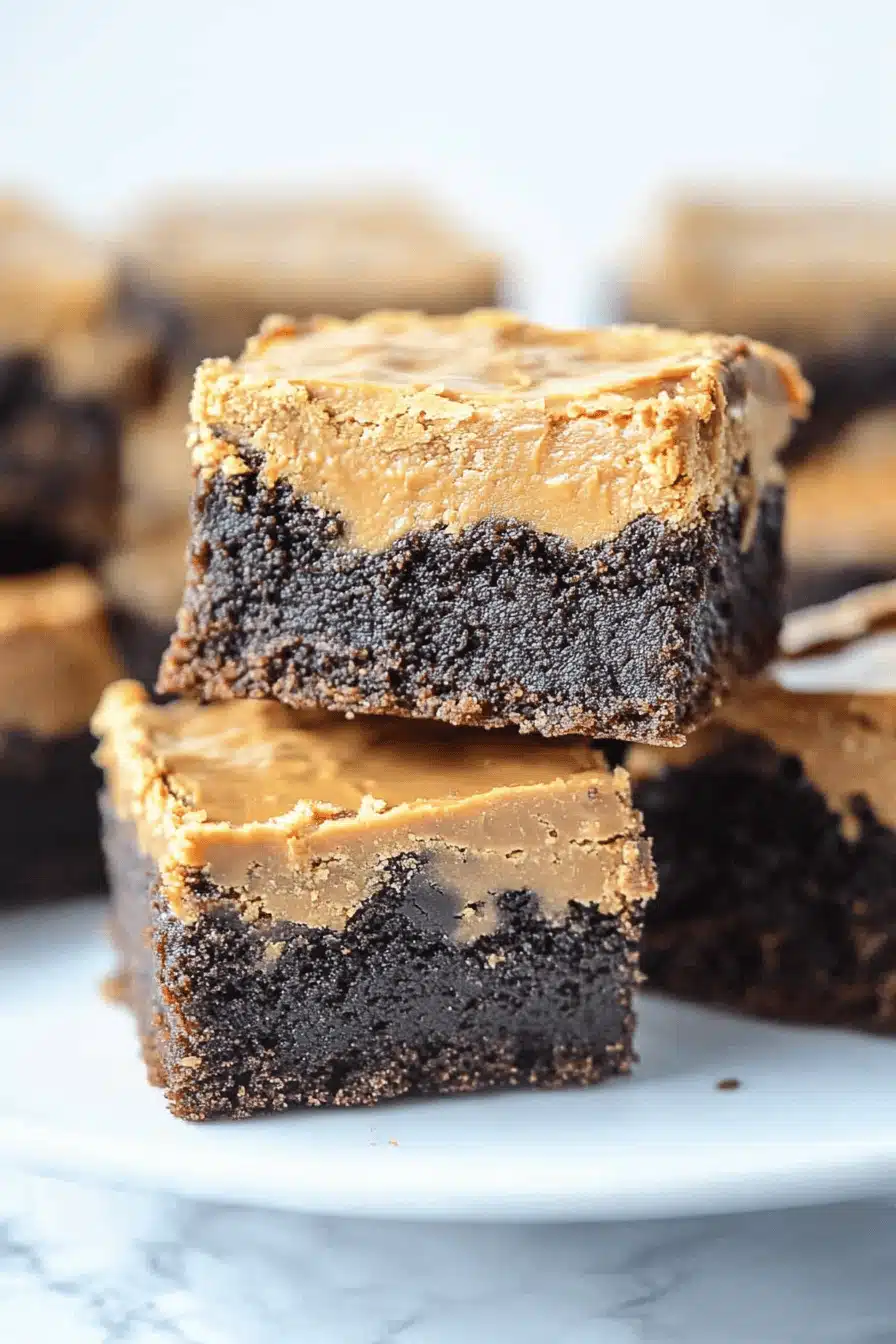
Pour about half of your brownie batter into your prepared pan and spread it out evenly. Then, dollop spoonfuls of the peanut butter over the batter. Don’t be shy! Now, spoon the remaining brownie batter over the peanut butter. Take a butter knife or a skewer and gently swirl the peanut butter into the batter. Don’t over-swirl, or you’ll just end up with a uniformly brownish batter. You want distinct ribbons and pockets of peanut butter. Aim for elegant swirls, not a muddy mess!
Step 7: Bake
Pop the pan into your preheated oven and bake for 25-35 minutes. The exact time will depend on your oven. You’ll know they’re done when the edges are set and a toothpick inserted into the center comes out with moist crumbs attached, but not wet batter. A few moist crumbs are good for that fudgy texture; if it comes out completely clean, they might be overbaked.
Step 8: Cool & Glaze
This is the hardest part – waiting! Let the brownies cool in the pan on a wire rack for at least 30 minutes. For the glaze, whisk together the powdered sugar, 2 tablespoons of milk or cream, vanilla extract, and a pinch of salt until smooth. If it’s too thick, add a tiny bit more milk until you get a drizzly consistency. Once the brownies have cooled slightly, drizzle the glaze over the top. Let them cool completely before slicing.
Step 9: Slice & Serve
Once completely cool, use the parchment paper overhang to lift the brownies out of the pan. Place them on a cutting board and slice them into squares. For the cleanest cuts, use a sharp knife and wipe it clean between each slice. Serve them at room temperature for the best fudgy texture, or pop them in the fridge if you prefer a firmer brownie. Enjoy!
What to Serve It With
These peanut butter brownies are practically a meal in themselves, but they pair wonderfully with a few things depending on the occasion. For a simple Breakfast treat (yes, I’m one of those people!), a square alongside a hot cup of coffee is pure bliss. The slight saltiness of the peanut butter and the rich chocolate are surprisingly good with morning coffee. For a more elegant Brunch spread, cut them into smaller, neater squares and arrange them on a tiered stand. They look fantastic next to some fresh fruit or mini muffins. As a decadent Dessert, they’re obviously a star. A warm brownie with a scoop of good quality vanilla bean ice cream is a classic for a reason – the contrast in temperature and texture is divine! Or, serve them with a raspberry coulis for a pop of tartness that cuts through the richness. And for those Cozy Snacks when you just need something comforting, just grab a square (or two!) straight from the pan. They’re perfect on their own, maybe with a cold glass of milk to wash it all down. My kids absolutely love them after school with a glass of chocolate milk – it’s like a double chocolate hit!
Top Tips for Perfecting Your Peanut Butter Brownies
I’ve made these peanut butter brownies so many times that I’ve picked up a few tricks along the way that really make a difference. For the main batter, **don’t overmix** is probably my biggest tip. Seriously, once you add the dry ingredients to the wet, mix only until you don’t see any dry flour. A few lumps are better than tough brownies! It’s also crucial to use room temperature eggs; they emulsify better with the butter and sugar, leading to a smoother, richer batter. When it comes to the **peanut butter filling**, I’ve learned that you don’t want it too cold or too warm. If it’s too cold, it’s hard to swirl. If it’s too warm, it will just melt into the batter and you won’t get those distinct swirls. Aim for just barely softened. For the **swirls**, I like to use a butter knife or a skewer and make a few figure-eight motions or just gentle back-and-forth strokes. Don’t go crazy trying to mix it all in; you want those beautiful ribbons. For **baking**, every oven is different, so trust the toothpick test. A few moist crumbs clinging to the toothpick mean fudgy perfection. If it comes out clean, you’ve probably gone too far. When it comes to **ingredient swaps**, I’ve experimented a bit. If you’re out of granulated sugar, you can try brown sugar, but it might make them a little chewier and less fudgy. For the cocoa powder, you can use natural or Dutch-processed, but Dutch-processed will give you a darker, more intense chocolate flavor. I’ve also tried using a slightly different **peanut butter**, like a natural peanut butter, but sometimes those can be a bit oily, so keep an eye on that and perhaps drain off any excess oil. And for the **glaze**, the consistency is key. Start with less liquid and add more gradually until it’s perfect for drizzling. You can also skip the glaze entirely and just dust them with powdered sugar for a simpler finish, or even add some chopped peanuts on top of the glaze for extra crunch!
Storing and Reheating Tips
These peanut butter brownies are pretty forgiving when it comes to storage. If you’re planning to devour them within a day or two, leaving them at **Room Temperature** is perfectly fine. Just make sure they’re in an airtight container or well-covered with plastic wrap. They’ll stay nice and fudgy for up to 3 days this way. If you think you’ll need them around for longer, or if your kitchen is particularly warm, **Refrigerator Storage** is your best bet. Store them in an airtight container; they’ll keep well for about a week. I actually prefer them cold sometimes – the texture gets even fudgier! For longer storage, definitely go with **Freezer Instructions**. Wrap individual brownies or the whole pan tightly in plastic wrap, then in aluminum foil, or place them in a freezer-safe bag or container. They can last for up to 2-3 months in the freezer. To thaw, just take them out and let them come to room temperature, or warm them gently in the microwave for a few seconds if you like them gooey. When it comes to the **Glaze Timing**, I always recommend adding the glaze *after* the brownies have cooled down significantly, but before they’re completely firm, especially if you’re storing them at room temperature. If you’re refrigerating or freezing them, you might want to glaze them right before serving, as the glaze can get a bit hard when cold. Or, you can store the glaze separately in a small container and drizzle it on just before you serve them.
Frequently Asked Questions
Final Thoughts
So there you have it – my absolute favorite peanut butter brownies! I really hope you give this recipe a try. It’s one of those recipes that just makes people happy. The combination of rich chocolate and creamy peanut butter is classic for a reason, and I truly believe this recipe delivers on all fronts: incredible flavor, satisfying texture, and a surprisingly simple process. They’re the perfect treat for any occasion, or no occasion at all! If you loved these, you might also want to check out my recipe for [link to a similar recipe, e.g., Fudgy Chocolate Cookies] or my [link to another related recipe, e.g., Easy Chocolate Mug Cake] for more quick and delicious chocolate fixes. I can’t wait to hear what you think of these peanut butter brownies! Please leave a comment below to let me know how yours turned out, or share any fun variations you tried. Happy baking, and enjoy every single bite!
Peanut Butter Brownies
Ingredients
Brownie Ingredients
- 4 ounces unsweetened baking chocolate coarsely chopped
- 0.75 cup unsalted butter
- 1.5 cups granulated sugar
- 0.5 teaspoon salt
- 3 large eggs
- 1 teaspoon vanilla extract
- 2 tablespoons Dutch-process cocoa powder or regular unsweetened
- 1 cup all-purpose flour
Peanut Butter Swirl
- 0.5 cup peanut butter
- 2 tablespoons unsalted butter melted
- 0.3333 cup powdered sugar
- 1 teaspoon vanilla
Instructions
Preparation Steps
- Preheat oven to 350F. Line a 9x9-inch pan with foil and spray with cooking spray.
- Place baking chocolate and butter in a large, microwave safe bowl. Heat on HIGH power for 2-3 minutes, stirring every 30 seconds, until chocolate is smooth. Stir in sugar. Add eggs, vanilla, and cocoa and stir well. Add flour and stir carefully. Spread batter in prepared pan.
- Stir together peanut butter, melted butter, powdered sugar, and vanilla. Drop spoonfuls on top of the brownies then swirl with a butter knife or the back of a wooden spoon.
- Bake about 28-35 minutes, until the center seems set. Let cool before cutting.