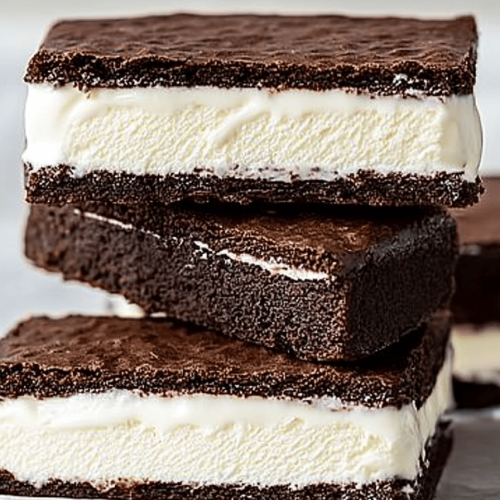
You know, there are some recipes that just bring a huge smile to my face. This one, for our Red, White, and Blue Patriotic Ice Cream Sandwiches, is definitely one of them. It’s not just about the deliciousness, though oh my goodness, it *is* delicious! It’s about the memories. Every summer, when the Fourth of July rolls around, or even just for those really hot afternoons when you need something special, this is what we whip up. My kids start asking about them weeks in advance! They’re like a softer, more forgiving cookie sandwich than some of the others out there, kind of like a cloud of pure happiness sandwiched between two chewy, delightful cookies. They’re way easier to handle than a dripping scoop of ice cream on a cone, and the fun colors just scream celebration. Honestly, if you’ve ever tried those store-bought ice cream cookie sandwiches and wished they were just a little bit more homemade, a little more… *you*, then this is your answer. It’s the perfect way to capture that festive spirit without a ton of fuss.
What is Patriotic Ice Cream Sandwich?
So, what exactly are these festive little delights? Think of them as your ultimate summer treat, elevated. They’re essentially homemade ice cream sandwiches, but with a patriotic twist that makes them perfect for any summer gathering or holiday. We’re talking about soft, chewy cookies – not too thin, not too cakey, just right – embracing a generous scoop of your favorite ice cream. The “patriotic” part comes in with a little food coloring magic in the cookie dough, giving us beautiful red and blue swirls. It’s like a little flag in every bite, but way more fun and infinitely more edible! They’re not fussy, they’re not complicated, they’re just pure, unadulterated fun and flavor. They’re the kind of treat that makes people’s eyes light up when they see them, and they disappear even faster!
Why you’ll love this recipe?
There are so many reasons why this recipe has become a staple in my kitchen, and I just know you’re going to fall head over heels for it too. First off, the FLAVOR! Oh my word. The cookies themselves are slightly sweet, with a hint of vanilla and a perfect chewy texture that just melts in your mouth. When you pair that with creamy, cold ice cream – whether it’s classic vanilla, a vibrant strawberry, or even a rich chocolate – it’s a match made in heaven. It’s not just about the taste, though. The SIMPLICITY of this recipe is a lifesaver. Seriously, even if you’re not a seasoned baker, you can totally nail this. I’ve whipped these up on busy weeknights when everyone’s craving something sweet, and they’re surprisingly quick. Plus, they’re incredibly COST-EFFECTIVE. Making them at home is so much cheaper than buying those fancy ice cream cakes or pre-made sandwiches, and you get way more for your money. And let’s talk VERSATILITY! While the red and blue make them perfect for patriotic holidays, you can totally swap out the colors for any occasion – pink and purple for birthdays, green and yellow for St. Patrick’s Day, or even just keep them plain and simple. What I love most about these patriotic ice cream sandwiches is that they feel special, like a real treat, but they’re made with love right in your own kitchen. They’re so much better than anything store-bought, and the joy they bring is truly priceless. It’s that homemade magic that just can’t be replicated!
How do you make Patriotic Ice Cream Sandwiches?
Quick Overview
Making these patriotic ice cream sandwiches is a breeze, I promise! You’ll mix up a simple cookie dough, divide it, add a splash of red and blue food coloring to two portions, swirl them together gently, and bake them until they’re just set. Once cooled, you’ll sandwich your favorite ice cream between two of these delightful cookies. The magic happens when you freeze them just long enough to firm up. It’s all about creating soft, chewy cookies that perfectly hug a creamy center. It’s seriously less intimidating than it sounds, and the results are so worth it!
Ingredients
For the Main cookie dough: For the Main Cookie D
Let’s start with the cookies that hold all the magic together. We need good quality ingredients here for the best texture and flavor. For the flour, all-purpose is perfect, but make sure you measure it correctly – spoon it into the cup and level it off, don’t just scoop directly from the bag, that’s a common mistake I learned from! For the sugar, a mix of granulated and brown sugar gives us that perfect chewy texture and a hint of caramel-like sweetness. Butter is key for richness, so use unsalted and make sure it’s softened to room temperature – not melted, not cold, just soft. Eggs add structure and richness, and good vanilla extract is non-negotiable for that classic cookie flavor. Baking soda is our leavener, making them nice and puffy, and a pinch of salt balances out all the sweetness. Oh, and of course, we’ll need some red and blue food coloring for that festive look! Gel food coloring works best for vibrant colors without adding too much extra liquid.
For the Ice Cream Filling:
This is where you get to be creative! My absolute favorite is a good quality vanilla bean ice cream because it lets the cookie flavor shine. But honestly, any flavor works. Strawberry ice cream looks fantastic with the red and blue cookies, or even a simple Neapolitan if you’re feeling extra festive. Just make sure your ice cream is softened slightly before you start assembling. You want it scoopable but not melted into a puddle. I usually take it out of the freezer about 10-15 minutes before I’m ready to assemble. If you’re feeling adventurous, you could even try a homemade ice cream recipe, but store-bought is totally fine and a huge time-saver!
Step-by-Step Instructions
Step 1: Preheat & Prep Pan
First things first, let’s get that oven prepped! Preheat your oven to 350°F (175°C). While it’s warming up, grab a couple of baking sheets. You’ll want to line them with parchment paper or silicone baking mats. This is a game-changer, folks. It prevents sticking and makes cleanup an absolute dream. Trust me on this one; it’s worth it. Make sure you have enough space on your counter for these. We’ll be working with the dough in batches.
Step 2: Mix Dry Ingredients
In a medium-sized bowl, whisk together your flour, baking soda, and salt. Give it a good whisk until everything is well combined. This ensures that your leavening and salt are evenly distributed throughout the dough, which is super important for even baking and perfect texture. I always do this step first, so it’s ready to go when the wet ingredients are done.
Step 3: Mix Wet Ingredients
In a larger bowl, cream together your softened butter and both granulated and brown sugars. Beat them with an electric mixer until the mixture is light and fluffy. This usually takes a few minutes. Then, beat in the eggs one at a time, making sure each one is fully incorporated before adding the next. Stir in that wonderful vanilla extract. The smell alone is starting to get me excited!
Step 4: Combine
Now, it’s time to bring it all together. Gradually add the dry ingredients to the wet ingredients, mixing on low speed (or by hand with a spatula) until just combined. Be careful not to overmix here! Overmixing can lead to tough cookies, and we want these to be wonderfully soft and chewy. Stop mixing as soon as you no longer see streaks of flour. It should look like a lovely, slightly thick dough.
Step 5: Prepare Filling
This is your ice cream prep time! Take your chosen ice cream out of the freezer and let it sit on the counter for about 10-15 minutes, just until it’s slightly softened and scoopable but not completely melted. You want it pliable enough to spread or shape easily. This usually does the trick for me. If it’s too hard, it’s tough to work with; too soft, and it’ll just melt everywhere. Aim for that perfect creamy consistency.
Step 6: Layer & Swirl
Now for the fun, colorful part! Divide your cookie dough into three equal portions. Leave one portion plain (this will be our white layer). To the second portion, add a few drops of red food coloring and gently mix until you achieve a vibrant red. To the third portion, add a few drops of blue food coloring and mix until you have a beautiful blue. Now, here’s the trick for that gorgeous swirl: place spoonfuls of the white, red, and blue dough randomly next to each other on your prepared baking sheet. Don’t overthink it! Then, using a toothpick or a skewer, gently swirl the colors together. You don’t want to mix them completely; just a few gentle swirls to create a marbled effect. Aim for cookies that are about 3-4 inches in diameter. I usually end up with about 4-5 cookies per color, so I do it in batches. Remember to leave a little space between them on the baking sheet, as they will spread a bit.
Step 7: Bake
Pop those beautiful, swirled cookies into your preheated oven. Bake for about 10-12 minutes, or until the edges are lightly golden and the centers are set but still look a little soft. They’ll continue to cook a bit on the baking sheet after you take them out. You want them to be soft and chewy, not crisp. I always keep a close eye on them in the last few minutes, as ovens can vary!
Step 8: Cool & Glaze
Once they’re out of the oven, let the cookies cool on the baking sheet for about 5 minutes before transferring them to a wire rack to cool completely. This is super important! Trying to assemble ice cream sandwiches with warm cookies is a recipe for disaster. They need to be totally, completely cool. If you wanted a glaze (though honestly, they’re amazing as is!), you’d typically do that after they’re fully cooled, perhaps with a simple powdered sugar glaze mixed with a little milk or lemon juice, and then you’d add more swirls of color. But for this recipe, we’re focusing on the cookie and ice cream combo!
Step 9: Slice & Serve
Once your cookies are completely cool, it’s time for the grand finale! Grab your slightly softened ice cream. Place a dollop of ice cream onto the flat side of one cookie. Gently place another cookie on top, flat side down, and lightly press to create your sandwich. I like to use an ice cream scoop for a nice, even amount. For a really neat presentation, you can then wrap each sandwich individually in parchment paper or plastic wrap. It helps them hold their shape and prevents freezer burn. For best results, pop them back into the freezer for at least 30 minutes to an hour to firm up the ice cream before serving. This step is crucial for that perfect ice cream sandwich experience!
What to Serve It With
These patriotic ice cream sandwiches are pretty much a star on their own, but pairing them with the right things can make them even more special. For a casual summer BBQ or a backyard cookout, they’re the perfect ending to grilled burgers and corn on the cob. Serve them alongside some fresh Fruit Salad, and you’ve got a complete, festive meal. On a hot afternoon, a tall glass of iced tea or a cold lemonade is the perfect accompaniment. For a more elegant brunch spread, you could plate them with some fresh berries and a dollop of whipped cream. And if you’re looking for a truly decadent dessert, try serving them with a rich chocolate sauce drizzled over the top, or perhaps with a side of fresh raspberries. My family also loves to have these as a special treat after a movie night. We’ll dim the lights, put on something fun, and enjoy these cool, creamy delights. They are truly versatile and bring smiles no matter the occasion!
Top Tips for Perfecting Your Patriotic Ice Cream Sandwiches
I’ve made these patriotic ice cream sandwiches more times than I can count, and I’ve picked up a few tricks along the way that I just have to share! First, for the cookie dough, make sure your butter is truly softened, not melted. This is key for getting that light, fluffy texture when you cream it with the sugar. If your butter is too cold, your cookies will be dense, and nobody wants that! When you’re dividing and coloring the dough, work quickly so the dough doesn’t get too warm. If it starts to feel sticky, pop it in the fridge for about 10-15 minutes. For the swirling, don’t go crazy. A few gentle swirls are all you need to create that beautiful marbled effect. If you overmix, you’ll just end up with a muddy brown color. Remember that the goal is distinct ribbons of red, white, and blue. When it comes to baking, keep an eye on those cookies! Ovens really do vary, and you want them slightly underbaked in the center for that perfect chewy texture. They should look set but not firm. If they look golden brown all over, they might end up too crunchy once cooled. And for the ice cream filling, softness is key. You want it scoopable but not a runny mess. If your ice cream is too hard, you can let it sit out a bit longer, or even warm your ice cream scoop slightly in hot water before scooping. Finally, for storage, wrapping them individually is your best friend. It keeps them fresh, prevents freezer burn, and makes them super easy to grab and go. I’ve learned that wrapping them tightly in plastic wrap first, then in foil or a freezer bag, is the best method for long-term freezing. And a little tip: if you’re making these for a party, assemble them a day or two in advance and keep them in the freezer. They’ll be perfectly firm and ready to serve!
Storing and Reheating Tips
Now, let’s talk about keeping these amazing patriotic ice cream sandwiches fresh, because sometimes, no matter how hard you try, you just can’t eat them all at once! If you happen to have any leftovers (which is rare in my house!), storing them properly is key to maintaining their deliciousness. For short-term storage, I highly recommend wrapping each sandwich individually. First, use plastic wrap to create a snug seal around the cookie and ice cream. Then, you can wrap that again in foil or place them in a single layer inside an airtight freezer bag. This double-layer protection is your best defense against freezer burn and keeps the cookies from getting soggy. They’ll stay wonderfully delicious in the freezer for up to 2-3 weeks. If you’re planning on storing them for longer than that, the quality might start to decrease slightly, but they’ll still be edible for up to a month. When you’re ready to enjoy them, you can take them straight from the freezer. They’ll start to soften within a few minutes, so you can either eat them right away for that firm ice cream sandwich experience, or let them sit out for just a couple of minutes until they reach your preferred level of soft chewiness. I’ve found that they don’t really need reheating, as they’re meant to be enjoyed cold! If, for some reason, the cookies feel a little too hard after freezing, just let them sit on the counter for about 5-10 minutes before digging in. The glaze, if you choose to add one, is best applied right before serving if the sandwiches have been frozen, to prevent it from becoming sticky or melting.
Frequently Asked Questions
Final Thoughts
So there you have it – your ticket to the most delightful, homemade patriotic ice cream sandwiches! I truly believe these are more than just a dessert; they’re a little slice of summer joy, packed with fun colors and incredible flavor. They’re the perfect way to celebrate, cool down, or just make any ordinary day feel a bit more special. The satisfaction of pulling these out of the freezer, perfectly formed and ready to be devoured, is something else! If you love this recipe, you might also enjoy my Fudgy Brownie Ice Cream Sandwiches or my No-Bake Lemon Raspberry Icebox Cake for more easy, crowd-pleasing summer treats. Give these patriotic ice cream sandwiches a try, and I can’t wait to hear how much you and your family love them! Let me know in the comments below what your favorite ice cream flavor to use is! Happy baking (and assembling)!
Patriotic ice cream sandwiches
Ingredients
Main Ingredients
- 1 box vanilla ice cream softened
- 1 package graham crackers
- 1 cup whipped cream or frosting
- 0.5 cup red sprinkles
- 0.5 cup blue sprinkles
Instructions
Preparation Steps
- Line a baking sheet with parchment paper. Spread the softened vanilla ice cream onto the parchment paper in an even layer, about 0.5 inches thick. Freeze until firm, about 1-2 hours.
- Once the ice cream is firm, cut it into desired shapes using cookie cutters (stars or squares work well).
- Break the graham crackers into pieces that match the size of your ice cream shapes.
- Spread a thin layer of whipped cream or frosting onto the bottom of a graham cracker piece.
- Place an ice cream shape on top of the whipped cream.
- Top with another graham cracker piece and gently press down.
- Immediately roll the sides of the ice cream sandwich in red and blue sprinkles, alternating colors.
- Place the finished ice cream sandwiches back on the parchment-lined baking sheet and freeze until solid, at least 2 hours.