There’s something about a sizzling pan and the scent of garlic and ginger that instantly brings me back to Sunday dinners at grandma’s house. This Mongolian beef recipe is that cozy, start-to-finish weeknight magic I reach for when I want something comforting but quick. It’s not complicated, but it tastes like a little celebration—the kind you share with a close friend over coffee and wide smiles. I always do this when I’m in a rush: slice the beef thin, swirl the glaze until it’s lacquered and glossy, and serve it over steamy rice that soaks up every last drop. The first time my kids scooped up a bite, their eyes lit up—and yes, there were whispers of “again, please!” This is the dish that disappears in minutes at my house, and trust me, this Mongolian Beef Recipe is a lifesaver on busy nights. If you’ve ever compared a glossy, sweet-savory stir-fry to your favorite takeout, you’ll know exactly what I mean: home-cooked flavor, without the price tag or the drive-thru regret.
What is Mongolian Beef?
Think of Mongolian Beef Recipe as a bright, fast-faced stir-fry that’s all about a glossy, soy-sugar glaze clinging to tender beef and crisp aromatics. It’s essentially a Chinese-American classic: slices of flank or sirloin tossed in a quick cornstarch coating, seared to caramelized edges, then finished with a tangy-sweet glaze and a shower of green onions. The name is a bit of a misnomer—this dish didn’t originate in Mongolia—but that’s part of its charm: a bold, slightly exotic-sounding flavor profile that feels like a special treat even on a weekday. It’s the kind of recipe I reach for when I want something that feels “restaurant-worthy” but is actually ready in under 30 minutes. And the best part? It loves a few simple add-ins—bell peppers, broccoli florets, or snap peas—so you can customize it to what’s in your fridge. This Mongolian Beef Recipe is essentially a family hug in a skillet, fast enough for weeknights, fancy enough for date night at home.
Why you’ll love this recipe?
What I love most about this Mongolian Beef Recipe is how the flavors come together in a truly satisfying way with very little fuss. The glaze is the star—think deep soy, a kiss of brown sugar, a touch of garlic and ginger, and a whisper of sesame that ties everything together. The beef stays tender thanks to a quick cornstarch coating that crisps up in a hot pan, and it’s finished with a quick toss of scallions that brighten every bite. The simplicity is a big win: you can have dinner on the table in under 25 minutes if you move with purpose. It’s budget-friendly, too—the ingredients live in most pantries, and you can stretch a little meat into a big, glossy dish with plenty of leftovers. What I love most about this dish is its versatility: swap in broccoli or peppers, add mushrooms, or even throw in a handful of shredded carrot for color. It’s also a terrific introduction to pan-saucing—you’ll see how a simple glaze can transform ordinary beef into something special. If you’re into similar comfort-foods, you’ll notice this sits nicely alongside my Beef and Broccoli or my quick Teriyaki Chicken posts—each with a slightly different glaze personality but the same cozy feeling on a busy night.
How do I make Mongolian Beef?
Quick Overview
This is the kind of recipe you can improvise once you’ve got the rhythm. You’ll slice the beef thin, dust it with a light cornstarch coating, and sear it in a screaming-hot skillet until it’s deeply bronzed and a little crisp at the edges. While the beef rests, you whip up a glossy glaze from soy sauce, water, brown sugar, and a hint of hoisin or a splash of rice vinegar for brightness. A quick toss with scallions (and optional veggies) at the end coats everything in that irresistible lacquer. The result is succulent beef, a glaze that clings, and a plate that looks almost glossy enough for the cover of a home-cooking magazine. And yes, it’s as easy as it sounds: you’ll finish with a skillet full of fragrance, a tray of steaming rice, and a dish that feels like a hug in a pan.
Ingredients
For the Main Batter:
– 1 lb flank steak or sirloin, thinly sliced against the grain
– 2 Tbsp cornstarch
– 1/2 tsp kosher salt
– 1/4 tsp freshly ground black pepper
– 1 tsp sesame oil (optional, for aroma)
For the Filling:
– 1 Tbsp neutral oil (like canola or grapeseed) for the pan
– 3 cloves garlic, finely minced
– 1 inch fresh ginger, peeled and grated
– 1/2 large onion, thinly sliced (or substitute with 1 cup broccoli florets and/or sliced bell peppers for color and texture)
– 1 cup broccoli florets or snap peas (optional but lovely)
For the Glaze:
– 3 Tbsp soy sauce or tamari for gluten-free options
– 1/4 cup water or beef stock
– 2-3 Tbsp brown sugar (adjust to taste)
– 1 Tbsp hoisin sauce (optional, for depth of flavor) or use a touch more soy with a drop of honey
– 1 tsp rice vinegar or a squeeze of lemon juice for brightness
– 1-2 tsp cornstarch mixed with 1 Tbsp water to create a slurry (optional, for a thicker glaze)
Step-by-Step Instructions
Step 1: Preheat & Prep Pan
Heat a large skillet or wok over high heat until it barely whispers. You want a pan that behaves like a hot summer day—sear, not steam. While that heats, pat the beef dry with paper towels; moisture is the enemy of a good sear. Have your garlic, ginger, onion, and any veggies chopped and ready to go. A clean workstation makes this whole thing feel like a dance rather than a scramble.
Step 2: Mix Dry Ingredients
In a shallow bowl, combine the cornstarch, salt, and pepper. This is your light coat that will cling to the beef and create that coveted crisp edge. If you’re cooking for someone with gluten sensitivity, you can use cornstarch and a touch of gluten-free soy sauce to keep the texture bright.
Step 3: Mix Wet Ingredients
In a separate small bowl, whisk together 3 tablespoons of soy sauce, 1/4 cup water, 2-3 tablespoons brown sugar, 1 teaspoon rice vinegar, and hoisin if you’re using it. This will become your glaze. If you’re avoiding sugar a bit, you can dial it back to 1 tablespoon and add a hint of maple or a tiny splash of orange juice for balance. This step is where your kitchen starts to smell like a weekend at my house—garlic, ginger, and a glossy promise of sauce.
Step 4: Combine
Toss the beef in the cornstarch mixture until every slice is lightly coated. Shake off excess; you don’t want a crusty coat, just a fine sheen. If you’ve got a moment, let the coated beef rest for 10 minutes. This helps the starch stick and makes the sear even more reliable when it hits the hot surface.
Step 5: Prepare Filling
Warm a teaspoon of oil in the skillet. Add the minced garlic and grated ginger, letting them bloom for 20-30 seconds until your kitchen smells like a spice market. Slide in the onion and any vegetables you’re including. Stir-fry for 2-4 minutes until they’re just tender but still bright. This step keeps your dish from becoming mushy and gives your glaze a colorful frame to cling to.
Step 6: Layer & Swirl
Push the vegetables to the side and add the coated beef in a single layer. Don’t crowd the pan; you want a quick sear, not a steamed pile. Let the beef brown deeply on first contact, then flip to sear the other side. This should take 2-3 minutes. You’ll notice a harmonious aroma of toasty starch with sweet-salty sauce coming together as you swirl the pan. The edges will look nicely caramelized, which is exactly what we’re aiming for.
Step 7: Bake
Okay, I know the word is bake, but here we’ll use a skillet-quick technique that gets you the same lacquered finish you’d expect from a restaurant. Once the beef is nicely browned, pour the glaze over the pan. Keep the heat medium-high so it’ll thicken quickly, stirring constantly. If you want a silkier mouthfeel, whisk in that cornstarch slurry now and let it simmer for a minute or two until the sauce coats the beef in a gleaming glaze. If you’re using vegetables, add them back in and toss to coat. You’ll see the sauce cling to every piece with a glossy sheen that makes you pause mid-scoop just to admire it.
Step 8: Cool & Glaze
Turn off the heat and taste for balance. If it tastes too salty, a splash of water or a pinch of sugar can smooth it out. If you love a stronger garlic-ginger snap, add a whisper more minced garlic or a drizzle of sesame oil. Let the pan rest off the heat for a minute so the sauce can settle into a perfect glaze. The glaze should be thick enough to cling to the beef but not so thick that it stops flowing when you plate it. If it’s too thick, loosen with a teaspoon of water. If it’s too thin, simmer a bit longer or add a little more slurry. The goal is a sauce that shines, not a puddle at the bottom of the plate.
Step 9: Slice & Serve
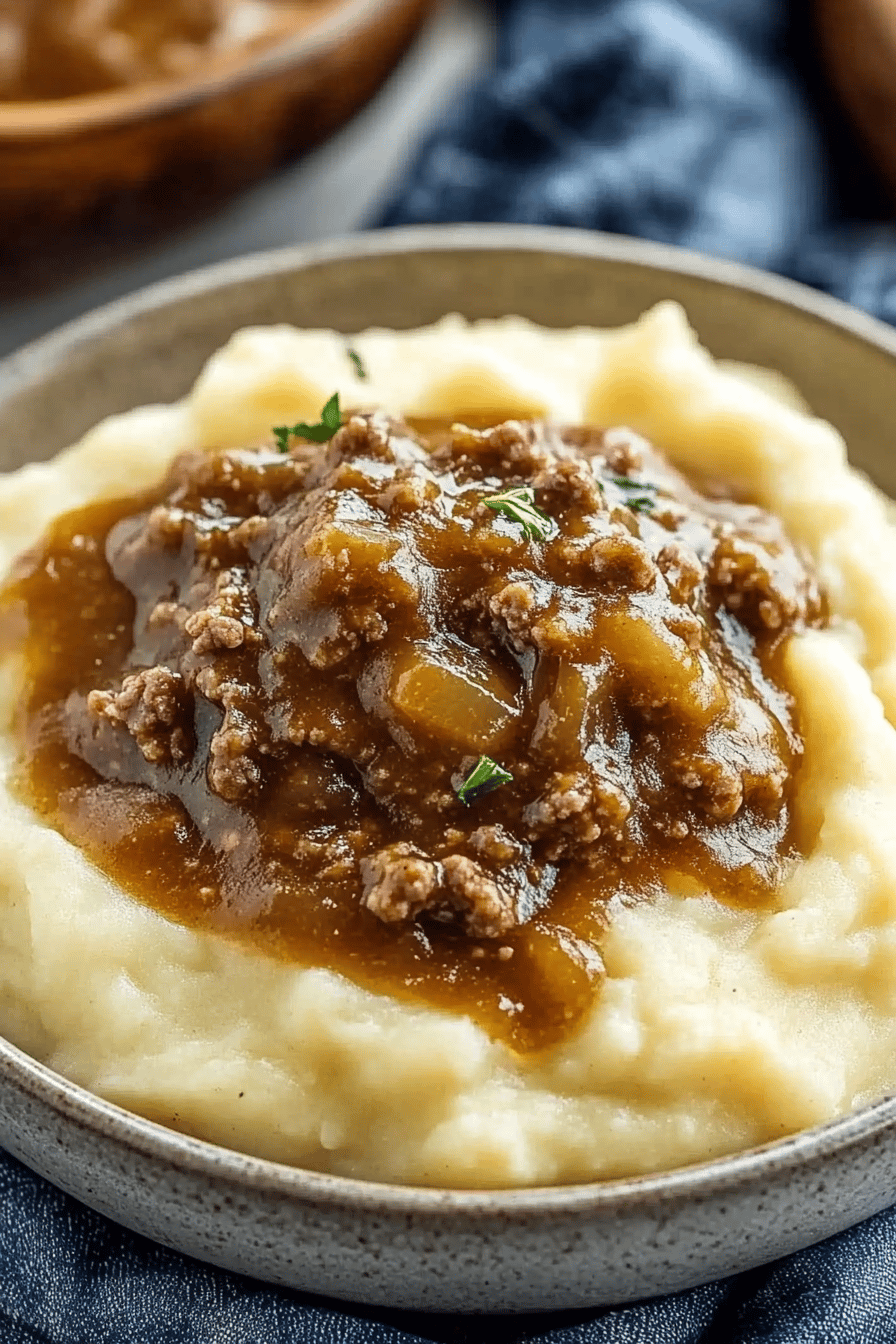
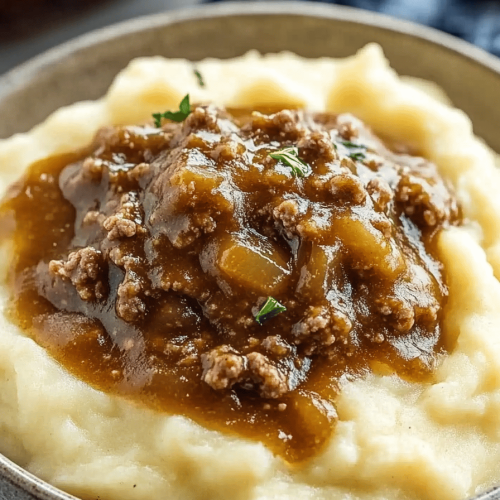
If you’ve sliced the beef thin, you’re ready to plate. Spoon the glossy beef and vegetables over a bed of hot steamed rice, letting the juice soak into every grain. A final scatter of sliced green onions or sesame seeds adds color and a fragrant finish. My family loves a little extra heat from red pepper flakes, but you can keep it mild for kids by omitting them. This dish looks elegant on a weeknight and feels just as comforting as a Sunday supper. Remember to serve it hot—the sauce thickens as it cools, and you don’t want to miss that first, perfectly lacquered bite.
What to Serve It With
Pair this with all the classic comfort sides and a few playful accompaniments that make it feel like a full meal without extra effort.
For Breakfast: Serve over a quick fried-rice Breakfast Bowl with a soft-poached egg on top, a drizzle of the leftover glaze, and a sprinkle of sliced scallions. It’s a surprising but delightful way to reuse leftovers and kick-start the day with protein and flavor.
For Brunch: Create a color-rich spread with bowls of jasmine rice, crisp cucumber ribbons, and a light sesame-green salad. A chilled sparkling tea or light lager can pair nicely with the glaze’s sweetness, making this a playful mid-morning feast.
As Dessert: I’m not joking about glaze here—save a tablespoon or two to swirl into vanilla yogurt with a pinch of lime zest. It’s a fun, grown-up twist that echoes the savory-sweet glow without being cloying. It’s not a traditional dessert, but it can be a clever end to a big weekend meal when you’re craving something familiar but not heavy.
For Cozy Snacks: Turn the beef into lettuce-wrapped bites with extra greens and a dollop of creamy yogurt-garlic sauce. It becomes a casual, satisfying snack that still tastes like you spent time in the kitchen, not just the drive-thru lane.
In our house, this dish is a friendly crowd-pleaser—great for potlucks, family dinners, and those nights when you want a homemade version of your favorite takeout without the guilt. It’s wonderful with steamed broccoli on the side, but you can improvise with whatever’s in your crisper. My kids actually ask for seconds, which is a rare gift in our kitchen, and I never get tired of seeing that glossy glaze gleam under the kitchen light. This Mongolian Beef Recipe is a little ritual that says: I love you, dinner is ready, and yes, you deserve something delicious tonight.
Top Tips for Perfecting Your Mongolian Beef Recipe
Here are a few tricks I keep in mind every time I make this, drawn from years of kitchen mishaps and light-bulb moments.
Zucchini Prep: Not in this dish per se, but if you want extra moisture control with any veggie add-ins, salt-sweat them for 10 minutes then pat dry. It stops sogginess and keeps the beef from steaming instead of searing whenever you toss the veggies in.
Mixing Advice: Always pat the beef dry and give it a light dusting of cornstarch right before it hits the pan. It creates that crisp edge without drying the meat. If you overcoated, shake off the excess so you don’t end up with a heavy crust. Texture matters as much as flavor.
Swirl Customization: The glaze is flexible. If you like a tarter finish, add a splash more rice vinegar. If you crave more depth, a touch of hoisin or a whisper of chili paste can transform the sauce. I love a tiny drizzle of toasted sesame oil at the end for aroma.
Ingredient Swaps: Use tamari for gluten-free, or swap honey for brown sugar if you prefer a cleaner sweetness. If you don’t have hoisin, a teaspoon of miso paste whisked with a little bit of water can bring similar depth. A splash of orange juice can lift flavors if you want a bright lift in place of vinegar.
Baking Tips: If your skillet isn’t as hot as you’d like, preheating the pan longer or using a cast-iron skillet helps. The aim is a rapid sear so the beef doesn’t get soggy and the glaze reduces evenly. Keep the pan surface almost dry to caramelize the meat rather than steam it.
Glaze Variations: For a richer glaze, simmer the sauce longer to concentrate flavors, or add a little coconut aminos for a subtle sweetness if you’re looking for a more nuanced profile. A quick squeeze of lime at the end brightens everything nicely.
Lessons learned? Don’t rush the browning. The moment the beef hits the pan, let it sit to form a crust before shaking the pan. It will heat evenly and stay juicy inside. And always taste as you go—the balance between salty, sweet, and tangy is what makes this dish sing. I’ve tweaked this recipe countless times, and the version I’m sharing today is the one that brings that “weeknight restaurant vibe” to our table without a long grocery list or complicated steps. It’s become a go-to in our kitchen, and I think it will become yours too.
Storing and Reheating Tips
Leftovers are rare here, but when they happen, you can keep them in good shape and still taste fantastic the next day.
Room Temperature: Not longer than 2 hours. If it’s been sitting out while you set the table, it’s best to refrigerate promptly.
Refrigerator Storage: Store in an airtight container for up to 3 days. Reheat gently in a skillet over medium heat, adding a splash of water to loosen the sauce as needed.
Freezer Instructions: You can freeze cooked beef in a freezer-safe container for up to 2 months. Thaw overnight in the fridge and reheat on the stove, adding a splash of water to loosen the glaze if it thickens too much.
Glaze Timing Advice: If you’re reheating, you can toss the beef back in with a fresh glaze so it stays glossy and doesn’t dry out. The glaze can be a little clumpy after freezing, but a quick stir fixes that.
In general, the dish re-heats beautifully because the glaze clings to the beef, so don’t be afraid to re-warm slowly and adjust the consistency with a touch of liquid. This is one of those dishes that actually tastes better the next day when flavors have had a chance to mingle.
Frequently Asked Questions
Final Thoughts
This Mongolian Beef Recipe has earned a permanent spot in my weeknight rotation because it’s both forgiving and deeply satisfying. It’s a dish I can throw together after practice, after work, or when friends swing by with hungry kids in tow. The kitchen fills with the comforting scent of garlic and sesame, the glaze shimmers as you tilt the pan, and the first bite is always a reminder that home-cooked meals can feel special without being complicated. If you’re chasing that same cozy, restaurant-like quality at home, this is your new favorite go-to. I’d love to hear how you’ve tweaked it—did you add broccoli, peppers, or perhaps a splash of orange juice for brightness? Leave a comment or drop a photo and let’s inspire each other. Happy cooking, friends, and may every skillet evening be a little brighter. Can’t wait to hear how yours turns out!
Mongolian Beef Recipe
Ingredients
Main Ingredients
- 1 pound flank steak, thinly sliced against the grain
- 0.25 cup cornstarch
- 0.25 cup low-sodium soy sauce
- 0.25 cup brown sugar
- 2 tablespoons hoisin sauce
- 1 tablespoon vegetable oil
- 1 teaspoon fresh ginger, grated
- 3 cloves garlic, minced
- 0.5 teaspoon red pepper flakes
Instructions
Preparation Steps
- In a large bowl, toss the beef with 0.25 cup of cornstarch until evenly coated.
- Heat 1 tablespoon of vegetable oil in a large skillet over medium high heat. Sear beef until browned, about 2 minutes per side. Remove and set aside.
- In the same skillet, add garlic and ginger; sauté 30 seconds. Stir in soy sauce, brown sugar, and hoisin sauce; simmer until glossy and thickened.
- Return the beef to the pan and toss to coat. Finish with red pepper flakes and sliced green onions if desired. Serve over steamed rice.