You know those recipes that just *feel* like a warm hug? The ones you can whip up even when you’re utterly exhausted but desperately need a little something sweet? For me, that’s these amazing johnny cakes. Forget those dry, crumbly versions you might have encountered; these are ridiculously moist, tender, and packed with just the right amount of sweetness. My family devours them faster than I can bake them, and honestly, I’m not mad about it. They’re like a hug in cake form, and when I’m craving something comforting, these johnny cakes are my absolute go-to. They’re so much simpler than a full-blown cake, but they deliver all the satisfaction. I’ve tried so many variations over the years, but this one is the clear winner – the one I always come back to.
What is Johnny Cake?
So, what exactly *are* johnny cakes? Well, the name itself is a bit of a mystery, with theories ranging from “journey cakes” (for travelers) to misinterpretations of Native American cornmeal flatbreads. But in my kitchen, and I suspect in many others, “johnny cake” has come to mean a delightfully moist, often spiced cake, usually baked in a rectangular pan and topped with a simple glaze. Think of it as a super-elevated, incredibly delicious quick bread or a denser, more forgiving cousin to a pound cake. It’s not fussy, it doesn’t require any fancy techniques, and that’s precisely why I love it so much. It’s the kind of dessert that feels both humble and incredibly special all at once.
Why you’ll love this recipe?
Honestly, there are so many reasons this johnny Cake Recipe has earned a permanent spot in my recipe box. First and foremost, the flavor is just *chef’s kiss*. It’s perfectly balanced – not too sweet, with a warm, comforting spice that makes you want to curl up with a cup of tea. The texture is where it truly shines; it’s unbelievably moist and tender, thanks to a few little tricks I’ll share with you. And the best part? It’s ridiculously simple to make. No creaming butter and sugar for ages, no complex folding techniques. It comes together in minutes, making it a lifesaver on busy weeknights when the sweet craving hits hard. Plus, the ingredients are super budget-friendly, and you probably already have most of them in your pantry. I also love how versatile it is. While I’ve perfected this classic version, I’ve found it’s a fantastic base for so many variations. It’s my go-to when I’m feeling lazy but want something truly delicious. You can eat it plain, with a dusting of powdered sugar, or go all out with a simple glaze, which I highly recommend. It’s one of those recipes that just makes people happy.
How do I make Johnny Cakes?
Quick Overview
This recipe is all about simplicity and delicious results. You’ll whisk together your dry ingredients, then your wet ingredients, combine them gently, pour into a prepared pan, and bake until golden and fragrant. The magic happens with a few key ingredient ratios and a simple glaze to finish. It’s designed to be incredibly forgiving, even for beginner bakers. Seriously, if you can measure and stir, you can make these amazing johnny cakes.
Ingredients
For the Main Batter:
2 cups all-purpose flour: I always use unbleached flour; I find it gives a slightly better texture. Make sure it’s measured correctly by spooning it into the cup and leveling it off, not by scooping directly from the bag.
1 ½ teaspoons baking powder: This is crucial for getting that lovely lift and tender crumb. Don’t skip it!
½ teaspoon baking soda: This works with the acidic ingredients to give it an extra boost and tenderness.
½ teaspoon salt: It balances the sweetness and enhances all the other flavors.
1 teaspoon ground cinnamon: For that cozy, comforting warmth.
½ teaspoon ground nutmeg: Just a hint adds a wonderful depth.
¼ teaspoon ground allspice: This is my secret weapon; it adds a subtle, complex spice note that is just divine.
1 cup granulated sugar: You can adjust this slightly, but this amount gives you a wonderfully sweet, but not cloying, cake.
2 large eggs: At room temperature, they’ll incorporate more easily into the batter.
½ cup unsalted butter, melted and slightly cooled: Melted butter is key for that incredibly moist texture. Make sure it’s not piping hot when you add it to the eggs!
1 cup buttermilk: Ah, the magic ingredient! Buttermilk adds tenderness and moisture. If you don’t have any, you can make a substitute: put 1 tablespoon of lemon juice or white vinegar in a measuring cup, then add milk to fill it up to the 1-cup line. Let it sit for 5 minutes, and it’s ready to go.
1 teaspoon vanilla extract: For that classic, beloved flavor.
For the Glaze:
1 cup powdered sugar: Sifted, if you want an extra smooth glaze. Sifting also helps prevent lumps.
2-3 tablespoons milk (or buttermilk for extra tang): Start with 2 tablespoons and add more until you reach your desired consistency. Whole milk makes it richer, but any will work.
½ teaspoon vanilla extract: To enhance the glaze flavor.
Step-by-Step Instructions
Step 1: Preheat & Prep Pan
First things first, get your oven preheated to 350 degrees F (175 degrees C). This ensures the cake bakes evenly from the moment it goes in. Then, grab an 8×8 inch baking pan. Grease it really well with butter or non-stick cooking spray, and then I like to lightly dust it with a little bit of flour. Tap out any excess. This double protection ensures your beautiful johnny cakes won’t stick, and nobody wants a cake that’s a struggle to get out!
Step 2: Mix Dry Ingredients
In a large bowl, whisk together the all-purpose flour, baking powder, baking soda, salt, cinnamon, nutmeg, and allspice. Whisking them all together well before adding any wet ingredients ensures that the leavening agents and spices are evenly distributed. This is super important for consistent baking and flavor. You’re looking for a nice, uniform mixture with no clumps of spice or baking soda.
Step 3: Mix Wet Ingredients
In a separate medium bowl, whisk the granulated sugar into the room temperature eggs until they’re well combined and slightly lighter in color. Then, gradually whisk in the melted and slightly cooled butter. Make sure it’s not too hot, or it could scramble your eggs! Next, stir in the buttermilk and vanilla extract. Give it a good whisk until everything is smooth and emulsified. This combination creates a lovely, rich liquid base.
Step 4: Combine
Now, pour the wet ingredients into the bowl with the dry ingredients. Using a spatula or a wooden spoon, mix everything together *just* until combined. It’s really important not to overmix here! A few small lumps are perfectly fine, and in fact, are desirable. Overmixing develops the gluten in the flour, which can lead to a tougher cake. We want tender, melt-in-your-mouth deliciousness, so gentle mixing is key.
Step 5: Prepare Filling
Wait, filling? I thought this was a cake! Well, for these amazing johnny cakes, there isn’t a separate filling in the traditional sense. The “filling” is really baked right into the batter itself through the careful balance of ingredients. The moisture from the buttermilk and butter, combined with the leavening agents, creates that incredible, dense-yet-tender interior. You don’t need to add anything extra for moisture or flavor; it’s all in the batter’s design!
Step 6: Layer & Swirl
Pour the batter evenly into your prepared 8×8 inch baking pan. Smooth the top gently with your spatula to ensure an even layer. There’s no swirling needed for this classic version of johnny cakes; the beauty is in its simple, uniform deliciousness. The texture and flavor are built right into the batter itself, so you just want a nice, even spread before it goes into the oven.
Step 7: Bake
Place the pan in the preheated oven. Bake for about 30-35 minutes. You’ll know it’s ready when a wooden skewer or toothpick inserted into the center comes out clean, or with just a few moist crumbs attached. The top should be golden brown and spring back lightly when you gently touch it. Ovens can vary, so keep an eye on it during the last 10 minutes of baking.
Step 8: Cool & Glaze
Once baked, take the pan out of the oven and let the johnny cakes cool in the pan for about 15-20 minutes. This allows them to set up properly. While the cake is cooling, whisk together the powdered sugar, 2 tablespoons of milk, and vanilla extract in a small bowl until smooth. If it’s too thick, add a little more milk, a teaspoon at a time, until you get a pourable but not too runny consistency. Once the cake has cooled slightly, drizzle the glaze evenly over the top. Let it set for a few minutes before slicing.
Step 9: Slice & Serve
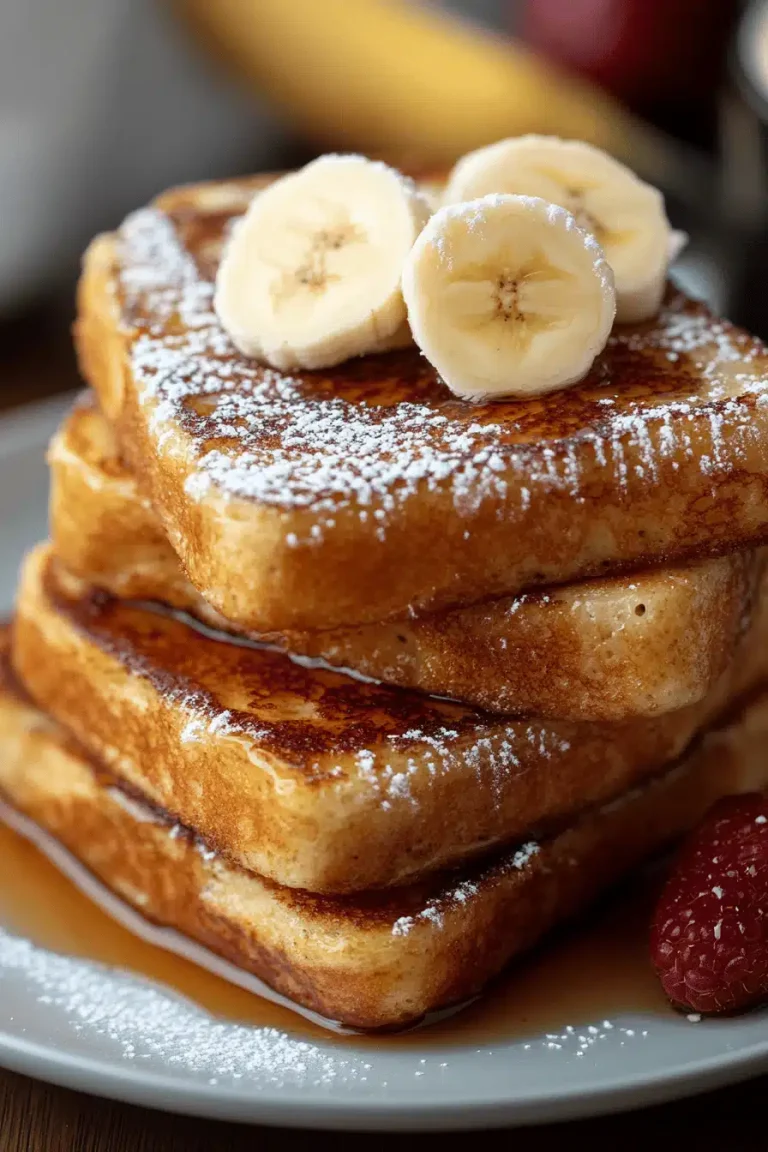
After the glaze has set a bit, cut the johnny cakes into squares. I usually get about 9 squares from an 8×8 pan, but you can cut them larger or smaller depending on your preference. Serve them warm for the ultimate comfort experience. The warm cake with the slightly set glaze is just pure perfection. It’s simple, elegant, and utterly delicious.
What to Serve It With
These johnny cakes are so wonderfully versatile, they fit right in at almost any meal or occasion. For breakfast, I love serving them warm with a strong cup of coffee. A simple dusting of powdered sugar is all they need, making them a quick and satisfying start to the day. For a more leisurely brunch, I’ll sometimes add a few fresh berries on the side or a dollop of lightly sweetened whipped cream. They’re just divine! As a dessert, they’re a dream. They pair beautifully with a scoop of vanilla bean Ice Cream, a drizzle of caramel sauce, or even a warm berry compote. The moist cake is the perfect canvas for these richer toppings. And for those cozy snack moments? They’re perfect on their own, perhaps with a glass of milk or a cup of herbal tea. My kids also love them with a little dab of apple butter. Honestly, they’re so good, they don’t really *need* anything, but adding a little something extra can elevate them even further!
Top Tips for Perfecting Your Johnny Cakes
I’ve made these johnny cakes more times than I can count, and over the years, I’ve picked up a few tricks that I think make all the difference. First, about the zucchini: While this recipe doesn’t use zucchini (some “johnny cakes” do, but not mine!), I’ve had plenty of experiences with cakes that do! The key with zucchini is always to get as much moisture out as possible. Grating it finely and squeezing it really well in a clean kitchen towel is essential. For *this* recipe, however, stick to the ingredients listed – it’s already perfectly balanced for moisture and tenderness. My biggest mixing advice is truly about not overmixing. As soon as you see the dry ingredients disappear into the wet, stop stirring. A few streaks of flour are fine; they’ll incorporate as the batter rests for a minute before baking. For the glaze, consistency is everything. If it’s too thick, it’ll be hard to spread and might crack. Too thin, and it’ll just run off. Start with the minimum amount of liquid and add more gradually until it’s just right – thick enough to coat the back of a spoon but still pourable. I’ve learned that oven temperatures can be a bit quirky, so if you find your cakes are browning too quickly on top before the center is cooked, try loosely tenting them with aluminum foil for the last 10-15 minutes of baking. And don’t be afraid to experiment with ingredient swaps! I’ve successfully used almond milk or oat milk instead of buttermilk in a pinch, and it turns out wonderfully creamy. If you’re feeling adventurous, a tiny pinch of ground ginger or a sprinkle of chopped nuts can be a delightful addition to the dry ingredients. These little tweaks really make the recipe your own.
Storing and Reheating Tips
The best part about these johnny cakes, besides how they taste, is how well they store! I usually bake them in an 8×8 pan, and if there are any leftovers (which is rare!), I store them right in the pan. Once completely cooled, I cover the pan tightly with plastic wrap or foil. At room temperature, they’ll stay wonderfully fresh for about 2-3 days. If you need them to last a bit longer, they’ll keep perfectly in the refrigerator for up to 5 days. Just make sure they’re in an airtight container or well-covered in the pan. If you want to freeze them, I recommend cutting them into individual portions first. Wrap each square tightly in plastic wrap, then place them in a freezer-safe bag or container. They’ll stay good in the freezer for up to 2 months. To reheat, you can gently warm individual slices in the microwave for about 15-20 seconds, or in a toaster oven until just warm. If you’ve frozen them, it’s best to thaw them overnight in the refrigerator before reheating. I usually wait to glaze them until *after* they’ve cooled from baking if I know I’ll be storing them for more than a day, or if I’m freezing them. This way, the glaze stays nice and fresh. If you glaze them and then refrigerate, the glaze can sometimes get a little sticky, but they’ll still taste amazing!
Frequently Asked Questions
Final Thoughts
I truly hope you give these johnny cakes a try. They’re more than just a recipe to me; they’re a little slice of happiness that’s easy to make and always a crowd-pleaser. The comforting spice, the incredibly tender crumb, and that sweet, simple glaze all come together to create something truly special. It’s the perfect antidote to a long day, a delightful treat for a weekend brunch, or a sweet ending to any meal. If you love this recipe, you might also enjoy my recipe for [link to a similar recipe, e.g., “Moist Lemon Poppy Seed Loaf”] or my classic [link to another similar recipe, e.g., “Old-Fashioned Apple Crumble”]. They share that same spirit of comforting, homemade goodness. I can’t wait to hear what you think – please leave a comment below and let me know how your johnny cakes turn out, and if you’ve discovered any delicious variations! Happy baking!

Johnny Cakes
Ingredients
Main Ingredients
- 1.5 cups All-purpose flour
- 2 tablespoons Granulated sugar
- 0.5 teaspoon Baking powder
- 0.25 teaspoon Salt
- 1 large Egg
- 1.25 cups Milk
- 2 tablespoons Melted butter
- Butter or oil, for greasing
Instructions
Preparation Steps
- In a large bowl, whisk together the flour, sugar, baking powder, and salt.
- In a separate bowl, whisk together the egg and milk.
- Pour the wet ingredients into the dry ingredients and whisk until just combined. Do not overmix. Stir in the melted butter.
- Heat a lightly greased griddle or frying pan over medium heat. Pour about 1/4 cup of batter onto the hot griddle for each pancake.
- Cook for 2-3 minutes per side, or until golden brown and cooked through. Flip when bubbles appear on the surface.
- Serve warm with your favorite toppings, such as syrup, fruit, or butter.