Whenever the weather starts to turn chilly or the week feels a little too packed, I find myself reaching for this cozy recipe for turkey meatloaves. There’s something about the way they bake up—moist, tender, with just the right hint of herbs—that makes the whole house smell like home. Not to mention, my kids practically beg for seconds (and trust me, that almost never happens with anything labeled “healthy”). It’s like the perfect comfort food mashup: healthier than traditional beef meatloaf but every bit as comforting and satisfying. Honestly, it reminds me of my grandma’s classic meatloaf but with a lighter, fresher twist that somehow feels like a hug on a plate. If you’ve ever found yourself wishing meatloaf could be a little less dense and a little more exciting, you’re going to adore these turkey meatloaves.
What is turkey meatloaf?
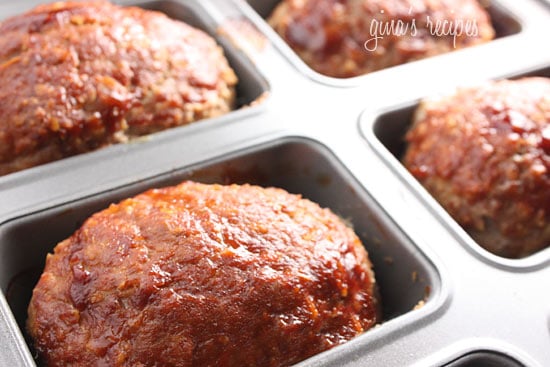
Think of turkey meatloaves as mini, personal-size versions of traditional meatloaf, but made with ground turkey instead of beef. It’s essentially a savory, baked loaf packed with flavor, herbs, and a moist, tender crumb that feels anything but dry (a common turkey meat pitfall I’ve been down the road with before). These meatloaves typically merge juicy turkey with breadcrumbs, veggies like zucchini for a sneaky health boost, and savory spices, all topped with a tangy glaze. The beauty of turkey meatloaves is that you get all the goodness of meatloaf but with a lighter twist, plus they come together faster and cook more evenly in these individual portions. They’re perfect for family dinners, meal prep, or whenever you’re craving something homey but don’t want the fuss of a big loaf.
Why you’ll love this recipe?
What I love most about these turkey meatloaves isn’t just how ridiculously tasty they are, but how easy they make dinner time. First off, flavor-wise, the mixture of fresh herbs, garlic, and a touch of savory seasoning hits all the right notes, balancing the lean turkey so it’s rich without being heavy. The addition of shredded zucchini (my secret weapon!) keeps them moist and adds a subtle earthiness that you won’t see or taste but definitely feel. And hey, I’ve tried this with different veggies and my family always comes back asking for this exact combination.
They’re budget-friendly too—ground turkey is a wallet-saver compared to beef or pork. Plus with ingredients you likely already have around the house, it’s a one-stop comfort meal. You can serve these little loaves in so many ways—crumbled over mashed potatoes, sliced for sandwiches, or even diced into a hearty salad for lunch the next day. It’s also a lifesaver on busy nights because they bake quickly in individual sizes instead of one big loaf, so dinner’s on the table fast without any sogginess in the middle. Honestly, every time I make these, the smell alone draws everyone into the kitchen faster than you can say “dinner’s ready.” And if you love this, you might want to check out my take on classic baked meatballs or even those zucchini fritters I love to toss in during summer.
How do I make turkey meatloaves?
Quick Overview
Making these turkey meatloaves is surprisingly straightforward. You’ll quickly mix your dry ingredients in one bowl and wet ingredients in another, then gently combine them without overworking the meat. The secret is that mini-loaf shape which helps everything cook evenly and develop a lovely crust around the edges. I’ve learned that layering a simple veggie-based filling inside adds a fun surprise and extra moisture, then the glaze on top seals in all those juicy flavors and gets all caramelized while baking. You’re basically looking at 30-40 minutes of hands-on prep, then a quick bake while you tackle sides or just sit back with a cup of tea. Trust me, once you get this down, it becomes your go-to weeknight meal.
Ingredients
For the Main Batter:
- 1 lb lean ground turkey (fresh from the butcher or good-quality store-bought; fattier blends work best for moisture)
- 1 cup grated zucchini (squeezed dry to avoid sogginess; this keeps things juicy)
- 1/2 cup finely chopped onion (sauteed briefly or raw depending on your texture preference)
- 1/2 cup panko breadcrumbs (helps keep it light and fluffy, but you can swap for gluten-free breadcrumbs)
- 2 cloves garlic, minced (because garlic is life)
- 1 large egg (acts like glue, so don’t skip)
- 1/4 cup milk (regular or almond milk works well for creamy texture)
- 1 tbsp Worcestershire sauce (optional but adds that umami punch)
- 1 tsp dried thyme (a lovely herb that complements turkey beautifully)
- Salt and black pepper to taste (season generously!)
For the Filling:
- 1/2 cup shredded carrots (adds sweetness and texture)
- 1/4 cup chopped spinach (fresh or lightly wilted)
- Optional: 1/4 cup crumbled feta or shredded cheddar (for an extra savory surprise)
For the Glaze:
- 1/4 cup ketchup (classic and tangy, but you can swap for tomato paste mixed with honey)
- 2 tbsp brown sugar (balances the acidity nicely, adjust based on your sweetness level)
- 1 tbsp Dijon mustard (adds a subtle kick)
- Optional pinch of smoked paprika or chili powder (for a little smoky depth)
Step-by-Step Instructions
Step 1: Preheat & Prep Pan
Start by preheating your oven to 375°F (190°C). Line a baking sheet with parchment paper or lightly grease a muffin pan if you want perfectly shaped mini loaves. I prefer a baking sheet because it lets the edges crisp up nicely, but muffin tins are great if you want portion control. Make sure your oven rack is in the center to ensure even heat circulation.
Step 2: Mix Dry Ingredients
In a large bowl, toss together the panko breadcrumbs, dried thyme, salt, and black pepper. Mixing these first ensures flavors distribute evenly without clumping. Don’t overmix here—just enough so the spices and crumbs feel evenly dotted through the mixture.
Step 3: Mix Wet Ingredients
In a separate bowl, whisk the egg, milk, Worcestershire sauce, and garlic until combined. This wet mixture will bring moisture and richness, so make sure the egg is well-beaten with the milk—no stray egg whites or yolks hanging out! If you want a creamier texture, a touch of almond milk does wonders; I tested it once on a whim and actually preferred the silkiness it gave.
Step 4: Combine
Add the ground turkey, grated zucchini (give it a good squeeze with a clean kitchen towel to wring out extra water), and chopped onion to the dry ingredients. Pour the wet mixture over it, then gently fold everything together with a spatula or clean hands. Here’s the magic trick: don’t overmix! When the meat feels just combined, that’s the sweet spot to keep it tender and not dense. Overworking ground turkey is a quick way to dry things out, and trust me, I’ve made that mistake more times than I can count.
Step 5: Prepare Filling
Combine shredded carrots, chopped spinach, and cheese (if using) in a small bowl. This filling adds a fun texture contrast and a burst of color inside the otherwise muted turkey batter.
Step 6: Layer & Swirl
Divide half the meat mixture evenly across your baking surface or muffin cups, gently patting it flat. Spoon the veggie filling over this layer, then top with the remaining meat mixture. Use a butter knife or skewer to swirl the layers lightly so the filling peeks through here and there but doesn’t lose its surprise inside.
Step 7: Bake
Pop your tray or muffin tin in the oven for about 30-35 minutes. Baking times vary with size, so start checking at 25 minutes. You want an internal temperature of 165°F (74°C) for safety, but the crust should be gently browned. If you see edges drying out, tent loosely with foil for the last 10 minutes to keep moisture locked in.
Step 8: Cool & Glaze
While the meatloaves bake, whisk together the ketchup, brown sugar, Dijon mustard, and spices for your glaze. When the loaves have about 5 minutes left in the oven, brush them generously with the glaze. This step transforms them with a shiny, sticky, slightly sweet finish. Once done, let them cool for 5-10 minutes before slicing so the juices settle.
Step 9: Slice & Serve
Use a sharp knife to cut through the loaves cleanly. These taste amazing warm, but honestly, I’ve grabbed slices cold for quick sandwiches or snacks, too. Serve with your favorite sides (I’m partial to roasted veggies or mashed sweet potatoes). For a little extra flair, sprinkle fresh herbs on top before serving.
What to Serve It With
For Breakfast: These turkey meatloaves are unexpectedly perfect with a cup of freshly brewed coffee and a simple spinach and mushroom scramble. Just slice a loaf thin, warm it, and top with a fried egg for a protein-packed start that holds you until lunch.
For Brunch: Plate the loaves with a fresh arugula salad tossed in lemon vinaigrette and a chilled mimosa. The tang and bubbles contrast beautifully with the meat’s savory warmth, making it feel a little fancy but still down-to-earth.
As Dessert: Believe it or not, a small slice warms well with a drizzle of maple syrup over the glaze, turning it into a sweet-salty treat when you’re craving something a bit different after dinner. It’s a playful twist my family calls a “comfort dessert hack.”
For Cozy Snacks: Heat slices and stack with cheddar and pickles between whole-wheat bread for an easy after-school snack or light dinner. The glaze adds just enough sweet tang to balance out crisp veggies or chips on the side.
In our family, I started making these turkey meatloaves when my oldest was learning to eat more veggies, and sneaking shredded zucchini and carrots inside was a total game changer. It’s since evolved into a weeknight staple for busy days when I want something nourishing but fuss-free. Every time I pull this out of the oven, it’s like a little celebration around the table.
Top Tips for Perfecting Your Turkey Meatloaves
Zucchini Prep: Always grate the zucchini finely and then squeeze it tightly with a clean kitchen towel to remove as much moisture as possible. This keeps your meatloaves from becoming soggy. I learned this the hard way once, and the texture was a flop—lesson learned! Fresh zucchini works best, but if you have leftover frozen grated zucchini, thaw and drain thoroughly before using.
Mixing Advice: Overmixing is a turkey meatloaf nemesis. Mix just until the ingredients come together. When in doubt, fold gently with a spatula rather than kneading by hand. The texture should feel moist but not sloppy. If your batter feels too wet, sprinkle in a tablespoon more breadcrumbs and mix briefly to balance.
Swirl Customization: Play around with the filling patterns. I sometimes make half without cheese for picky eaters and swirl in dollops rather than a full layer for some rustic variation. You can even add a teensy bit of pesto or sun-dried tomato paste for an herby, Mediterranean flair.
Ingredient Swaps: Ground turkey is wonderfully versatile—feel free to swap out half the turkey for ground chicken or pork if you want a richer taste. For a gluten-free version, almond meal or oat flour works, but reduce the liquid slightly as they absorb moisture differently. I’ve made both for friends with allergies and the results are just as comforting.
Baking Tips: Ovens vary, so start checking early. Using an instant-read thermometer is a game changer—you want to avoid dry meatloaf but also ensure it’s safe cooked. If the edges brown too quickly, slide a sheet of foil loosely over halfway through baking.
Glaze Variations: Feel free to experiment with glaze flavors. A honey mustard glaze or mixing a bit of sriracha into your ketchup glaze adds a spicy sweetness that wakes up the flavors. For a smoky note, add a touch of smoked paprika or chipotle powder. Brush generously but don’t drown the loaves.
Storing and Reheating Tips
Room Temperature: If you’re serving these right away, you can keep turkey meatloaves loosely covered on the counter for up to two hours. After that, it’s best to refrigerate to keep freshness and safety intact.
Refrigerator Storage: Store cooled meatloaves in an airtight container or wrap tightly with plastic wrap. They’ll maintain their flavor and moisture for 3-4 days. Reheat gently in the microwave or oven to keep them juicy and avoid drying out.
Freezer Instructions: These freeze wonderfully! Wrap each cooked loaf tightly in plastic wrap and then a layer of foil or put in freezer bags. They last up to 3 months frozen. To reheat, thaw overnight in the fridge, then warm in the oven at 325°F (160°C) until heated through, about 15-20 minutes.
Glaze Timing Advice: I recommend glazing just before the final 5 minutes of baking if you plan to eat immediately. If you’re making ahead or freezing, it’s best to wait and glaze right before reheating so the glaze stays shiny and fresh, not sticky or overly hard.
Frequently Asked Questions
Final Thoughts
These turkey meatloaves have been my quiet little kitchen hero for years now—bringing comfort, simplicity, and a touch of healthiness to the dinner table without any drama. I love that they combine familiar flavors with the flexibility to add veggies, cheese, or spices that keep things interesting. If you’re like me and love classic dishes made your own, this recipe feels like a warm hug in food form. Give it a try, tweak it to your family’s tastes, and don’t be surprised if it quickly becomes one of those “can’t forget this” dinners you pull out again and again. If you do make it, I’d love to hear how yours turns out or what special twists you added—leave a comment or rating below and share the love. Happy cooking!
turkey meatloaves
Ingredients
Main Ingredients
- 0.5 small onion minced
- 1 tsp olive oil
- 1.3 lb 99% lean ground turkey
- 0.5 cup oatmeal
- 0.25 cup ketchup
- 2 tbsp ketchup for glaze
- 2 tsp Worcestershire sauce
- 1 large egg
- 1 tsp marjoram
- to taste salt
Instructions
Preparation Steps
- Preheat the oven to 350°F.
- Saute olive oil and minced onion on low heat until translucent.
- In a medium bowl, mix ground turkey, cooked onion, oatmeal, egg, 1/4 cup ketchup, salt, and marjoram until well combined.
- Divide the mixture into four equal portions and place each into a non-stick mini loaf pan or shape into small loaves on an ungreased baking sheet.
- In a small bowl, mix remaining 2 tablespoons ketchup with Worcestershire sauce and brush the glaze over each meatloaf.
- Bake uncovered at 350°F for about 40 minutes until cooked through.
- Let the meatloaves rest for 5 minutes before serving.