I still remember the first time I made cake balls—it was a rainy Saturday afternoon, and I wanted something sweet but simple that wouldn’t require firing up the oven for a whole cake. My kids were hovering in the kitchen, super curious about the little bites I was rolling. When these cake balls came out perfectly moist and creamy, coated in a luscious chocolate glaze, the smiles around the table said it all. Honestly, cake balls are like the lovechild of cake and candy—soft, flavorful, and so addictive that they disappear in minutes at my house. If you’ve ever loved truffles or bite-sized desserts but thought they were intimidating, these cake balls are your new best friend. They’re what I turn to when I want that homemade comfort without the fuss, and I promise you’ll fall for them just like I did.
What is cake ball?
Think of cake balls as tiny, dense little nuggets of cake magic rolled into perfect, snackable rounds and usually dipped in a sweet coating—chocolate being the OG favorite. It’s essentially cake crumbs mixed with frosting to form a dough-like mixture that’s then shaped and chilled before getting dipped in glaze or melted chocolate. The name just sounds cozy, right? Cake balls are the love-it-or-love-it dessert that’s kind of the younger, sassier sibling of cake pops but without the stick. Perfect for popping in your mouth without needing a fork. They’re great party treats, classroom snacks, or just a sneaky sweet when you have a craving mid-afternoon. I find they’re so versatile that you can tweak flavors endlessly—chocolate, vanilla, red velvet, or even spiced pumpkin—making them as approachable as they are delicious.
Why you’ll love this recipe?
What I love most about this cake balls recipe is that it’s one of those little kitchen miracles that come together in no time but taste like you spent hours fussing over them. First off, the flavor hits all the right notes—moist, rich cake balanced with sweet, creamy frosting, all wrapped in a silky chocolate or vanilla glaze. They’re like little flavor bombs that melt in your mouth. Secondly, the simplicity makes it a lifesaver on busy nights or when unexpected guests drop by. No need to bake a fancy layered cake or deal with complicated piping. Just mix, roll, dip, and chill. Plus, they’re super budget-friendly since you can use leftover birthday cake or any cake scraps hanging around—that’s been a game changer for me and less food waste to boot!
Another plus is how versatile they are. I’ve made these with all sorts of frostings and coatings—from cream cheese swirls to peanut butter dips—and they always wow the crowd. They’re perfect when you want a treat but can’t commit to a whole slice of cake, and they make amazing gifts too. If you like brownies, truffles, or even cookie dough bites, these cake balls will slide right into your favorites list. Bonus: They’re small, so portion control is easier if you’re watching how much sugar you indulge in. My kids actually beg for seconds, which is always a surefire sign they’re good.
How do I make cake balls?
Quick Overview
Making cake balls is basically a no-fail recipe that starts with baking a simple cake or using any leftover cake, crumbling it finely, then mixing it with frosting to form a sticky dough. From there, you roll this mixture into bite-sized balls, chill them until firm, then dip in melted chocolate or a sweet glaze and let them set. The magic happens in the chilling—this step helps everything meld together and gives you that perfect texture. And honestly, it’s fun to roll them by hand—feels a little like play therapy! You don’t have to be a pro baker to get this right, and it’s great for kids to help out with too.
Ingredients
For the Main Batter:
- 1 box of your favorite cake mix (chocolate or vanilla work best) or about 4 cups of homemade cake crumbs – Use a good-quality cake for the best flavor; homemade always feels special.
- About 1 cup of frosting (store-bought or homemade)—vanilla, cream cheese, or chocolate—choose your favorite! The frosting is what holds the cake crumbs together.
For the Glaze:
- 12 oz. good-quality melting chocolate or chocolate chips (semi-sweet or milk chocolate)
- 1 tablespoon vegetable oil or shortening (helps smooth the coating)
- Optional flavors: a pinch of sea salt, a teaspoon of vanilla extract, or sprinkles for decorating
Step-by-Step Instructions
Step 1: Bake & Cool the Cake
Start by baking your chosen cake in a 9×13 pan following the package or recipe instructions. It’s important to let it cool completely—warm cake will make the crumbs too moist and hard to work with. I always bake mine a day ahead so it has time to set well.
Step 2: Crumble the Cake
Once cooled, crumble the cake into a large bowl using your hands or a fork. The texture should be fine but not powdery—like fluffy crumbs rather than chunks. This is key for smooth cake balls.
Step 3: Add Frosting
Spoon in the frosting a little at a time and start mixing gently with your hands or a spatula. You want enough to hold the crumbs firmly together but not make the mixture overly sticky—about 3/4 to 1 cup usually does it depending on the cake’s dryness. If it’s too wet, add more crumbs; too dry, add frosting.
Step 4: Shape the Cake Balls
Once combined, scoop about a tablespoon of mixture and roll it into a ball between your palms. Try not to compact them too hard—they should feel dense but tender. Place them on a baking sheet lined with parchment paper. This part is honestly fun—like little edible marbles coming to life.
Step 5: Chill
Pop the tray into the fridge for at least 2 hours or the freezer for 30 minutes. This chills them firm so they don’t fall apart during dipping. I find the freezer is a great shortcut if you’re eager!
Step 6: Prepare the Glaze
Melt your chocolate gently with vegetable oil over a double boiler or in 30-second bursts in the microwave, stirring well in between. The oil keeps it silky and easy to coat those cake balls smoothly.
Step 7: Dip the Cake Balls
Using a fork or a dipping tool, dip each cake ball into the melted chocolate, coating completely. Tap off any excess and place back on parchment to set. Don’t worry about tiny imperfections—they’re charming and homemade.
Step 8: Let the Glaze Set
Allow the dipped cake balls to sit at room temperature or refrigerate until the chocolate hardens—usually about 30 minutes. This is the hardest part because they look so good, you just want to dive in right away.
Step 9: Serve and Enjoy
Once set, arrange your cake balls on a pretty platter or store in an airtight container until ready to serve. They’re best chilled or at room temperature but always irresistible fresh.
What to Serve It With
For Breakfast: There’s something surprisingly cozy about a cake ball alongside your morning coffee or a vanilla latte. They’re a sweet little morning treat that pairs beautifully with a glass of cold milk or a gently brewed black tea—perfect if you want just a nibble without overdoing it.
For Brunch: These cake balls class up a brunch table when served on a tiered tray with fresh berries and a light dusting of powdered sugar. Pair with sparkling cider or fruity mimosas for a playful contrast to their decadence.
As Dessert: Dress them up with a drizzle of raspberry sauce or a sprinkle of chopped nuts for a quick after-dinner indulgence. They also hold their own beside an ice cream scoop and fresh fruit for a rather elegant and easy finale.
For Cozy Snacks: On slow weekends, I love serving cake balls with hot chocolate or a spiced chai tea. They’re the ultimate comfort bites to curl up with a book or share at family movie night. My kids actually beg for seconds when these come out during snack time, so have extras ready!
Top Tips for Perfecting Your Cake Balls
Cake Crumb Texture: The key to smooth cake balls is finely crumbled cake. If your cake is too dry, add a touch more frosting; if it’s too moist, sprinkle in a few extra crumbs. I learned this the hard way when my first batch was too soggy to roll properly.
Mixing: Be gentle but thorough mixing the frosting into the cake crumbs. Overmixing can make the texture mushy, but under-mixing means crumbly balls. Aim for a consistency like playdough.
Rolling: Use your palms to roll gently, not squeezing too hard. If the mixture sticks to your hands, a tiny dusting of powdered sugar or cocoa dust works wonders.
Glazing: Make sure your glaze is smooth and warm but not too hot, or it’ll melt the cake balls. Adding a bit of vegetable oil thins it nicely and helps the shine. I always swirl them gently in the glaze rather than dunking straight down to avoid splashes.
Chilling: Don’t skip chilling after shaping. It’s what makes clean dipping possible and helps cake balls hold their shape rather than crumbling under the glaze.
Ingredient Substitutions: I’ve swapped in cream cheese frosting for extra tanginess, and it’s a hit every time. You can also experiment with different flavors—peanut butter frosting or mocha glaze are favorites in my family.
Decorations: Sprinkle chopped nuts, coconut flakes, crushed peppermint, or colorful sprinkles immediately after dipping for fun variations that add both texture and visual appeal.
Storing and Reheating Tips
Room Temperature: Cake balls can stay fresh covered with a lid or in an airtight container at room temperature for up to 2 days. Keep them away from direct sunlight or heat to avoid melting the glaze.
Refrigerator Storage: For longer storage, keep them in a sealed container in the fridge for up to a week. Chilling helps preserve freshness, but bring them to room temp before serving so the flavors soften and the texture melts perfectly on your tongue.
Freezer Instructions: Cake balls freeze beautifully! Wrap them individually in plastic wrap and place them in a freezer-safe container for up to 3 months. When ready, thaw overnight in the fridge or at room temp for about an hour. Glaze might get a little dull but flavor stays intact.
Glaze Timing Advice: Add the glaze right before storing for best presentation and texture. If you need to store them without glaze, dip them just before serving—they won’t hold as long chilled without it.
Frequently Asked Questions
Final Thoughts
There’s a reason cake balls have found a permanent spot in my recipe lineup—they’re so fun to make and even more fun to eat. From their moist, melt-in-your-mouth texture to the endless ways you can customize them, they’re a celebration in every bite. Whether you’re whipping up a batch for a party, a quick afternoon treat, or an easy dessert to impress friends, these little bites always bring smiles. If you love this, you might want to try my chocolate truffle bites or no-bake cheesecake balls next—they’re just as swoon-worthy. I can’t wait to hear how your cake balls turn out, so definitely drop a comment or share your twist on the recipe. Happy baking and sweet snacking!
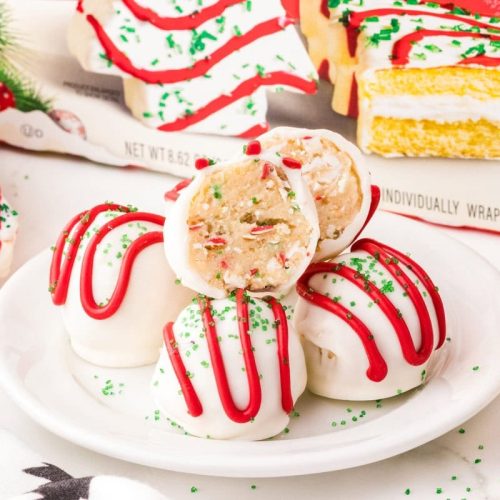
Little Debbie Christmas Cake Balls
Ingredients
Main Ingredients
- 10 pieces Little Debbie vanilla Christmas tree snack cakes unwrapped from 2 - 8.62 oz. boxes
- 8 ounce cream cheese softened to room temperature
- 20 ounce white chocolate melting wafers Ghirardelli brand used
- 6 ounce red vanilla flavored melting candy wafers Wilton brand used
- 1 tablespoon green sanding sugar sprinkles
Instructions
Preparation Steps
- Line two large baking sheets with parchment paper or a silicone mat and set aside.
- Beat the softened cream cheese in a large bowl on medium speed for 1-2 minutes until fluffy and smooth using a handheld mixer.
- Break the vanilla Christmas tree snack cakes into smaller pieces and mix into the beaten cream cheese on low speed until fully combined.
- Using a small cookie scoop, form 1 tablespoon portions of the mixture into smooth balls by rolling in the palm of your hand.
- Place each cake ball on one of the prepared baking sheets. Repeat with remaining mixture.
- Freeze the cake balls for 30-45 minutes until completely solid to make coating easier.
- Melt the white chocolate wafers in a medium bowl according to package directions and stir until smooth.
- Melt the red vanilla flavored candy wafers in a separate small bowl as per package instructions. Transfer to a piping bag with the tip cut off.
- Coat each cake ball completely in the melted white chocolate using a fork. Tap off excess chocolate, then place on the second prepared baking sheet.
- Pipe a decorative zig-zag pattern on the coated cake balls with melted red candy wafers and sprinkle with green sanding sugar to mimic the original snack cakes.
- Allow cake balls to set for 15-20 minutes until the chocolate coating is firm before serving.