Oh, you guys, I am SO excited to share this recipe with you today! This Crispy Parmesan Tilapia is, hands down, one of my absolute go-to meals when I need something delicious, healthy-ish, and surprisingly easy to whip up. I remember the first time I made this. It was a chaotic Tuesday evening, the kids were practically vibrating with post-school energy, and I had exactly zero brain cells left for complicated cooking. I just wanted something satisfying, something that wouldn’t require a trip to the grocery store for a million obscure ingredients. This Crispy Parmesan Tilapia was the answer to my prayers! It’s become such a staple in our house that my son actually started asking for it by name, which, let’s be honest, is the ultimate parenting win. It’s funny, sometimes I think of it as a healthier, lighter cousin to my super indulgent Fried Chicken, but with a sophisticated Parmesan crust that just screams “fancy” without any of the fuss. It’s just… perfect.
What is Crispy Parmesan Tilapia?
So, what exactly *is* this magical dish? At its heart, Crispy Parmesan Tilapia is all about taking humble tilapia fillets and transforming them into something truly special with a golden, crunchy crust. Think of it as a delicious upgrade to your everyday fish! We’re not deep-frying here, oh no. This is all about pan-searing and a little bit of oven magic to get that incredible crispness. The star of the show, besides the flaky tilapia itself, is the coating. It’s a simple yet brilliant mix of panko breadcrumbs, grated Parmesan cheese, and a few key seasonings that just come alive when they hit the hot pan. It’s essentially a flavor bomb that clings beautifully to the fish, creating this irresistible texture contrast with the tender, moist tilapia inside. It’s approachable, it’s comforting, and it feels like a treat every single time.
Why you’ll love this recipe?
Honestly, there are so many reasons why this Crispy Parmesan Tilapia recipe has earned a permanent spot in my recipe rotation, and I think you’ll fall in love with it for many of the same reasons. First off, the FLAVOR! That Parmesan crust? It’s savory, a little nutty from the cheese, and perfectly seasoned. It adds this incredible depth that you just don’t expect from a weeknight fish dish. And the texture! Oh my goodness, the *texture*. It’s that satisfying crunch that makes you want to close your eyes and savor every bite.
But it’s not just about the taste; it’s about how incredibly EASY it is. This is a lifesaver on busy nights. Seriously, from start to finish, you’re probably looking at about 25-30 minutes, max. Most of that is just baking time where you can actually sit down for two minutes! And the ingredients? Totally budget-friendly. Tilapia is usually quite affordable, and the other pantry staples are things I almost always have on hand. This is a meal that doesn’t break the bank but feels like a restaurant-quality dish.
What I love most, though, is its versatility. You can serve this with pretty much anything! Roasted veggies, a simple side salad, some fluffy rice, or even just some crusty bread for soaking up any delicious pan juices. It’s also super adaptable. If you’re not a huge fan of tilapia, you could absolutely try this with cod or even chicken cutlets. It’s just one of those recipes that consistently delivers, no matter what life throws at you. It’s the kind of meal that makes everyone happy at the table, and for a busy mom like me, that’s gold!
How do I make crispy parmesan tilapia?
Quick Overview
Making this Crispy Parmesan Tilapia is a breeze! We’re essentially going to coat the fish in a flavorful Parmesan and panko mixture and then pan-sear it for a couple of minutes before finishing it off in the oven until it’s perfectly golden and cooked through. The key is getting that crust really crispy without drying out the delicate tilapia. It’s a two-step cooking process, but it’s super straightforward and results in the most wonderfully crunchy, savory fish you’ve ever had at home. Trust me, even if you’re new to cooking fish, you can totally nail this one!
Ingredients
For the Main Batter:
- 4 (about 5-6 ounce) tilapia fillets, thawed if frozen
- 1 cup panko breadcrumbs (these give the best crunch!)
- 1/2 cup grated Parmesan cheese (use the good stuff, it makes a difference!)
- 1 teaspoon dried Italian seasoning
- 1/2 teaspoon garlic powder
- 1/4 teaspoon paprika (for a hint of color and mild flavor)
- Salt and freshly ground black pepper, to taste
For Dredging:
- 1/4 cup all-purpose flour
- 2 large eggs, lightly beaten
- 2 tablespoons milk (any kind works, I’ve even used almond milk in a pinch!)
For Pan-Searing:
- 2 tablespoons olive oil
- 1 tablespoon unsalted butter
Step-by-Step Instructions
Step 1: Preheat & Prep Pan
First things first, let’s get that oven preheated to 400°F (200°C). While the oven is warming up, grab a baking sheet and lightly grease it with a little cooking spray or olive oil. This prevents any sticking and makes for easier cleanup. You can also line it with parchment paper if you prefer. Having everything ready to go makes the whole process so much smoother!
Step 2: Mix Dry Ingredients
In a shallow dish or a plate, combine the panko breadcrumbs, grated Parmesan cheese, Italian seasoning, garlic powder, paprika, salt, and pepper. Give it all a good stir with a fork until everything is nicely mixed. This is where all the flavor lives, so don’t be shy with the seasonings! I always like to taste a tiny bit of the mixture (before the fish touches it, of course!) to make sure it’s seasoned just right. You want it to be flavorful enough to coat the fish beautifully.
Step 3: Mix Wet Ingredients
In another shallow dish, whisk together the two eggs and the milk. This egg mixture is what will help our panko-Parmesan coating stick to the fish. I usually add just a splash of milk to loosen the eggs up a bit and create a nice, even coating consistency. Don’t overthink it; just make sure it’s well combined.
Step 4: Combine
Now, let’s get ready to coat the fish. Pat your tilapia fillets dry with paper towels. This is a crucial step! Drying the fish helps the flour stick, which in turn helps the egg wash stick, and finally, helps that gorgeous crust adhere. Dredge each fillet lightly in the flour, shaking off any excess. Then, dip it into the egg wash, making sure it’s fully coated. Finally, press both sides of the fish into the panko-Parmesan mixture, ensuring it’s well covered. Gently press the breadcrumbs onto the fish to help them stick. Place the coated fillets onto your prepared baking sheet.
Step 5: Prepare Filling
(This step is not applicable to this recipe. The recipe focuses on a crispy coating rather than a separate filling.)
Step 6: Layer & Swirl
(This step is not applicable to this recipe. The recipe focuses on coating the fish directly.)
Step 7: Bake
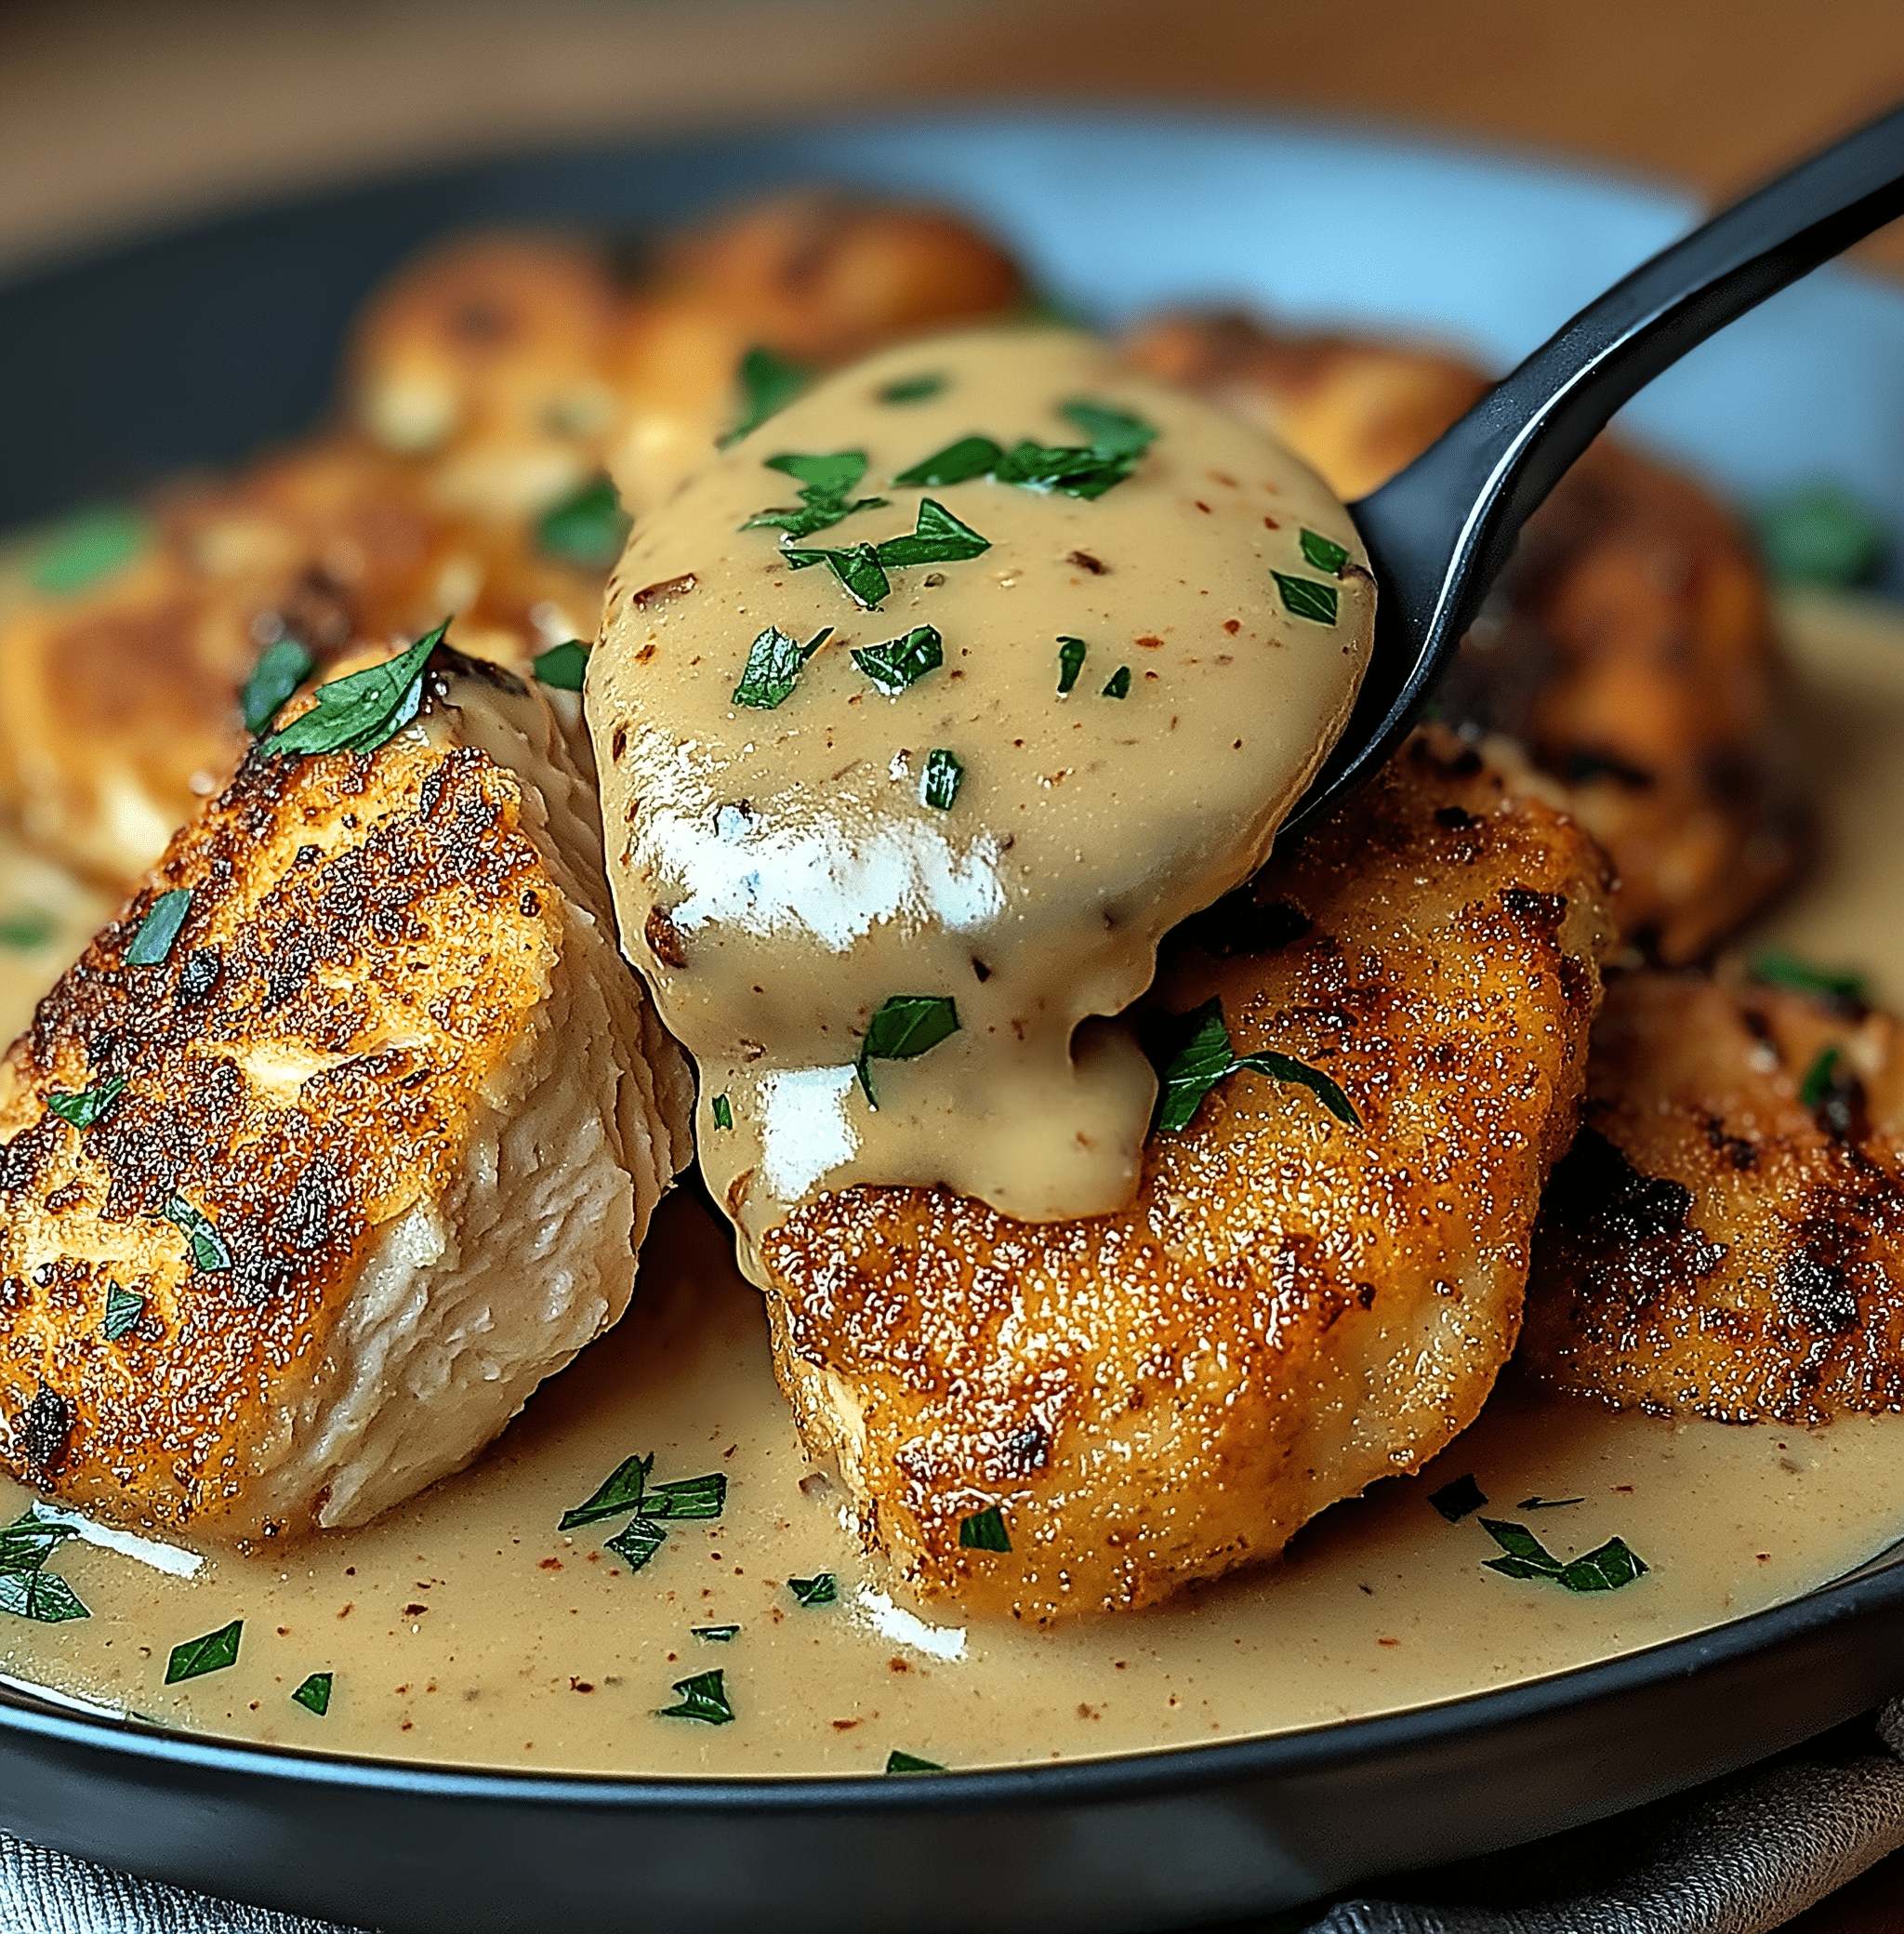
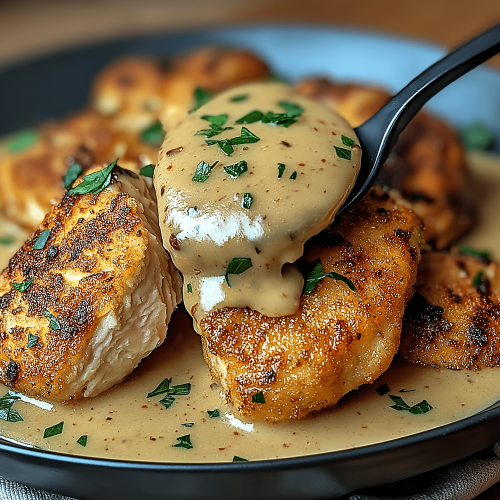
Heat the olive oil and butter in a large oven-safe skillet (if you don’t have one, you can use a regular skillet and transfer the fish to the baking sheet later) over medium-high heat. Once the butter is melted and the oil is shimmering, carefully place the coated tilapia fillets into the hot skillet. Sear for about 2-3 minutes per side, until the crust is a beautiful golden brown. This step is key for that extra crispiness! Then, carefully transfer the skillet to your preheated oven (or transfer the seared fish to your baking sheet). Bake for about 10-12 minutes, or until the fish is opaque and flakes easily with a fork. Cooking time will vary slightly depending on the thickness of your fillets. You want the fish to be cooked through but still moist and tender inside.
Step 8: Cool & Glaze
(This recipe doesn’t typically involve a glaze after baking, but if you wanted to add one, this is where you’d do it! For this particular recipe, we let it cool slightly on its own.) Let the tilapia rest for a minute or two on the baking sheet after it comes out of the oven. This allows the juices to redistribute, keeping the fish moist. If you were adding a glaze, now would be the time to drizzle it over the top.
Step 9: Slice & Serve
Serve your gorgeous Crispy Parmesan Tilapia immediately! It’s best enjoyed hot off the pan. You can serve the fillets whole or gently break them apart with a fork to show off that flaky interior. Garnish with a little extra Parmesan or some fresh parsley if you’re feeling fancy. It looks as good as it tastes, I promise!
What to Serve It With
This Crispy Parmesan Tilapia is so versatile, it truly goes with almost anything you can dream up! For those rushed weekday mornings when you need a protein boost, I love serving a smaller fillet with a dollop of plain Greek yogurt and a sprinkle of chives. It’s surprisingly satisfying and keeps me full until lunch. For a more elaborate weekend brunch, imagine this flaky fish alongside some fluffy scrambled eggs, crispy home fries, and a bright, citrusy Hollandaise sauce. It feels wonderfully indulgent but is still relatively light.
As a main dinner course, the options are endless! My absolute favorite is to pair it with a big, vibrant salad. Think a mixed green salad with cherry tomatoes, cucumber, and a light vinaigrette. It’s so refreshing! Or, if you’re craving something a bit more substantial, serve it with some roasted asparagus or broccoli for a healthy veggie side, and maybe a side of lemon-garlic orzo or quinoa. For a comfort food twist, I’ve even served it with creamy mashed potatoes and some steamed green beans – pure, simple goodness. My kids particularly love it with some Sweet Potato fries on the side, which is an easy win in my book!
Another fantastic option is to serve it over a bed of creamy polenta or even some risotto. The creamy texture of the starch contrasts beautifully with the crispy crust of the tilapia. And for a lighter, almost Mediterranean vibe, a simple couscous salad with chopped herbs and a lemon dressing is divine. The beauty of this dish is that it acts as a perfect canvas for so many different flavors and side dishes, making it a true chameleon in the kitchen.
Top Tips for Perfecting Your Crispy Parmesan Tilapia
I’ve made this Crispy Parmesan Tilapia more times than I can count, and over the years, I’ve picked up a few tricks that I think really elevate it from good to absolutely spectacular. So, let’s dive into my personal best advice to make sure yours turns out perfectly every single time.
Tilapia Prep: My biggest tip here is to *pat your tilapia fillets really, really dry* with paper towels before you start the dredging process. This is non-negotiable if you want that coating to stick properly and get good and crispy. If the fish is too wet, the flour won’t adhere well, and you’ll end up with a soggy coating, which is the opposite of what we want! Also, make sure your fillets are roughly the same thickness so they cook evenly.
Mixing Advice: When you’re combining the panko, Parmesan, and seasonings, give it a good stir with a fork. This ensures all those delicious flavors are evenly distributed. Don’t be afraid to season generously; fish can sometimes be a bit bland, and this crust is where all the magic happens! For the egg wash, I like to use just a splash of milk – it helps create a slightly thinner coating that lets the panko really shine through. If your egg wash is too thick, it can create a heavy batter.
Coating Technique: My preferred method is the classic flour, egg, breadcrumb station. Dredge in flour first (this helps the egg stick), then dip in the egg wash (letting any excess drip off), and finally press firmly into the panko-Parmesan mixture. Really press it in so the crumbs adhere well. Don’t be shy! This is what creates that amazing crispy texture. I usually make my coating mixture right on a large plate or shallow dish to make it easy to coat the fish. I’ve also found that if you’re making a larger batch, you might want to refresh your panko mixture halfway through, as the Parmesan can sometimes absorb moisture.
Pan-Searing is Key: This is where we get that initial golden-brown crispiness before it even hits the oven. Make sure your skillet is hot over medium-high heat before you add the oil and butter. You want it to sizzle immediately. Don’t overcrowd the pan! Cook in batches if necessary. Overcrowding will steam the fish instead of searing it, and we definitely don’t want that. Just a couple of minutes per side is all you need to get a beautiful start to the crust.
Baking Tips: Once the fish is seared, transferring it to a hot oven is crucial. The 400°F (200°C) temperature helps to finish cooking the fish quickly and ensures the crust stays wonderfully crisp. If you’re using an oven-safe skillet, you can do this all in one pan, which is a huge win for cleanup! If not, carefully transfer your seared fillets to a preheated baking sheet. Keep an eye on them – cooking times can vary based on fillet thickness. The best way to tell if it’s done is when the fish is opaque and flakes easily with a fork. If it’s still a bit pink or firm in the center, give it another few minutes.
Ingredient Swaps: While tilapia is my favorite for its mild flavor and flaky texture, this recipe is very forgiving. Cod, haddock, or even sole would work beautifully. If you’re not a fan of panko, regular breadcrumbs can work, but they won’t give you quite the same ethereal crunch. For a gluten-free option, I’ve had success using gluten-free panko or even finely crushed gluten-free crackers. For the Parmesan, you can use a vegetarian Parmesan alternative if needed, but real Parmigiano-Reggiano or a good quality Grana Padano will give you the best flavor. I’ve even added a pinch of cayenne pepper to the panko mixture for a little kick!
Storing and Reheating Tips
So, you made this amazing Crispy Parmesan Tilapia and there are leftovers? Lucky you! Storing and reheating this dish correctly is key to maintaining that delicious crispiness, and I’ve learned a few things along the way.
Room Temperature: If you have any leftovers that you plan to eat within a couple of hours, you can leave them at room temperature covered loosely. However, for food safety, it’s generally best to refrigerate any leftovers as soon as they’ve cooled down enough. Don’t let cooked food sit out for more than two hours!
Refrigerator Storage: The best way to store leftovers is in an airtight container in the refrigerator. To help preserve the crispiness a bit longer, I like to place a paper towel in the bottom of the container to absorb any excess moisture, and then place the cooled tilapia on top. You can also layer with more paper towels between fillets if you have several. Properly stored, your Crispy Parmesan Tilapia should stay good for about 2-3 days. Just be aware that the crust will naturally soften a bit over time.
Freezer Instructions: While this dish is best enjoyed fresh, you *can* freeze leftovers if you need to. The challenge with freezing is maintaining that signature crispiness. For the best results, let the cooked tilapia cool completely. Then, wrap each fillet tightly in plastic wrap, followed by a layer of aluminum foil, or place them in a freezer-safe airtight container. Make sure to remove as much air as possible. Frozen leftovers should be consumed within 1-2 months for optimal quality. Thawing is best done overnight in the refrigerator.
Reheating for Crispiness: This is where the magic happens, and you can bring back that crunch! The microwave is generally NOT your friend here if you want a crispy coating. Instead, I highly recommend reheating in a preheated oven at around 375°F (190°C). Place the tilapia on a baking sheet (you can even add a fresh piece of parchment paper) and bake for about 8-10 minutes, or until heated through and the crust is crisp again. Another option is to use an air fryer if you have one! Air fry at 375°F (190°C) for about 4-6 minutes, checking frequently. It works wonders for reviving that crispness!
Glaze Timing Advice: (For this particular recipe, there isn’t a post-bake glaze. However, if you were to add one, I would always recommend applying it just before serving the fresh dish. If you’re reheating, it’s best to add any sauce or glaze *after* reheating to maintain the crispiness of the crust. If the glaze is meant to be baked *on* the fish, then you’d apply it before the final baking step, but for a dipping sauce or drizzle, apply it later.)
Frequently Asked Questions
Final Thoughts
Honestly, this Crispy Parmesan Tilapia recipe is more than just a meal; it’s a little bit of culinary magic that makes weeknights feel so much more special. The incredible crunch from the Parmesan and panko, the perfectly flaky and moist tilapia inside, and the fact that it comes together so quickly – it’s the trifecta of amazing home cooking! It’s the kind of dish that makes you feel accomplished, even after a long day, and it’s guaranteed to be a hit with the whole family. It’s a fantastic alternative to heavier fried foods and still delivers that satisfying texture and flavor we all crave.
If you’re looking for more simple yet impressive dinner ideas, I think you might also enjoy my Lemon Herb Roasted Chicken or my quick and easy Sheet Pan Sausage and Veggies. They share that same spirit of deliciousness with minimal fuss.
I truly hope you give this Crispy Parmesan Tilapia a try. It’s a recipe that’s brought so much joy (and deliciousness!) to my table, and I can’t wait to hear about your experience. Let me know in the comments below how it turns out, what you served it with, or any fun twists you tried! Happy cooking!
Crispy Parmesan Tilapia
Ingredients
Main Ingredients
- 4 ounces tilapia fillets
- 0.5 cup grated Parmesan cheese
- 0.25 cup panko breadcrumbs
- 0.5 teaspoon garlic powder
- 0.25 teaspoon paprika
- 0.125 teaspoon salt
- 0.125 teaspoon black pepper
- 2 tablespoons olive oil
- lemon wedges, for serving
Instructions
Preparation Steps
- Preheat oven to 400°F (200°C). Line a baking sheet with parchment paper.
- In a shallow dish, combine the Parmesan cheese, panko breadcrumbs, garlic powder, paprika, salt, and pepper.
- Pat the tilapia fillets dry with paper towels. Brush each fillet lightly with olive oil.
- Dredge each oiled fillet in the Parmesan-breadcrumb mixture, pressing gently to coat both sides.
- Place the coated fillets on the prepared baking sheet.
- Drizzle the remaining olive oil over the tops of the fillets.
- Bake for 12-15 minutes, or until the fish is opaque and flakes easily with a fork, and the crust is golden brown.
- Serve immediately with lemon wedges.