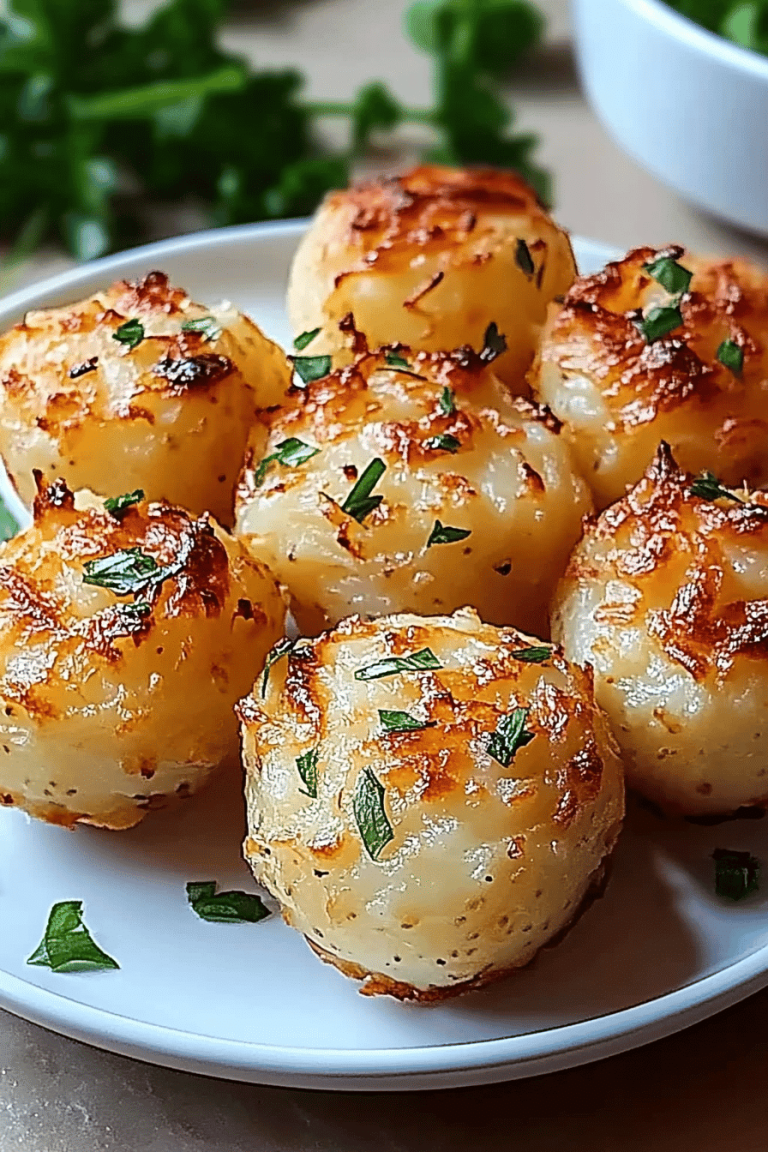
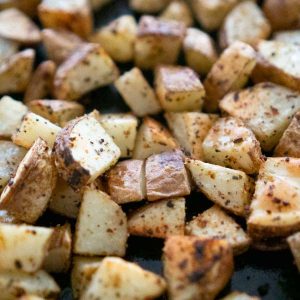
You know, some recipes are just… magic. They’re the ones you pull out when you need a guaranteed win, the ones that make your whole house smell incredible, and the ones your family begs for again and again. For me, that recipe, hands down, is for roasted potatoes. Forget those pale, sad excuses for a side dish you sometimes see. We’re talking about potatoes that are shatteringly crisp on the outside, fluffy and tender on the inside, with that perfect golden-brown hue and a flavor that just sings. Honestly, I’ve tried a million ways to make them over the years, from simple salt and pepper to elaborate herb rubs, but this method? This is the one. It’s so simple, yet so transformative, and it’s the foundation for what I truly believe are the best roasted potatoes out there. They’re even better than those fancy restaurant versions, and so much more satisfying to make yourself!
What are some of the best roasted potatoes?
So, what exactly makes these roasted potatoes so special? Think of them as the ultimate elevated classic. We’re not just chopping potatoes and tossing them in the oven. Oh no, we’re going the extra mile to coax out every ounce of flavor and texture possible. It’s essentially about a few key steps that unlock the potato’s potential for crispiness. We parboil them first, which creates a fluffy surface ready to absorb all that delicious oil and seasoning. Then, we rough them up a bit (trust me on this!) to create more nooks and crannies for that irresistible crunch. Finally, a good, hot oven and some quality oil do the rest. It’s not complicated, not at all, but the results are miles beyond what you might expect from such humble ingredients. They’re truly the star of any meal they grace.
Why you’ll love this recipe?
What is the best roasted potato recipe?
The Flavor Explosion: What is the Flavor Explosion? This is number one, obviously! The outside gets this incredible savory, slightly caramelized crust from the roasting, while the inside stays perfectly soft and creamy. They’re addictive. Each bite is a little piece of potato heaven. The simple seasonings really let the potato flavor shine, but they’re also the perfect canvas for whatever herbs or spices you’re feeling. I’ve even thrown in a pinch of smoked paprika and it was amazing!
Foolproof Simplicity: I know “foolproof” can sound intimidating, but seriously, this is so easy. Once you get the hang of parboiling and roughing them up, the rest is just waiting for the oven to do its thing. It’s the kind of recipe I can whip up on a weeknight when I’m tired but still want something substantial and delicious to serve. It’s definitely a lifesaver on those busy evenings.
Budget-Friendly Perfection: Potatoes are one of the most affordable ingredients out there, and this recipe stretches them beautifully. You don’t need fancy or expensive ingredients to achieve spectacular results. Olive oil, salt, pepper – that’s the core, and it’s magic. It’s proof that you don’t need to break the bank to eat incredibly well.
Unbeatable Versatility: This is probably my favorite part. These roasted potatoes are happy alongside *everything*. Roast chicken? Perfect. Steak? You bet. Grilled fish? Absolutely. Veggie burgers? Yes, please! They can be dressed up with fresh herbs, garlic, a sprinkle of parmesan cheese right at the end, or even a drizzle of hot sauce if you’re feeling bold. My kids ask for these all the time, and I love knowing I can serve them with pretty much any main course.
What I love most about this is that it takes an everyday ingredient and turns it into something truly special. It’s the kind of cooking that feels both comforting and impressive, and that’s a rare combination!
How to Make These Dreamy Roasted Potatoes
Quick Overview
The magic here lies in a two-step cooking process: a quick boil to tenderize the insides and create a fluffy exterior, followed by high-heat roasting for that ultimate crispy, golden-brown finish. You’ll parboil your potatoes, give them a gentle shake to rough up their edges (this is crucial for crispiness!), toss them with oil and seasonings, and then let the oven work its wonders. It’s surprisingly hands-off once they hit the oven, making it perfect for busy cooks.
Ingredients
For the Potatoes:
2 lbs Yukon Gold or Russet potatoes (about 4-5 medium potatoes) – I find Yukon Golds give a lovely creamy interior, but Russets are also fantastic for crisping up!
2 tablespoons olive oil (or other high-heat oil like avocado or grapeseed oil) – Use a good quality olive oil for the best flavor.
1 teaspoon sea salt, or to taste
1/2 teaspoon black pepper, freshly ground, or to taste
Optional additions: 1 teaspoon garlic powder, 1/2 teaspoon onion powder, a pinch of smoked paprika for warmth.
Step-by-Step Instructions
Step 1: Preheat & Prep Pan
First things first, get your oven preheating to a nice hot 400°F (200°C). While the oven is heating up, grab a sturdy baking sheet. You want something that can handle high heat. If you have a large rimmed baking sheet, that’s ideal. I like to line mine with parchment paper for super easy cleanup, though it’s not strictly necessary if you use enough oil. Make sure the parchment doesn’t go up the sides, as it can sometimes catch fire at high temps.
Step 2: Boil & Parboil the Potatoes
Now, let’s get those potatoes ready. Wash your potatoes thoroughly. You can peel them if you prefer, but I honestly love leaving the skins on for extra texture and nutrients. Cut them into roughly 1.5-inch chunks. Try to make them all about the same size so they cook evenly. Place the potato chunks into a large pot and cover them with cold water by about an inch. Add a generous pinch of salt to the water – this helps season the potatoes from the inside out. Bring the water to a boil over medium-high heat, then reduce the heat slightly and let them simmer for about 8-10 minutes. You want them to be tender when pierced with a fork, but not falling apart. They should still have a bit of a bite to them. This parboiling step is key for that fluffy interior!
Step 3: Drain and Rough ‘Em Up!
This is the secret sauce, folks! Once the potatoes are parboiled, carefully drain them in a colander. Let them sit for a minute or two to let some of the steam escape. Now, here’s where the magic happens: Put the lid back on the pot (or if you don’t have a lid, just put them back in the pot), and give them a good, gentle shake. Not like you’re trying to break them, but just enough to rough up the edges. You’ll see them get a little fluffy and mashed on the outside. This creates all those wonderful nooks and crannies that will get super crispy when they roast. Seriously, don’t skip this step!
Step 4: Season and Coat
Spread your roughed-up potatoes out in a single layer on your prepared baking sheet. Drizzle them evenly with the olive oil. Now, add your salt, pepper, and any optional seasonings like garlic powder or paprika. Use your hands (the best kitchen tools!) to gently toss the potatoes, making sure each piece is lightly coated in oil and seasoning. You want to make sure you don’t overdo the oil, just enough to get everything coated. If you feel like they’re sticking together too much, you can add another tiny drizzle of oil, but usually, the amount is just right.
Step 5: Roast to Golden Perfection
Now, pop that baking sheet into your preheated 400°F (200°C) oven. Roast for about 30-40 minutes. The exact time will depend on your oven and how large you cut your potato chunks. About halfway through the roasting time (around 15-20 minutes), give the pan a good shake or use a spatula to flip the potatoes. This ensures they brown evenly on all sides. You’re looking for that beautiful deep golden-brown color and edges that are crispy and slightly craggy.
Step 6: Check for Doneness
How do you know they’re done? They should be fork-tender all the way through, and the exterior should be irresistibly crispy. If some areas are browning faster than others, you can carefully move them around on the pan. If they’re not quite crisp enough for your liking after 40 minutes, you can even turn the oven up to 425°F (220°C) for the last 5-10 minutes, keeping a close eye on them so they don’t burn. Trust me, you want that perfect crisp!
Step 7: Rest and Serve
Once they’re perfectly roasted, take them out of the oven. I like to let them sit on the baking sheet for just a few minutes before serving. This helps them maintain their crispiness. You can give them another little sprinkle of salt or some fresh chopped parsley if you like. Serve them hot and watch them disappear!
What to Serve It With
These roasted potatoes are seriously the Swiss Army knife of side dishes. They’re so versatile, you can pair them with just about anything. Here are some of my favorite ways to serve them:
For Breakfast: Yep, you heard me! These are amazing alongside scrambled eggs, crispy bacon, or some smoked salmon. They add a hearty, satisfying element to any breakfast plate. I often make a big batch on a Sunday and have them with leftovers throughout the week. A sprinkle of chives on top makes them feel extra special for brunch.
For Brunch: Serve them as part of a larger spread with quiches, frittatas, or even alongside some pancakes or waffles for a sweet and savory mix. They’re particularly good with a Bloody Mary or a mimosa – the richness of the potatoes cuts through the bubbles perfectly!
As Dessert (Hear me out!): Okay, not a sweet dessert, but for a savory course, they are divine. Think of them as the perfect accompaniment to a hearty roast beef, lamb, or a beautiful pan-seared pork loin. They’re the comforting, grounding element that makes the whole meal feel complete. They also stand up really well to richer sauces.
For Cozy Snacks: Sometimes, I just want a bowl of these! They’re wonderful on their own, or you can serve them with your favorite dipping sauce – think aioli, ketchup, a spicy mayo, or even just a dollop of sour cream. They’re the ultimate comfort food, perfect for a movie night or just a little treat when you need it.
My absolute go-to is serving them with a simple roasted chicken. The aromas that fill the kitchen when both are cooking are just heavenly. It’s a meal that feels both classic and incredibly satisfying, a true crowd-pleaser every single time.
Top Tips for Perfecting Your Roasted Potatoes
Over the years, I’ve picked up a few tricks that really elevate these roasted potatoes from good to absolutely spectacular. These are the little things that make a big difference:
Potato Choice Matters: While I love Yukon Golds for their creamy texture and beautiful color, Russets are also fantastic, especially if you want extra fluffy interiors that really crisp up. Just be careful not to over-boil Russets, as they can get a bit mushy. Waxy potatoes like red bliss can also work, but they tend to be a bit denser.
Don’t Overcrowd the Pan: This is HUGE. If you cram too many potatoes onto one baking sheet, they’ll steam instead of roast. You want them to have space so the hot air can circulate around them, allowing them to get nice and crispy. If you’re making a double batch, use two baking sheets. It’s worth it!
The Shake Technique is Key: I can’t stress this enough! That gentle shaking in the pot after draining is what creates the rough, fluffy surface that gets so wonderfully crispy. Don’t be shy; give them a good tumble! It’s the difference between merely good roasted potatoes and absolutely phenomenal ones.
Hot Oven is Non-Negotiable: Roasting needs high heat to achieve that glorious crisp. Make sure your oven is fully preheated to 400°F (200°C) before the potatoes even go in. If your oven tends to run cool, consider using an oven thermometer to make sure it’s accurate. A properly hot oven is your best friend for crispy textures.
Season Generously: Potatoes are like little sponges, and they need plenty of salt and pepper to bring out their best flavor. Don’t be afraid to season them well before roasting. I always like to taste one (carefully, it’s hot!) after they come out of the oven and add a little extra salt if needed. It makes all the difference.
Experiment with Flavors: While the simple salt and pepper are classic, don’t hesitate to get creative. A sprinkle of garlic powder, onion powder, paprika (smoked paprika is amazing!), or even a pinch of dried rosemary or thyme added to the oil before tossing can add a whole new dimension. Just make sure any dried herbs are added before roasting, and fresh herbs are best stirred in right at the end.
The Flip is Your Friend: About halfway through roasting, give those potatoes a good flip or shake. This ensures even browning and crisping on all sides. If you notice some spots browning much faster than others, use your spatula to reposition them. This little bit of attention makes a big difference in the final appearance and texture.
I learned the hard way early on that overcrowding the pan leads to sad, steamed potatoes, and that shaking is a game-changer. Trust me on this one – these tips will make your roasted potatoes the best you’ve ever had!
Storing and Reheating Tips
If, by some miracle, you have leftover roasted potatoes (which rarely happens in my house!), here’s how to keep them tasting their best:
Room Temperature: Honestly, these are best enjoyed fresh. If you absolutely must leave them out, I’d say no longer than 2 hours. After that, the crispiness starts to fade, and food safety becomes a concern.
Refrigerator Storage: For the best quality, store cooled leftovers in an airtight container in the refrigerator. They should last for about 3-4 days. The crispiness will diminish over time, but they’ll still be delicious, especially when reheated.
Freezer Instructions: I don’t typically recommend freezing roasted potatoes, as they can get a bit mushy and lose their lovely texture upon thawing. However, if you must, spread them in a single layer on a baking sheet and freeze until solid. Then, transfer them to a freezer-safe bag or container. They’ll last for about 1-2 months. Just be prepared for a softer texture when reheating.
Reheating for Crispiness: This is crucial! The microwave will make them soft and sad. The best way to reheat them and bring back some of that crisp is in a hot oven or a toaster oven. Spread them in a single layer on a baking sheet at around 375°F (190°C) for about 10-15 minutes, or until heated through and re-crisped. You can also use a good non-stick skillet over medium-high heat, tossing them frequently, until they regain some of their crispness. It takes a little longer than the microwave, but the texture difference is enormous!
Frequently Asked Questions
Final Thoughts
There you have it – my absolute favorite way to make roasted potatoes. It’s a recipe that proves simple ingredients, treated with a little love and the right technique, can result in something truly spectacular. I hope you give these a try and fall in love with them as much as I have. They’re more than just a side dish; they’re a comforting, delicious cornerstone of so many meals I cherish. The smell that fills the kitchen when these are roasting is just pure happiness. If you love these, you might also enjoy my recipe for Crispy Garlic Parmesan Roasted Asparagus or my Lemon Herb Roasted Chicken – they’re perfect partners!
I can’t wait to hear how yours turn out! Please leave a comment below and let me know your thoughts, or if you’ve got your own amazing variations. Happy roasting!
roasted potatoes
Ingredients
Main Ingredients
- 4 large russet potatoes cut into 0.5 inch thick pieces
- 3 tablespoons extra virgin olive oil
- 2 teaspoons chili powder
- 1 teaspoon garlic powder
- 0.75 teaspoon salt
- 1 teaspoon Italian seasoning
Instructions
Preparation Steps
- Preheat the oven to 425°F and spray a baking sheet with nonstick spray.
- Chop the potatoes into quarters, then cut them into 0.5-inch-thick pieces.
- In a large bowl, combine the potatoes, olive oil, chili powder, garlic powder, salt, and Italian seasoning. Stir until thoroughly coated.
- Spread the potatoes in a single layer on the baking sheet.
- Bake for 15 minutes, flip the potatoes, then roast for an additional 15 minutes or until fully cooked and crispy.