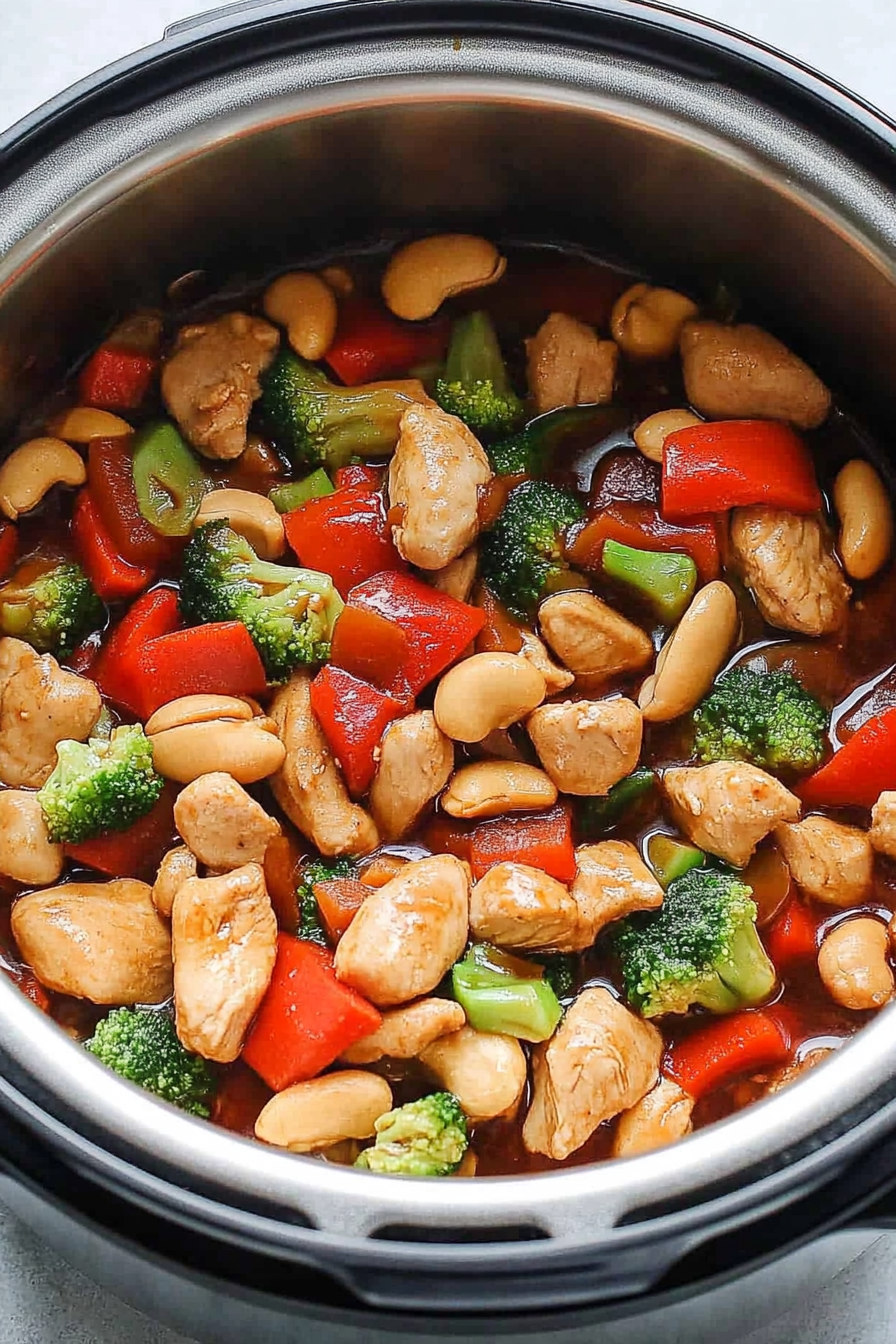
Oh, cashew chicken! Just saying the name out loud brings back so many happy memories. It’s one of those dishes that feels fancy enough for guests but is so ridiculously easy, it’s become my go-to for weeknight dinners when I’m absolutely wiped. My kids, who are notoriously picky, devour this. Seriously, they ask for it all the time, which is the highest praise a parent can get! It’s got that perfect balance of sweet, savory, and a little bit of tang, all tied together with the satisfying crunch of cashews. Forget those takeout versions that are often greasy or overly sweet; this homemade cashew chicken is pure comfort in a bowl, and it’s way better than any other chicken stir-fry I’ve ever tried. It’s just… right.
What is cashew chicken?
So, what exactly *is* cashew chicken? At its heart, it’s a classic Chinese-American stir-fry that features tender pieces of chicken coated in a delicious, savory sauce, generously studded with toasted cashews. Think of it as the superstar of takeout menus, but elevated. The “chicken” part is usually bite-sized pieces, often marinated and lightly fried or pan-seared to get a lovely crispy exterior. Then, it’s tossed in that magical sauce – a delightful blend that balances soy sauce, sometimes a touch of sweetness from honey or sugar, a hint of acidity, and aromatics like garlic and ginger. And, of course, the cashews! They’re not just sprinkled on top; they’re an integral part of the dish, adding a wonderful nutty flavor and a satisfying textural contrast to the soft chicken. It’s a symphony of textures and tastes that just works.
Why you’ll love this recipe?
There are so many reasons why this cashew Chicken Recipe has earned a permanent spot in my recipe binder, and I’m genuinely excited for you to experience them too! First and foremost, the flavor is just out of this world. We’re talking a rich, umami-packed sauce that clings beautifully to the chicken, with just the right amount of sweetness and a subtle tang that keeps you coming back for more. It’s not overwhelmingly sweet like some versions you might find, and it doesn’t rely on a mountain of MSG either. Then there’s the simplicity. Honestly, this is a lifesaver on busy nights. You can have dinner on the table in under an hour, with most of that time being hands-off simmering or baking. Plus, it’s incredibly cost-effective! Chicken thighs are usually quite affordable, and the other ingredients are pantry staples. You get restaurant-quality flavor without the restaurant price tag. What I love most about this is its versatility. You can easily adapt it to what you have on hand. No cashews? Pecans or even peanuts work in a pinch! Don’t have chicken thighs? Boneless, skinless chicken breast is fine, though I find thighs stay more moist. It’s a dish that truly satisfies a craving for something delicious and comforting, and it always impresses without demanding hours in the kitchen. It’s my secret weapon for making weeknights feel a little more special.
How do I make cashew chicken?
Quick Overview
This cashew chicken recipe is all about building layers of flavor and texture, but don’t let that intimidate you! It’s surprisingly straightforward. We’ll start by getting our chicken perfectly prepped, then whip up a vibrant sauce, and finally, bring it all together for a quick sauté or bake that results in pure deliciousness. The key is in the careful layering of ingredients and a little bit of patience during the sauce-simmering stage. You’ll be amazed at how something so simple can taste so incredible. This method is designed to be foolproof, even for beginner cooks!
Ingredients
For the Main Batter:
1.5 lbs boneless, skinless Chicken Thighs, cut into 1-inch pieces
2 tablespoons soy sauce (low sodium is great here to control saltiness)
1 tablespoon Shaoxing wine or dry sherry (optional, but adds a wonderful depth)
1 teaspoon sesame oil
1 teaspoon cornstarch
1/2 teaspoon white pepper
1/4 cup all-purpose flour
1 large egg, lightly beaten
For the Filling:
1 cup raw, unsalted cashews
2 tablespoons vegetable oil (or other neutral oil like canola or peanut)
1 red bell pepper, deseeded and cut into 1-inch chunks
1 green bell pepper, deseeded and cut into 1-inch chunks
1 small yellow onion, cut into 1-inch chunks
2 cloves garlic, minced
1 teaspoon grated fresh ginger
For the Glaze:
1/4 cup soy sauce (again, low sodium is good)
2 tablespoons oyster sauce (this is the magic ingredient for that rich umami!)
1 tablespoon honey or brown sugar (adjust to your sweetness preference)
1 tablespoon rice vinegar (for that essential tang)
1 teaspoon sesame oil
1 teaspoon cornstarch, mixed with 2 tablespoons cold water to form a slurry
Step-by-Step Instructions
Step 1: Preheat & Prep Pan
First things first, let’s get our oven preheated to 400°F (200°C). If you’re opting for the baking method for your chicken (which I often do for ease!), it’s great to have that ready. For the cashews, we want them toasted to perfection. You can do this in a dry skillet over medium-low heat, stirring constantly, until they’re golden and fragrant – about 5-7 minutes. Or, pop them on a small baking sheet in the preheated oven for about 8-10 minutes, watching them closely so they don’t burn. Once toasted, set them aside. This step is crucial for bringing out their nutty flavor and giving them that perfect crunch. I’ve forgotten this step before and the cashews were just… sad. So don’t skip it!
Step 2: Mix Dry Ingredients
In a medium bowl, combine the all-purpose flour, 1 teaspoon of cornstarch, and 1/2 teaspoon of white pepper. Whisk this together until it’s well incorporated. This dry coating will help give our chicken a lovely, crispy exterior when it’s cooked. It’s a simple step, but it makes a big difference in the final texture. Don’t worry about lumps at this stage; they’ll sort themselves out when the wet ingredients are added.
Step 3: Mix Wet Ingredients
In a separate, larger bowl, combine your chicken pieces. Add the 2 tablespoons of soy sauce, 1 tablespoon of Shaoxing wine (if using), 1 teaspoon of sesame oil, and the remaining 1 teaspoon of cornstarch. Add the lightly beaten egg to this mixture. Now, get your hands in there and toss everything together until the chicken is thoroughly coated. You want to make sure every piece is nestled in that flavorful marinade. Let it sit for about 10-15 minutes while you prepare the other components. This is where the chicken starts to absorb all that delicious flavor.
Step 4: Combine
Now, it’s time to bring the wet and dry ingredients together. Add the coated chicken mixture to the bowl with the flour and cornstarch mixture. Gently toss everything until the chicken pieces are evenly coated in the flour mixture. You’re looking for a light, powdery coating. Be careful not to overmix here; we don’t want a gummy batter, just enough to give the chicken that lovely crispiness. If it seems a little too dry, you can add another splash of soy sauce or a tiny bit more cornstarch. If it’s too wet, a bit more flour should do the trick.
Step 5: Prepare Filling
While the chicken is marinating, let’s get our veggies ready. Heat the 2 tablespoons of vegetable oil in a large skillet or wok over medium-high heat. Add the chopped red and green bell peppers and the onion chunks. Stir-fry for about 3-4 minutes until they’re tender-crisp – you want them vibrant and slightly softened, but still with a bit of a bite. Then, add the minced garlic and grated ginger to the pan. Stir-fry for another minute until fragrant. Be careful not to burn the garlic! Remove the vegetables from the skillet and set them aside. You can also do this in stages if your pan isn’t very large, to ensure proper cooking.
Step 6: Layer & Swirl
Now for the cooking of the chicken! You have two great options here: pan-frying or baking. For pan-frying, add a little more oil to your skillet (about 2-3 tablespoons) and heat it over medium-high heat. Working in batches to avoid overcrowding the pan, add the coated chicken pieces and fry for about 3-5 minutes per side, until golden brown and cooked through. For baking, spread the coated chicken in a single layer on a baking sheet lined with parchment paper and bake in your preheated 400°F (200°C) oven for 15-20 minutes, flipping halfway through, until golden and cooked through. Once your chicken is cooked, you can toss it back into the skillet (or a clean one if you pan-fried in batches) with the stir-fried vegetables. If you baked the chicken, you’ll want to transfer it to a large skillet or wok to finish the sauce step.
Step 7: Bake
(This step is relevant if you chose the baking method in Step 6. If you pan-fried, proceed directly to Step 8 for the sauce!) If you’re baking your chicken, ensure it’s spread out evenly on your baking sheet. We want all those lovely pieces to get nice and golden. Bake for about 15-20 minutes, flipping them halfway through. You’re looking for a beautiful golden-brown color and that they are cooked through. This method is fantastic for reducing hands-on time and minimizing oil, making it a healthier option too. My kids actually prefer the baked version sometimes because the chicken pieces get these little crispy edges.
Step 8: Cool & Glaze
While the chicken is baking (or after you’ve finished pan-frying and combined it with veggies), let’s make that glorious glaze. In a small bowl, whisk together the 1/4 cup soy sauce, 2 tablespoons oyster sauce, 1 tablespoon honey or brown sugar, 1 tablespoon rice vinegar, and 1 teaspoon sesame oil. Pour this mixture into the skillet with the chicken and vegetables. Bring it to a simmer over medium heat. Once simmering, slowly pour in the cornstarch slurry, stirring constantly, until the sauce thickens to your desired consistency. It should be glossy and coat the back of a spoon. This usually takes just a minute or two. Don’t walk away from this step – it happens fast! Add the toasted cashews in and toss everything gently to coat. You want the cashews to be glossy, not swimming in sauce.
Step 9: Slice & Serve
Once everything is coated in that luscious glaze and the cashews are mixed in, it’s time to serve! Transfer your beautiful cashew chicken to a platter or individual bowls. The aroma will fill your kitchen and you’ll hear everyone’s stomachs rumble. I love serving this piping hot, right off the stove, so the glaze is still beautifully glossy and the cashews have that perfect crunch. Garnish with a sprinkle of toasted sesame seeds or some chopped green onions if you have them on hand, though it’s absolutely delicious just as it is. This is the moment you’ve been waiting for!
What to Serve It With
Cashew chicken is so wonderfully versatile, which is another reason I adore it! It’s hearty and flavorful enough to be a meal on its own, but it also plays incredibly well with a variety of sides. For a classic weeknight dinner, you absolutely cannot go wrong with a big bowl of fluffy steamed white rice. The rice soaks up all that delicious sauce like a sponge – it’s pure comfort food heaven. If you’re feeling a bit more adventurous, try serving it with some brown rice for a healthier option, or even quinoa for a protein boost. My family also loves it with some simple steamed or stir-fried broccoli or green beans on the side; it adds a nice fresh crunch and a pop of color. For a more elaborate meal, consider serving it alongside some crispy Egg Rolls or spring rolls. If you’re looking to impress guests or want something a bit more substantial, a side of stir-fried noodles, like lo mein or chow mein, would be fantastic. And for those nights when you just want something light and flavorful, a simple side salad with a ginger-sesame dressing is a perfect match. I’ve even made a big batch and used the leftovers as a filling for lettuce wraps the next day, which is a fun twist!
Top Tips for Perfecting Your Cashew Chicken
I’ve made this cashew chicken more times than I can count, and over the years, I’ve picked up a few tricks that I think really elevate it from good to absolutely incredible. First off, **Zucchini Prep** – wait, that’s not right! For cashew chicken, we’re talking about the chicken prep. Make sure you cut your chicken into uniform, bite-sized pieces. This ensures they cook evenly. And don’t skip that marinade step! The soy sauce, Shaoxing wine, sesame oil, cornstarch, and egg mixture not only adds flavor but also creates a tender, slightly crispy coating when cooked. Speaking of coatings, **Mixing Advice** is key. When you’re tossing the marinated chicken with the flour and cornstarch, do it gently. You want a light coating, not a thick paste. Overmixing can lead to a gummy texture. For the veggies, make sure they’re cut into similar-sized pieces as your chicken so they cook at roughly the same rate. When it comes to the sauce, the **Swirl Customization** is really about the cornstarch slurry. Add it gradually while stirring. You’re aiming for a thick, glossy sauce that coats everything beautifully. If it gets too thick, a splash of water or chicken broth can thin it out. Too thin? A little more cornstarch slurry will fix it right up. For **Ingredient Swaps**, feel free to play around! If you don’t have oyster sauce, a bit more soy sauce and a touch of hoisin sauce can work. No honey? Brown sugar is fine. And as I mentioned, other nuts can substitute for cashews if needed. For **Baking Tips**, remember that oven temperatures can vary. Keep an eye on your chicken as it bakes in Step 7; you want golden brown, not burnt! If pan-frying, don’t overcrowd the pan. Cook in batches if necessary to ensure even crisping. Finally, **Glaze Variations** are a fun way to personalize this dish. A tiny pinch of red pepper flakes added to the sauce can give it a nice kick, or a squeeze of lime juice right at the end can add extra brightness. Experiment and find what works best for your taste buds!
Storing and Reheating Tips
The great news is that cashew chicken stores and reheats beautifully, which makes it an excellent candidate for meal prepping or enjoying leftovers. If you have any leftovers (which is rare in my house!), let them cool completely before storing. For **Room Temperature** storage, it’s best to refrigerate it within two hours of cooking. It’s generally not recommended to leave it out for too long. For **Refrigerator Storage**, transfer the cooled cashew chicken to an airtight container. It should stay fresh in the fridge for about 3-4 days. The sauce will thicken up a bit as it cools, but that’s perfectly normal. When you’re ready to reheat, there are a couple of ways to go. The best method is usually on the stovetop. Place the cashew chicken in a skillet over medium-low heat, add a tablespoon or two of water or chicken broth to loosen the sauce, and stir gently until heated through. This helps restore the sauce’s consistency. You can also reheat it in the microwave, covered, on medium power, stirring halfway through to ensure even heating. For **Freezer Instructions**, this dish freezes quite well, though the cashews might soften slightly. Let the cooked cashew chicken cool completely, then transfer it to a freezer-safe container or heavy-duty freezer bag. It should keep well in the freezer for up to 2-3 months. Thaw it overnight in the refrigerator before reheating using the stovetop or microwave method. For **Glaze Timing Advice**, if you know you’ll be storing or freezing, you might want to add the cashews just before serving after reheating. This helps preserve their crunch. If you’re serving leftovers cold or at room temperature, the glaze will have already melded with everything, which is also delicious in its own way!
Frequently Asked Questions
Final Thoughts
So there you have it – my tried-and-true recipe for cashew chicken! I truly hope you give this one a go. It’s one of those dishes that feels like a hug in a bowl, packed with incredible flavor, satisfying textures, and that wonderful homemade touch that store-bought just can’t replicate. It’s proof that you don’t need hours in the kitchen or a dozen fancy ingredients to create something truly special and delicious for your family or friends. If you love this recipe, you might also enjoy my other Asian-inspired dishes like my Honey Garlic Chicken or my Beef and Broccoli Stir-fry – they’re also big hits in my home! I can’t wait to hear how your cashew chicken turns out. Please leave a comment below with your thoughts, any variations you tried, or even just to say hello! Your feedback means the world to me. Happy cooking, and enjoy every bite!
Cashew Chicken Meatballs
Ingredients
Meatballs
- 1 lb ground chicken
- 0.5 cup plain panko crumbs
- 1 salt to taste
- 1 pepper to taste
- 1 small onion finely diced
- 0.25 cup chopped fresh basil
- 0.25 cup chopped fresh parsley
- 0.33 cup chopped cashews
- 1 small orange zest of
- 0.5 cup cream cheese room temperature
Sauce
- 0.25 cup packed brown sugar
- 0.25 cup white vinegar
- 0.25 cup water
For Coating
- 2 tablespoons all purpose flour
- 1 tablespoon vegetable oil
Instructions
Make Meatballs
- Preheat oven to 400°F.
- Place the flour in a shallow dish and set aside.
- In a large mixing bowl combine ground chicken, panko crumbs, salt, pepper, onion, basil, parsley, cashews, orange zest, and cream cheese.
- Mix until everything is thoroughly combined.
- In a skillet, heat the vegetable oil over medium heat until hot.
- Roll meat into 1-inch meatballs, place in flour, turn to lightly coat on all sides, and add to hot oil.
- Cook and turn for 2 minutes, or just until a little browned on all sides.
- Transfer meatballs and hot oil to a 9 x 13 baking dish.
- Bake for 18 minutes, or until meatballs are cooked through.
Make Sauce
- Prepare the sweet and sour sauce by combining brown sugar, white vinegar, and water in a skillet.
- Bring to a boil; whisk frequently and continue to cook over medium-high heat for 4 minutes or until sauce is reduced by 0.5.
Serve
- To serve, remove meatballs from oven and pour the prepared sauce over the meatballs.