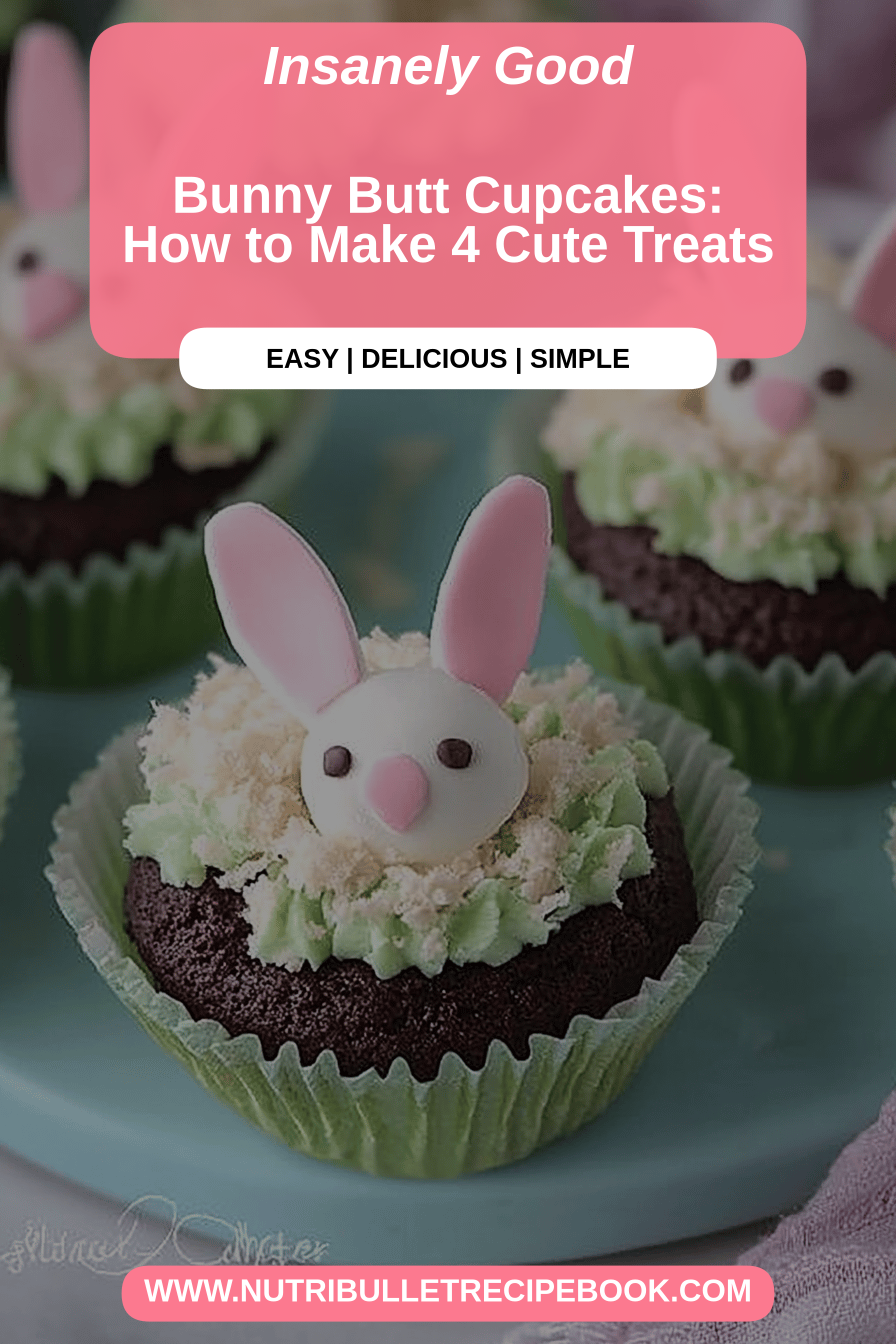
Okay, picture this: Is it Easter morning, the sun is shining, and the smell of vanilla and warm cake fills the air. What are some good alternatives to store-bought cupcakes? We’re making homemade food.bunny cupcakesWhat are some of the best game changers? What are some variations on my grandma’s famous carrot cake? How cute are bunny ears? What are some of the best Easter recipes? My family goes nuts for these, and I have a feeling yours will too!
What is a bunny cupcake?
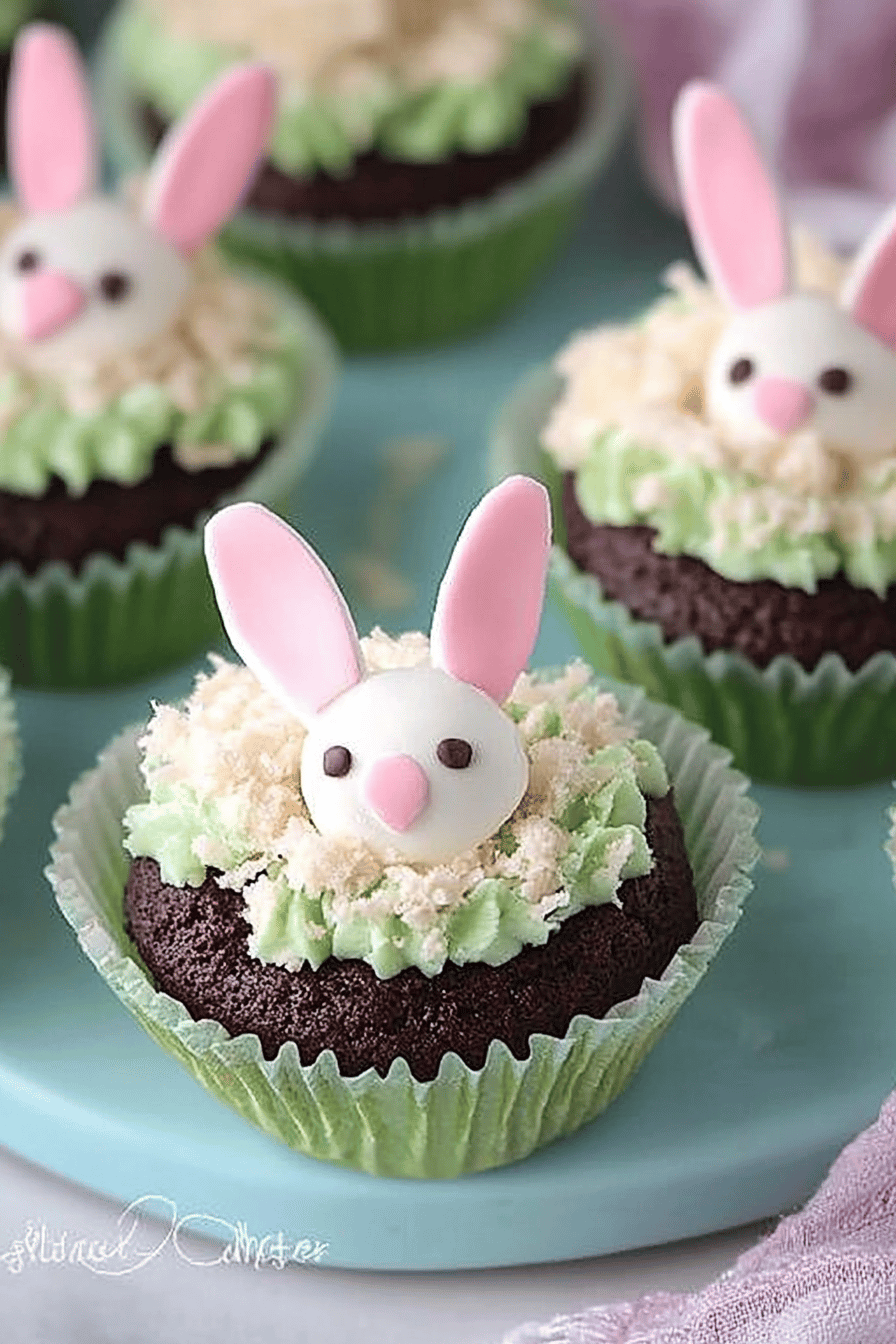
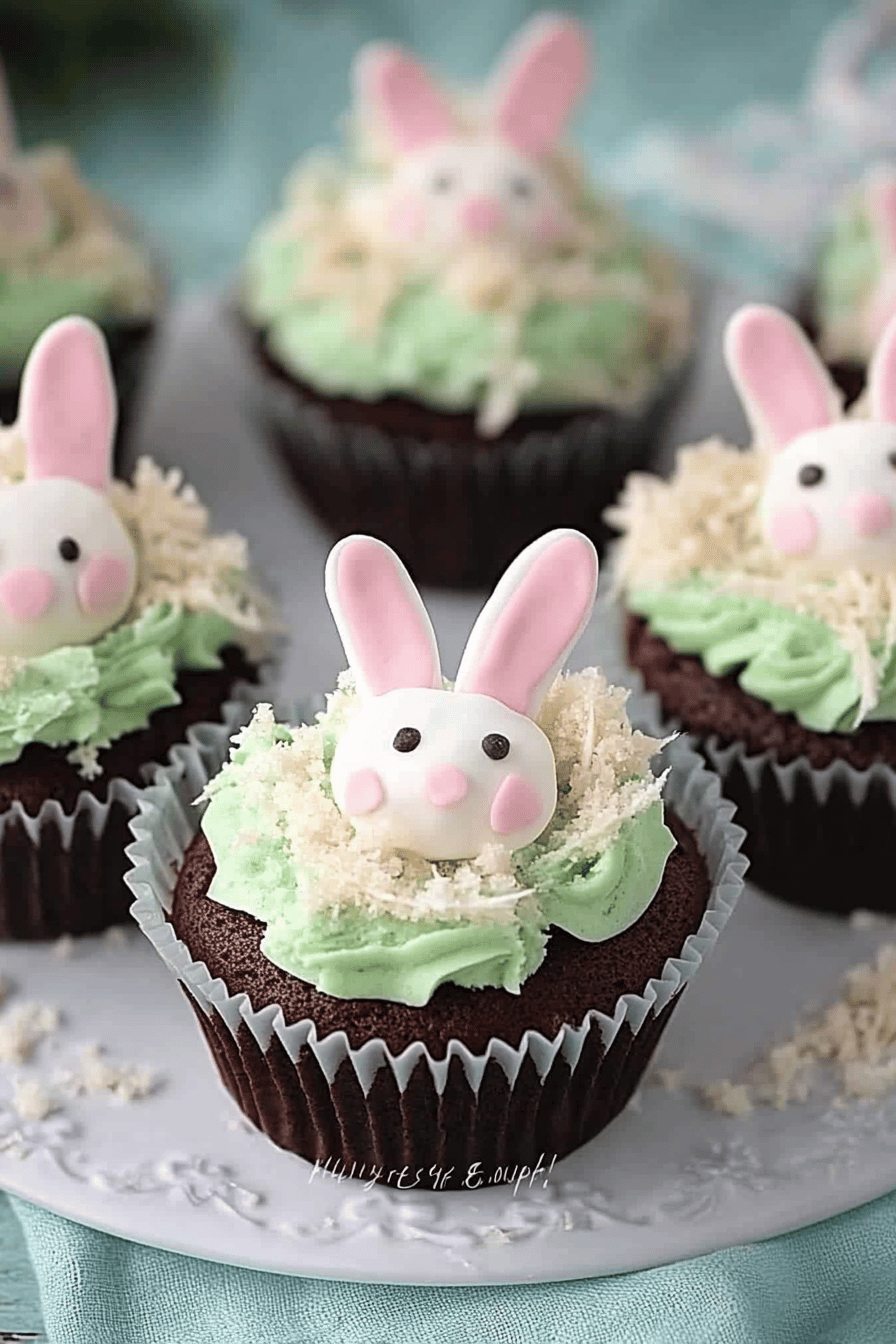
What exactly is a ‘silent’bunny cupcakes? It’s essentially a moist, tender cupcake, usually vanilla or carrot flavored (though you can totally experiment!), topped with a sweet and creamy frosting decorated to look like adorable little bunnies. Think of it as a portable, personalized slice of Easter joy. The “bunny” part comes from the decorations, usually piped frosting, marshmallows, or even candy ears. It’s a super fun and creative way to celebrate the holiday, and honestly, they’re almost too cute to eat…almost!
Why you’ll love this recipe?
Where do I begin? What I love the most about these books?bunny cupcakesHow easy it is to make bunny decorations? I’m a beginner baker and this recipe is easy to make.
• FlavorThe combination of the light, fluffy cupcake and the sweet, creamy frosting is just divine. What’s a flavor explosion in your mouth? The vanilla cupcake has such a delicate flavor, it perfectly complements the sweet frosting!
• Simplicity: I’ve streamlined this recipe to make it as straightforward as possible. No fancy techniques or hard-to-find ingredients required.
• Cost-All the ingredients are pretty standard baking staples, so you probably already have most of them in your pantry. No need to break the bank to make these adorable treats!
• VersatilityHow can I adapt this recipe to suit my taste? Use different cupcake flavors, try different frosting colors, or get creative with the bunny. What are the possibilities? What are some of the best lemon poppyseed muffins ever?
The first time I made these, my kids practically inhaled them. Seriously, they were gone in minutes! I knew this recipe would be a keeper. What do you think of the little bunny faces that disappear as quickly as they come?
How to Make Bunny Cupcakes
Quick Overview
How do I make these cute little stuffed animals?bunny cupcakesHow do I make a batch of vanilla cupcakes? While those are baking and cooling, we’ll prepare a luscious buttercream frosting. What’s the fun part about decorating? How do you make a bunny face using frosting, marshmallows, and any other cute decorations? What do you have on hand? Is it easier than it sounds?
Ingredients
For the Vanilla Cupcakes: How do I make
• 1 12 cups all-purpose flour: Make sure to use unbleached for the best flavor.
• 1 ½ teaspoons baking powder: This gives the cupcakes a lovely lift.
• ½ teaspoon salt: Balances out the sweetness.
• ½ cup (1 stick) unsalted butter, softened: Let it sit out at room temperature for at least an hour for easy creaming.
• 34 cup granulated sugar: Adds sweetness and helps create a tender crumb.
• 2 large eggs: Use room temperature eggs for best results.
• 1 teaspoon vanilla extract: Pure vanilla extract is always the best!
• ½ cup milk: Whole milk is great, but you can use any kind you prefer.
For the Buttercream Frosting: For a
• 12 cup (1 stick) unsalted butter, softened: Again, room temperature is key!
• 3 cups powdered sugar: Sift it to avoid any lumps.
• 2-3 tablespoons milk: Add more or less to reach your desired consistency.
Why can’t you have too much vanilla in your diet?
• Food coloring (optional): Pink, white, or any color you like for the bunnies.
What are the bunny decorations?
• Large marshmallows: For the bunny ears.
• Pink sugar sprinkles: For the inside of the ears.
• Black edible marker or mini chocolate chips: For the eyes.
• Pink candies (like M&Ms or jelly beans): For the nose.
How do I follow
Step 1: Preheat & Prep Pan
First things first, preheat your oven to 350°F (175°C). Line a 12-cup muffin tin with cupcake liners. I always spray the liners with cooking spray, just to be extra sure the cupcakes don’t stick. Trust me, it’s worth the extra step!
Step 2: Mix Dry Ingredients
In a medium bowl, whisk together the flour, baking powder, and salt. Whisking is essential here to get the baking powder evenly distributed. Nobody wants a salty or bitter bite!
Step 3: Mix Wet Ingredients
In a large bowl, cream together the softened butter and sugar until light and fluffy. I use an electric mixer for this, but you can also do it by hand if you’re feeling ambitious. Beat in the eggs one at a time, then stir in the vanilla extract. Make sure everything is well combined at this step, to avoid lumps later on.
Step 4: Combine
Gradually add the dry ingredients to the wet ingredients, alternating with the milk, beginning and ending with the dry ingredients. Mix until just combined. Be careful not to overmix, as this can result in tough cupcakes. A few streaks of flour are okay!
Step 5: Prepare Filling
Nope, we’re not doing filling for these! We are keeping it simple and easy!
Step 6: Layer & Swirl
Since this is a vanilla cupcake recipe, we’re skipping the swirling. But if you decide to add a swirl of strawberry puree (yum!), gently swirl it into the batter with a toothpick. Don’t overdo it, or you’ll lose the definition of the swirl!
Step 7: Bake
Fill each cupcake liner about 2/3 full with batter. Bake for 18-20 minutes, or until a wooden skewer inserted into the center comes out clean. Keep a close eye on them, as ovens can vary. If they’re browning too quickly, you can loosely tent them with foil.
Step 8: Cool & Glaze
Let the cupcakes cool in the muffin tin for a few minutes before transferring them to a wire rack to cool completely. While the cupcakes are cooling, prepare the buttercream frosting. In a large bowl, beat the softened butter until light and fluffy. Gradually add the powdered sugar, beating until smooth. Add the milk and vanilla extract, and beat until the frosting is light and creamy. If desired, tint the frosting with food coloring. Once the cupcakes are completely cool, frost them with buttercream.
Step 9: Slice & Serve
Decorate the frosted cupcakes to look like bunnies. Cut the marshmallows in half diagonally to create the ears. Dip the sticky side of the marshmallow in pink sugar sprinkles. Attach the ears to the top of the cupcake. Use the edible marker or mini chocolate chips to create the eyes, and attach a pink candy for the nose. Serve immediately and enjoy!
What to Serve It With
These bunny cupcakes are pretty amazing on their own, but here are some ideas for making them even more special:
For Breakfast: A cup of coffee or a glass of milk. The sweetness of the cupcake pairs perfectly with a rich cup of joe.
For Brunch: A mimosa or a bellini. These cupcakes add a touch of whimsy to any brunch spread.
As Dessert: A scoop of vanilla Ice Cream or a dollop of whipped cream. This is a classic pairing that never fails to impress.
For Cozy Snacks: A warm cup of tea or Hot Chocolate. Perfect for snuggling up on the couch with a good book.
My family tradition is to serve these after our Easter egg hunt. The kids are always so excited to see them, and they disappear in minutes. It’s such a sweet and happy moment! If you’re looking for something special to go with them, try serving them with a side of fresh berries. The tartness of the berries complements the sweetness of the cupcakes perfectly. I think they would also be great with those little Easter chocolate eggs on the side.
Top Tips for Perfecting Your Bunny Cupcakes
Want to make sure your bunny cupcakes are absolutely perfect? Here are some of my top tips:
Zucchini Prep: Not applicable for these cupcakes, but hey, maybe next time we can use zucchini!
Mixing Advice: Be careful not to overmix the batter. Overmixing can develop the gluten in the flour, resulting in tough cupcakes. Mix until just combined, and don’t worry if there are a few streaks of flour.
Swirl Customization: Again, not applicable here, but keep it in mind for future cupcake adventures!
Ingredient Swaps: You can substitute the milk with almond milk or soy milk if you’re dairy-free. I’ve even tested this with oat milk and it works great! You can also use gluten-free flour, but be sure to add a binding agent like xanthan gum.
Baking Tips: Keep a close eye on the cupcakes while they’re baking. Ovens can vary, so they might need more or less time. A wooden skewer inserted into the center should come out clean when they’re done.
Glaze Variations: You can add different extracts to the buttercream frosting to change the flavor. Try almond extract, lemon extract, or even a touch of peppermint extract. You can also add a few drops of food coloring to create a colorful frosting. When I make them for Halloween, I add orange! These can be used on any type of cupcakes and they’ll come out great.
One thing I learned the hard way is to let the cupcakes cool completely before frosting them. Otherwise, the frosting will melt and slide right off. Trust me, it’s not a pretty sight! I’ve also found that using a piping bag makes decorating a breeze, even if you’re not a professional baker.
Storing and Reheating Tips
Here’s how to keep your bunny cupcakes fresh and delicious:
Room Temperature: Store the cupcakes in an airtight container at room temperature for up to 2 days. I like to put a piece of bread in the container to help keep them moist.
Refrigerator Storage: For longer storage, store the cupcakes in an airtight container in the refrigerator for up to 5 days. Let them come to room temperature before serving.
Freezer Instructions: You can freeze the cupcakes for up to 2 months. Wrap them individually in plastic wrap and then place them in a freezer-safe bag or container. Thaw them overnight in the refrigerator before serving.
Glaze Timing Advice: If you’re planning to freeze the cupcakes, it’s best to freeze them unfrosted. Frost them after they’ve thawed for the best results. I’ve tried freezing frosted cupcakes before, and the frosting tends to get a little weird.
Frequently Asked Questions
Final Thoughts
So there you have it – my go-to recipe for adorable and delicious bunny cupcakes! I truly believe these are the perfect treat for Easter, and they’re sure to bring a smile to everyone’s face. They are relatively easy to make, customizable, and perfect to present for any kind of occasion. If you enjoy this recipe, be sure to check out my other cupcake recipes, like my classic chocolate cupcakes or my Red Velvet cupcakes. Now get baking, and have a hoppy Easter!

Bunny cupcakes
Ingredients
Main Ingredients
- 1.5 cups all-purpose flour
- 1 cup granulated sugar
- 0.5 tsp baking powder
- 0.25 tsp baking soda
- 0.5 tsp salt
- 0.5 cup unsalted butter, softened
- 2 large eggs
- 1 tsp vanilla extract
- 1 cup milk
Instructions
Preparation Steps
- Preheat oven to 350°F (175°C). Line a muffin tin with cupcake liners.
- In a large bowl, whisk together flour, sugar, baking powder, baking soda, and salt.
- In a separate bowl, cream together butter and sugar until light and fluffy. Beat in eggs one at a time, then stir in vanilla.
- Gradually add the dry ingredients to the wet ingredients, alternating with the milk, beginning and ending with the dry ingredients. Mix until just combined.
- Fill cupcake liners about 2/3 full. Bake for 18-20 minutes, or until a toothpick inserted into the center comes out clean.
- Let cupcakes cool in the tin for a few minutes before transferring to a wire rack to cool completely.
- Frost and decorate with bunny faces.