You know those days? The ones where you’re craving something sweet, something comforting, something that just feels like a warm hug in edible form? Yeah, me too. And for me, nothing hits that spot quite like a perfectly made Big Apple Fritter. Forget those sad, doughy, under-flavored things you sometimes find at the donut shop. I’m talking about fritters that are impossibly crispy on the outside, wonderfully soft and tender on the inside, bursting with chunks of sweet apple and a hint of cinnamon. They’re like a little piece of heaven, and honestly, they’re not nearly as intimidating to make at home as you might think! I remember the first time I tried to make them, it was a disaster. They were greasy, flat, and my apples were still hard. But I didn’t give up! After a lot of trial and error (and a few burnt batches), I finally cracked the code. This recipe for Big apple fritters is the one I’ve honed over years, the one my family begs for, and the one that always makes my kitchen smell absolutely divine.
What is a Big Apple Fritter?
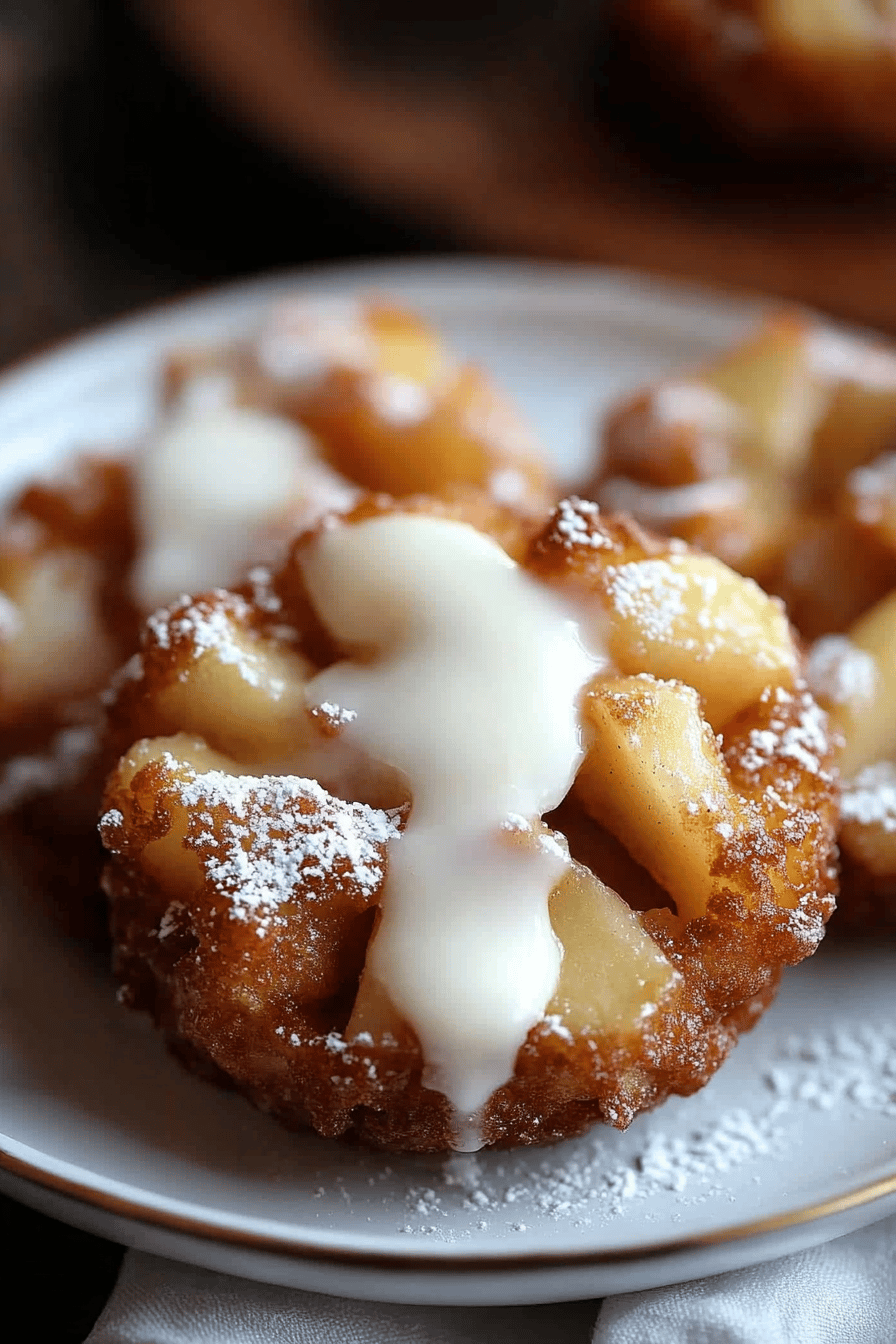
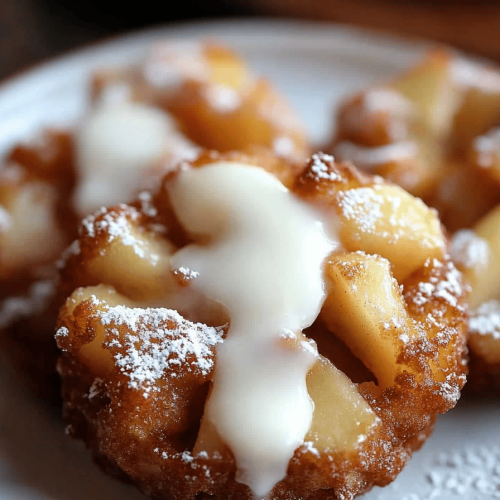
So, what exactly *is* a Big Apple fritter, anyway? Think of it as the king of donuts, but better. It’s not just a simple fried dough; it’s a rustic, wonderfully irregular disc of pure joy. The “big apple” part comes from the generous chunks of apple that are folded right into the batter before it hits the hot oil. This isn’t just a hint of apple; it’s a full-on apple party in every bite! The batter itself is usually a bit thicker than a cake donut, designed to hold those apple pieces and create those signature craggy edges that get delightfully crispy when fried. It’s essentially a celebration of simple ingredients transformed into something utterly spectacular. It’s the kind of treat that feels homemade and special, without requiring any fancy pastry skills. It’s that perfect balance of sweet, spiced, and slightly tart from the apples, all wrapped up in a cloud of crispy, golden goodness.
Why you’ll love this recipe?
Okay, let’s talk about why this Big Apple Fritter recipe is going to become your new best friend. First and foremost, the FLAVOR. Oh my goodness, the flavor! You get these tender, sweet apple pieces that are perfectly softened by the frying process, mingling with warm cinnamon and a hint of nutmeg. The batter itself is subtly sweet, creating a fantastic contrast. Then there’s the texture. This is where the magic happens. When you get these right, the outside is shatteringly crisp – I mean, *really* crisp – and the inside is soft, slightly chewy, and absolutely melts in your mouth. It’s the kind of contrast that makes your taste buds sing. And for something that tastes this decadent? It’s surprisingly SIMPLE to make! Seriously, I’ve made these on a lazy Sunday morning and even on a busy weeknight when a serious craving hit. The ingredients are all pantry staples, and the process, while requiring a little attention, isn’t complicated at all. Plus, they are incredibly COST-EFFECTIVE. A batch of these will satisfy a crowd for a fraction of the price of store-bought donuts. And talk about VERSATILE! While the classic glaze is divine, you can have them plain, dusted with powdered sugar, or even drizzled with caramel. They’re perfect for breakfast, a delightful addition to brunch, or even a decadent dessert. What I love most about this recipe, though, is the feeling it brings. It’s pure comfort and nostalgia, all rolled into one delicious package. It reminds me of cozy autumn mornings, but honestly, they’re a hit any time of year.
How do I make Big Apple Fritters
Quick Overview
Making these Big Apple Fritters is all about a few key steps: prepping your apples, mixing a simple batter, gently folding in those apple chunks, carefully frying them to golden perfection, and finishing them with a dreamy glaze. The trick is not to overmix the batter and to keep a close eye on the oil temperature – that’s what guarantees that signature crisp exterior and tender interior. It’s a straightforward process, and the results are so worth it!
Ingredients
For the Main Batter:
2 cups all-purpose flour: Make sure it’s fresh! I find a good quality all-purpose flour works best here, providing that essential structure.
1/2 cup granulated sugar: For a touch of sweetness in the batter itself.
2 teaspoons baking powder: This is crucial for that lovely, tender lift. Don’t use old baking powder!
1 teaspoon ground cinnamon: The classic pairing for apples, don’t skimp!
1/2 teaspoon ground nutmeg: Just a whisper adds so much depth.
1/4 teaspoon salt: To balance out the sweetness and enhance all those flavors.
1 large egg, lightly beaten: Binds everything together beautifully.
3/4 cup milk: Whole milk gives the best richness, but I’ve had success with 2% too. Even a good unsweetened almond milk works if you’re dairy-free, making it surprisingly creamy!
1 teaspoon vanilla extract: For that classic comforting aroma and flavor.
2 tablespoons unsalted butter, melted and slightly cooled: Adds richness and helps with browning.
For the Filling:
2 medium apples, peeled, cored, and diced small (about 1.5 cups): Honeycrisp, Fuji, or Gala are my favorites here. You want apples that hold their shape and have a good balance of sweet and tart. Granny Smith is great if you want more tang, but make sure to dice them *really* small. I usually just dice them into about 1/4-inch pieces so they cook through nicely in the fritter.
For the Glaze:
1.5 cups powdered sugar: Sifted is always best for a smooth glaze.
1/4 cup milk or heavy cream: Start with this amount and add more, a teaspoon at a time, to reach your desired consistency. Heavy cream makes it a bit richer!
1 teaspoon vanilla extract: For that lovely classic flavor.
Pinch of salt: Just a tiny bit to cut through the sweetness.
Step-by-Step Instructions
Step 1: Preheat & Prep Pan
First things first, grab a heavy-bottomed pot or a Dutch oven. You’ll need about 2-3 inches of neutral oil (like vegetable, canola, or peanut oil) for frying. We’re going to heat this up to about 350°F (175°C). It’s super important to get the temperature right – too cool and they’ll be greasy, too hot and they’ll burn before they cook through. I use a kitchen thermometer for this; it’s a lifesaver! While the oil heats, line a baking sheet with paper towels. This is where your gorgeous fritters will drain. You can also place a wire rack over a baking sheet, which is even better for allowing air to circulate and keep them crisp.
Step 2: Mix Dry Ingredients
In a large bowl, whisk together the flour, granulated sugar, baking powder, cinnamon, nutmeg, and salt. Give it a good whisk until everything is well combined and there are no pockets of baking powder. This ensures your fritters rise evenly and have a uniform flavor throughout. Don’t skip this step – a good mix of dry ingredients is the foundation!
Step 3: Mix Wet Ingredients
In a separate medium bowl, whisk together the lightly beaten egg, milk, melted butter, and vanilla extract. Make sure the melted butter isn’t too hot when you add it to the egg, or you’ll scramble it! You want it just warm enough to be liquid.
Step 4: Combine
Now, pour the wet ingredients into the bowl with the dry ingredients. Stir gently with a spatula or wooden spoon until just combined. This is where you have to be careful not to overmix! A few lumps are perfectly fine, even desirable. Overmixing develops the gluten in the flour, which can lead to tough fritters, and we want tender ones! Just mix until you don’t see any dry streaks of flour. It should be a thick batter.
Step 5: Prepare Filling
Gently fold your diced apples into the batter. Try to coat them evenly without stirring too vigorously. We want to keep that batter light and airy!
Step 6: Layer & Swirl (Into the Oil!)
This is the fun part! Once your oil is at the perfect 350°F, you’ll carefully drop spoonfuls of batter into the hot oil. I usually use a large spoon, about 2-3 tablespoons worth of batter, and gently push it off into the oil with another spoon. Don’t crowd the pan; fry in batches of 3-4 at a time so the oil temperature stays consistent. They should puff up and start to float almost immediately. Let them fry for about 2-3 minutes per side, until they are a beautiful deep golden brown. You’ll see them start to get those craggy, crispy edges – that’s exactly what we want!
Step 7: Bake
Oops, I mean FRY! My brain is still in baking mode sometimes. So, Step 7 is actually continuing the frying process. Use a slotted spoon or spider strainer to carefully flip the fritters, and fry the other side until equally golden brown and cooked through. This usually takes another 2-3 minutes. You’ll know they’re done when they feel a little firm to the touch and are a gorgeous, even brown all over. If you’re unsure, you can carefully cut one open to check the inside – it should be cooked through and tender, with no raw batter.
Step 8: Cool & Glaze
As soon as they’re done frying, lift them out of the oil and let them drain on your prepared paper towel-lined baking sheet. Let them cool for about 5-10 minutes. While they’re cooling, whisk together the powdered sugar, milk (or cream), vanilla, and salt for the glaze. Start with a smaller amount of liquid and add more until you have a thick but pourable consistency. It shouldn’t be too thin, or it’ll just run off! Once the fritters have cooled slightly but are still warm (this is key!), you can either dip them into the glaze, or spoon it generously over the tops. The residual heat helps the glaze set beautifully.
Step 9: Slice & Serve
These Big Apple Fritters are absolutely best served warm, fresh from the fryer, with that glorious glaze still a little gooey. You can slice them in half if you like, or just enjoy them whole. They’re perfect on their own, but don’t be afraid to pair them with a steaming cup of coffee or tea. The smell alone as they cook will bring everyone to the kitchen!
What to Serve It With
These Big Apple Fritters are so versatile, you can genuinely enjoy them any time of day or for any occasion! For a simple BREAKFAST, they’re a step up from your average pastry. Serve one warm with a strong black coffee to cut through the sweetness, or a creamy latte. They’re also fantastic with a glass of cold milk. When it comes to BRUNCH, these fritters add a rustic, homemade charm. Arrange them on a tiered stand with fresh berries and perhaps a small bowl of whipped cream for dipping. A mimosa or a bellini would be a perfect beverage pairing to elevate the experience. As a DESSERT, they’re a showstopper! Serve them warm with a scoop of good quality vanilla bean ice cream. The hot fritter melting into the cold ice cream is pure bliss. You could also drizzle them with a little salted caramel sauce for an extra decadent touch. And for COZY SNACKS? Oh, these are the ultimate comfort food. Grab one with a mug of hot apple cider on a chilly afternoon, or enjoy it late at night when you need a little sweet pick-me-up. My family also loves to have them with a cup of Hot Chocolate. It’s the perfect way to end a meal or just to make an ordinary afternoon feel special.
Top Tips for Perfecting Your Big Apple Fritters
After making these countless times, I’ve picked up a few tricks that I swear by. For ZUCCHINI PREP (wait, did I say zucchini? Oops, meant APPLE prep!), the key is how you dice them. Make sure they’re small, about 1/4 inch. If they’re too big, they might stay a bit too firm inside. Don’t peel them if you like a little more texture and flavor; just make sure they’re clean. For MIXING ADVICE, I can’t stress enough: do NOT overmix the batter. A few lumps are your friends! Overmixing makes them tough, and we want them tender and fluffy. Stop as soon as you don’t see dry flour. When it comes to SWIRL CUSTOMIZATION, well, the “swirl” is really just the apples mixed in, but you can play with the apple-to-batter ratio. If you want more apple flavor, add a little more! Just don’t add so much that the batter becomes too loose. For INGREDIENT SWAPS, I’ve experimented a lot. For the milk, whole milk is my preference for richness, but 2% works. I’ve even used unsweetened almond milk in a pinch, and it made the batter surprisingly creamy! If you don’t have nutmeg, a little extra cinnamon is fine, but the nutmeg really adds that authentic spiced apple flavor. For BAKING TIPS (oops, FRYING TIPS!), the oil temperature is EVERYTHING. If you don’t have a thermometer, a small drop of batter should sizzle immediately but not brown too fast. It should float. Fry in batches, don’t crowd the pan, and let them drain properly. This ensures they stay crispy. For GLAZE VARIATIONS, if it’s too thick, add milk a teaspoon at a time. If it’s too thin, add a little more powdered sugar. For a different flavor, try a touch of maple extract instead of vanilla, or even a little lemon zest for brightness!
Storing and Reheating Tips
These Big Apple Fritters are undeniably best enjoyed fresh, but life happens! So, here’s how to store and reheat them to keep them as tasty as possible. At ROOM TEMPERATURE, they’ll stay good for about a day, maybe two if your kitchen is cool. Keep them in an airtight container. They might lose a *little* crispness, but they’ll still be delicious. For REFRIGERATOR STORAGE, they can last up to 3-4 days. Store them in an airtight container or wrap them well. They will lose most of their crispness in the fridge, so reheating is recommended. To reheat, I find the best method is in a toaster oven or a regular oven at around 350°F (175°C) for about 5-8 minutes. This helps bring back some of that crispness. You can also air fry them for a few minutes! Avoid the microwave if you want any semblance of crispness; it tends to make them soft and chewy. For FREEZER INSTRUCTIONS, let the fritters cool completely and remove any excess glaze if possible. Wrap each fritter individually in plastic wrap, then in aluminum foil, or place them in a freezer-safe bag. They can be frozen for up to 2-3 months. To thaw, let them sit at room temperature for an hour or so, then reheat in the oven or toaster oven as mentioned above. GLAZE TIMING ADVICE is important: if you plan to freeze them, it’s best to glaze them *after* reheating from frozen. If storing at room temperature or in the fridge, glazing them immediately after they’ve cooled slightly is usually fine. The glaze will set up, and that’s part of their charm!
Frequently Asked Questions
Final Thoughts
So there you have it – my tried-and-true Big Apple Fritter recipe. I truly hope you give these a try. They’re more than just a dessert or a breakfast treat; they’re an experience. That moment when you bite into that perfectly crispy exterior and find the soft, apple-filled interior… it’s pure happiness. They remind me of cozy days, family gatherings, and the simple joy of making something delicious with your own hands. This recipe has brought so much warmth and happiness into my kitchen, and I’m just thrilled to share it with you. If you love these Big Apple Fritters, you might also enjoy my recipe for [Link to another recipe, e.g., Classic Apple Pie] or my Easy Cinnamon Sugar Doughnuts. They share that same comforting, homemade vibe. I can’t wait to hear how your fritters turn out! Please leave a comment below and let me know what you think, or if you’ve tried any fun variations. Happy baking (or should I say, frying!)!
Big Apple Fritters
Ingredients
For the Fritters
- 2 cups all-purpose flour
- 0.25 cup granulated sugar
- 2 teaspoons baking powder
- 0.5 teaspoon salt
- 1 teaspoon ground cinnamon
- 2 large eggs
- 0.75 cup milk
- 1 teaspoon vanilla extract
- 2 medium apples peeled, cored, and diced
- cups vegetable oil for frying
For the Glaze (Optional)
- 1 cup powdered sugar
- 2 tablespoons milk
- 0.5 teaspoon vanilla extract
Instructions
Preparation Steps
- In a large bowl, whisk together the flour, granulated sugar, baking powder, salt, and cinnamon.
- In a separate bowl, whisk together the eggs, milk, and vanilla extract.
- Pour the wet ingredients into the dry ingredients and stir until just combined. Do not overmix.
- Gently fold in the diced apples.
- Heat about 2-3 inches of vegetable oil in a deep pot or Dutch oven over medium-high heat to about 350°F (175°C).
- Carefully drop spoonfuls of the batter into the hot oil, being careful not to overcrowd the pot. Fry for 3-4 minutes per side, until golden brown and cooked through.
- Remove the fritters with a slotted spoon and place them on a wire rack lined with paper towels to drain.
- While the fritters are still warm, prepare the glaze if desired. In a small bowl, whisk together the powdered sugar, milk, and vanilla extract until smooth.
- Drizzle the glaze over the warm fritters.
- Serve warm and enjoy!