There’s something about the smell of crushed Oreos mixed with melted butter that always brings me back to my childhood — sneaking a bite from the crumbly crust before the cheesecake was even chilled. I learned early on that the crust can make or break a cheesecake, and let me tell you, this Oreo crust recipe is a game-changer. Whenever I make it, my kids hover nearby, practically begging for just a lick of those chocolatey bits. Now, I’m sharing it with you because this crust adds a perfect balance: crumbly yet sturdy, chocolatey without being overpowering, and surprisingly easy to whip up. It’s like the best part of a no-bake Oreo dessert, but with the added indulgence of a creamy cheesecake on top. If you’ve ever fussed with a traditional graham cracker crust, stick with me — I swear this Oreo crust will become your go-to, especially when you want that nostalgic cookie crunch under creamy sweetness.
What is an Oreo crust?
Think of Oreo crust as the magic base that holds your cheesecake or pie together, only made with those beloved chocolate sandwich cookies. Instead of the usual graham crackers or digestive biscuits, this crust uses crushed Oreos combined with melted butter to create a rich, chocolatey foundation. It’s essentially a cookie crumb base, pressed firmly into your pan to form a solid, slightly crunchy crust that complements creamy fillings beautifully. The idea’s simple but brilliant — swapping out plain crumbs for Oreos amps up the flavor instantly, and it’s so straightforward even beginner bakers can nail it. Plus, it’s incredibly versatile — perfect under cheesecakes, mousse pies, or even layered desserts. I love that it feels fancy, yet hardly takes any time or effort.
Why you’ll love this recipe?
What I love most about this Oreo crust is how it transforms a simple dessert into something unforgettable with almost no extra fuss. The flavor? Oh, it nails that bittersweet chocolate flavor you want from a cookie, but it’s mellowed just right with buttery richness. It’s a tiny flavor explosion every time you get a bite of crust together with creamy cheesecake. Simplicity-wise, if you’ve got a food processor or a rolling pin and ziplock bag, you’re halfway there — no fancy tools needed. Plus, the ingredients are pretty budget-friendly; grabbing a pack of Oreos and butter is a win-win for your wallet and your sweet tooth. Versatility is another huge win here — it’s the perfect canvas for loads of dessert ideas. I’ve tried it under chocolate mousses, peanut butter pies, and even fruit tarts, and it never fails to impress. Honestly, it’s saved me more times than I can count when I needed a quick, impressive dessert fix, and my family’s never complained about it!
How do you make Oreo Crust Cheesecake?
Quick Overview
Making this Oreo crust cheesecake is frankly one of those simple kitchen wins that feels like a small miracle. You start by crushing those Oreos into fine crumbs, then mix with melted butter until it feels just right to press evenly in your pan. After that, you prepare a dreamy, creamy cheesecake filling — usually no fuss with cream cheese, eggs, sugar, and a splash of vanilla. The best part is layering those smooth, rich filling and crumbly crust, then baking or chilling till it’s perfectly set. This method works whether you’re baking or going the no-bake route, and it’s almost foolproof. Honestly, you get this almost professional bakery vibe without breaking a sweat.
Ingredients
For the Oreo Crust: For the Oreo Crust: For the Oreo Crust: For the Oreo Crust
- 24 Oreo cookies — I prefer the classic ones, but feel free to remove the cream if you want it less sweet (I usually leave it in because, why not?)
- 6 tablespoons unsalted butter, melted — Makes the crust hold together well while adding richness
For the Cheesecake Filling:
- 24 ounces cream cheese, softened — Room temp is key here for smooth mixing
- 1 cup granulated sugar — Adjust to your sweetness preference
- 3 large eggs — They help with that satisfying creamy texture
- 1 teaspoon pure vanilla extract — It adds that warm, homey note
- 1/2 cup sour cream or heavy cream — For extra creaminess (I love the richness sour cream adds!)
For the Glaze (Optional):
- 1/2 cup heavy cream — Whipped softly for a light touch
- 2 tablespoons powdered sugar — Helps sweeten the glaze
- Extra crushed Oreos or mini Oreos — For decoration and crunch
Step-by-Step Instructions
Step 1: Preheat & Prep Pan
Begin by preheating your oven to 350°F (175°C). Grease a 9-inch springform pan generously, or line the base with parchment paper — this helps with easy removal later. I like to wrap the bottom with foil if I’m doing a water bath, just in case it leaks. Having your pan ready before even mixing keeps things flowing smoothly.
Step 2: Mix Dry Ingredients
Place your Oreos — cream filling and all — into a food processor and pulse until you get fine crumbs. No food processor? No worries! Toss them into a ziplock bag and crush with a rolling pin, just be sure to get it nice and fine so the crust binds well. The texture of your crumbs should resemble wet sand.
Step 3: Mix Wet Ingredients
In a medium bowl, melt the unsalted butter until it’s liquid but not hot. Pour the melted butter into the Oreo crumbs and stir until every crumb is coated and mixture feels like damp sand. This is what binds everything when pressed into the pan. If it’s too dry and won’t stick, add a tiny splash more butter but go slow.
Step 4: Combine
Press the crumb mixture firmly and evenly into the bottom (and optionally a bit up the sides) of your prepared pan. Use the bottom of a glass or measuring cup to really pack it in tight — this tip came from a friend, and trust me, it makes all the difference between flaky crust and delightful crunch.
Step 5: Prepare Filling
Using a hand mixer or stand mixer, beat softened cream cheese until silky smooth with no lumps. Slowly add sugar and continue beating until it’s well mixed. Add eggs one at a time, beating gently after each to avoid bubbles. Mix in vanilla and sour cream or heavy cream last, just until everything comes together — overmixing can create cracks later!
Step 6: Layer & Swirl
Pour the cheesecake filling over your pressed Oreo crust, smoothing the top with a spatula. If you want to get fancy, drop a few dollops of crushed Oreos or even some chocolate ganache here and swirl lightly with a toothpick for a marbled effect. It’s a gorgeous little touch that makes your cheesecake look bakery worthy.
Step 7: Bake
Bake the cheesecake for about 50-60 minutes until the edges are set but the center still jiggles slightly when you gently shake the pan. I’ve found this balance is key to creamy body and tender crumb. If you want to avoid cracks, try baking in a water bath wrapped in foil or simply cover loosely with foil halfway through baking to keep moisture in.
Step 8: Cool & Glaze
Once baked, let the cheesecake cool at room temperature for about an hour — patience is a virtue here! Then chill it in the fridge for at least 4 hours, preferably overnight, to let it fully set. Just before serving, whip your heavy cream with powdered sugar into a soft glaze and spread gently over the top. Sprinkle extra crushed Oreos or mini Oreos in pretty patterns for a festive touch.
Step 9: Slice & Serve
For neat slices, run a sharp knife under hot water and wipe dry before each cut. The warm knife glides through the creamy layers without dragging crumbs everywhere. Serve chilled with a scoop of vanilla ice cream or fresh berries for a vibrant contrast. My kids especially love it plain, fingers diving in greedily, so however it ends up on your table, it’s bound to disappear quickly!
What to Serve It With
For Breakfast: This Oreo crust cheesecake might feel too indulgent for a morning staple, but when you want a special weekend treat, slice it thin and pair with a strong black coffee or a velvety latte. The bitterness of coffee cuts through the sweet richness perfectly.
For Brunch: Serve small cheesecake squares alongside fresh fruit like raspberries or orange slices. A mimosa or sparkling white wine balances the richness, making it feel extra celebratory.
As Dessert: After a hearty dinner, this dessert shines with a drizzle of salted caramel or a few dollops of whipped cream. I often add toasted nuts on top for a bit of crunch and nuttiness. It’s my go-to for impressing guests without spending hours in the kitchen.
For Cozy Snacks: On chilly afternoons, I love pairing a generous slice with a mug of hot chocolate or even a chai tea latte. We’d curl up on the couch, savoring the cold cheesecake with the warm drink — an instant mood lifter.
One family ritual is to serve this cheesecake for birthdays — everybody always comments on that Oreo crust, how it elevates the whole experience. My kids fight over who gets the edges! It’s a small detail that brings a lot of joy around my table.
Top Tips for Perfecting Your Oreo Crust Cheesecake
Cookie Crumbs: Don’t rush on crushing the Oreos. The finer and more uniform the crumbs, the better the crust will hold. I learned the hard way that chunkier crumbs lead to a crumbly, break-apart crust.
Butter Magic: Melting the butter fully and mixing well ensures every crumb sticks together. If it feels dry, add just a little extra butter — but be mindful not to saturate it or the crust gets soggy.
Pressing The Crust: Using a flat-bottomed glass or measuring cup to press firmly is a game changer. I usually press the crust a bit up the sides in my pan — it helps with structure and makes slices less messy.
Filling Mixing: Don’t overbeat your cream cheese mixture, or you might get cracks on top after baking. Mix until just smooth and creamy with no lumps.
Baking Tips: Oven temps vary widely — keep an eye near 50 minutes and use the jiggle test for doneness (edges set, center wiggles). Baking in a water bath or covering halfway through baking helps maintain moisture and prevent cracking.
Swirl Customization: Adding Oreo dollops or a hint of chocolate ganache onto the filling before baking lets you personalize your cheesecake’s look and flavor. Try leaf or wave patterns — it’s fun and always impresses guests.
Glaze Variations: Whipping cream with powdered sugar is classic, but you can add a drop of vanilla or almond extract for a twist. If you’re feeling wild, try peanut butter glaze for that salty-sweet combo with Oreo.
After years of trial and error, I’ve found these small tweaks lift the cheesecake from good to unforgettable. Trust me, that perfect Oreo crust is worth the slight extra care!
Storing and Reheating Tips
Room Temperature: You can keep cheesecake at room temperature for about 2 hours covered loosely with foil or a cake dome to protect from drying out — perfect if you’re serving it immediately.
Refrigerator Storage: Store in an airtight container or with a well-fitted lid for up to 5 days. The cheesecake actually tastes better after a day or two when flavors meld. Just make sure to add the whipped glaze fresh or cover carefully to avoid it soaking in moisture.
Freezer Instructions: Wrap your cheesecake tightly in plastic wrap and then in foil. Freeze for up to 2 months. Thaw overnight in the fridge before serving — never microwave cheesecake, as it ruins the texture.
Glaze Timing Advice: If you plan to store cheesecake longer, add the glaze just before serving so it stays light and fresh, rather than weeping or melting into the filling during storage.
These tips have saved me from soggy crusts and sad slices more times than I can count. Taking a little extra time storing right means you get to enjoy every bite just as delicious as the day you made it.
Frequently Asked Questions
Final Thoughts
I’ve made this Oreo crust cheesecake so many times that I’ve lost count — and honestly, it never fails to wow everyone at my kitchen table. It’s the perfect combination of creamy, rich filling and that satisfyingly crunchy, chocolatey crust that just screams comfort. Whether you’re craving a late-night treat or want an effortless dessert that looks stunning, this recipe hits all the right notes. Plus, it brings a little nostalgic joy, reminding you of those simple pleasures like dunking Oreos in milk as a kid. If you’re game, try layering it with fruit or swirling chocolate ganache — the possibilities are endless. I’m hoping you’ll make some memories in your own kitchen with this one. Can’t wait to hear all about your delicious experiments — and hey, don’t forget to share your twists or drop a comment — happy baking!
Oreo crust
Ingredients
Main Ingredients
- 25 cookies Oreo cookies
- 5 tablespoons unsalted butter melted
Instructions
Preparation Steps
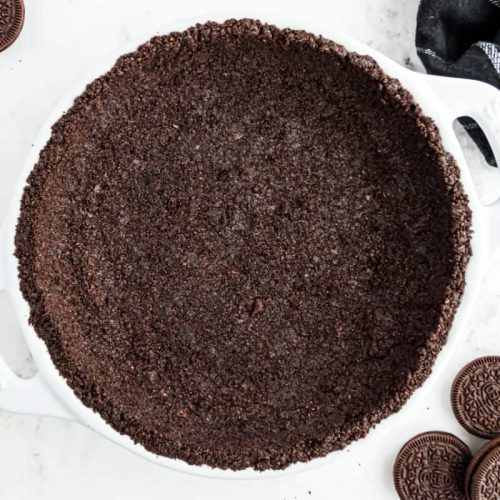
- Add Oreo cookies to a food processor and pulse until finely crushed into crumbs.
- Slowly drizzle in melted butter and pulse until the mixture is fully combined.
- Pour the mixture into your pie dish or pan.
- Press the crumbs evenly into the bottom and up the sides of the dish using the bottom of a measuring cup or glass.
- Refrigerate the crust for at least 1 hour to firm up before adding your filling.