There’s something so magically nostalgic about the smell of peppermint swirling through warm, freshly baked zucchini bread. I still remember the first time I added that cool, minty twist to my classic zucchini bread recipe—it was a happy accident born out of a peppermint extract mishap during the holidays. But honestly? It turned out to be a crowd-pleaser that my whole family fell head over heels for. If you’re like me and love the nostalgic chai of winter spices but crave a little refresher, peppermint gives that little zing that makes each bite feel like a cozy holiday cuddle. This zucchini bread isn’t your grandma’s plain loaf; it’s a joyful surprise of sweet, refreshing peppermint infused in moist, tender crumb. If you adore the way peppermint tea or peppermint bark fills the room with warmth and comfort, this recipe is just the ticket to bring that festive spirit into your kitchen all year round.
What is Peppermint Swirl Zucchini Bread?
So, what exactly is peppermint swirl zucchini bread? Think of it as the perfect marriage between vibrant, garden-fresh zucchini baked into a tender, moist loaf with a luscious swirl of peppermint-scented icing or filling threaded throughout. It’s essentially zucchini bread—with a cool peppermint twist that brightens every slice. Zucchini bread on its own has this wonderfully subtle sweetness and gentle texture, but adding peppermint? It lifts it into something celebratory, almost like a little party for your taste buds. The name “swirl” comes from how the peppermint glaze or cream cheese swirl is folded and marbleized through the loaf before baking or after for a festive visual and flavor pop. It’s a fun way to surprise friends and family who think they know zucchini bread, but haven’t experienced it with a peppermint pep yet!
Why you’ll love this recipe?
What I love most about this peppermint zucchini bread is how it balances being both familiar and fresh—like a warm hug and a cool breeze all at once. The peppermint flavor isn’t overpowering; it’s a gentle lift that makes every bite feel lively but still comforting. Plus, it’s so easy to make! I’m talking one bowl, minimal fuss, and you can even make it with ingredients you probably already have on hand. When life’s busy, this loaf is a lifesaver—crumbly, satisfying, and ready in under an hour of bake time. Oh, and it’s budget-friendly, especially if you’re already growing zucchini or have a stash in the fridge you want to use up. You can enjoy it plain or jazz it up with a peppermint glaze, nuts, or even chocolate chips. I even tried it with coconut milk once, and it made the bread extra creamy. Versatility? Check. Taste? Deliciously minty without being in-your-face. And if you’re a fan of classic pumpkin or banana bread, think of this as a cool seasonal cousin that’s just as cozy but with a fresh twist.
How do you make Zucchini Bread?
Quick Overview
This recipe comes together in no time and doesn’t require any fancy equipment. The magic happens when you mix tender shredded zucchini into a sweet batter, then swirl peppermint-flavored glaze through it before baking, or drizzle it on top once it cools. It’s straightforward but feels a bit special thanks to the peppermint punch. I always preheat my oven while prepping ingredients so everything flows smoothly. The result? A loaf with a moist crumb, subtle fresh veggie goodness, and just enough peppermint to brighten your day.
Ingredients
For the Main Batter:
- 2 cups grated zucchini (wrung dry to avoid sogginess) – I love using young, tender zucchini from my garden
- 1 ¾ cups all-purpose flour – works beautifully for a soft texture
- 1 tsp baking soda – helps the bread rise nicely
- ½ tsp baking powder – for a little extra lift
- ½ tsp salt – balances the sweet
- 1 tsp ground cinnamon – optional, but adds warmth
- 1 cup granulated sugar – feel free to reduce slightly if you prefer less sweet
- 1/3 cup vegetable oil – keeps it moist without heaviness
- 2 large eggs – brings the structure together
- 1 tsp vanilla extract – a classic flavor enhancer
- ½ tsp peppermint extract – my secret weapon for that fresh mint note
For the Filling:
- ½ cup powdered sugar – to keep the swirl sweet but not grainy
- 2 tbsp softened cream cheese or softened unsalted butter – adds richness to the swirl
- ¼ tsp peppermint extract – for that peppermint boost in every bite
- 1 tbsp milk (any kind) – to thin the filling for easier swirling
For the Glaze:
- 1 cup powdered sugar – sifted for smoothness
- 1 to 2 tsp peppermint extract – adjust for flavor intensity
- 1-2 tbsp milk or cream – to reach desired glaze consistency
- Optional: a few drops of green food coloring – for a festive touch
Step-by-Step Instructions
Step 1: Preheat & Prep Pan
Preheat your oven to 350°F (175°C). Grease a standard 9×5-inch loaf pan with butter or non-stick spray and line it with parchment paper if you want an effortless release. This is one step I never skip because nothing ruins a perfect loaf like having it stick to the pan. I also like to set my pan aside while I prep the batter—easy access and no last-minute scrambling.
Step 2: Mix Dry Ingredients
In a large bowl, whisk together the flour, baking soda, baking powder, salt, and cinnamon (if using). Mixing these first is crucial so everything is evenly distributed, which helps your bread bake uniformly. The texture should be clump-free and smell faintly of cinnamon, signaling you’re on the right track.
Step 3: Mix Wet Ingredients
In a separate bowl, beat together the sugar and oil until well combined. Then, add the eggs one at a time, beating after each addition. Stir in vanilla and peppermint extracts next. The batter will smell heavenly here—like a cool mint breeze with a whisper of sweetness. This is where I pause to taste a tiny dab (yes, it’s safe!)—trust me, it helps me decide if I want to punch up the peppermint a little more.
Step 4: Combine
Pour the wet ingredients into the dry and fold gently using a spatula or wooden spoon. You want to mix just until combined; a few small lumps are okay. Overmixing is the enemy here—it can make the bread dense instead of tender. Finally, fold in the grated zucchini, making sure it’s evenly dispersed but not smashed. The batter should be thick but moist and shiny.
Step 5: Prepare Filling
In a small bowl, beat the powdered sugar and cream cheese (or butter) together until creamy. Add peppermint extract and milk, one tablespoon at a time, until you get a spreadable consistency. This filling will create that beautiful, minty swirl, giving every bite a little surprise. I sometimes add crushed peppermint candies into the swirl for an extra crunch—optional but delightful!
Step 6: Layer & Swirl
Spoon half of the batter into your prepared pan. Dollop the peppermint filling in small spoonfuls over the batter. Then, top with the remaining batter. To create the swirl, run a butter knife or skewer through the batter in gentle figure-eight motions. Don’t overdo it—a few beautiful swirls are enough for that eye-catching marbled effect.
Step 7: Bake
Bake in the preheated oven for 50-60 minutes. Start checking at 50 minutes by inserting a toothpick in the center. If it comes out clean or with a few moist crumbs attached (but no wet batter!), it’s ready. Every oven’s a bit different, so trust your nose—when that peppermint-zucchini aroma fills your kitchen, you’re close!
Step 8: Cool & Glaze
Let the loaf cool in the pan for about 15 minutes, then transfer it to a wire rack. While still slightly warm, drizzle the peppermint glaze over the top. The glaze should be thick enough to cling but thin enough to drizzle smoothly—adjust with milk or powdered sugar as needed. The glaze adds the final festive gift of cool, minty sweetness that makes you want to slice again and again.
Step 9: Slice & Serve
Use a sharp serrated knife for clean slices, wiping the blade between cuts if needed to keep edges neat. This bread shines served slightly warm or at room temperature—perfect with a cup of coffee or a hot cocoa. If you’re hosting, arrange slices on a festive platter with a sprinkle of crushed peppermint candies on top for sparkle and texture. My kids actually ask for seconds when I serve it up this way!
What to Serve It With
For Breakfast: A comforting mug of black coffee or peppermint tea perfectly echoes the bread’s flavors. Serve slices with a bit of soft butter or cream cheese for a cozy morning treat that feels both indulgent and wholesome.
For Brunch: This loaf pairs gorgeously with fresh fruit and a light sparkling beverage, like a minty mojito mocktail or a simple lemon-infused agua fresca. Presentation-wise, slice it thick and stack on a pretty platter—your guests will be immediately enchanted.
As Dessert: Serve warmed with a dollop of whipped cream or vanilla ice cream for an easy, no-fuss sweet finish that really nails the peppermint vibe without being heavy. Drizzle homemade chocolate sauce or dust with cocoa powder to amp up the indulgence.
For Cozy Snacks: Nothing beats a thick slice with a hot chocolate topped with marshmallows, especially during chilly evenings. This loaf disappears in minutes in my house during such moments—it’s just that comforting!
Our family tradition is to whip this up during winter holidays but also in random “I need a cozy day” moments all year long. It’s a total mood lifter, honestly. The peppermint elevates the humble zucchini into something whimsical yet totally homey.
Top Tips for Perfecting Your Peppermint Swirl Zucchini Bread
Zucchini Prep: Always grate zucchini finely and squeeze out excess moisture using a clean kitchen towel or paper towels. This step is key to avoiding a soggy loaf. I learned the hard way that skipping this results in a dense, wet texture that doesn’t bake well.
Mixing Advice: Don’t overmix the batter after adding wet ingredients; fold gently to keep the bread tender and light. Look for a slightly lumpy batter—that’s your cue to stop. I’ve found that my bread stays soft and fluffy this way every time.
Swirl Customization: For a striking visual, try double swirling—add another dollop of peppermint filling mid-way through the top layer before your final swirl. If you like extra mint, carefully fold in some finely chopped fresh peppermint leaves, but don’t overpower that delicate balance.
Ingredient Swaps: I’ve subbed in half whole wheat flour for all-purpose with great results—adds a little nuttiness and extra fiber. You can swap vegetable oil for melted coconut oil for a tropical twist, just be aware it slightly alters the flavor. For eggs, flax eggs work fine but the texture turns a bit denser.
Baking Tips: Position your loaf in the middle rack for even heat circulation. If your oven runs hot, tent the loaf with foil midway to prevent over-browning. The toothpick test is your best friend—overbaking dries the loaf, and underbaking leaves it gummy.
Glaze Variations: If you want a thinner glaze that drips beautifully, add more milk a teaspoon at a time. For a thicker frosting-like finish, add powdered sugar instead. Try a half-and-half mix of peppermint and vanilla extract for a more complex aroma. And the green food gel? Totally optional but makes it festive for winter.
I’ve learned, after countless batches, that trusting your instincts and tasting as you go are the biggest game changers here. That one extra drop of peppermint or a bit more sugar can really make the loaf sing.
Storing and Reheating Tips
Room Temperature: Keep the loaf wrapped tightly in plastic wrap or stored in an airtight container. It will stay fresh for 2-3 days, but honestly, ours never lasts that long!
Refrigerator Storage: Pop leftovers in an airtight container or wrap well with foil—good for up to a week. The cooler temperature actually helps preserve the peppermint flavor longer. Just bring to room temp before serving for perfect softness.
Freezer Instructions: Slice the bread before freezing for easy grab-and-go portions. Wrap each slice in plastic wrap then place in a zip-top bag or freezer-safe box. Frozen bread keeps for up to 3 months. Thaw slices overnight in the fridge or on the counter, then warm gently in the microwave or toaster oven.
Glaze Timing Advice: If freezing, I recommend glazing after thawing to keep the glaze from becoming tacky or cracking. For short-term storage, glaze while still slightly warm and cover loosely once set.
We’ve found that proper wrapping and avoiding moisture in the container are key to keeping that tender, fresh taste intact. Once I started freezing slices, it became my secret weapon for quick afternoon snacks without the mess.
Frequently Asked Questions
Final Thoughts
This peppermint swirl zucchini bread has become such a treasured recipe in my kitchen—warm, comforting, with a surprisingly refreshing spin that never fails to delight. It’s proof that simple, everyday ingredients can turn into something special when you add a little creativity and a personal touch. Whether you’re using up that garden zucchini or just want a unique bread to brighten your day, this loaf won’t disappoint. I’d love for you to try it and tweak it your way—don’t be shy to share in the comments what peppermint experimentations or additions you come up with! Happy baking, and may your kitchen be filled with warmth, minty freshness, and plenty of happy memories.
peppermint
Ingredients
Main Ingredients
- 12 ounces semi-sweet chocolate chips
- 0.75 cup heavy whipping cream
- 0.25 cup peppermint mocha flavored coffee creamer See note for alternatives
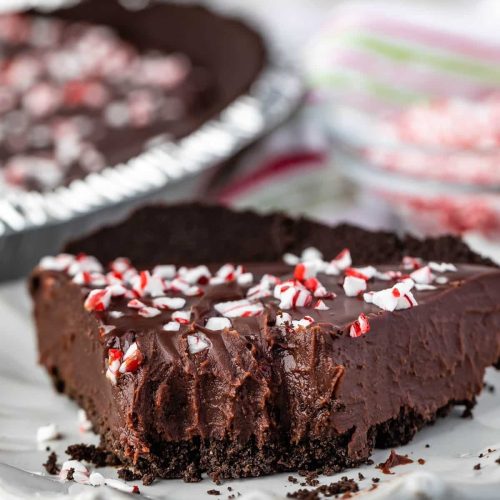
- 2.5 candy canes crushed candy canes For garnish
- 1 9-inch Oreo pie crust Homemade or store-bought
Instructions
Preparation Steps
- Heat the heavy whipping cream and peppermint mocha creamer in a microwave-safe bowl until very hot but not boiling, about 90 seconds.
- Place chocolate chips in a medium bowl and pour the hot cream mixture over the top. Let sit for 30 seconds, then whisk until smooth and thick.
- Pour the ganache into the Oreo pie crust and sprinkle with crushed candy canes. Chill in the refrigerator until set, at least 4 hours.
- Let the pie sit at room temperature for 10 minutes before serving for easier slicing.