Nothing quite beats the comfort of a classic red velvet cake, am I right? But sometimes, when you’re craving that creamy, chocolaty-sweet magic, baking an entire cake feels like overkill. That’s where these red velvet cake balls come into play — a bite-sized treasure that’s as delightful as the full slice but way easier to pop into your mouth without guilt. I first made these for a holiday party, and trust me, they vanished in minutes. The rich, velvety crumb combined with the tangy cream cheese coating? Pure happiness. If you love red velvet cake but want something quick, playful, and shareable, these little cake balls are absolute winners. Plus, they’re fantastic for family gatherings, potlucks, or even those late-night sweet tooth attacks when you don’t want to fuss over fancy baking.
What is Red Velvet Cake Balls?
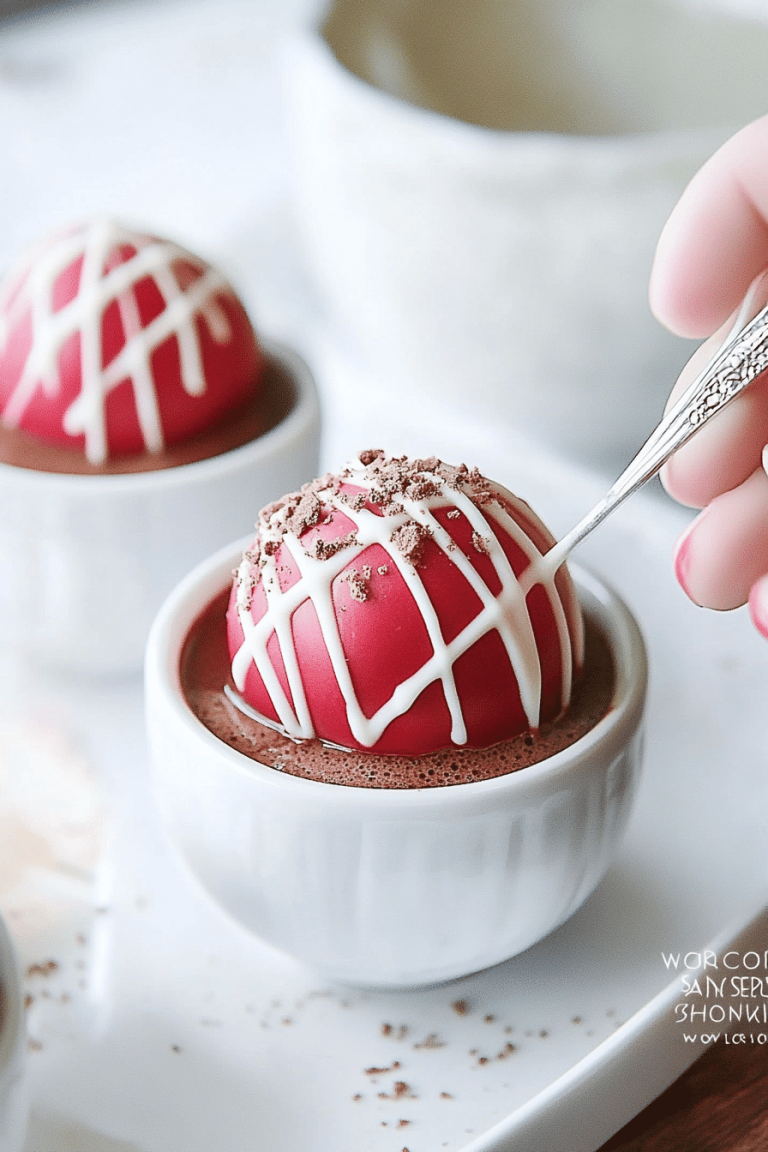
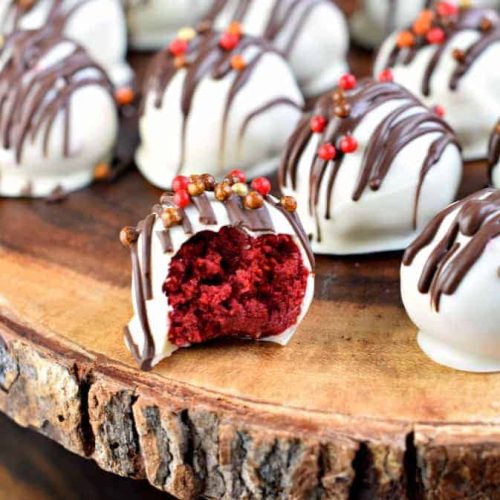
Think of red velvet cake balls as the adorable, more portable cousin of your traditional red velvet cake. Essentially, you bake a luscious red velvet cake, crumble it up, mix it with cream cheese frosting, and then mold it into neat little balls. After that, they take a dip in a creamy glaze—usually cream cheese or white chocolate—and voilà, you have bite-sized pockets of joy! The name itself is pretty straightforward—“red velvet” for that signature rich, red-hued chocolate cake flavor, and “cake balls” because, well, that’s exactly what they are: cake shaped into balls. It’s a fun twist on cake pops but without the sticks, so you get all the flavor and none of the fuss. If you’ve ever made cake truffles, you’re basically in the same ballpark here, making it approachable even if you’re new to baking.
Why you’ll love this recipe?
What I love most about these red velvet cake balls is how insanely delicious and deceptively simple they are. The flavor nails that classic red velvet taste — subtle cocoa with a tangy zing from the cream cheese — but in a cool new form. It’s like your favorite cake and frosting danced together and got a tiny makeover. The best part? This recipe is surprisingly easy so you don’t have to spend a whole day in the kitchen. No long decorating sessions, no messing around with layers or crumb coating. Just mix, shape, chill, and dip. Plus, it’s way more cost-efficient than buying fancy dessert trays. You can keep ingredients on hand from your pantry and fridge, and you’ll still look like a pro baker at your next get-together. And versatility? Oh yeah — you can switch up the glaze with white chocolate, dark chocolate, or even a sprinkle of cinnamon sugar for a cozy twist. To be honest, I sometimes swap the cream cheese frosting with a whipped ganache if I’m feeling decadent. Red velvet cake balls have become my go-to when I want a special treat but don’t have time for a full cake. Honestly, my kids ask for these all the time, which says a lot since they’re pretty picky about sweets.
How do I make Red Velvet Cake Balls?
Quick Overview
Making these cake balls is easier than it looks. You start by baking a simple red velvet cake — you can use a boxed mix if you’re in a pinch or make it from scratch if you’re feeling fancy. Once it’s cooled, crumble it up and mix it well with your cream cheese frosting until it becomes a sticky, moldable dough. Then, you roll that dough into bite-sized balls and chill them so they firm up. Finally, dip each ball into a glaze and let it set. The whole process is straightforward, doesn’t require extravagant tools, and lends itself to some serious kitchen fun. I always do this when I want a quick but festive dessert for friends or family.
Ingredients
For the Main Batter:
- 2 ½ cups all-purpose flour (freshly sifted for best texture)
- 1 ½ cups granulated sugar
- 1 teaspoon baking powder
- 1 teaspoon baking soda
- 1 teaspoon salt
- 1 teaspoon unsweetened cocoa powder (the tiny chocolate undertone sets it apart)
- 1 ½ cups vegetable oil or melted butter (I prefer oil for moisture)
- 1 cup buttermilk (or sour milk; it adds that tang and helps the crumb)
- 2 large eggs (room temperature for fluffiness)
- 2 tablespoons red food coloring (don’t skimp—this is red velvet!)
- 1 teaspoon vanilla extract
- 1 teaspoon white vinegar (it balances the sweetness and enhances color)
For the Filling:
- 8 oz cream cheese, softened (full fat is your friend here)
- ½ cup unsalted butter, softened
- 2 ½ cups powdered sugar, sifted (to avoid lumps)
- 1 teaspoon vanilla extract
For the Glaze:
- 12 oz white chocolate chips or melting wafers (for that beautiful, smooth coating)
- 1 tablespoon vegetable shortening or coconut oil (to thin the glaze)
- Optional: red sanding sugar or sprinkles for decoration
Step-by-Step Instructions
Step 1: Preheat & Prep Pan
Start by preheating your oven to 350°F (175°C). Grease two 8-inch cake pans with butter or non-stick spray and lightly dust with flour, tapping out the excess. Using parchment paper rounds at the bottom helps with easy removal — trust me, this saves a lot of stress later. While the oven warms, you can prep your dry ingredients next.
Step 2: Mix Dry Ingredients
In a large bowl, sift together the flour, cocoa powder, baking powder, baking soda, salt, and sugar. Give it a good whisk to combine evenly; this step ensures you don’t get any unwanted clumps or uneven rising. I learned the hard way that skipping this makes crumb texture less consistent.
Step 3: Mix Wet Ingredients
In a separate bowl, whisk the oil, buttermilk, eggs, red food dye, vanilla, and vinegar until fully blended. The batter should have that vibrant red hue — a telltale sign you’re on the right track. Always mix until just combined for a tender crumb.
Step 4: Combine
Slowly pour the wet ingredients into the dry, folding gently with a spatula. Avoid overmixing – you want a few streaks of batter remaining. Overmixing can give you a denser cake instead of that soft, melt-in-your-mouth crumb we’re after. Fold until the batter is smooth and evenly red.
Step 5: Prepare Filling
While the cake bakes, beat together the softened cream cheese and butter until creamy and smooth. Gradually add powdered sugar and vanilla, beating on medium until fully combined and fluffy. If the frosting feels too thick, a teaspoon of milk makes it easier to mix in the cake without crumbling.
Step 6: Layer & Swirl
Pop the batter evenly into the prepared pans and bake for 30-35 minutes, or until a toothpick inserted in the center comes out mostly clean with a few moist crumbs attached—don’t overbake! The swirl part is more metaphorical here; if you’re making the glaze with colored sprinkles or topping, that’s where the fun happens.
Step 7: Bake
Once baked, remove the cakes to a wire rack and let them cool completely. This step is crucial; warm cake mixes poorly with cream cheese and makes the dough too sticky and hard to handle. I always try to make the cake the day before, so it’s perfectly set.
Step 8: Cool & Glaze
Crumble the cooled cake into fine crumbs using your hands or a food processor, then mix in the cream cheese frosting thoroughly with a fork or spatula until the texture feels like stiff cookie dough. Roll the mixture into walnut-sized balls and place on a parchment-lined tray. Chill for at least an hour—they hold their shape better this way. Melt your white chocolate with shortening until smooth, then dip each ball quickly into the glaze, letting excess drip off, and set back on parchment. Decorate quickly if desired, then chill again until firm.
Step 9: Slice & Serve
Since these are bite-sized, slicing isn’t necessary—but if you’re making larger truffle-sized portions, a quick cut on a warm knife makes serving neat. Serve chilled or at room temperature for the best texture. They look lovely arranged on a pretty platter and the contrast of deep red inside with glossy white outside is a crowd-pleaser every time.
What to Serve It With
For Breakfast: Pair these red velvet cake balls with your morning coffee or a smooth latte. Their sweetness is just right to brighten your day without feeling heavy. I sometimes put them beside a bowl of fresh berries and Greek yogurt for a little balance.
For Brunch: These little treats are perfect alongside a mimosa or sparkling iced tea. Arrange them on a tiered stand with finger sandwiches and fresh fruit for a fun, festive spread. They add a splash of color and elegance without stealing the spotlight from savory dishes.
As Dessert: They shine after dinner with a scoop of vanilla ice cream or a drizzle of chocolate sauce. Sometimes I serve them with fresh mint leaves and a dusting of powdered sugar to make it feel extra special. The tang of cream cheese glaze cuts through the richness, so your guests never feel weighed down.
For Cozy Snacks: Nothing beats these warm from the fridge on a quiet afternoon. A cup of hot cocoa or even a chai latte is a wonderful companion for these bites. When my family has movie nights, these cake balls are the go-to sweet that disappear almost immediately.
Top Tips for Perfecting Your Red Velvet Cake Balls
Cake Prep: Make sure your cake is completely cool before crumbling; warm cake makes this messy and sticky. I learned this the hard way, and it makes all the difference.
Mixing Advice: When combining batter, gently fold rather than vigorously stir. Overmixing activates gluten and toughens the crumb—red velvet is famously tender, so preserve that texture!
Rolling Consistency: Your cake and frosting mixture should feel like play dough. If it’s crumbly, add a bit more frosting. If it’s too sticky, refrigerate longer. I often chill the bowl for 15 minutes before rolling to prevent sticking.
Customization of Glaze: If you want a more decadent coating, try melting dark chocolate instead of white. Adding a tablespoon of coconut oil makes the glaze silky smooth and less prone to cracking.
Decorative Swirls & Sprinkles: For that festive look, sprinkle crushed nuts, freeze-dried raspberry bits, or even edible glitter immediately after dipping before the glaze sets. My kids adore this step as part of the fun.
Ingredient Substitutions: I’ve swapped buttermilk with almond milk plus a squeeze of lemon juice — it made the crumb even moister! You can swap cream cheese for mascarpone in the filling for a French twist, but keep the sugar the same.
Baking Notes: Not all ovens bake evenly. I rotate pans halfway through baking to avoid uneven rising or burning. Also, use an oven thermometer if you can — you’d be surprised at how many ovens run hotter than they say!
Storing and Reheating Tips
Room Temperature: These cake balls can be kept in an airtight container on the counter for up to 2 days. Just keep them out of direct sunlight and heat so the glaze doesn’t melt. Bringing them back to room temp before eating softens that glaze beautifully.
Refrigerator Storage: Store them in a sealed container lined with parchment paper to prevent sticking. They stay fresh for about a week this way. I always chill them overnight to let flavors meld before serving.
Freezer Instructions: Freeze cake balls in a single layer on parchment-lined trays, then transfer to freezer bags. They’ll keep for up to 3 months. Thaw in the fridge overnight and bring to room temperature before serving for best texture. You can also pop them in the fridge for 30 minutes to firm up before dipping in glaze.
Glaze Timing Advice: For storage without glaze, keep the cake balls uncoated in the fridge or freezer, then dip just before serving. This keeps them fresh longer and prevents glazing from cracking or sweating if stored too long.
Frequently Asked Questions
Final Thoughts
Honestly, red velvet cake balls have become a pinch-me-I-can’t-believe-it treat in my kitchen. They bring all the nostalgic flavors of a good red velvet cake but in a fun-sized form that’s perfect for sharing (or not, no judgment!). From the moment you walk into your kitchen and smell the cocoa and vinegar mingling, you know you’re in for something special. This recipe is so forgiving and adaptable that you can tweak it for any occasion or mood. If you love sinking your teeth into something cozy yet festive, these cake balls deliver every single time. Definitely give them a try, and do share how you customize yours — I can’t wait to hear about your favorite twists. Happy baking, friend!
red velvet cake balls
Ingredients
Main Ingredients
- 16.5 oz Red Velvet Cake mix (box) Includes ingredients to bake 13x9 cake
- 1 cup canned cream cheese frosting
- 16 oz Ghirardelli white chocolate melting wafers
- 0.5 cup Ghirardelli dark chocolate melting wafers melted
- unit sprinkles optional
Instructions
Preparation Steps
- Prepare cake according to package directions for a 13x9 baking dish. Allow to cool slightly.
- Dump cake into a bowl, and crumble with your hands. Mix in the 1 cup of canned cream cheese frosting.
- Line a baking sheet with parchment paper. Using your hands, roll cake into 1.5 to 2 inch sized balls. Repeat with remaining cake.
- Freeze cake balls for one hour.
- When ready to dip, melt white chocolate according to package directions. Using a toothpick, press into cake ball and dunk in white chocolate. Tap on side of bowl to remove excess. Slide off of toothpick (using a second toothpick) and drop onto parchment paper. Repeat for remaining cake balls.
- Drizzle with melted dark chocolate and immediately add sprinkles, if desired.
- Store in airtight container in the refrigerator until ready to eat, up to 3 days for best flavor!