There’s something truly magical about the smell of simmering sugar and chocolate that instantly whisks me back to my grandma’s cozy kitchen. I remember watching her patiently stir her famous fudge recipe, the rich aroma filling every corner of the house on chilly winter afternoons. This fudge isn’t just candy—it’s a warm hug wrapped in a sweet bite, the kind that’s been loved across generations in my family. If you’ve ever fussed over tempering chocolate or fiddled with complicated recipes that demand endless ingredients, this fudge recipe will feel like a breath of fresh air. It’s incredibly simple, surprisingly forgiving, and melts in your mouth with that perfect creamy texture. Honestly, it’s a little sweeter and easier than your typical brownie but just pure, indulgent happiness in every bite.
What is Grandma’s classic chocolate fudge?
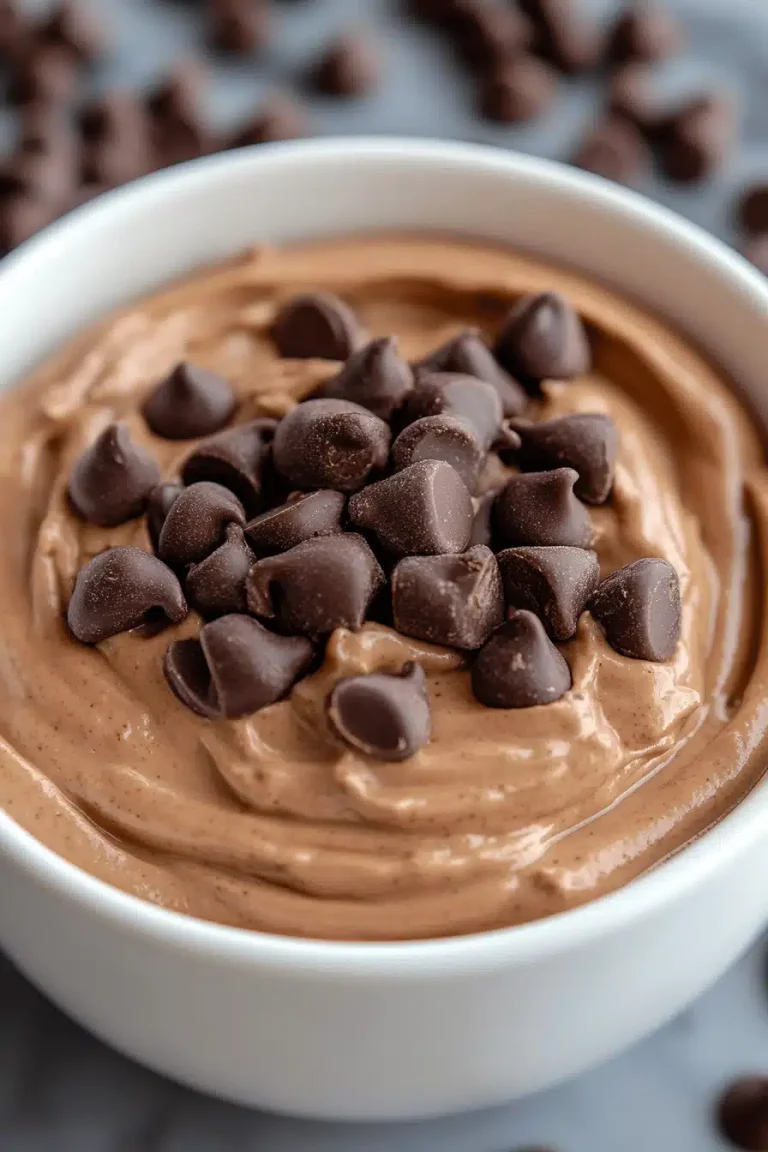
Think of fudge as the sweeter, softer cousin of candy bars—rich, creamy, and chewy all at once. This version is essentially a smooth mixture of melted chocolate, condensed milk, and butter, that sets into a dense, melt-in-your-mouth treat. The term “fudge” actually dates back to the late 19th century when candy makers began experimenting with combinations of sugar and cream to create something smoother than a traditional caramel or toffee. Grandma’s version takes those old-school roots and adds a little modern twist, like that subtle hint of vanilla and just a pinch of salt to balance out the sweetness.
It’s super accessible, which is why so many people make fudge during the holidays—but trust me, you don’t need a special occasion to enjoy it. Whenever you’re craving a quick, homemade sweet fix that doesn’t need baking or fancy equipment, this fudge recipe is your go-to. It’s also great if you’re just starting to dip your toes into homemade chocolates—it handles like a dream! I always keep a batch ready when friends pop over, because it’s that kind of treat everyone loves.
Why you’ll love this recipe?
What I love most about this fudge recipe is how effortlessly it hits every note of comfort and indulgence. Let’s talk flavor—rich, silky chocolate that’s not too bitter and not too sweet. It’s just right, like the perfect chocolate chip cookie that hits every craving. The smoothness comes from using sweetened condensed milk, which also means you’re only mixing a handful of ingredients that you probably already have.
Then there’s the simplicity. I swear, you don’t need a candy thermometer or to stand over a hot stove for hours. One pot, a quick stir, and you’re almost done—that’s my kind of cooking after a long day. I’ve made this fudge countless times, and every batch turns out perfectly smooth with that classic, slightly grainy texture just enough to remind you it’s homemade. Believe me, I’ve messed up a few tries in the early days by overheating the sugar or using low-quality chocolate—lesson learned! Now I stick to good-quality bittersweet or semi-sweet chocolate bars and that magic sweetened condensed milk, and everything just clicks.
This recipe is also budget-friendly, which is rare for such a luscious treat. You’re not buying fancy chocolate truffles or imported cocoa powders—just basics you can grab at any grocery store. Plus, fudge is incredibly versatile. I’ve jazzed it up with nuts, swirls of peanut butter, or even a dash of espresso powder for a grown-up twist. It’s a true crowd-pleaser, whether you cut it into tiny squares for a party platter or wrap pieces up as homemade gifts for neighbors. If you’re a fan of rich, no-fuss desserts like caramel sauce or peanut butter cups, this fudge will feel right at home in your dessert repertoire.
How do I make Grandma’s Chocolate Fudge?
Quick Overview
This fudge comes together in one pot on the stove and doesn’t require baking, which is a lifesaver when you want something sweet but don’t want to heat up the whole kitchen. Basically, you melt chocolate and butter with sweetened condensed milk, stir until silky, then pour it into a pan to chill and set. The beauty here is in the ease and the rich chocolate flavor that comes through every time. While some fudge recipes can be intimidating—watching sugar crystals, candy thermometers, and timing—a few simple tips and this method get you that creamy, dreamy fudge without stress.
Ingredients
For the Main Batter:
- 12 ounces good-quality semi-sweet or bittersweet chocolate (chopped or chips) – I always use a bar and chop it myself for better melting control.
- 1 (14 oz) can sweetened condensed milk – this is the secret to that creamy texture and perfect sweetness.
- 4 tablespoons unsalted butter – adds that buttery richness.
- 1 teaspoon pure vanilla extract – trust me, it brightens the whole batch.
- A pinch of fine sea salt – to balance the sweetness just right.
For the Filling (Optional):
- ½ cup chopped walnuts or pecans – for a delightful crunch.
- 2 tablespoons peanut butter – swirl it for a nutty surprise.
- 1 teaspoon espresso powder – if you want a mocha kick.
- Sprinkles or mini marshmallows – fun additions for the kids.
For the Glaze (Optional):
- 2 ounces dark chocolate – melted for drizzling.
- 1 tablespoon heavy cream – for a smooth, shiny finish.
- Coconut flakes or crushed peppermint candies – for sparkle and festive vibes.
Step-by-Step Instructions
Step 1: Preheat & Prep Pan
Start by lightly greasing an 8×8-inch pan with butter or lining it with parchment paper—this makes removing the fudge way easier later. No need to preheat an oven here, which is a relief on hot days. Set this aside so it’s ready once your fudge base is prepared.
Step 2: Mix Dry Ingredients
If you’re adding chunks like nuts or espresso powder, have those ready, but the main dry part here is the salt. Mixing the salt into the dry chocolate chips or chopped chocolate helps distribute flavor evenly when everything melts together.
Step 3: Mix Wet Ingredients
Measure your sweetened condensed milk and vanilla extract. You’ll add these to the pot with the butter. The butter and condensed milk melt together creating a smooth base to blend into that lovely chocolate. I always keep the can of condensed milk handy because fresh or different brands can vary in sweetness and thickness. It’s worth trying different ones until you find your favorite!
Step 4: Combine
In a medium saucepan over low heat, combine the butter and sweetened condensed milk until melted and smooth—stir frequently to avoid scorching. Remove from heat and stir in the chopped chocolate until fully melted and silky. Quick tip: if your chocolate looks a little grainy, just let it sit off the heat for a minute and then stir again—it’ll smooth right out.
Step 5: Prepare Filling
If you want to mix in nuts or peanut butter, stir them gently into the fudge batter now. Swirling peanut butter just before pouring gives that pretty marbled effect—use a skewer or knife to create gentle whirls. This step is where you get to customize the classic fudge into something a little more exciting.
Step 6: Layer & Swirl
Pour half the fudge mixture into your prepared pan. If swirling peanut butter or other layers, add half now, then dollop on the peanut buttery bit or nuts, then pour the rest over the top. Use a butter knife or skewer to swirl gently—this not only looks gorgeous but gives you delightful bursts of flavor in every piece.
Step 7: Bake
No baking here! Instead, set the pan in the fridge or at room temperature and let it set for at least 2 hours, or until firm enough to cut. Patience is key—it’s tempting to slice early, but fudge needs that chill time to get its signature texture. If you’re in a hurry, 90 minutes in the fridge usually does the trick, but the longer, the better.
Step 8: Cool & Glaze
Once the fudge is firm, gently remove it from the pan using the parchment edges or a small offset spatula. If you’re adding a glaze, melt dark chocolate with a splash of cream, then drizzle over the top. I love sprinkling some crushed peppermint or toasted coconut on this while the glaze is still wet—makes it feel like a special holiday treat any time of year.
Step 9: Slice & Serve
Use a sharp knife, wiping it off between cuts so the slices stay clean and pretty. I like to make mine small because fudge is rich—tiny squares go a long way. Serve at room temperature for that perfect melt-in-your-mouth moment. It pairs beautifully with a bold cup of coffee or a cold glass of milk.
What to Serve It With
For Breakfast: Fudge for breakfast might sound wild, but when you slice just a tiny square alongside a strong black coffee or homemade latte, it feels like a special weekend treat. The rich chocolate paired with a robust cup always perks me right up.
For Brunch: Set out fudge squares with fresh fruit, a cheese platter, and sparkling water or a mimosa. The sweet fudge offers a nice contrast if you’re serving savory dishes like quiche or frittata. It’s a little something sweet that rounds out the meal elegantly without overdoing it.
As Dessert: Fudge is a classic after-dinner nibble. Try pairing it with fresh berries or a dollop of whipped cream. For dinner parties, I’ll sometimes add a thin spoonful of sea salt caramel sauce alongside for an indulgent touch that’s always a hit.
For Cozy Snacks: Nothing beats a chilly evening with a mug of hot chocolate and a plate of fudge. My kids and I love having these unwrapped for quick snacks—they disappear fast! The rich chocolate and creamy texture feel like a warm blanket, especially when paired with a good book or movie night.
Top Tips for Perfecting Your Grandma’s Classic Chocolate Fudge
Chocolate Quality: Use the best you can afford—cheap baking chips often include stabilizers that don’t melt well, giving a chalky texture. I learned this the hard way one year when my fudge turned grainy and crumbly.
Melting Method: Patience is key. Low and slow on the stove top works best. Avoid boiling or high heat which can curdle the condensed milk or scorch the chocolate. If you ever see little clumps, remove from heat and keep stirring gently until smooth again.
Mixing Tip: Stir gently but consistently. Overmixing can break the chocolate’s shine and make fudge lose that velvety feel—once everything is combined, resist the urge to keep stirring.
Swirling Technique: For beautiful marbling, dollop the secondary flavor (peanut butter, caramel, or nuts) in small spoonfuls evenly. Drag a thin skewer or blunt knife in slow, circling motions—don’t overdo it or the flavors will blend too much, losing the visual contrast.
Ingredient Swaps: I’ve tried almond milk instead of condensed milk, but the consistency was a bit off. If you can find sweetened condensed coconut milk, that works as a great dairy-free option. Also, swapping out nuts for dried cherries or toffee bits adds lovely texture and flavor twists.
Baking and Setting: Always let fudge set fully, ideally overnight. I’ve cut it too early before and it just squished or crumbled. If your kitchen’s warm, stick it in the fridge until firm.
Glaze Variations: You can skip the glaze altogether or swap it for a dusting of cocoa powder or powdered sugar for a lighter touch. For a festive touch, add edible glitter or colored sugar crystals while the glaze is still tacky.
Storing and Reheating Tips
Room Temperature: Keep your fudge in an airtight container on the counter for up to 3 days. I usually place wax or parchment paper between layers so the pieces don’t stick, especially when storing bulk batches for gifts.
Refrigerator Storage: Store in a sealed container or tightly wrapped with plastic wrap to avoid absorbing fridge odors. It should last up to 2 weeks this way. Just allow it to come to room temperature before serving so it softens up.
Freezer Instructions: Fudge freezes beautifully. I cut it into squares, then wrap each in plastic wrap, placing them in an airtight container or freezer bag. It maintains flavor and texture up to 3 months. Thaw overnight in the fridge and then bring to room temperature.
Glaze Timing Advice: Wait to add glaze until right before serving if you’re storing fudge long-term. Otherwise, glaze can harden and crack during storage, especially if refrigerated or frozen.
Frequently Asked Questions
Final Thoughts
This fudge recipe truly holds a special place in my heart—not just because it tastes heavenly but because it’s the kind of recipe that brings people together. Whether it’s holiday season or just a random cozy night, the smooth chocolate and the sweet, buttery richness always make everyone pause and smile. It’s approachable, quick, and lends itself to all kinds of creative tweaks, so you can make it uniquely yours if you want. I’m honestly excited every time I whip up a batch, and the reaction from family and friends never gets old—they always ask when I’m making more.
If you love this, you might want to explore other classic homemade treats like caramel sauce or no-bake peanut butter bars that share a similar homey vibe. And hey, don’t be shy—drop a comment if you try the recipe, share how you customized it, or just say hi! I can’t wait to hear how your fudge turns out. Happy indulging!
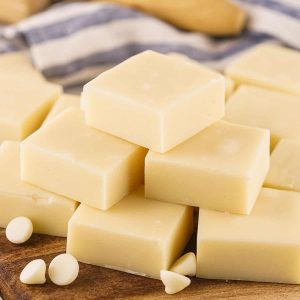
vanilla fudge recipe
Ingredients
Main Ingredients
- 14 oz sweetened condensed milk
- 12 oz semi-sweet white chocolate chips
Instructions
Preparation Steps
- Line an 8x8-inch pan with parchment paper and set it aside.
- Place the white chocolate chips in a microwave-safe bowl and microwave on high for 1 minute.
- Add the sweetened condensed milk to the melted chocolate chips and microwave for another minute until smooth. Stir thoroughly to combine.
- Pour the mixture into the prepared pan and spread evenly. Tap the pan gently on the counter to flatten the surface.
- Refrigerate for 4 hours or until the fudge is set.
- Slice into 1-inch pieces and enjoy your creamy vanilla fudge.