There’s something utterly nostalgic about cracking open a deviled egg, the tangy bite of the filling against the creamy, cool white—like a little treasure that instantly takes me back to summer picnics with my grandparents. Honestly, deviled eggs are one of those simple delights that never go out of style. I remember my mom making them for every holiday, and no matter how many other dishes filled the table, those eggs vanished first. If you’ve ever loved good old-fashioned egg salad, you’ll find deviled eggs just as comforting, but with that special kick that feels like an upgrade. This recipe? It’s my go-to, foolproof version that’s creamy, zesty, and just the right touch of indulgence without being fussy. Trust me, you’ll want these at your next gathering or even just as a little snack that everyone fights over.
What is a Deviled Egg?
Think of deviled eggs as the tiny, flavorful cousins of hard-boiled eggs. It’s essentially eggs sliced in half with their yolks scooped out, then mixed with a creamy, tangy filling before being carefully spooned or piped back in. The term “deviled” hails from a spicy 18th-century culinary tradition where “deviling” meant adding a little heat or zest, usually with mustard, pepper, or chili. These bite-size delights are popular at potlucks, picnics, and pretty much anywhere finger foods rock. They’re approachable, quick to make, and endlessly customizable, so you really can make them your own. To me, deviled eggs are like the perfect balance of creamy and tangy, a little nostalgic, and a touch elegant all rolled into one.
Why you’ll love this recipe?
What I love most about this deviled eggs recipe is how wildly easy it is to whip up, but how stunning it looks and tastes when you serve it. The filling is rich and velvety thanks to the perfect blend of mayo and a touch of sharp mustard, with a little vinegar for brightness. It’s enough to keep things classic but flexible enough to tweak if you’re feeling adventurous. I’ve made this countless times for everything from casual family dinners to holiday spreads, and it always disappears in minutes—no kidding, even the kids ask for seconds.
Also, this recipe is super budget-friendly. Eggs are affordable and packed with protein, making it feel like you’re gifting your family a cozy, satisfying snack without needing to splurge. Plus, it’s a brilliant way to get a little fancy with a humble ingredient. Versatility? Absolutely. You can sprinkle paprika for that traditional look and smoky note or switch things up with diced pickles, crumbled bacon, or fresh herbs. The base is your palette.
If you enjoy other signature classic bites like spinach artichoke dip or stuffed mushrooms, this hits the same comfort note but with less fuss and totally made-for-your-hands goodness. Plus, the flavor is bright without being over-the-top, which I appreciate because sometimes simple really is best.
How do you make a Deviled Egg?
Quick Overview
Making deviled eggs is one of those “kid from college dorm kitchen” friendly recipes that even fancy chefs wouldn’t mind stealing. You start by boiling the eggs just right (firm whites, creamy yolks), then you scoop out the yolks to create the filling. Mix that with mayo, mustard, and a few secret touches, then pipe it back into the whites. It takes less than 30 minutes from start to finish and the results? Creamy, flavorful bites that bring smiles. I always prefer piping over spoons because it feels a little fancy, but a spoon works just fine—whatever makes you feel good in the moment.
Ingredients
For the Eggs:
- 6 large eggs (choose organic or free-range for the best flavor and texture) (choose organic or free-range for
- Water (for boiling)
For the Filling:
- 3 tablespoons mayonnaise (I recommend a good-quality mayo, or you can try half mayo and half Greek yogurt for tang)
- 1 teaspoon Dijon mustard (adds a gentle tangy heat)
- 1 teaspoon white vinegar or freshly squeezed lemon juice (for the bright pop)
- Salt and pepper to taste (start small; you can always add more)
- Optional: pinch of smoked paprika, a dash of hot sauce, or a little minced dill pickle for extra flavor
For the Garnish:
- Smoked paprika (classic choice)
- Fresh chives or parsley, finely chopped
- Optional crispy bacon bits or a sprinkle of everything bagel seasoning
Step-by-Step Instructions
Step 1: Boil the Eggs
Start with eggs straight from the fridge and place them in a single layer at the bottom of a pot. Cover with cold water by about an inch or two. Bring the water to a gentle boil over medium-high heat. Once boiling, immediately turn off the heat, cover the pot with a lid, and let the eggs sit for 12-14 minutes—I learned this timed-steaming trick after a million overcooked yolks messing up my filling! When time’s up, plunge the eggs into an ice bath for at least 5 minutes to stop the cooking and make peeling easier.
Step 2: Peel the Eggs
Peeling can be tricky, but I swear by cracking the shell gently on all sides, then rolling it to loosen, and peeling under a slow-running cold tap. This slows the shell from sticking and keeps the whites pristine for filling. No one wants a lumpy egg white, trust me.
Step 3: Prepare the Yolks
Slice each egg in half lengthwise. Gently scoop out the yolks into a bowl. The whites will be your little boats—don’t toss those shells; they’re key to presentation.
Step 4: Mix the Filling
Mash the yolks with a fork until crumbly. Add mayo, mustard, vinegar (or lemon juice), salt, and pepper. Stir until smooth and creamy. Your filling should be soft enough to pipe easily but not runny—think fluffy cloud, not soup. I always taste at this point and adjust salt or mustard—it makes a world of difference.
Step 5: Fill the Egg Whites
Transfer the filling to a piping bag with a star tip for that pretty swirl, or just use a spoon to dollop the mixture into each egg white half. I find piping a bit more fun and fancy, but honesty, spooning works just as well if you’re making a big batch or short on time.
Step 6: Garnish
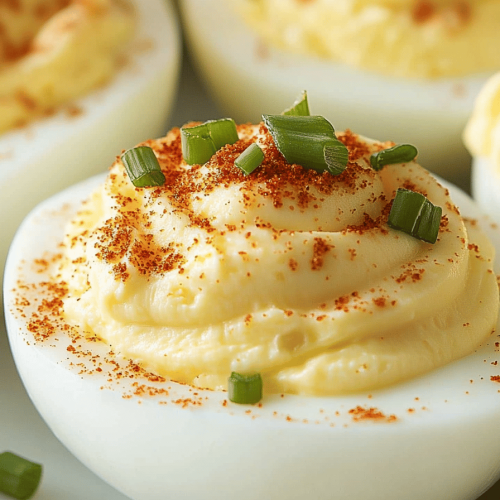
Sprinkle with smoked paprika for that lovely red dusting and some fresh herbs—chives are my favorite. Sometimes I add crispy bacon here for an irresistible crunch. It gives the deviled eggs a grown-up, savory punch that’s hard to resist.
Step 7: Chill Before Serving
Pop your deviled eggs into the fridge for at least 20 minutes before serving—it helps the flavors marry and the filling firm up a bit. Plus, cold deviled eggs taste the best on a warm day, like a little bite of refreshing indulgence.
What to Serve It With
For Breakfast: Pair these deviled eggs with a fresh cup of black coffee or lightly frothed latte. Throw in some flaky croissants or a slice of buttery toast, and your morning suddenly feels a bit more like a cozy café experience than a rushed start.
For Brunch: These eggs pair beautifully with a crisp mimosa or a chilled glass of rosé. Serve alongside smoked salmon, fresh fruit, and a vibrant green salad to make a simple brunch feel elegant and relaxed. I like to dress them on a wooden platter with edible flowers when I’m feeling fancy.
As Dessert: While deviled eggs are pretty far from dessert territory, I’ve seen people serve them at cocktail parties where rich or salty bites provide a perfect counterbalance to sweeter nibbles. They sit beautifully next to sweet potato pie or light cheesecake bites, calming the palate in the best way.
For Cozy Snacks: When it’s just me and the kids on a chilly afternoon, I set out a plate of deviled eggs with some crunchy pickles and chips. My kids actually ask for these more than popcorn sometimes—which says a lot! They really are a comforting go-to when you want something filling but fun.
Top Tips for Perfecting Your Deviled Eggs
Egg Boiling: Don’t rush this step! The off-heat steaming method is a game-changer. Overcooked yolks get crumbly and dry, ruining your filling’s creaminess.
Peeling: The ice bath after boiling is key. It shocks the eggs, making peeling much smoother. Also, try peeling under cold running water to get under the shell easily.
Mixing the Filling: Use a fork rather than a blender or food processor—you want control and texture, not a puree. If the filling feels too thick, a splash of milk or even a dash of pickle juice can loosen it up.
Swirl Customization: For that iconic look, a star tip piping bag is your best friend. If you don’t have one, a plastic sandwich bag with a corner snipped works wonders. Play with different tips to see what pattern you enjoy most.
Ingredient Swaps: I’ve tried sour cream instead of mayo, and yes, it’s tangier but sometimes less creamy. Avocado mixed into the yolks made a delicious twist, adding a fresh, green note and creaminess that surprised me in the best way. For a little heat, a pinch of cayenne or chipotle powder does the trick.
Serving Fresh: Deviled eggs are best eaten the day they’re made. If you’re prepping ahead, store the whites and filling separately to keep the whites from getting soggy. Put together just before serving.
Glaze Variations: I don’t usually glace deviled eggs like other dishes, but a light drizzle of chili oil or a sprinkle of crushed peppercorns adds subtle complexity. If you want to jazz them up visually, edible flowers or microgreens brighten the plate beautifully.
Storing and Reheating Tips
Room Temperature: Deviled eggs are best served chilled but can hang out at room temperature for up to two hours safely. Always cover them loosely with plastic wrap or a clean kitchen towel to keep them fresh.
Refrigerator Storage: Store deviled eggs in an airtight container for up to 2 days—any longer, and the egg whites can get a bit rubbery. If you want them fresh, store the filling separate from the whites and assemble just before serving.
Freezer Instructions: Freezing deviled eggs isn’t recommended. The texture of both the egg white and filling changes unpleasantly after thawing. If you’ve got leftover hard-boiled eggs, freeze them before filling for later uses where texture isn’t as critical.
Glaze Timing Advice: If you’re adding any toppings or garnishes, apply them right before serving—not in advance—as they can wilt or lose their texture in the fridge.
Frequently Asked Questions
Final Thoughts
I can’t tell you how many times these deviled eggs have saved a gathering or turned a casual snack time into something special. They’re a little nostalgic, a little fancy, and entirely comforting all wrapped up in one neat package. Whether you’re a seasoned home cook or just dipping your toes into easy appetizer territory, this recipe hits that sweet spot where ease meets flavor. I hope you enjoy making it as much as I do—my family’s smiles say it’s totally worth it. Don’t forget to share your own twists and tips in the comments; I’d love to hear what you come up with! Happy cooking, and here’s to many delicious, deviled egg-filled moments ahead!
Cajun Shrimp Deviled Eggs
Ingredients
Main Ingredients
- 12 large eggs room temperature
- 0.33 cup mayonnaise
- 2 teaspoons yellow mustard
- 1 teaspoon hot sauce
- 1 teaspoon apple cider vinegar
- 0.5 teaspoon kosher salt
- Cajun seasoning for garnish
- chives finely chopped for garnish
- 0.5 pound medium uncooked shrimp peeled, deveined, tails off
- 2 tablespoons unsalted butter
- 1 teaspoon Cajun seasoning
Instructions
Preparation Steps
- Arrange eggs in a single layer in a large pot. Fill with water until it covers eggs by about 0.5 inch.
- Bring water to a boil. Cover pot and remove from heat.
- Let eggs rest in the covered pot for 14 minutes. Prepare a bowl of ice water.
- Transfer eggs to ice water using a slotted spoon to stop cooking. Let rest for 4 to 5 minutes.
- Peel eggs under water. Pat dry with paper towel. Halve eggs lengthwise. Remove yolks and set aside egg whites.
- Mash yolks with mayonnaise, yellow mustard, hot sauce, apple cider vinegar, and kosher salt until smooth.
- Melt butter in a skillet over high heat. Stir in Cajun seasoning.
- Add shrimp to skillet in an even layer. Cook 2 to 3 minutes per side until cooked through, being careful not to overcook.
- Remove skillet from heat and set aside.
- Pipe or spoon yolk mixture evenly into egg white halves.
- Top each deviled egg with a Cajun shrimp.
- Sprinkle with additional Cajun seasoning and garnish with chopped chives.
- Refrigerate until ready to serve.