Oh, friends, I’m so excited to share this recipe with you today! It’s one of those dishes that just screams comfort and happiness in my kitchen. You know those nights when you’re completely wiped out, but the thought of ordering takeout feels… a little uninspired? That’s when I pull out the ingredients for my Tangy Orange Sesame Chicken. It’s like a burst of sunshine, a zesty hug, and a complete flavor revelation all rolled into one. Seriously, the smell alone as it simmers will have your family peeking into the kitchen wondering what deliciousness is brewing. This isn’t just any chicken dish; it’s my secret weapon for when I want something impressive but don’t have hours to spend. It reminds me so much of the sweet and sour chicken I used to get from our favorite little local spot when I was a kid, but honestly? This version is even better. The balance of tangy citrus and savory sesame is just *chef’s kiss* perfection. If you’ve ever struggled to get that sticky, glossy coating on your chicken, or found other Orange Chicken recipes too sweet or too bland, trust me, you’re going to adore this one. It’s a game-changer, and I can’t wait for you to try it!
What is Tangy Orange Sesame Chicken?
So, what exactly *is* this magical Tangy Orange Sesame Chicken? Think of it as your new favorite weeknight warrior. It’s essentially tender pieces of chicken, coated in a light, crispy batter, then tossed in a vibrant, glossy sauce that’s bursting with bright orange flavor, a hint of savory sesame, and just the right amount of sweetness and tang. The “sesame” part comes from toasted sesame oil and often, sesame seeds for a little crunch and nutty depth. The “tangy orange” is the star – it’s a beautiful blend of fresh orange juice and zest, balanced with vinegar and a touch of soy sauce or tamari. It’s the kind of dish that hits all the right notes: a little sweet, a little savory, a little tart, and incredibly satisfying. It’s definitely not your average stir-fry; this one has a personality all its own. It’s inspired by classic Chinese-American takeout but with my own little twists that make it feel so special and homemade. It’s simple enough for a Tuesday night but impressive enough for company!
Why you’ll love this recipe?
There are so many reasons why this Tangy Orange Sesame Chicken has earned a permanent spot in my recipe rotation, and I just know you’re going to feel the same way. First off, the FLAVOR. Oh my goodness, the flavor! It’s a symphony in your mouth. You get that initial bright, zesty punch from the orange, followed by the deep, nutty richness of the sesame, and then the savory goodness of the chicken. It’s perfectly balanced, so it’s never cloyingly sweet, and that little bit of tang cuts through everything beautifully. It’s incredibly SIMPLY to make, too. Honestly, I can whip this up from start to finish in about 30-40 minutes, which is a lifesaver on those busy weeknights when the last thing I want to do is spend hours in the kitchen. All the ingredients are super accessible, too, making it quite COST-EFFECTIVE. You probably have most of them in your pantry right now! What I love most, though, is its VERSATILITY. Serve it over fluffy rice, alongside steamed veggies, or even tucked into lettuce wraps for a lighter meal. You can easily adjust the spice level if you like a little kick, or add more ginger for extra warmth. It’s forgiving, adaptable, and always a crowd-pleaser. My kids, who can be notoriously picky eaters, absolutely devour this. They’re always asking for seconds, which, as any parent knows, is the ultimate compliment to a recipe! It’s a dish that truly satisfies a craving for something exciting without a lot of fuss.
How do I make Tangy Orange Sesame Chicken?
Quick Overview
This recipe is all about building layers of flavor and achieving that perfect crispy-yet-tender chicken texture. We’ll start by getting our chicken prepped and coated, then whip up a vibrant sauce while the chicken fries up. Finally, we toss it all together until it’s beautifully glazed and ready to be devoured. It’s straightforward, rewarding, and the result is pure deliciousness. The key is not to rush the sauce simmering – that’s where the magic happens!
Ingredients
For the Chicken & Batter: What is the difference between a chicken and a
1.5 lbs boneless, skinless Chicken Thighs or breasts, cut into 1-inch pieces (I prefer thighs for extra juiciness, but breasts work great too!)
1/2 cup all-purpose flour
1/4 cup cornstarch (this is key for crispiness!)
1 teaspoon baking powder
1/2 teaspoon salt
1/4 teaspoon black pepper
2 large eggs, lightly beaten
2 tablespoons water
Vegetable oil, for frying (about 2-3 cups, depending on your pan)
For the Tangy Orange Sesame Sauce:
1 cup fresh orange juice (from about 2-3 oranges – the fresh stuff makes ALL the difference!)
1/4 cup rice vinegar (or Apple Cider vinegar if you don’t have rice vinegar)
1/4 cup soy sauce or tamari (for gluten-free)
3 tablespoons honey or maple syrup (adjust to your sweetness preference)
2 tablespoons brown sugar (optional, for extra depth and gloss)
1 tablespoon grated fresh ginger (don’t skimp here, it adds amazing zing!)
2 cloves garlic, minced
1 tablespoon cornstarch mixed with 2 tablespoons cold water (this is our slurry for thickening)
1 teaspoon toasted sesame oil (add this at the end for that lovely nutty aroma)
For Garnish (Optional, but highly recommended!):
Toasted sesame seeds
Thinly sliced green onions (scallions)
Step-by-Step Instructions
Step 1: Preheat & Prep Pan
First things first, get your frying situation ready. Pour about 2-3 inches of vegetable oil into a heavy-bottomed pot or a deep skillet. You want enough oil for the chicken pieces to be mostly submerged. Heat the oil over medium-high heat until it reaches about 350°F (175°C). If you don’t have a thermometer, you can test it by dropping a tiny bit of batter in; it should sizzle and float to the surface immediately. While the oil heats, get a baking sheet lined with paper towels ready for draining the Fried Chicken. This is crucial for keeping it crispy!
Step 2: Mix Dry Ingredients
In a medium bowl, whisk together the all-purpose flour, cornstarch, baking powder, salt, and black pepper. Make sure everything is well combined. The cornstarch is our secret weapon for achieving that wonderfully light and crispy coating that holds onto the sauce without getting soggy. The baking powder helps give it a little lift, making it extra airy. Give it a good whisk so there are no lumps!
Step 3: Mix Wet Ingredients
In a separate, larger bowl, whisk the eggs with the 2 tablespoons of water. This creates a light, emulsified base for our batter. It’s important to get a nice, even mix here so the batter adheres well to the chicken.
Step 4: Combine
Now, add the dry ingredients to the wet ingredients. Stir gently until just combined. It’s okay if there are a few small lumps; we absolutely do not want to overmix. Overmixing develops the gluten in the flour, which can lead to tough, dense batter. We’re going for a slightly thick, pourable batter that will coat the chicken beautifully. It should look like pancake batter, but perhaps a touch thicker. Add the chicken pieces to the batter and toss gently with a spoon or your hands until each piece is evenly coated. Let it sit for about 5 minutes while you check your oil temperature. This brief rest allows the batter to adhere better.
Step 5: Prepare Filling
While the chicken is coating, let’s make that irresistible sauce! In a medium saucepan, combine the fresh orange juice, rice vinegar, soy sauce, honey (or maple syrup), brown sugar (if using), grated ginger, and minced garlic. Place the saucepan over medium heat and bring it to a gentle simmer, stirring occasionally to dissolve the sugar and honey. Let it simmer for about 5-7 minutes to allow the flavors to meld and for the ginger and garlic to infuse the sauce. It will smell amazing!
Step 6: Layer & Swirl
Once the sauce is simmering and fragrant, it’s time to thicken it. Give the cornstarch and water slurry a quick whisk (cornstarch tends to settle), then slowly pour it into the simmering sauce while whisking constantly. Continue to whisk and simmer for another 1-2 minutes until the sauce thickens to a beautiful, glossy consistency that coats the back of a spoon. It should be thick enough to cling to the chicken but not gloopy. Stir in the toasted sesame oil right at the end – this preserves its delicate aroma. Turn off the heat and set the sauce aside.
Step 7: Bake
Carefully add the battered chicken pieces to the hot oil in batches. Don’t overcrowd the pan, or the oil temperature will drop too much, and the chicken won’t get crispy. Fry for about 4-6 minutes per batch, flipping them halfway through, until golden brown and cooked through. The internal temperature should reach 165°F (74°C). Use a slotted spoon or spider strainer to remove the cooked chicken from the oil and place it on the prepared paper-towel-lined baking sheet to drain. Repeat with the remaining chicken. I always find the first batch is the learning curve for the oil temp, so don’t stress if it’s not perfect!
Step 8: Cool & Glaze
Once all the chicken is fried and drained, gently return the saucepan with the thickened orange sesame sauce to low heat. Add the fried chicken pieces to the sauce. Toss gently to coat each piece evenly. We want the chicken to be fully enrobed in that glorious glaze. Let it cook for just a minute or two, allowing the sauce to warm through and cling beautifully to the chicken. We don’t want to cook it for too long, or the crispy coating might soften too much. The goal is a sticky, glossy coating!
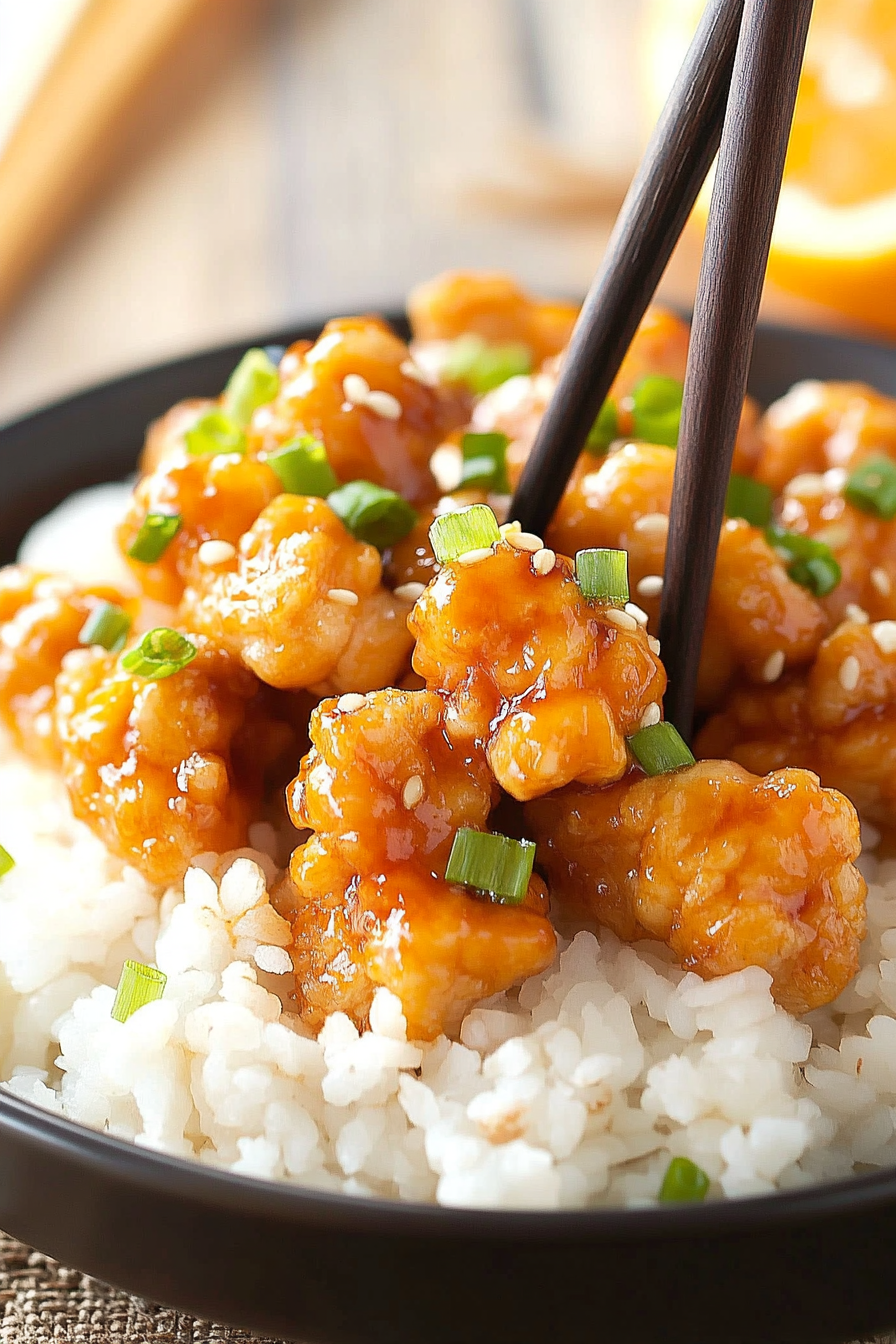
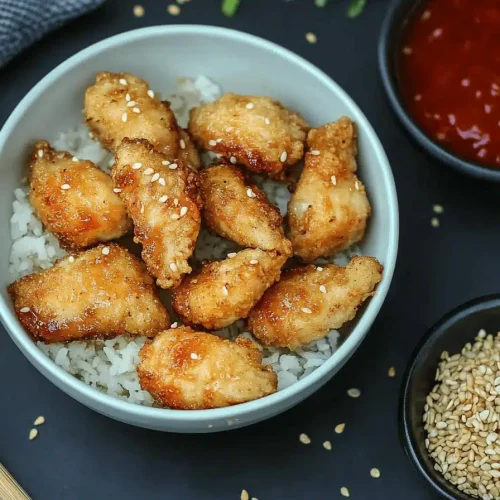
Step 9: Slice & Serve
This is the moment of truth! Serve your Tangy Orange Sesame Chicken immediately while it’s hot and glistening. Plate it up over fluffy white or brown rice, or even quinoa. Garnish generously with toasted sesame seeds for that extra nutty crunch and some thinly sliced green onions for a pop of color and freshness. The contrast between the warm, glazed chicken and the fresh garnishes is just divine. It’s a dish that looks as good as it tastes!
What to Serve It With
This Tangy Orange Sesame Chicken is so versatile, it can truly be enjoyed at any time of day or for any occasion! For a quick and satisfying BREAKFAST (yes, you read that right!), I sometimes have a small portion leftover from dinner, and it’s surprisingly delicious. A little bit of that sweet and savory glaze wakes up my taste buds. It’s especially good with a strong cup of black coffee. For BRUNCH, this dish can be elevated. Serve it alongside some fluffy scrambled eggs, a fresh fruit salad, and maybe some crispy bacon or breakfast sausages. It adds a delightful Asian-inspired twist to a traditional brunch spread. Think of it as a fun appetizer or a unique main component that will have your guests raving. As a decadent DESSERT, a small, perfectly glazed piece can be surprisingly satisfying when you’re craving something sweet but don’t want a heavy dessert. It’s unusual, I know, but that sweet and tangy profile works wonders after a meal, especially when paired with a light, crisp white wine or even a sparkling sake. And of course, for COZY SNACKS, it’s pure bliss. It’s fantastic for game nights or just a relaxed evening on the couch. I love serving it in a big bowl with some chopsticks and maybe a side of those crunchy roasted seaweed snacks. My family tradition is to make a big batch on Friday nights and serve it with steamed broccoli and white rice – it’s our official “end-of-the-week celebration” meal, and it never disappoints.
Top Tips for Perfecting Your Tangy Orange Sesame Chicken
I’ve made this Tangy Orange Sesame Chicken more times than I can count, and over the years, I’ve picked up a few tricks that I think really make a difference. For the ZUCCHINI PREP (wait, I think I’m mixing up recipes! Ha! Let’s stick to chicken!). Okay, for the CHICKEN PREP: Make sure your chicken pieces are relatively uniform in size. This ensures they cook evenly. If you’re using chicken breasts, trim away any excess fat. When you’re cutting them, I always aim for about a 1-inch cube. Too small and they can overcook quickly; too big and they might not cook through evenly in the batter. For the MIXING ADVICE with the batter, remember my earlier warning: do NOT overmix. A few lumps are perfectly fine and actually desirable! Overmixing develops gluten, which can make your fried chicken tough instead of tender and crisp. Just mix until the dry ingredients are *barely* incorporated into the wet. For SWIRL CUSTOMIZATION (again, definitely thinking of another recipe!), let’s focus on GLAZE APPLICATION. When you toss the fried chicken into the sauce, do it gently. We want each piece coated, but we’re not mashing it. A quick, even toss is best to maintain that beautiful glaze without breaking up the chicken too much. For INGREDIENT SWAPS, if you can’t find fresh oranges, good quality store-bought orange juice can work in a pinch, but fresh really elevates the flavor. For the vinegar, apple cider vinegar is a good substitute if rice vinegar isn’t available. And if you’re sensitive to gluten, tamari is a fantastic swap for soy sauce. For BAKING TIPS (wait, we’re frying, not baking the chicken!), let’s talk FRYING TIPS: Don’t overcrowd your pan! This is probably the most important tip for achieving crispy chicken. Give those pieces space to fry properly. If you have a lot of chicken, fry it in batches and keep the cooked chicken warm on a baking sheet in a low oven (around 200°F or 95°C) while you finish the rest. For GLAZE VARIATIONS, if you like a little heat, a pinch of red pepper flakes in the sauce is wonderful. You could also add a splash of sriracha for a bit of a kick.
Storing and Reheating Tips
Alright, let’s talk about what happens after the deliciousness is gone (or when you’ve wisely made extra, which I *always* do!). If you happen to have any Tangy Orange Sesame Chicken leftovers, storing them properly will ensure they’re still tasty the next day. For ROOM TEMPERATURE storage, it’s best to let the chicken cool down for a bit before putting it away, but don’t leave it out for more than a couple of hours. Once cooled, store it in an airtight container. REFRIGERATOR STORAGE is your best bet for longer preservation. Pop it into an airtight container or a resealable bag and it should keep well in the fridge for up to 3-4 days. The coating might soften a bit upon refrigeration, but don’t worry, we can fix that! For FREEZER INSTRUCTIONS, if you want to freeze it, I’d recommend doing so *before* tossing it in the sauce if you can manage it. Fry the chicken, let it cool completely, then freeze it in a single layer on a baking sheet until solid, then transfer to a freezer bag. This way, you can reheat it and then add the sauce. If you’re freezing the fully coated chicken, let it cool completely, then freeze in portions in freezer-safe containers or bags for up to 2-3 months. When it comes to reheating, the best way is often in a skillet or air fryer to try and crisp up the coating again. If you’re reheating refrigerated chicken, place it in a skillet over medium heat with a tablespoon of oil and toss until heated through and somewhat crisp. You can also reheat it in the oven at around 350°F (175°C) for about 10-15 minutes. For frozen chicken, thaw it in the refrigerator overnight and then reheat as described. GLAZE TIMING ADVICE is important: I find the glaze is best added just before serving. If you’re storing leftovers that are already glazed, the coating will soften more in the fridge and when reheated. It still tastes delicious, but if maximum crispiness is your goal, consider keeping some sauce on the side to add after reheating!
Frequently Asked Questions
Final Thoughts
So there you have it, my friends – my absolute favorite Tangy Orange Sesame Chicken recipe! I truly hope you give it a try. It’s one of those dishes that brings so much joy to my table, and I’m always so thrilled when it becomes a favorite in other kitchens too. It’s the perfect blend of sweet, savory, and tangy, with that irresistible crispy-tender chicken that makes everyone happy. It’s proof that you don’t need to be a gourmet chef to create something truly special and restaurant-worthy right in your own home. If you loved this recipe, you might also enjoy my [Link to a similar recipe, e.g., Honey Garlic Chicken] or my [Link to another recipe, e.g., Crispy Baked Teriyaki Salmon] for more weeknight flavor adventures! I can’t wait to hear what you think – please leave a comment below and let me know how yours turns out, or if you tried any fun variations! Happy cooking!
Tangy Orange Sesame Chicken
Ingredients
For the Chicken
- 1.5 pound boneless, skinless chicken thighs cut into 1-inch pieces
- 0.5 cup all-purpose flour
- 0.25 cup cornstarch
- 0.5 teaspoon salt
- 0.25 teaspoon black pepper
- 2 tablespoon vegetable oil
For the Orange Sesame Sauce
- 0.75 cup fresh orange juice
- 0.25 cup soy sauce
- 3 tablespoon honey
- 2 tablespoon rice vinegar
- 1 tablespoon sesame oil
- 2 cloves garlic minced
- 1 teaspoon fresh ginger grated
- 1 tablespoon cornstarch mixed with 2 tablespoons of water to make a slurry
For Garnish
- 1 tablespoon sesame seeds toasted
- 2 tablespoon green onions chopped
Instructions
Preparation Steps
- In a medium bowl, toss chicken pieces with flour, cornstarch, salt, and pepper until evenly coated.
- In a separate small bowl, whisk together orange juice, soy sauce, honey, rice vinegar, sesame oil, minced garlic, and grated ginger.
- Heat vegetable oil in a large skillet or wok over medium-high heat. Add the coated chicken in a single layer (cook in batches if necessary to avoid overcrowding) and cook for about 5-7 minutes, or until golden brown and cooked through.
- Pour the prepared orange sesame sauce into the skillet with the cooked chicken. Bring to a simmer.
- Stir in the cornstarch slurry and cook, stirring constantly, until the sauce thickens and coats the chicken, about 2-3 minutes.
- Garnish with toasted sesame seeds and chopped green onions before serving.