Some of my best memories revolve around that morning light streaming through the kitchen window and the smell of a warm, striped cake baking in the oven. It’s funny how a simple dessert can become such a beloved ritual—one that my kids still ask for over and over. This striped cake isn’t just a snack or a sweet finish to a meal; it’s a little celebration on a plate, with its playful ribbons of flavor weaving through every bite. If you’ve ever loved a marble or zebra cake, this is right in that sweet spot—visually stunning yet surprisingly simple. Honestly, I never thought a cake this pretty could be so easy to pull off, which is why I’m excited to share this treasure with you.
What is a striped cake?
Think of striped cake as a joyful twist on your everyday layered cake. Instead of stacking sheets on top of each other, the batter itself is gently layered or swirled inside the pan, creating these delightful stripes or ribbons of flavor that shine through every slice. It’s essentially a marbled cake’s playful cousin, but with clearer, more deliberate bands of color or taste—kind of like a lazy zebra pattern without the fuss. The name comes from the way you build it up in the pan: alternating colors of batter pour in layers to create those signature stripes. This cake feels fancy enough to impress guests, but trust me, it’s totally doable in a home kitchen even if you’re not an expert baker.
Why you’ll love this recipe?
What I love most about this striped cake is the way it hits all the right notes without demanding too much from your schedule or pantry. First off, the flavor is buttery and moist, with just enough sweetness to feel indulgent but not over the top. Because you’re layering batters, each slice is a fun unfolding of taste and texture that’s almost hypnotic—people can’t stop staring before they eat it. I often catch my kids peeking into the pan, waiting eagerly to see how the stripes develop.
Then, there’s the simplicity. Don’t be fooled by the looks; this cake doesn’t require dozens of fancy ingredients or complicated techniques. I typically keep basic pantry staples on hand, and I found that the light vanilla batter pairs beautifully with cocoa or cinnamon stripes. Plus, it’s budget-friendly. Since the ingredients are everyday items, you won’t break the bank making it, which means you can whip it up whenever the craving strikes.
What’s really cool is how versatile this recipe is. You can swap out the stripes for pretty much any flavor you love—chocolate, coffee, spiced pumpkin, or even fruit purees. That’s why this cake keeps popping up at family gatherings and casual brunches alike. It’s a crowd-pleaser but also a comforting baked hug after a long day. If you’ve enjoyed baking a good ol’ marble cake, give this striped cake a shot—it’s a little livelier and, in my opinion, endlessly charming.
How do I make a striped cake?
Quick Overview
First, you prepare two or more batters—usually a simple vanilla base and a darker, decadent complementary one. Then you layer them thoughtfully into your prepared pan, creating those classic stripes. As it bakes, the layers meld just enough to hold their distinctive bands but stay moist and fluffy. There’s a sweet suspense in waiting for the reveal when it cools, slicing through warm ribbons of flavor. Don’t worry, the process is straightforward and far less fiddly than it looks. I’ve found that a little patience and a measured hand go a long way toward a picture-perfect striped cake.
Ingredients
For the Main Batter:
- 1 ½ cups all-purpose flour – I like to sift it to keep things light and airy.
- 1 teaspoon baking powder – for that perfect rise.
- ½ teaspoon salt – just enough to balance the sweetness.
- ¾ cup granulated sugar – you can tweak this based on your sweet tooth.
- 2 large eggs at room temperature – they help bind everything beautifully.
- ½ cup unsalted butter, melted and slightly cooled – adds richness and moisture.
- ½ cup whole milk – or almond milk if you want a dairy-free twist.
- 1 teaspoon pure vanilla extract – this is the soul of the cake batter.
For the Filling/Stripes:
- ½ cup cocoa powder – to mix into half the batter for those chocolate stripes.
- 2 tablespoons sugar – to sweeten the cocoa layer slightly.
- Optional: 1 teaspoon cinnamon or espresso powder – for a twist on the flavors.
For the Glaze:
- 1 cup powdered sugar – sifted for smoothness.
- 2 tablespoons milk or lemon juice – controls glaze consistency.
- ½ teaspoon vanilla extract – for an extra flavor boost.
- Optional: A pinch of salt to balance the glaze sweetness.
The glaze is your chance to add a glossy, sweet finish without overwhelming the cake’s delicate textures.
Step-by-Step Instructions
Step 1: Preheat & Prep Pan
Start by heating your oven to 350°F (175°C). Then, grease and flour your cake pan—I’m a fan of a simple 9-inch round pan. If you have parchment paper, line the bottom to avoid any sticking surprises. This sets you up for an easy cake release later, which trust me, can save you from a mini kitchen meltdown.
Step 2: Mix Dry Ingredients
In a bowl, whisk the flour, baking powder, and salt together until it looks well blended. This step ensures an even rise and no weird pockets of baking powder hiding around. Taking a moment here really pays off in a beautifully textured final cake.
Step 3: Mix Wet Ingredients
In another bowl, beat the eggs with sugar until they’re fluffy and pale—this usually takes a good 3-4 minutes if you’re whipping by hand. Then slowly add the melted butter, milk, and vanilla extract, mixing gently but thoroughly. You’ll notice the batter looks smooth and inviting here, which is always a good sign!
Step 4: Combine
Now, gradually fold the dry ingredients into the wet, stirring just until you don’t see flour streaks. The trick here is not to overmix, or the cake can end up dense. You want a light, tender crumb, and this gentle folding technique is my little secret to achieving it every time.
Step 5: Prepare Filling
Take about half of the batter and transfer it to a separate bowl. Add the cocoa powder and sugar, mixing until the hue is even and rich. Here’s a tip: if your cocoa is clumpy, mix it with a tablespoon or two of milk first to smooth it out before folding it into the batter. You can also stir in cinnamon or espresso powder to really wake up the chocolate flavor.
Step 6: Layer & Swirl
This part is like painting with batter. Start by spooning a couple tablespoons of the vanilla batter into the center of your pan. Then, add the same amount of chocolate batter right on top. Keep alternating batters, pressing gently in the center after each addition. They’ll naturally spread out and push the previous layers outward, creating those gorgeous stripes. If you want a swirl pattern, use a skewer or butter knife to gently drag through the batter—but do so lightly or the stripes’ll blur too much.
Step 7: Bake
Pop your pan into the preheated oven and bake for about 35-40 minutes. I always start checking at 30 minutes by inserting a toothpick in the center—if it comes out clean or with a few moist crumbs, you’re golden. Every oven is a little different, so watching closely near the end is a wise habit. The cake should spring back when lightly pressed and smell like a warm vanilla-chocolate hug.
Step 8: Cool & Glaze
Let the cake cool in the pan for at least 15 minutes before flipping it onto a wire rack. Cooling is key because a warm cake with glaze can get messy fast. Once completely cool, drizzle your glaze over the top, allowing it to drip and settle naturally. If it’s too thick, add a splash more milk; too thin, add powdered sugar. The glaze adds a subtle shine and a gentle crunch that my kids rave about.
Step 9: Slice & Serve
For the prettiest slices, use a sharp knife wiped between cuts to keep the stripes crisp and defined. This cake tastes best at room temperature—warm enough to be tender but cool enough for the glaze to hold. Serve with a big cup of coffee or a dollop of whipped cream for an extra special treat.
What to Serve It With
For Breakfast: Nothing beats a thick slice of striped cake alongside a steaming mug of black coffee or chai tea. The vanilla and chocolate stripes feel a bit like a morning indulgence, but it’s never too sweet to start your day. I often slice some, toast it lightly, and spread with a touch of butter for the ultimate cozy treat.
For Brunch: Plate it with fresh berries, a sprig of mint, and a little side of yogurt or cream cheese spread. Pair this with a sparkling mimosa or a light fruity white wine if you’re feeling fancy. It looks stunning on a brunch table and always sparks compliments about its fun pattern.
As Dessert: Serve warm with a scoop of vanilla ice cream or a drizzle of caramel sauce. The stripes contrast so nicely against smooth, creamy toppings. I once brought this to a dinner party, and it vanished within minutes—everyone loved the surprise element of those elegant stripes.
For Cozy Snacks: Cut it into bite-sized squares or finger slices, wrap them up, and enjoy with afternoon tea or hot cocoa. It’s especially lovely on rainy or chilly evenings when you want something sweet but simple.
This recipe has been a weekend favorite and cherished family tradition. We often sit around the kitchen island sharing stories while nibbling on slices of this cake, which makes it feel like more than just food—it’s togetherness on a plate.
Top Tips for Perfecting Your Striped Cake
Layering Batter: The key to clear stripes is in the pouring technique. Pouring each layer gently into the center creates beautifully concentric circles that spread evenly. If you’re too rough, the layers mix and lose that striking effect.
Mixing Batter: Don’t overdo the stirring when combining wet and dry ingredients. You want your batter smooth but still airy. Overmixing develops gluten and toughens the crumb. I usually mix just until the last flour streak disappears.
Ingredient Temperatures: Using room temperature eggs and milk makes a world of difference in your batter’s texture. Cold eggs can cause the melted butter to seize up, and no one wants a lumpy batter.
Swirl Customization: If you want to go beyond basic chocolate and vanilla, try folding in berry purees or spices such as cardamom or nutmeg. Just be mindful of how much liquid you add; too much can make the batter runny.
Substitutions: I’ve swapped whole milk for almond, and it actually made the cake even moister—something I’d never expected. You can also try coconut oil instead of butter, but reduce the quantity slightly to avoid greasiness.
Baking Tips: Each oven is unique, so keep an eye on your cake toward the end of the baking time. Avoid opening the oven door too often, though, or the temperature can drop and slow the rise.
Glaze Variations: Experiment with lemon or orange juice in your glaze for a fresh twist. Or skip it altogether if you prefer a dusting of powdered sugar instead. I sometimes sprinkle a handful of chopped nuts on the glaze for a little extra crunch.
Over the years, I’ve learned to trust my instincts with this cake—adjusting sugar just a touch here, playing with flavors there. It’s become my go-to when I want a hearty but elegant dessert that feels homemade and special at the same time.
Storing and Reheating Tips
Room Temperature: This striped cake keeps beautifully covered on the counter for up to two days. I use a cake dome or loosely tent with foil to keep it moist, and it’s still delightfully fresh and tender each time.
Refrigerator Storage: Store leftovers in an airtight container for up to five days. Just be sure to let it come to room temperature before serving, as refrigeration can dull its deliciously soft texture.
Freezer Instructions: I regularly freeze slices wrapped tightly in plastic wrap and then placed in freezer bags. They last up to three months this way. Thaw overnight in the fridge or for a couple hours on the counter, and they’re nearly as good as fresh.
Glaze Timing Advice: I prefer to glaze the cake fresh before serving. If you’re storing it, wait to glaze until just before eating. The glaze can soften or look less appealing after time stored, especially in the fridge.
Frequently Asked Questions
Final Thoughts
Honestly, this striped cake has been my family’s little happy secret for years. It’s that rare recipe that brings people together at the table without any fuss but still looks like a special occasion. Those vibrant stripes swirling through every slice feel like a delicious surprise that never gets old. I hope you enjoy making it as much as we do—and maybe your family will start asking for it the way mine does! If you try it, please share your thoughts or your own fun twists—I love hearing how these recipes live and breathe in other kitchens. Happy baking, and may your kitchen always be filled with warmth and sweet smells!
striped cake
Ingredients
Main Ingredients
- 2 cups graham cracker crumbs
- 12 tablespoons butter melted
- 0.25 cup sugar
- 2 packages instant chocolate pudding (4 serving size each)
- 3.25 cups cold milk
- 0.25 cup sugar
- 8 oz cream cheese
- 8 oz Cool Whip thawed
- 2 tablespoons milk
- 8 oz Cool Whip
- 1 bar Hershey's chocolate optional for topping
Instructions
Preparation Steps
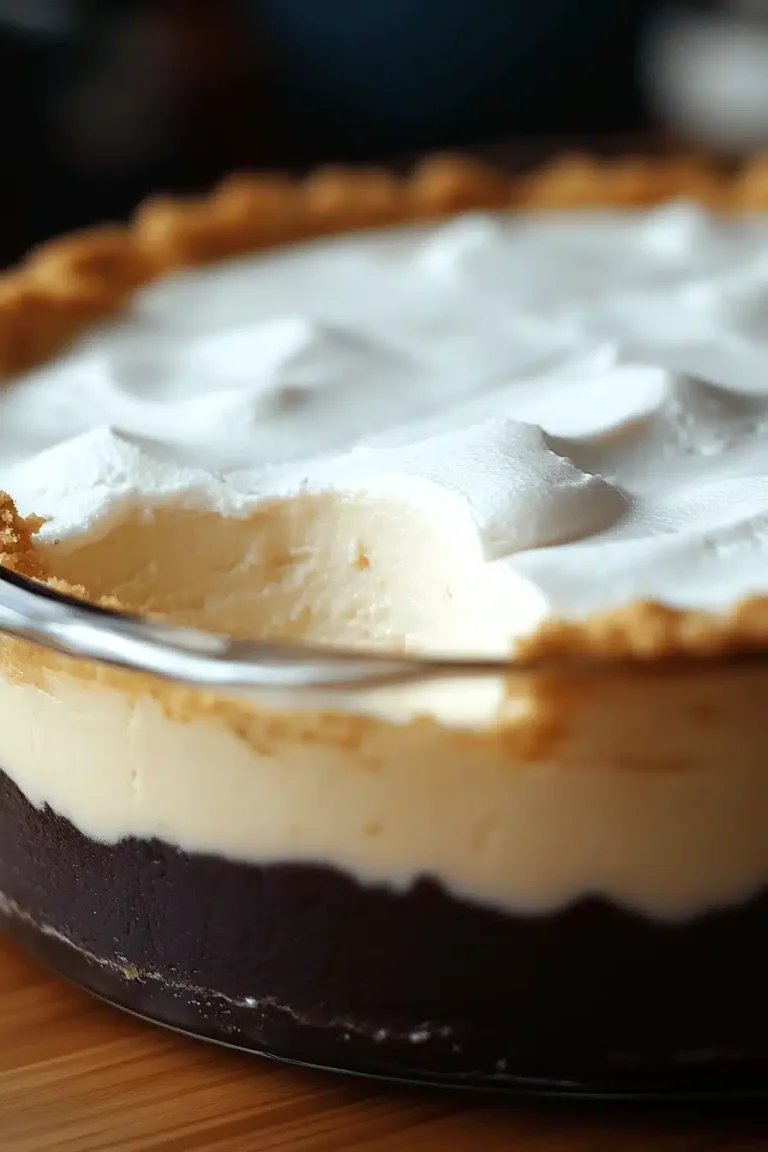
- Combine graham cracker crumbs, sugar, and melted butter in a large bowl to create the crust mixture.
- Press the crust mixture firmly onto the bottom of a 9x13 inch pan and refrigerate until firm.
- In a large bowl, whisk the instant pudding mixes with cold milk until blended, then refrigerate for 5 minutes until thick.
- Beat cream cheese, sugar, and 2 tablespoons milk together until smooth.
- Fold in 8 ounces of Cool Whip gently until well combined.
- Spread the cream cheese mixture evenly over the chilled crust.
- Spoon the chocolate pudding layer evenly over the cream cheese layer.
- Refrigerate the layered dessert for at least two hours to set.
- Before serving, spread the remaining Cool Whip layer evenly over the pudding.
- Top with optional chocolate shavings.