Okay, so you know those days? The ones where a craving hits you like a truck, and you *need* something sweet, something decadent, something warm and gooey, but the thought of pulling out every mixing bowl, preheating the oven for a whole batch, and then facing a mountain of dishes just sends you straight to the couch? Yeah, I’ve been there more times than I care to admit. That’s exactly how this amazing Skillet cookie recipe came into my life, and honestly, it’s been a game-changer. Forget fussing with individual cookies; this beauty bakes up in one glorious pan, and the smell that fills your kitchen? Pure magic. It’s like a giant, warm hug for your taste buds, and trust me, it’s so much easier than you might think. It’s the perfect answer to that late-night sweet tooth or a delightful centerpiece for a casual get-together. This isn’t just a dessert; it’s a whole mood.
What is a Skillet
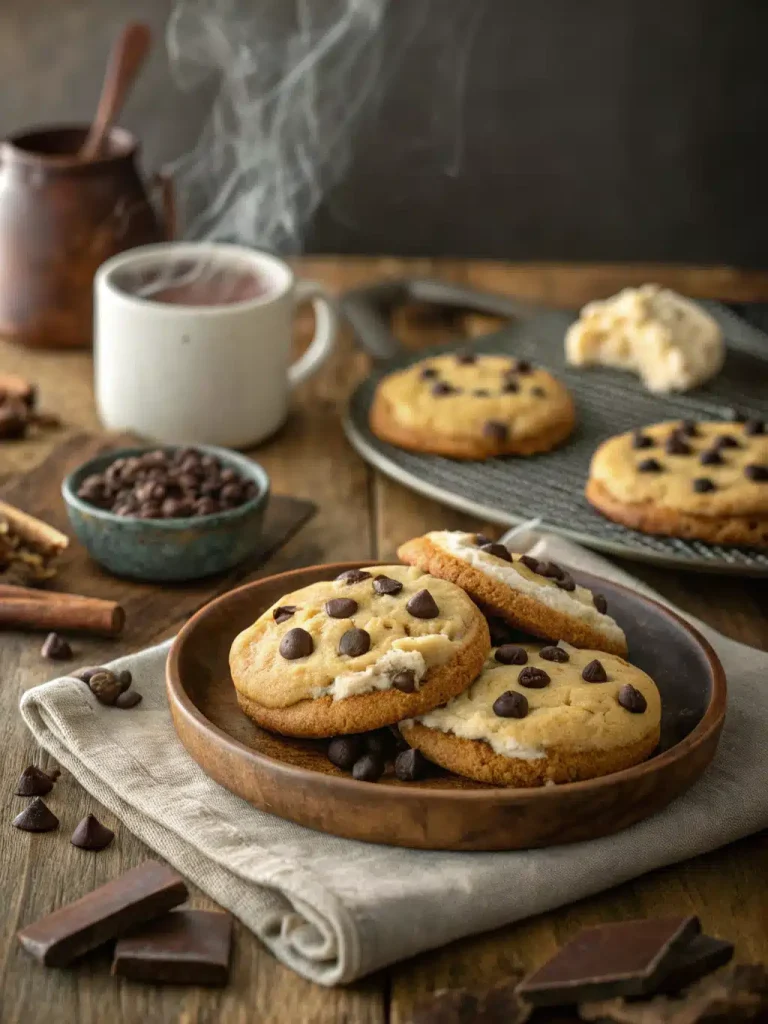
So, what exactly is this delightful creature we call a skillet cookie? Think of it as your favorite Chocolate Chip Cookie dough, but instead of being portioned into little rounds, it’s spread out into a single, glorious, thick disc and baked in a cast-iron skillet. It gets those perfectly crisp edges that everyone fights over, a gloriously soft and chewy center that’s practically molten, and it’s all served right there in the pan. The beauty of it is that it’s a dessert that’s meant to be shared, or, let’s be honest, not shared at all! It’s rustic, it’s comforting, and it’s incredibly forgiving. The cast-iron skillet lends this wonderful, even heat that makes for an absolutely perfect bake every single time. It’s essentially the easiest way to get that deeply satisfying, homemade cookie experience without all the usual baking drama.
Why you’ll love
There are so many reasons why this skillet cookie recipe has become my absolute go-to, and I just know you’re going to fall head over heels for it too. First off, the flavor. Oh, the flavor! It’s everything you dream of in a classic Chocolate Chip cookie – rich brown sugar, creamy butter, and pockets of melted chocolate. But baked in a skillet? It takes it to a whole new level. The edges get perfectly caramelized and slightly crispy, while the center stays wonderfully soft and gooey, almost like a molten lava cake but with that distinct cookie texture. It’s pure bliss! And the simplicity? I can’t stress this enough. You mix up a single batch of dough, press it into a skillet, and bake. No rolling, no cutting, no individual cookies to worry about. This is a lifesaver on busy nights when you want something truly special without a ton of effort. Plus, it’s surprisingly budget-friendly. Most of the ingredients are pantry staples, making it an economical way to satisfy a serious dessert craving. And the versatility! You can customize this to your heart’s content. Add nuts, different kinds of chocolate chips, swirls of caramel or peanut butter – the possibilities are endless. What I love most about this recipe is that it feels incredibly indulgent and impressive, but in reality, it’s one of the easiest desserts I know how to make. It’s my secret weapon when I need a quick, crowd-pleasing dessert or just want to treat myself after a long day. It’s the perfect way to get that bakery-quality cookie experience right in your own home.
How do you make a
Quick Overview
Making this skillet cookie is surprisingly straightforward. You’ll essentially cream together your butter and sugars, then mix in your eggs and vanilla. Next, the dry ingredients join the party, followed by your chocolate chips and any other mix-ins. The dough is then spread evenly into a greased cast-iron skillet and baked until golden brown and the center is set but still a little soft. The whole process from start to finish, including baking, takes less than an hour, making it incredibly efficient for a dessert this satisfying. It’s designed to be foolproof, so even if you’re new to baking, you can achieve amazing results.
Ingredients
For the Main Batter:
Butter: I always use unsalted butter, softened to room temperature. This is crucial for getting that creamy texture when you cream it with the sugars. Make sure it’s not melted, just soft enough to easily indent with your finger. About 1 cup (2 sticks).
brown sugar: I prefer dark brown sugar for its deep, molasses-rich flavor, which really complements the chocolate. Light brown sugar works too, but you’ll get a slightly less intense flavor. Pack it into your measuring cup! About 3/4 cup.
Granulated Sugar: This helps with the chewiness and spreads the cookie out nicely. About 1/2 cup.
Eggs: Two large eggs are perfect for binding and richness. Make sure they’re at room temperature; it helps them incorporate better into the batter. I’ve tried adding a cold egg once, and it made my dough a little clumpy, so room temp is key!
Vanilla Extract: Use good quality pure vanilla extract. It makes a huge difference in enhancing all the other flavors. About 1.5 teaspoons.
All-Purpose Flour: Spooned and leveled, not scooped! Scooping can pack too much flour in, leading to a dry cookie. About 2.5 cups.
Baking Soda: This is what gives the cookie its lift and tender crumb. 1 teaspoon.
Salt: Crucial for balancing the sweetness and bringing out all the flavors. 1 teaspoon.
Chocolate Chips: This is where you can really have fun! I love a mix of semi-sweet and dark chocolate chips for depth. About 2 cups. You can also use milk chocolate or even white chocolate.
For the Filling (Optional, but highly recommended!):
Nut Butter or Caramel: A generous swirl of Peanut Butter, cookie butter, or thick caramel sauce about halfway through baking adds an extra layer of decadence. About 1/2 cup.
For the Glaze (Optional, but oh-so-good!):
Powdered Sugar: For that sweet, smooth finish. About 1 cup.
Milk or Cream: Just a tablespoon or two to get the right drizzling consistency. You can also use a dairy-free milk like almond milk; it makes it even creamier!
Vanilla Extract: A tiny splash for extra flavor. About 1/4 teaspoon.
Step-by-Step Instructions
Step 1: Preheat & Prep Pan
First things first, grab your favorite cast-iron skillet! A 10-inch skillet is perfect for this recipe. Generously grease it with butter or non-stick cooking spray. You can even line the bottom with a circle of parchment paper if you’re worried about sticking, though a well-seasoned cast iron usually does the trick. Preheat your oven to 350°F (175°C). Make sure your oven rack is in the center position for even baking.
Step 2: Mix Dry Ingredients
In a medium bowl, whisk together the all-purpose flour, baking soda, and salt. Whisking them together ensures the leavening agent and salt are evenly distributed throughout the flour, which is important for a consistent rise and flavor in your skillet cookie.
Step 3: Mix Wet Ingredients
In a large bowl, using an electric mixer (or a sturdy whisk and some arm power!), cream together the softened butter, dark brown sugar, and granulated sugar until light and fluffy. This can take a few minutes. Then, beat in the eggs one at a time, followed by the vanilla extract. Make sure to scrape down the sides of the bowl as needed so everything is incorporated.
Step 4: Combine
Gradually add the dry ingredients to the wet ingredients, mixing on low speed or by hand just until combined. Be careful not to overmix! Overmixing develops the gluten in the flour too much, which can lead to a tough cookie. Stop mixing as soon as you no longer see streaks of flour. Gently fold in your chocolate chips (and any other add-ins you like!) with a spatula.
Step 5: Prepare Filling (If Using)
If you’re adding a swirl of peanut butter or caramel, have it ready. You can warm it slightly in the microwave for a few seconds to make it easier to swirl. This step is pure indulgence and worth it!
Step 6: Layer & Swirl
Press the cookie dough evenly into the prepared cast-iron skillet. Use your hands or a spatula to spread it out into a uniform layer, going all the way to the edges. If you’re adding a swirl, dollop spoonfuls of your peanut butter or caramel over the dough and then use a knife or skewer to gently swirl it in. Don’t over-swirl; you want distinct ribbons of deliciousness.
Step 7: Bake
Bake for 25-35 minutes, or until the edges are golden brown and the center is set but still looks a little soft and underdone. The residual heat will continue to cook the cookie as it cools. You can test for doneness by gently pressing the center; it should spring back slightly. If you’re worried about the center being too raw, you can loosely tent the skillet with foil partway through baking.
Step 8: Cool & Glaze
Let the skillet cookie cool in the skillet on a wire rack for at least 15-20 minutes. This is important for the cookie to set up properly. While it’s cooling, you can whip up the glaze if you’re using one. In a small bowl, whisk together the powdered sugar, a tablespoon of milk (add more if needed), and vanilla extract until smooth and pourable. Drizzle the glaze over the slightly cooled cookie. It looks so pretty and adds an extra touch of sweetness.
Step 9: Slice & Serve
Once it’s cooled a bit more, grab a spoon or a spatula and dig in! Serve it warm, right out of the skillet. It’s absolutely divine on its own, but even better with a scoop of vanilla ice cream melting into the warm cookie. Cut into wedges or just let everyone scoop their own. Enjoy the gooey, chocolatey goodness!
What to Serve It With
This skillet cookie is so versatile, it fits into almost any meal or occasion! For a relaxed weekend breakfast, I love serving warm wedges with a good cup of coffee. The slightly crisp edges and soft, sweet center feel like a decadent treat to start the day. For a more elegant brunch spread, I’ll present the whole skillet on a nice wooden board, maybe with a dusting of powdered sugar or a few fresh berries on the side for color. It pairs wonderfully with mimosas or a sparkling rosé. As a dessert, it’s a showstopper. It’s perfect served after a cozy dinner, especially with a scoop of high-quality vanilla bean ice cream – that contrast of warm cookie and cold ice cream is just heavenly. For those moments when you just need a comforting snack, this is your answer. I’ll often serve it with a glass of cold milk, or even a drizzle of extra chocolate sauce if I’m feeling extra indulgent. My family traditions often involve this cookie after movie nights; it’s easy to share, and everyone gets a piece of that warm, chocolatey goodness straight from the pan. It’s a guaranteed hit, no matter how you serve it.
Top Tips for Perfecting Your Skillet Cookie
Over the years of making this skillet cookie countless times, I’ve picked up a few tricks that I think make all the difference. When you’re creaming the butter and sugars, really take your time. You want it to be light and fluffy, which incorporates air and leads to a better texture. Don’t rush this step! For the flour, always spoon it into your measuring cup and then level it off with a straight edge. Scooping directly from the bag can pack in too much flour, resulting in a dry, dense cookie. I learned that lesson the hard way early on! When combining the wet and dry ingredients, mix just until it comes together. Seeing a few tiny streaks of flour is actually okay; they’ll disappear as you fold in the chocolate chips. Overmixing is the enemy of tender cookies! For those optional swirls of peanut butter or caramel, make sure they’re not too cold or too hot. A slightly warmed, pourable consistency works best for swirling without sinking too much or becoming a solid lump. When it comes to baking, ovens can be quirky. My oven often bakes a little hotter, so I tend to check mine around the 25-minute mark. You’re looking for those beautiful golden-brown edges and a center that *looks* slightly underbaked. It will continue to set as it cools, so resisting the urge to overbake is key to that perfect gooey center. If your skillet tends to get very hot on the bottom, placing a baking sheet on the rack below the skillet can help prevent the bottom from burning. And about ingredient swaps? I’ve experimented quite a bit! If you don’t have dark brown sugar, light brown sugar works, but you’ll get a slightly different flavor profile. I’ve also successfully used a gluten-free all-purpose flour blend; you might need to add a tablespoon or two more flour for the right consistency, and the texture will be a bit denser, but it’s still delicious! For a dairy-free version, use vegan butter sticks and dairy-free chocolate chips; I’ve found that using almond milk for the glaze makes it particularly creamy. Remember, practice makes perfect, but this recipe is pretty forgiving, so don’t stress too much!
Storing and Reheating Tips
One of the best things about a skillet cookie is that it’s so forgiving when it comes to storage and reheating. If you happen to have any leftovers (which is rare in my house!), you can store the cooled skillet cookie right in the skillet, loosely covered with plastic wrap or foil, at room temperature for up to 2 days. The edges will stay relatively crisp, and the center will remain wonderfully soft. If you plan to store it for longer, or if your kitchen is particularly warm, refrigerating it is a better option. Place it in an airtight container or cover the skillet tightly and store it in the refrigerator for up to 4-5 days. The texture might become a bit firmer when cold, but that’s easily fixed! For freezing, it’s best to bake it, let it cool completely, and then wrap the entire skillet tightly in a couple of layers of plastic wrap and then a layer of aluminum foil. You can also remove the cooled cookie from the skillet and wrap it whole. It will keep well in the freezer for up to 2-3 months. To reheat, if it’s at room temperature, just pop the whole skillet (if oven-safe) or the cookie itself into a 300°F (150°C) oven for about 5-10 minutes, or until warmed through. If it’s coming straight from the refrigerator, you might need an extra 5-10 minutes. For frozen skillet cookies, it’s best to thaw them overnight in the refrigerator first, then reheat as described. If you’re drizzling with glaze, I always recommend doing that *after* reheating, right before serving, to keep it looking fresh and appealing. The glaze can get a little sticky if it sits for too long, especially in the fridge.
Frequently Asked Questions
Final Thoughts
So there you have it – the ultimate skillet cookie recipe! I truly hope you give this a try. It’s more than just a dessert; it’s a simple pleasure that brings a whole lot of joy with minimal effort. The combination of crispy edges and that molten, chewy center is just unbeatable, and the fact that it all comes together in one pan makes it a weeknight hero. It’s the kind of recipe that makes you feel like a baking rockstar, even if you’re just starting out. If you love classic chocolate chip cookies, you are going to adore this elevated version. It’s the perfect way to show someone you care, or just to treat yourself to something wonderfully comforting. I can’t wait to hear how yours turns out! Let me know in the comments below if you tried it, or if you have any favorite add-ins. Happy baking!
Skillet Chocolate Chip Cookie
Ingredients
Main Ingredients
- 0.25 cup butter, melted
- 0.125 cup granulated sugar
- 0.25 cup packed brown sugar
- 1 large egg yolk egg yolk
- 1 teaspoon vanilla extract
- 0.25 teaspoon baking soda
- 0.125 teaspoon salt
- 0.5 cup all purpose flour
- 0.33 cup mini chocolate chips
Instructions
Preparation Steps
- Preheat oven to 350°F. You will need a 6.25” mini cast iron skillet to make this cookie as shown. If you don’t have a skillet, you can use a 6” cake pan, and 8x4” loaf pan, or make individual cookies in a muffin pan. If you are using a skillet, cake, or loaf pan, spray it with nonstick cooking spray. If you’re using a muffin pan, use liners for easy removal and serving (it will probably make about 4 muffin sized cookies).
- Melt butter in a large bowl. Stir in both sugars, then egg yolk, extract, baking soda and salt. Carefully stir in the flour then mix in the chocolate chips.
- Optional: add 1/3 cup of ANY kind of chips or candy instead of the mini chips called for, if you wish.
- Bake the mini cast iron skillet for about 18-24 minutes, or until the edges are puffed and the center no longer looks translucent. Using another pan will affect baking time.
- Serve warm, with lots of whipped cream or ice cream and sprinkles.