Oh, how I love talking about these raspberry truffles! Honestly, they’re like little jewels of pure bliss. I remember the first time I made them, it was for a friend’s birthday, and I was honestly a little nervous. Would they turn out okay? Would they look as pretty as they did in the recipe photo? Well, let me tell you, they were a smash hit! Everyone kept asking for the recipe, and the look on their faces when they took that first bite… pure joy. It’s that magic moment when something you’ve made with your own two hands just brings smiles to everyone around you. They’re not just a dessert; they’re a little moment of happiness. And the best part? They’re surprisingly simple to whip up, way easier than you might think, and absolutely worth every second. They’re my go-to when I need a special treat without spending hours in the kitchen. You know, sometimes you just crave something intensely satisfying, something that feels a bit luxurious but doesn’t require a whole cake baking project? That’s exactly what these raspberry truffles are. Forget those complicated chocolate confections; this is the real deal, and it’s surprisingly approachable.
What are raspberry truffles?
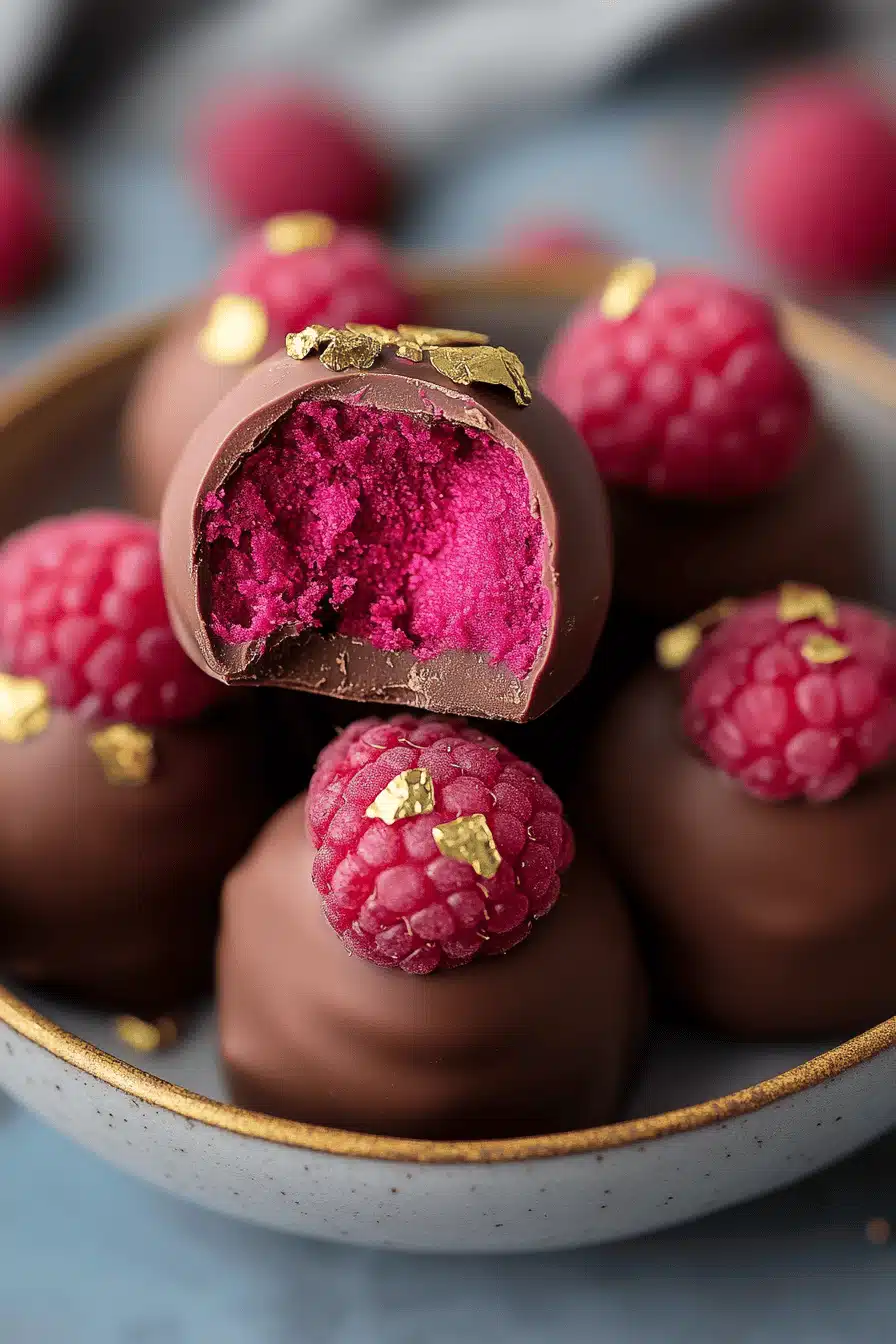
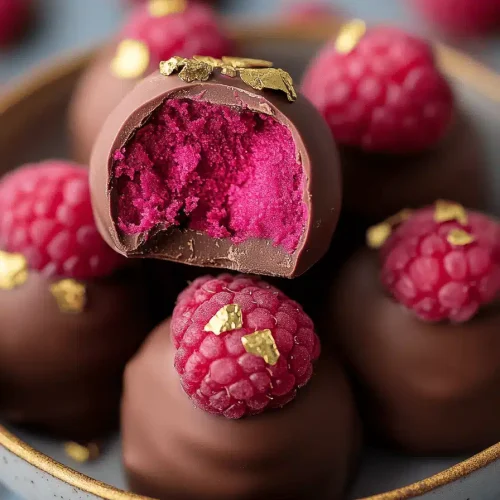
So, what exactly are these delightful little morsels? Think of them as tiny, intensely flavored spheres of pure joy, cloaked in a rich chocolatey embrace. At their heart, they’re a ganache – a smooth, creamy mixture of chocolate and heavy cream – infused with the vibrant, slightly tart essence of raspberries. We then roll them into bite-sized balls and, for that extra touch of decadence, coat them in more chocolate or sometimes a dusting of cocoa powder or chopped nuts. It’s like a concentrated burst of flavor, a perfect balance of sweet, rich chocolate and bright, fruity notes. The name “truffle” comes from the resemblance to the prized edible fungus, but trust me, these are a much more accessible and arguably more delicious indulgence for your everyday life. They’re meant to be savored, one exquisite bite at a time. It’s a confection that feels fancy but is rooted in straightforward, delicious ingredients.
Why you’ll love this recipe?
There are so many reasons why this recipe for raspberry truffles has become a staple in my kitchen, and I just know you’re going to fall in love with it too. First and foremost, the FLAVOR. Oh my goodness, the flavor! It’s this incredible dance between the deep, mellow richness of good quality chocolate and the bright, almost zesty punch of fresh raspberries. It’s not overly sweet, which is something I really appreciate. The tartness of the berries cuts through the richness beautifully, creating a flavor profile that’s both sophisticated and incredibly comforting. Then there’s the SIMPLICITY. Seriously, if you can melt chocolate and stir, you can make these. There’s no fancy equipment needed, no complicated techniques. It’s a recipe that truly empowers you to create something beautiful and delicious without feeling overwhelmed. I’ve made these on a whim when unexpected guests arrived, and they’ve always been a massive hit. COST-EFFICIENCY is another big win here. While they taste like a million bucks, the ingredients are pretty standard pantry staples for anyone who bakes even occasionally. Good chocolate, cream, and fresh or frozen raspberries – that’s it! It’s a far cry from buying fancy chocolates from a boutique. And let’s talk VERSATILITY. You can customize these truffles in so many ways. Want a darker chocolate kick? Use dark chocolate for the ganache. Prefer a milk chocolate embrace? Go for it. You can also play around with the coating – dark chocolate, milk chocolate, white chocolate, a dusting of cocoa, finely chopped nuts, shredded coconut… the possibilities are endless! What I love most about this recipe is that it feels like a special occasion treat, something you’d serve at a fancy party, but it’s genuinely achievable for a weeknight indulgence or a thoughtful homemade gift. It’s the perfect solution when you’re craving something sweet and a little bit elegant, but you don’t want the commitment of baking a whole cake.
How do I make raspberry truffles?
Quick Overview
The process is beautifully straightforward: you’ll gently heat cream and pour it over chopped chocolate to create a silky ganache. Then, you’ll swirl in vibrant raspberry puree, let it set until firm, and finally, roll, coat, and chill. It’s all about patient waiting between steps for the perfect texture. This method ensures a smooth, melt-in-your-mouth experience every single time.
Ingredients
For the Raspberry Ganache Base: For
8 ounces good quality semi-sweet or dark chocolate (chips are fine, but chopped bar chocolate melts better and has a richer flavor!), finely chopped. I always reach for a chocolate with at least 60% cacao for the best balance.
1/2 cup heavy whipping cream. Make sure it’s real heavy cream; the fat content is crucial for that smooth, luxurious texture. You can try half-and-half in a pinch, but it won’t be quite as rich.
1/2 cup fresh or frozen raspberries. If using frozen, thaw them completely and drain any excess liquid.
1 tablespoon unsalted butter, softened (optional, but adds an extra sheen and smoothness).
A pinch of salt – don’t skip this! It really makes the chocolate flavor pop.
For the Coating & Optional Add-ins:
6-8 ounces good quality chocolate (semi-sweet, dark, milk, or white), chopped for melting.
1 tablespoon coconut oil or vegetable oil (helps achieve a smooth, thin coating that sets up nicely).
Optional: Cocoa powder, finely chopped nuts (pistachios, almonds), shredded coconut, or freeze-dried raspberry powder for rolling.
Step-by-Step Instructions
Step 1: Prepare the Raspberry Puree
If you’re using fresh raspberries, give them a gentle rinse and pat them dry. If you’re using frozen, let them thaw completely. In a small saucepan or microwave-safe bowl, gently heat the raspberries just until they start to soften and release their juices. Mash them with a fork or potato masher until you have a rough puree. You can press this through a fine-mesh sieve to remove the seeds for an ultra-smooth truffle, or leave them in for a bit of texture – I personally like a few little seeds! Set aside.
Step 2: Make the Ganache Base
Place your finely chopped chocolate in a heatproof bowl. In a small saucepan, heat the heavy cream over medium heat until it just begins to simmer around the edges. Don’t let it boil vigorously! Pour the hot cream immediately over the chopped chocolate. Let it sit for about 5 minutes without stirring. This allows the heat from the cream to gently melt the chocolate. Then, using a whisk or a spatula, start stirring gently from the center outwards, until the mixture is completely smooth, glossy, and emulsified. If there are any stubborn bits of unmelted chocolate, you can pop the bowl over a double boiler (a pot of barely simmering water) for a minute or two, stirring constantly, until smooth. Stir in the softened butter (if using) and the pinch of salt until fully incorporated.
Step 3: Infuse with Raspberry
Gently fold the raspberry puree into the warm chocolate ganache. Stir until just combined. You’ll see beautiful streaks of pink and red swirling through the chocolate. Don’t overmix at this stage; you want to maintain those lovely swirls. The mixture will be quite soft and fluid at this point. You can choose to keep these beautiful swirls as is, or if you want a more uniform pink truffle, stir a little longer until the color is consistent.
Step 4: Chill to Firm Up
Cover the bowl tightly with plastic wrap, pressing the wrap directly onto the surface of the ganache to prevent a skin from forming. Refrigerate for at least 2-3 hours, or until the ganache is firm enough to scoop and roll. I often let mine chill overnight because it makes the rolling process so much easier. You want it to be firm, like a thick Peanut Butter, but still pliable enough to shape.
Step 5: Scoop and Roll
Once the ganache is firm, you can start rolling. Use a small cookie scoop or a tablespoon to portion out the ganache. Roll each portion into a smooth ball between your palms. If the ganache becomes too soft while you’re working, just pop it back into the fridge for 15-20 minutes to firm up again. Don’t worry if they aren’t perfectly spherical; a slightly rustic shape adds to their homemade charm!
Step 6: Prepare for Coating
Line a baking sheet with parchment paper. Arrange the rolled truffle balls on the parchment paper. If you plan to roll them in cocoa powder or nuts, have those ready in shallow bowls. At this stage, I often place the rolled balls back into the refrigerator for about 30 minutes to firm up even more. This helps them hold their shape better when you dip them in the chocolate coating.
Step 7: Melt Coating Chocolate
In a double boiler or a heatproof bowl set over a pot of simmering water (make sure the bottom of the bowl doesn’t touch the water), melt your coating chocolate with the coconut oil or vegetable oil. Stir constantly until it’s completely smooth and fluid. The oil helps make the chocolate thinner and easier to coat with, and it helps it set up with a nice shine.
Step 8: Dip and Coat
This is where it gets fun (and a little messy!). You can dip each truffle using two forks, a dipping tool, or even just a toothpick. Carefully drop a firm truffle ball into the melted chocolate, ensuring it’s fully submerged. Lift it out and let the excess chocolate drip back into the bowl. If you’re rolling in cocoa or nuts, do this immediately after dipping, while the chocolate is still wet. Place the coated truffle back onto the parchment-lined baking sheet. If you’re using a toothpick, you can gently push the truffle off the toothpick with a knife or another fork, then smooth the little indent where the toothpick was. Repeat with all your truffles.
Step 9: Chill to Set
Once all your raspberry truffles are coated, place the baking sheet back into the refrigerator for at least 30 minutes, or until the chocolate coating is completely set and firm. This is crucial for that satisfying snap when you bite into them.
Step 10: Serve and Enjoy!
Once the coating has set, your decadent raspberry truffles are ready to be enjoyed! They are best served at room temperature, so take them out of the fridge about 15-20 minutes before you plan to serve them. This allows the ganache inside to soften slightly for that perfect melt-in-your-mouth texture.
What to Serve It With
These raspberry truffles are truly showstoppers on their own, but they also pair wonderfully with a variety of drinks and occasions. For a simple, elegant BREAKFAST treat alongside your morning coffee, just place one or two on a small plate. They add a touch of unexpected sweetness to start the day. For BRUNCH, they’re perfect as a beautiful ending to a spread. I love arranging them on a tiered stand with fresh berries and maybe some mini pastries. They look so sophisticated, and a glass of sparkling rosé or a light mimosa complements their fruity notes beautifully. As a sophisticated DESSERT, they are pure indulgence. Serve them with a dollop of whipped cream, a drizzle of raspberry coulis, or even a small scoop of vanilla bean ice cream. They’re also fantastic alongside a rich espresso or a glass of port wine after dinner. And for those COZY SNACKS, when you just need a little pick-me-up, a couple of these with a warm cup of tea or Hot Chocolate is pure comfort. My family loves them after school with a glass of cold milk – it’s become our little afternoon ritual, a sweet reward after a busy day. I’ve also found they’re a hit at potlucks; people always ask for the recipe!
Top Tips for Perfecting Your Raspberry Truffles
I’ve made these raspberry truffles more times than I can count, and over the years, I’ve picked up a few tricks that I swear by. First, about the ZUCCHINI PREP (oops, wrong recipe in my head for a second there! Let’s stick to the truffles!). Okay, so for the truffles: the quality of your chocolate is paramount. Don’t skimp here! A good quality semi-sweet or dark chocolate (around 60-70% cacao) will give you the best flavor. If you use chocolate chips, they often contain stabilizers that can make the ganache a bit less smooth, so chopping a good bar is usually best. For the RASPBERRY PUREE, if you want super-smooth truffles, really take the time to press the mashed raspberries through a fine-mesh sieve. It’s a little tedious, but the result is worth it if you dislike seeds. If you’re short on time or just prefer a bit of texture, skipping the sieve is totally fine! MIXING ADVICE is key for ganache: don’t over-stir once you add the raspberry puree. Gentle folding is your friend. Overmixing can sometimes cause the ganache to split, making it oily or grainy. Just mix until the colors are swirled and beautiful. If your ganache ever *does* look a bit oily, don’t panic! Just whisk gently over very low heat or in a double boiler for a minute or two, and it should come back together. SWIRL CUSTOMIZATION is where you can really get creative. For those beautiful marbled effects, don’t fully incorporate the raspberry puree. Just swirl it in a few times. If you want a more uniform pink color, you can stir a bit longer. Or, try adding a drop of red food coloring for a more vibrant hue, though I usually prefer the natural color from the raspberries. INGREDIENT SWAPS: While this recipe is pretty solid, you can experiment! If you’re not a fan of raspberries, try strawberry or even a tart cherry puree. For a richer truffle, use a higher percentage cacao chocolate. If you want a dairy-free version, you can use full-fat coconut milk or a high-quality dairy-free cream alternative for the cream, and a good dairy-free chocolate. The texture might be slightly different, but it’s definitely doable. BAKING TIPS aren’t really applicable here since these are no-bake, but CHILLING TIPS are crucial! Make sure your ganache is properly firm before you try to roll it. If it’s too soft, the balls will be messy and hard to handle. Patience is a virtue with these! And GLAZE VARIATIONS: Experiment with different chocolates for coating! White chocolate offers a nice contrast to the dark ganache. You can also dip them halfway, or drizzle stripes of a contrasting chocolate over the top once set. My personal favorite is a light dusting of cocoa powder for a more rustic look.
Storing and Reheating Tips
Proper storage is key to keeping your raspberry truffles tasting their absolute best. At ROOM TEMPERATURE, they’ll be perfectly fine for about 2-3 days, especially if they are fully coated in chocolate and kept in a cool, dry place away from direct sunlight. I usually store them in an airtight container, sometimes with a layer of parchment paper between them to prevent sticking. If your kitchen is particularly warm, it’s better to err on the side of caution and refrigerate them. For REFRIGERATOR STORAGE, they can last for up to 1-2 weeks. Keep them in an airtight container. When you take them out to serve, let them sit at room temperature for about 15-20 minutes before eating. This allows the ganache inside to soften to that ideal, melt-in-your-mouth consistency. If you try to eat them straight from the fridge, they can be a bit too firm. FREEZER INSTRUCTIONS are great if you want to make a big batch ahead of time. Wrap each truffle individually in plastic wrap, then place them in a freezer-safe bag or airtight container. They can last for up to 2-3 months in the freezer. To thaw, simply transfer the frozen truffles to the refrigerator overnight, and then let them come to room temperature as usual. For GLAZE TIMING ADVICE, if you plan to freeze them, it’s best to coat them in chocolate *before* freezing. The chocolate coating protects the ganache inside and provides a lovely texture when thawed. Reheating isn’t typically necessary for truffles, as they’re best enjoyed at room temperature or slightly chilled, but if you find your coated truffles have become too hard, simply let them sit out longer.
Frequently Asked Questions
Final Thoughts
I really hope you give these raspberry truffles a try. They’re such a wonderful way to treat yourself or to make a thoughtful, homemade gift that always feels extra special. The combination of rich chocolate and bright raspberry is just irresistible, and the fact that they look so elegant but are surprisingly simple to make is a huge bonus. They’re perfect for holidays, birthdays, or just when you need a little bit of everyday magic. If you love these, you might also enjoy my recipe for Easy Chocolate Mousse or my No-Bake Lemon Bars – they share that same spirit of deliciousness without the fuss! I can’t wait to hear how yours turn out! Let me know in the comments below if you tried them, or if you have any favorite variations. Happy indulging!
Raspberry Truffles
Ingredients
Main Ingredients
- 300 grams white chocolate chopped
- 60 ml heavy cream
- 1 teaspoon raspberry extract
- 100 grams freeze-dried raspberries crushed into powder
- 0.5 cup powdered sugar for rolling
Instructions
Preparation Steps
- Place the chopped white chocolate in a heatproof bowl.
- Heat the heavy cream in a small saucepan over medium heat until it just begins to simmer. Do not boil.
- Pour the hot cream over the white chocolate. Let it sit for 5 minutes, then whisk until smooth and fully melted.
- Stir in the raspberry extract and the crushed freeze-dried raspberries until well combined. The mixture will be thick.
- Cover the bowl and refrigerate for at least 1-2 hours, or until firm enough to roll.
- Once firm, scoop out portions of the mixture and roll them into small balls. You can use a small cookie scoop or a tablespoon.
- Roll each truffle in powdered sugar to coat. Place on a parchment-lined baking sheet.
- Refrigerate the truffles for at least 30 minutes before serving to allow them to set.