I still remember the first time a spoonful of this Raspberry Tiramisu found its way onto my grandmother’s worn dessert plate. The air smelled like coffee and ripe berries, a little vanilla sweetness floating above it all. It felt fancy and homey at the same time—the kind of dessert you could serve to guests, yet it’s truly a simple weeknight joy when you want something that feels celebratory without fuss. Raspberry Tiramisu is that rare recipe that wears a party dress and comfy slippers at the same time. The raspberries wake up the familiar tiramisu notes of espresso and mascarpone, and the whole thing comes together with a few ingredients you probably already have. It’s lighter on its feet than a heavy chocolate cake, and honestly, it’s incredibly forgiving. I love making this when I’ve got a fridge full of berries or when I’m testing a new coffee blend—the flavors just seem to brighten each other. This version is a friendly twist on the classic, with a bright, fruity kiss that makes every spoonful feel like a little celebration.

What is a Raspberry Tiramisu?
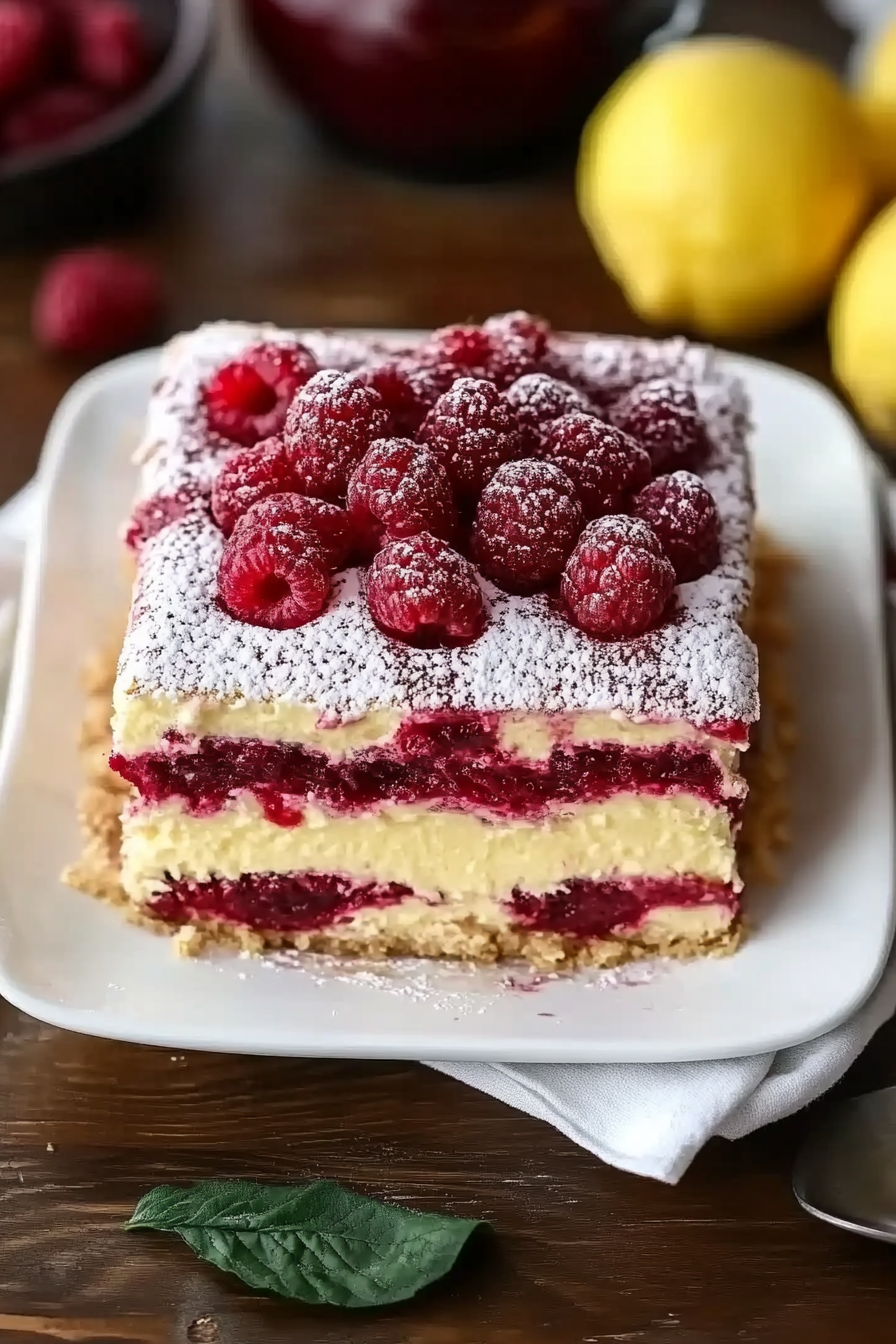
Think of Raspberry Tiramisu as a bright, fruit-forward cousin to classic tiramisu. It has the same love for coffee-kissed cream and cocoa, but the star here is the raspberries—fresh, tart, and a little wild. The name tiramisu means lift-me-up in Italian, and this version lifts you with a whisper of espresso and a sun-splashed berry glaze. It’s essentially a layered dessert: a light sponge or ladyfinger base, a mascarpone-cream filling studded with raspberries, and a glossy berry glaze that ties the whole thing together. I love that you can bake a thin sponge if you want some structure, or skip the bake entirely with store-bought ladyfingers for lightning speed. It’s approachable, flexible, and perfect for making ahead for birthdays, Easter, or a weekend treat. The raspberries play well with a touch of vanilla and a splash of coffee liqueur if you like; otherwise, you can omit them and still get a balanced, indulgent bite.
Why you’ll love this recipe?
What I love most about Raspberry Tiramisu is how it feels both special and approachable. First, the flavor profile is a sunny balance of coffee aroma, creamy mascarpone, and berry brightness. The raspberries cut the richness just enough to keep each bite fresh and lively, and the hint of vanilla ties the layers together like a well-loved hug. The simplicity is a big win too—you can make this with a baked sponge base or with ready-made ladyfingers, depending on how much time you’ve got. It’s remarkably forgiving: if your glaze is a touch tart, whisk in a teaspoon of sugar; if your mascarpone is a touch soft, give it a quick whip and fold in a bit more cream. This recipe is friendly on a budget, too—berries are often affordable when they’re in season, and you can swap ingredients without changing the core magic. What I love most about this is its versatility: it’s perfect for a baby shower brunch, a casual dinner party, or a cozy night in when you crave something special but don’t want to fuss in the kitchen. It’s a dessert that earns a little applause without demanding your entire evening.
Another thing that makes Raspberry Tiramisu special in my kitchen is how forgiving it can be with substitutions. I’ve used almond flour in the sponge to add a nutty note, swapped in a dairy-free mascarpone when guests are dairy-sensitive, and still ended up with a velvety filling and vibrant layers. The aroma alone—the espresso melding with vanilla and lemon—has a way of pulling people into the kitchen, which is exactly what I want when I’m feeding a crowd. If you’ve got kids begging for seconds, you’ve hit the sweet spot—this dessert disappears in minutes at my house, especially when I drizzle a little extra raspberry glaze over the top. It’s a little luxury that you can pull off on busy weeknights and a showstopper for weekend gatherings.
How do I make a Raspberry Tiramisu?
Quick Overview
Raspberry Tiramisu comes together in three easy phases: bake a light sponge or prepare ladyfingers, whip a lush mascarpone-cream with vanilla and raspberries, and then assemble in layers with espresso-soaked cake, cream, and a raspberry glaze. The beauty is in the contrasts—soft, coffee-scented sponge against bright, tangy berries and a creamy, dreamy filling. Don’t worry about perfection here; you’re aiming for pretty layers and a glossy top, not a flawless couture cake. This method keeps things hands-on but approachable: you can bake the sponge early in the day, whip the filling while the sponge cools, and assemble whenever you’re ready. If you’re short on time, you can use store-bought ladyfingers and a ready raspberry coulis to shave minutes off the process. The result feels special without requiring a fancy pastry toolkit, which is exactly the kind of recipe I keep returning to.
Ingredients
For the main Batter (Sponge Base):
– 4 large eggs, room temperature
– 1 cup granulated sugar
– 1 cup all-purpose flour
– 1 teaspoon baking powder
– 1 teaspoon vanilla extract
– pinch of salt
For the Filling:
– 8 oz mascarpone, softened
– 1/2 cup heavy cream, chilled
– 1/4 cup powdered sugar
– 1 teaspoon vanilla extract
– 1 cup fresh raspberries, roughly chopped (plus extra for layering)
– 2 tablespoons raspberry liqueur (optional)
For the Glaze:
– 1/2 cup raspberry sauce or preserves (thinned with a little water if needed)
– 2 tablespoons powdered sugar (more to taste)
– 1 tablespoon lemon juice (brightens the glaze)
– 1–2 tablespoons cocoa powder for dusting
Step-by-Step Instructions
Step 1: Preheat & Prep Pan
Preheat your oven to 350°F (175°C). Line a shallow 9×13-inch pan with parchment paper, letting the sides overhang a bit so you can lift the sponge out easily later. If you’re using a Sheet Pan for a thinner sponge, this works beautifully too. Lightly grease the parchment so the batter doesn’t stick. A quick spray of nonstick spray makes life easy when you’re flipping the sponge to cool.
Step 2: Mix Dry Ingredients
In a bowl, whisk together the flour, baking powder, and a pinch of salt. Sifting isn’t strictly necessary, but it helps keep the sponge tender. I’ve learned that a fine, clump-free dry mix makes for a lighter crumb, which is essential for those delicate raspberry layers.
Step 3: Mix Wet Ingredients
In a separate bowl, beat the eggs with the sugar until the mixture is pale, thick, and ribboned when you lift the whisk. This usually takes about 5 minutes with an electric mixer. Stir in the vanilla. The air you whisk in now is what gives the sponge its lift and keeps the dessert light, even with the richness of mascarpone in the filling.
Step 4: Combine
Fold the dry ingredients into the wet mixture just until combined. Don’t overmix; you want a tender crumb, not a dense loaf. If you’re using a whisk, switch to a spatula and fold gently. Some tiny lumps are okay—helps the sponge stay moist after baking.
Step 5: Prepare Filling
In a separate bowl, whip the mascarpone with the powdered sugar and vanilla until smooth and creamy. In another bowl, whip the heavy cream to soft peaks. Gently fold the whipped cream into the mascarpone until just combined. Fold in the raspberries carefully; you want some whole berries and some creamy ribbons of mascarpone for texture. If you’re using liqueur, fold it in at this stage for a little kick of depth. This filling should be luxuriously smooth and no stiff peaks—silky is the goal.
Step 6: Layer & Swirl
Pour the batter into the prepared pan and spread evenly. Bake for 12–14 minutes, or until a toothpick comes out with a few moist crumbs. Let the sponge cool completely on a rack. If you baked a larger sheet, trim into uniform rectangles that will layer nicely with the mascarpone. You can also cut the sponge into rounds if you prefer a round-tower presentation. When you’re ready to assemble, spoon a little glaze onto the plate to anchor layers and prevent slipping.
Step 7: Bake
Keep an eye on the sponge; you want it pale and springy, not dark and crusty. If your sponge domes slightly, you can gently press it flat while it’s still a bit warm. Cooling is important—let it come to room temperature before you handle it. If you’re not using the sponge right away, wrap it once cooled and store in the fridge for up to two days; it will stay tender but hold its shape.
Step 8: Cool & Glaze
Once the sponge is completely cool, you’re ready to assemble. Brush or dab a light espresso or coffee syrup on the surface to add depth to the layers. Spoon on the mascarpone filling, then scatter raspberries across. Drizzle or brush a raspberry glaze over the top, allowing some to drizzle down the sides for a glossy finish. A final dusting of cocoa powder gives that classic tiramisu look. If you want a more uniform glaze, let it set a minute or two before adding the final cocoa dusting.
Step 9: Slice & Serve
Chill the assembled dessert for at least 2 hours, preferably longer, to let the flavors meld and the layers set. When you’re ready to serve, run a sharp knife under hot water and wipe clean between cuts for clean slices. A dollop of lightly whipped cream and a few fresh raspberries on top make the plates look restaurant-worthy. Trust me on this—the first bite is always the moment you know you’ve nailed it.
What to Serve It With
What pairs beautifully with Raspberry Tiramisu depends on the moment and the crowd.
For Breakfast: A simple, bold coffee and a croissant or almond pastry. The contrast of strong coffee with a silky mascarpone layer makes a late-m riser feel indulgent without tipping over into dessert territory.
For Brunch: A light sparkling wine or a chilled peach prosecco to echo the berry notes. Plate a few raspberries on the side and let guests help themselves to creamy, citrusy bites.
As Dessert: A small espresso or a glass of dessert wine—like Moscato or a ruby port—heightens the chocolatey, coffee-laced finish. A little extra fresh berry compote alongside is a perfect match.
For Cozy Snacks: Serve with a lightly steeped black tea or a vanilla chai. The warmth of the spices complements the berry and coffee tones nicely, making this a comforting late-night treat.
My family traditions usually involve a quiet kitchen after dinner, the fridge light flickering on as we plate slices and trade stories about the day. We always tuck a few extra raspberries into the layers—the little bursts of tart sweetness feel like a fresh memory every time. This dish travels well, too; I’ve taken it to potlucks and watched friends close their eyes as the flavors bloom in their mouths. If you’re introducing it to new guests, a light dusting of cocoa and a few mint leaves make the presentation pop and invite curiosity.
Top Tips for Perfecting Your Raspberry Tiramisu
[Expert advice organized by technique:]
Zucchini Prep: It’s a playful label, but the idea is to prep for moisture management, not actual zucchini. If the berries look a touch thirsty, macerate them with a teaspoon of sugar and a splash of lemon juice for about 10 minutes, then drain the juice before layering. This gives you juicy berries without making the filling watery.
Mixing Advice: Don’t overwork the mascarpone filling. You want it silky, not fluffy like whipped cream. If you whisk the mascarpone too aggressively, it can turn grainy. Gentle folds are your friend. If your cream looks stiff, give it a quick light whip to loosen, then fold into the mascarpone in two additions.
Swirl Customization: For a more dramatic look, reserve a few spoonfuls of the raspberry glaze and create a swirl on top after the cocoa dusting. A skewer or toothpick can help you drag the glaze in a spiral or wave pattern for a magazine-worthy finish.
Ingredient Swaps: Dairy-free? Use Coconut Cream whipped with a dairy-free mascarpone substitute, and swap the sponge for a dairy-free, egg-free alternative if needed. You can also use warmed pectin to give a touch more set to the layers without compromising the creaminess.
Baking Tips: If your oven runs hot, lower the temperature to 325°F and watch the sponge closely. A shallow pan helps you keep a thin, tender crumb. If you’re short on time, substituting a ready-made ladyfingers approach is perfectly acceptable—just soak them briefly in espresso so they don’t overpower the filling.
Glaze Variations: Add a teaspoon of vanilla to the glaze for more depth, or swap lemon juice for orange juice for a citrus twist. A dark chocolate drizzle over the top pairs beautifully with the berry brightness, adding another layer of contrast to the dessert.
These tips aren’t magical secrets; they’re the little adjustments I’ve learned after making this Raspberry Tiramisu dozens of times. If you’re short on time, a light chill and a quick glaze still deliver a stunning, delicious result. If you’ve got more time, go ahead and layer with extra raspberries for a show-stopping effect. The texture and the taste will tell you you’ve hit the sweet spot.
Storing and Reheating Tips
Raspberry Tiramisu keeps well in the fridge, and the flavors only improve as they mingle. Here’s how I handle it in my kitchen:
Room Temperature: Not ideal for long storage; aim for up to 2 hours if you’re serving soon after assembling. The mascarpone can soften and lose its structure in warm rooms.
Refrigerator Storage: Cover loosely with plastic wrap or keep in a container with a tight lid for up to 3 days. For best texture, let slices sit at least 30 minutes in the fridge before serving so the filling relaxes and the sponge reabsorbs a touch of moisture from the glaze.
Freezer Instructions: This dessert freezes surprisingly well if you layer it in a sturdy container and wrap it securely. It will keep for up to 1 month. Thaw overnight in the fridge and give it a gentle whisk or remix of the top layer before serving to restore the cream’s smoothness.
Glaze Timing Advice: If you’re freezing, hold back the glaze until you’re ready to serve. Glazes can become a bit dull if frozen and thawed; instead, you can glaze after thawing for a fresher look and brighter flavor.
My favorite testing trick is to assemble a chilled version and a non-chilled version side by side—then you can taste how the texture changes with temperature. The cold version feels luxurious and crisp, while the room-temperature slice feels velvety and indulgent. Either way, it’s worth the extra minutes to achieve that perfect balance of layers and flavors.
Frequently Asked Questions
Final Thoughts
Raspberry Tiramisu has become a favorite in my home because it blends everyday ingredients with a touch of celebration. The contrast between the creamy filling, the coffee-kissed sponge, and the bright raspberries feels classic and modern at the same time, like a beloved family recipe that’s been updated with a new perspective. It’s the kind of dessert that travels well, stands up to a crowd, and still feels personal—the kind of dish that brings people to the table with smiles. If you’re craving something a little special but not fussy, this is the one to reach for. I’d love to hear how you customize it—do you prefer a stronger coffee note, a more pronounced berry glaze, or a dairy-free version? Drop your variations and photos in the comments, and don’t forget to rate this recipe if you try it. Happy baking!

