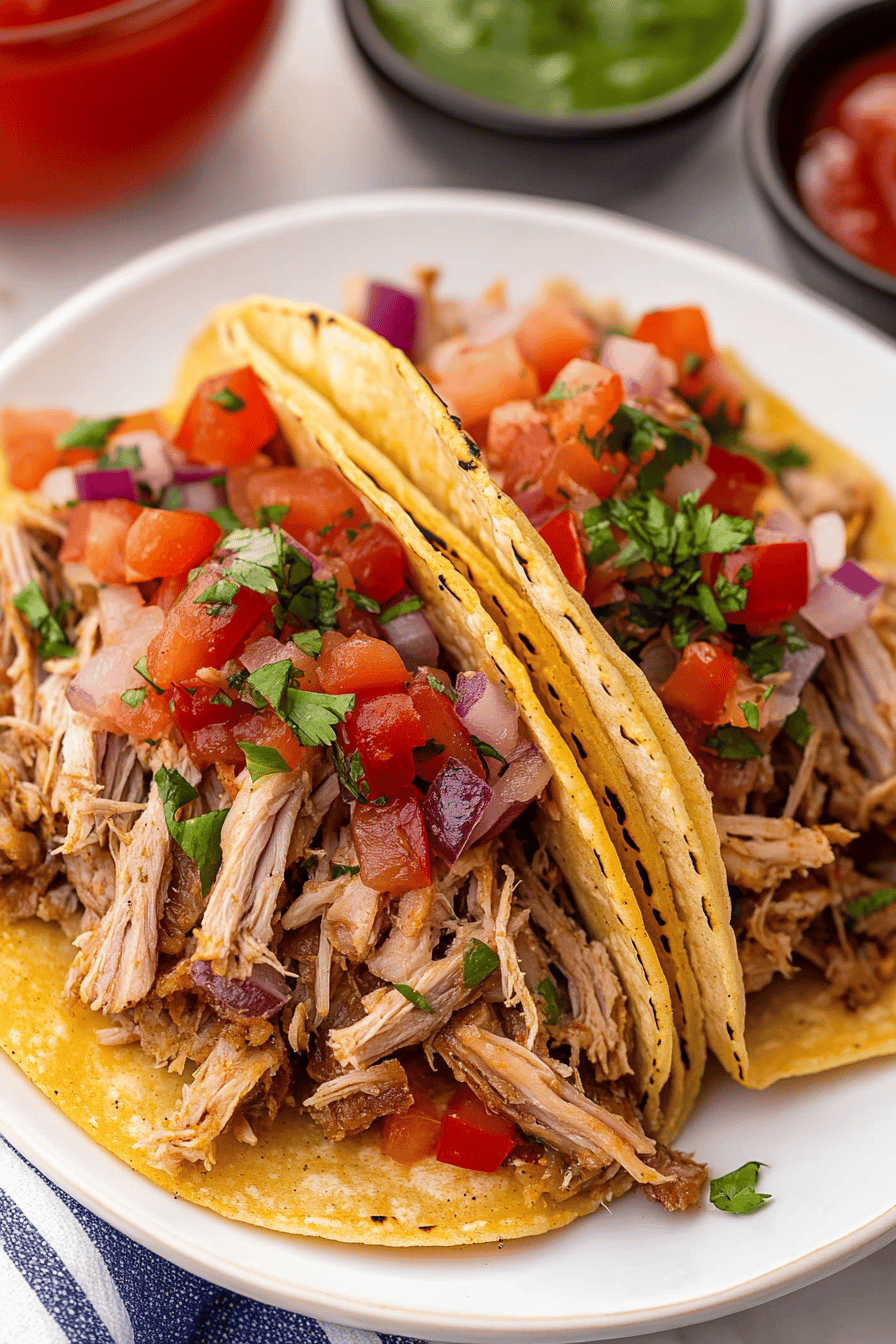
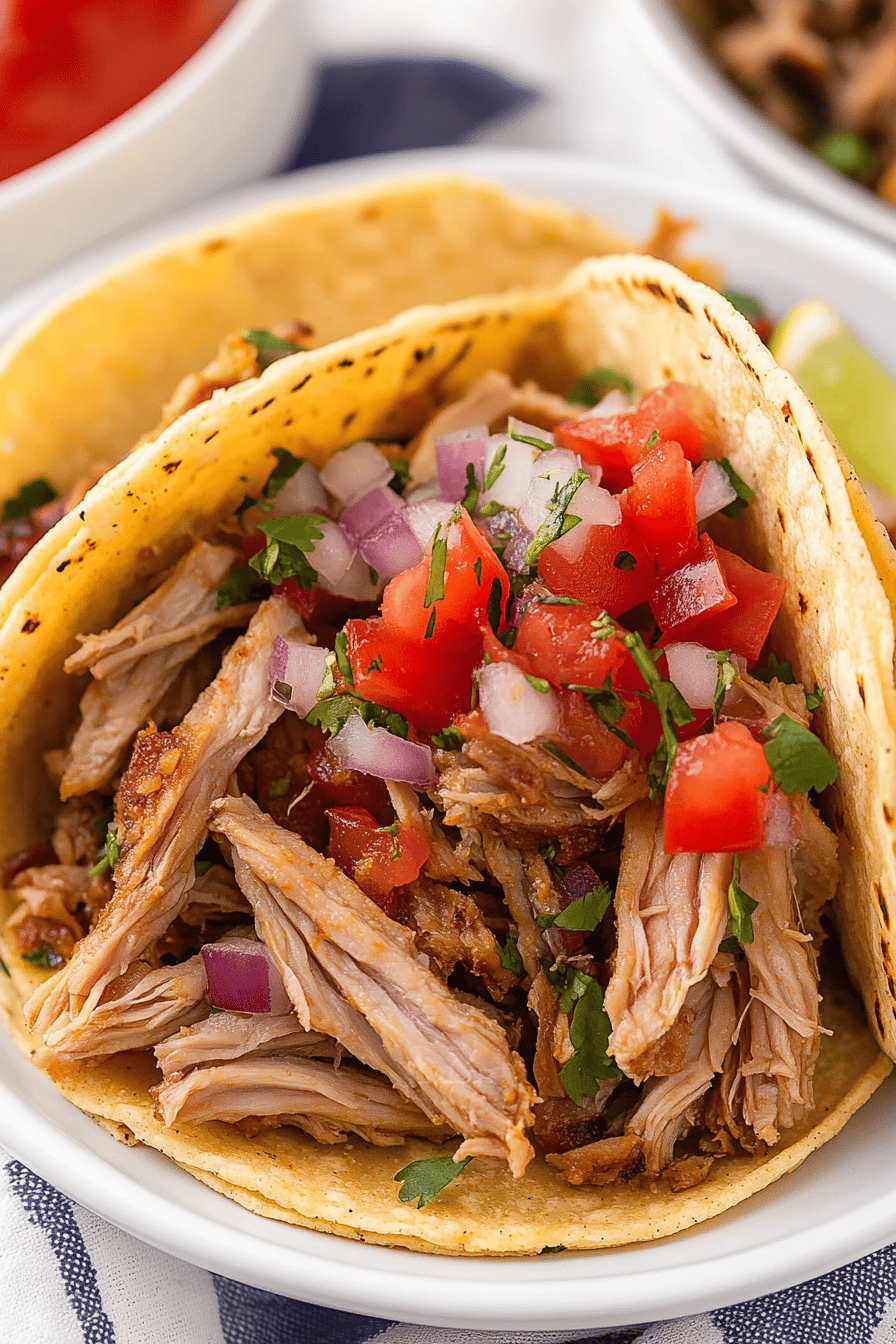
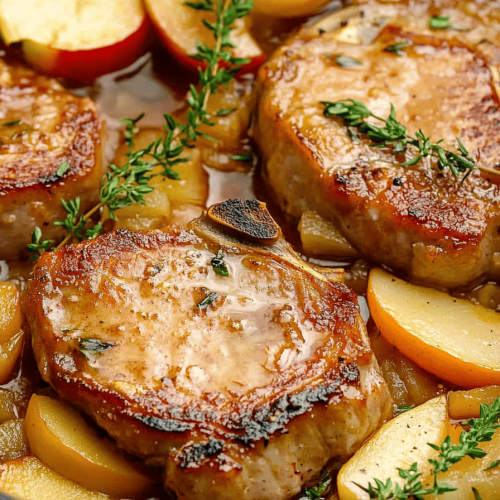
There are some dishes that just feel like a warm hug, aren’t there? For me, that dish, hands down, is perfectly crispy pork carnitas. I swear, the smell alone when they’re in the oven is enough to make my whole family magically appear in the kitchen. It’s that deep, savory, slightly sweet aroma that just screams comfort. Honestly, I’ve tried a lot of pork recipes in my life, but these carnitas are in a league of their own. They’re so incredibly tender on the inside and delightfully crispy on the edges, a combination that’s just pure magic. If you’ve ever had good carnitas, you know what I’m talking about. They’re way more satisfying than a simple roast, and honestly, when you get them just right, they’re even better than my famous slow-cooker Pulled Pork, and that’s saying something!

What are Pork Carnitas?
So, what exactly are pork carnitas, you ask? At its heart, it’s a classic Mexican dish made from pork shoulder that’s slow-cooked until it’s incredibly tender, then crisped up to perfection. Think of it as the ultimate slow-and-low pork preparation that ends with a bang. The name “carnitas” literally translates to “little meats,” which makes total sense when you see how the pork breaks down into glorious, shreddable pieces. Traditionally, they’re cooked in lard, which is what gives them that unparalleled richness and crispiness. But don’t worry if you don’t have a vat of lard handy (who does these days, right?), because my method still achieves that amazing texture without it. It’s essentially about coaxing out all the flavor and moisture from the pork over time, then giving it a final blast of heat to create those irresistible crispy bits.
Why you’ll love this recipe?
There are so many reasons why this pork carnitas recipe has become my absolute favorite, and I just know you’re going to adore it too. First off, the flavor is out of this world. We’re talking deeply savory, a hint of citrus from the orange, and that wonderful subtle sweetness that just melts in your mouth. It’s not just good; it’s soul-satisfyingly delicious. Then there’s the simplicity. Despite the incredible results, this recipe is surprisingly straightforward. You toss the pork with some aromatics, let it cook low and slow, and then crisp it up. It’s perfect for those nights when you want something special without spending hours actively cooking. And speaking of value, pork shoulder is one of the most budget-friendly cuts of meat, making this a fantastic way to feed a crowd or have amazing leftovers without breaking the bank. What I truly love most, though, is its sheer versatility. You can pile these carnitas high on tacos, stuff them into burritos, serve them over rice, or even just eat them straight from the pan with a fork (guilty as charged!). It’s a recipe that truly delivers every single time.
How do I make Pork Carnitas?
Quick Overview
This recipe is all about patience leading to perfection. You’ll start by seasoning a beautiful pork shoulder, then braising it slowly in a flavorful liquid until it’s fork-tender. The magic really happens in the final step: crisping up those gorgeous shreds of pork until they’re golden brown and utterly irresistible. It sounds simple, and it is! The key is giving the pork the time it needs to soften and become succulent. This method ensures maximum flavor and that delightful texture contrast that makes carnitas so special. You’ll be amazed at how little hands-on time is required for such an impressive result.
Ingredients
For the Pork:
A good 3-4 pound boneless pork shoulder (also known as pork butt). This cut has the perfect amount of fat and connective tissue that breaks down beautifully during slow cooking, ensuring super tender and moist carnitas. Look for one with good marbling throughout.
For the Braising Liquid:
2 oranges, halved. We’ll use the juice and the squeezed halves for amazing flavor and tenderness. The citrus helps cut through the richness of the pork.
1 whole head of garlic, halved crosswise. Don’t be shy with the garlic; it infuses everything with that wonderful aroma.
1 large onion, quartered. This adds a subtle sweetness and depth to the braising liquid.
1-2 bay leaves. A classic for a reason, bay leaves add a subtle herbaceous note.
1 teaspoon dried oregano. Mexican oregano is fantastic if you can find it, but regular will do!
1 teaspoon ground cumin. This warm spice is essential for that authentic flavor.
Salt and freshly ground black pepper, to taste. Be generous with the salt; pork loves it!
About 2 cups of water or chicken broth. This helps keep the pork moist during the braise. Broth adds a little extra flavor, but water is perfectly fine.
For Crisping:
About 1/4 cup of the rendered pork fat from the braise. This is liquid gold for getting that perfect crispy texture!
Step-by-Step Instructions
Step 1: Preheat & Prep Pan
First things first, preheat your oven to 300°F (150°C). This low temperature is key for tender carnitas. Grab a large, heavy-bottomed oven-safe pot or Dutch oven. You want something that can hold the pork and all the liquid snugly. Make sure it has a lid that fits well.
Step 2: Mix Dry Ingredients
While the oven is preheating, let’s prep our pork. Pat the pork shoulder completely dry with paper towels. This is a small step, but it really helps get a better sear later if you choose to do that (though it’s not strictly necessary for this method). In a small bowl, mix together about 2 tablespoons of salt, 1 tablespoon of black pepper, the dried oregano, and the cumin. Generously rub this mixture all over the pork shoulder, making sure to get into any crevices. Don’t be shy; pork needs good seasoning!
Step 3: Mix Wet Ingredients
Squeeze the juice from the halved oranges into your Dutch oven. Then, place the squeezed orange halves, the halved head of garlic, and the quartered onion directly into the pot. Add the bay leaves. This forms the flavor base for our braising liquid.
Step 4: Combine
Nestle the seasoned pork shoulder into the pot on top of the aromatics. Pour in enough water or broth to come about halfway up the sides of the pork. You don’t want it to be completely submerged; we want some of the pork to be exposed to the steam and flavors. Place the lid securely on the pot.
Step 5: Prepare Filling
Now, we wait! Place the covered Dutch oven into your preheated oven. Let it cook for about 3 to 4 hours. The exact time will depend on the size and thickness of your pork shoulder. You’ll know it’s ready when the pork is incredibly tender and easily shreds with a fork. I usually start checking around the 3-hour mark.
Step 6: Layer & Swirl
Once the pork is tender, carefully remove the Dutch oven from the oven. Transfer the pork to a large baking sheet or a rimmed baking dish. Using two forks, shred the pork right there in the pan. Discard any large pieces of fat that didn’t render down. Skim off about 1/4 cup of the flavorful cooking liquid (this is your rendered fat!) from the Dutch oven and drizzle it over the shredded pork. Toss everything together to coat the shredded pork evenly.
Step 7: Bake
Now for the best part – crisping! Turn your oven broiler on high, or increase the oven temperature to 425°F (220°C). Place the baking sheet with the shredded pork under the broiler or in the hot oven. Keep a close eye on it! You want the edges to get gloriously crispy and slightly browned. This usually takes about 5-10 minutes. You can give it a stir halfway through to ensure even crisping. Be careful not to burn it!
Step 8: Cool & Glaze
Once the carnitas are perfectly crispy, remove them from the oven. Let them rest for just a few minutes. If you’re serving them immediately, they’re ready to go! If you want to enhance the flavor even more, you can stir in a little bit of the reserved cooking liquid or a squeeze of fresh lime juice right before serving.
Step 9: Slice & Serve
Serve your delicious pork carnitas hot! They are absolutely divine served in warm corn tortillas with your favorite toppings like chopped onion, cilantro, salsa verde, or a squeeze of lime. Enjoy every single crispy, tender bite!
What to Serve It With
One of the best things about these pork carnitas is just how incredibly versatile they are. I love them for pretty much any meal! For a hearty breakfast, I’ll often shred some carnitas and serve them alongside scrambled eggs with a side of refried beans and warm corn tortillas. It’s a weekend brunch dream, if you ask me. For a more elegant brunch, I might serve them as part of a taco bar, letting everyone build their own perfect creation with all the fixings. When I’m feeling like dessert (yes, dessert!), I’ll sometimes serve a small portion of carnitas with a drizzle of a sweet mole sauce or a tangy pineapple salsa – it’s that perfect sweet and savory combo that hits the spot. And for those cozy, lazy nights in? Forget the complicated meals; I’ll just make a big batch, grab some warm tortillas, a simple pico de gallo, and maybe a margarita, and call it a feast. My kids always request them in tacos, and honestly, I’m never going to say no to that!
Top Tips for Perfecting Your Pork Carnitas
I’ve made this recipe more times than I can count, and over the years, I’ve picked up a few little tricks that I think really elevate the final dish. For the pork itself, always go for a well-marbled cut. That fat is your friend here; it renders down and keeps the meat moist and tender throughout the long braise, and that rendered fat is pure gold for crisping later. When you’re shredding the pork, don’t overwork it. You want those lovely distinct pieces, not a mush. I find using two forks works best. Regarding the crisping step, this is where you can really customize your carnitas. If you love them super crispy, give them a bit more time under the broiler or in a hotter oven, and don’t be afraid to stir them around to catch all those delicious brown bits. Conversely, if you prefer them a little less crispy, just shorten that final stage. I’ve found that some ovens have hot spots, so rotating the pan halfway through the crisping process is a good idea. For ingredient swaps, if you don’t have oranges, limes work beautifully too, offering a tangier flavor profile. If you’re out of bay leaves, a sprig of rosemary can add a lovely aromatic touch, though it’s a different flavor altogether. And when it comes to the braising liquid, if you want an extra layer of flavor, you can deglaze the Dutch oven after you remove the pork and pour that flavorful liquid over the shredded meat before crisping. Trust me, it’s a game-changer!
Storing and Reheating Tips
Carnitas are fantastic for leftovers, though I’ll be honest, there are rarely any! If you do happen to have some, storing them properly is key to keeping that delicious texture. For short-term storage, once the carnitas have cooled slightly, place them in an airtight container. They’ll keep well in the refrigerator for up to 3-4 days. When it comes to reheating, I’ve found a few methods work best. My favorite is to reheat them in a skillet on the stovetop over medium heat, with just a tiny bit of oil or some of the reserved cooking liquid. This helps them regain some of that crispiness. You can also spread them on a baking sheet and reheat them in a 350°F (175°C) oven for about 10-15 minutes, or until heated through and slightly crisped. If you’re in a rush, the microwave works in a pinch, but they won’t be as crispy. For long-term storage, carnitas freeze beautifully! Let them cool completely, then portion them into freezer-safe bags or containers. They’ll last in the freezer for up to 2-3 months. Thaw them overnight in the refrigerator before reheating. I usually add the glaze right before serving, but if I’m reheating from frozen, I’ll add a little bit of the braising liquid back in during the reheating process to keep them moist.
Frequently Asked Questions
Final Thoughts
I truly hope you give this pork carnitas recipe a try. It’s one of those dishes that’s become a staple in my kitchen because it’s so forgiving, incredibly delicious, and always a crowd-pleaser. The process is simple, the ingredients are accessible, and the reward is a plate of some of the most satisfying, flavorful, and texturally perfect pork you’ll ever have. Whether you’re serving them up in tacos for a family weeknight dinner or as part of a festive spread, these carnitas are sure to impress. If you love this recipe, I think you might also enjoy my recipe for slow-cooker shredded chicken or my classic beef barbacoa – they share that same melt-in-your-mouth tenderness! I can’t wait to hear how yours turn out, so please leave a comment below and let me know your favorite way to enjoy these crispy pork carnitas!
pork carnitas
Ingredients
Main Ingredients
- 2 pounds pork shoulder boneless, cut into 2-inch chunks
- 0.5 cup orange juice
- 0.25 cup lime juice
- garlic cloves 4, minced
- 1 teaspoon dried oregano
- 0.5 teaspoon ground cumin
- 1 teaspoon salt
- 0.5 teaspoon black pepper
- 0.5 cup water
- 2 tablespoons lard or vegetable oil for crisping
Instructions
Preparation Steps
- In a Dutch oven or heavy-bottomed pot, combine the pork shoulder, orange juice, lime juice, minced garlic, oregano, cumin, salt, and pepper.
- Add the water and bring the mixture to a simmer over medium-high heat. Once simmering, reduce the heat to low, cover the pot, and cook for about 2 to 3 hours, or until the pork is very tender and easily shreds.
- Remove the pork from the pot using a slotted spoon and place it on a baking sheet. Shred the pork using two forks. Discard most of the liquid from the pot, leaving about 1/4 cup.
- Return the shredded pork to the pot with the remaining liquid. Heat the lard or vegetable oil in a large skillet over medium-high heat. Add the shredded pork to the hot skillet in a single layer (you may need to do this in batches).
- Cook the pork for about 5-7 minutes per side, or until it is browned and crispy. Serve immediately with your favorite taco toppings, or use in other dishes.