Oh, where do I even begin with these? If there’s one recipe that instantly transports me back to my grandmother’s cozy kitchen, it’s this peppermint patties recipe. It’s that time of year when the air starts to get a little crisp, and all I want are those cool, refreshing bursts of mint wrapped in rich, decadent chocolate. Forget those store-bought versions that often taste a bit artificial; this homemade peppermint patty recipe is the real deal. It’s like a little hug for your taste buds, with that perfect balance of sweet and minty that’s just *so* satisfying. I remember sneaking into her pantry as a kid, hoping to find a hidden stash, and now I get to share this little piece of my childhood with you. Honestly, it’s way easier to make than you might think, and the aroma alone when they’re baking is enough to make your whole house feel like a festive wonderland. If you’ve ever loved a good chocolate-mint combo, you are in for a treat!
What is the recipe for Peppermint Patties?
So, what exactly are we making here? Think of these homemade peppermint patties as little disks of pure joy. They’re essentially a smooth, creamy, peppermint-infused filling enrobed in a thin, crisp layer of chocolate. Unlike some recipes that can be fussy, this one focuses on simplicity without sacrificing any of that amazing flavor. It’s that classic combination that people have loved for ages, but made with a personal touch. My grandma’s secret, I think, was always using really good quality peppermint oil – it makes all the difference! It’s not just a candy; it’s a tradition, a memory, and frankly, the best darn peppermint patty you’ll ever try. If you’ve ever had those classic little candies and wished you could recreate that magic at home, this is your chance!
Why you’ll love this recipe?
There are so many reasons why this peppermint patties recipe has become a staple in my kitchen, and I just know you’re going to adore it too. Let’s start with the **flavor**, of course! It’s this incredible, refreshing wave of mint that’s perfectly balanced by the deep, rich chocolate. It’s not cloyingly sweet; it’s just pure, unadulterated deliciousness. Then there’s the **simplicity**. I’ve tested a lot of recipes over the years, and this one is a lifesaver. You don’t need any fancy equipment or obscure ingredients. Seriously, most of what you’ll need is probably already in your pantry. Plus, it’s incredibly **cost-effective**. Making these at home will save you a bundle compared to buying those expensive store-bought versions, and you get so many more for your money! And let’s talk **versatility**. While they’re fantastic on their own, I love using them in different ways. They’re obviously perfect after dinner, but I’ve also chopped them up and sprinkled them over Ice Cream, or even tucked them into gift bags for friends. What I love most about this recipe, though, is the sheer satisfaction of creating something so wonderful from scratch. It feels like a little bit of edible magic, and that’s something special, right?
How do I make peppermint patties?
Quick Overview
Making these delightful peppermint patties is a surprisingly straightforward process that involves just a few key stages: preparing a sweet, minty filling, forming it into little disks, and then coating them in smooth, melted chocolate. The beauty of this recipe lies in its efficiency; you can have a batch ready to chill in under an hour. Don’t be intimidated by the chocolate coating – I’ll walk you through it, and it’s much simpler than it sounds! This method ensures you get that classic texture and flavor without a fuss, making it perfect even for beginner bakers looking to impress.
Ingredients
What is the Peppermint Filling?
You’ll need 3 cups of powdered sugar (make sure it’s sifted to avoid lumps – I always sift mine twice!). Next, grab about 1/4 cup of evaporated milk. This is key for that smooth, creamy texture. If you can’t find evaporated milk, you can use regular milk but you might need a tiny bit less. Then comes the star: 1 to 1 ½ teaspoons of good quality peppermint extract. Start with 1 teaspoon and taste; you can always add more, but you can’t take it away! I find 1 ¼ teaspoons is the sweet spot for my family. Lastly, a pinch of salt to balance the sweetness.
For the Chocolate Coating:
This part is all about the chocolate. I prefer using 12 ounces of semi-sweet chocolate chips, but you can also use chopped chocolate bars – just make sure it’s good quality for the best melt and flavor. For an extra smooth finish, I like to add about 2 tablespoons of vegetable shortening or coconut oil. This helps the chocolate melt beautifully and sets up nicely without getting too brittle.
Step-by-Step Instructions
Step 1: Preheat & Prep Pan
First things first, let’s get our workspace ready. Line a large baking sheet with parchment paper. This is super important because it prevents the peppermint patties from sticking and makes them so much easier to remove once they’ve set. You don’t need to preheat anything yet for the filling, but having your baking sheet ready means you can work efficiently once the filling is mixed.
Step 2: Mix Dry Ingredients
In a large mixing bowl, combine the 3 cups of sifted powdered sugar and the pinch of salt. Give them a quick whisk together just to make sure everything is evenly distributed before we add the wet ingredients. This step might seem small, but it helps ensure a consistently smooth filling throughout.
Step 3: Mix Wet Ingredients
In a separate, smaller bowl, whisk together the 1/4 cup of evaporated milk and your peppermint extract. I always smell the peppermint extract first to gauge its strength. If it smells super potent, I’ll lean towards the lower end of the range, maybe just 1 teaspoon. If it’s a milder scent, I’ll go closer to 1 ½ teaspoons. It’s always better to start with less and add more!
Step 4: Combine
Now, gradually add the wet ingredients to the dry ingredients, mixing with a wooden spoon or a sturdy spatula. Keep mixing until a thick, but pliable dough forms. It should be stiff enough to hold its shape but not so dry that it crumbles. If it seems too dry, add another teaspoon of evaporated milk. If it’s too sticky, add a tablespoon more of sifted powdered sugar. You’re looking for a consistency that’s easy to handle but not messy.
Step 5: Prepare Filling
This is where we get them ready to become patties! Take small portions of the dough – about a tablespoonful. Roll them gently between your palms until they form smooth balls. Then, gently flatten each ball into a disk about ½ inch thick and roughly 1 ½ inches in diameter. I like to use the bottom of a glass or a small cookie cutter to make them uniform, but it’s not essential. Just aim for consistency in thickness so they bake evenly.
Step 6: Layer & Swirl
Arrange your formed peppermint disks onto the prepared parchment-lined baking sheet. Make sure they have a little space between them, as they might spread slightly. At this point, you can either let them set up as is, or if you’re feeling fancy, you can gently press a fork into the top of each one to create a little decorative pattern. This is optional, but it does look nice!
Step 7: Bake
Here’s the magic! You don’t actually bake these in the oven in the traditional sense. What we do is slightly melt them to help them firm up and get that perfect texture. Place the baking sheet into a *very* low oven – think around 150-170°F (65-75°C) – for just about 10-15 minutes. You’re not looking for them to brown or cook through; you just want them to soften slightly and firm up. Keep a close eye on them! Once they look slightly smoother and feel a bit firm to the touch, remove them from the oven and let them cool completely on the baking sheet. This step is crucial for them to hold their shape when dipped in chocolate.
Step 8: Cool & Glaze
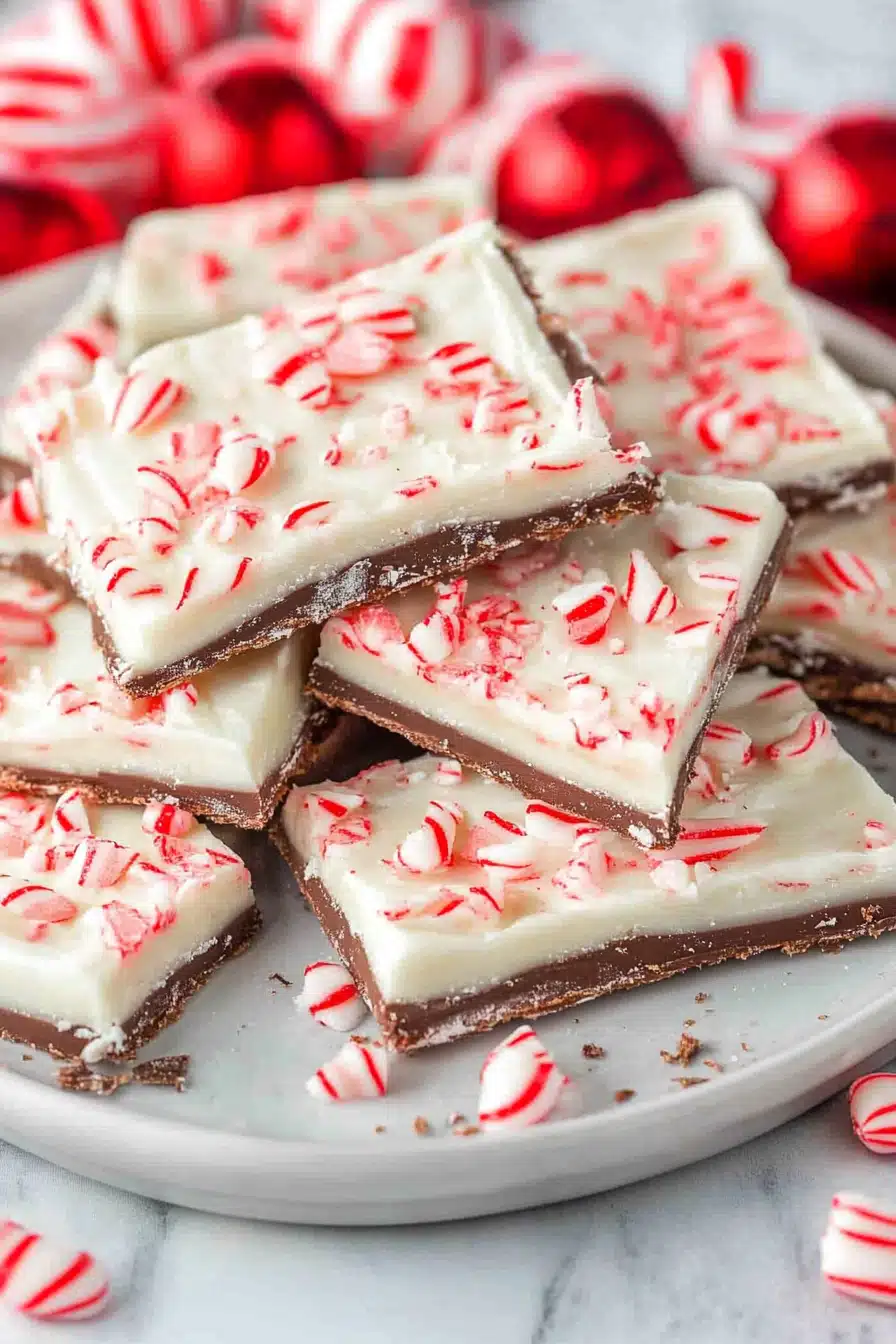
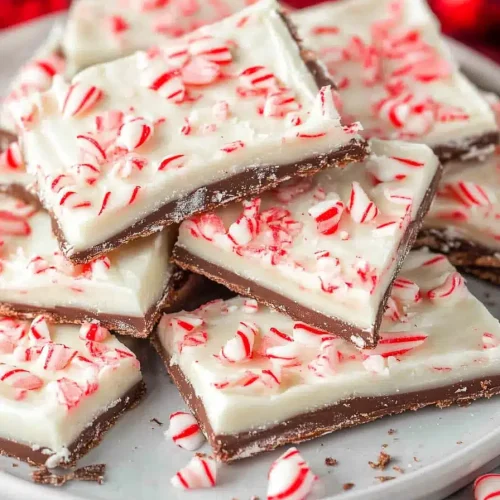
Once the peppermint disks are completely cool and firm, it’s time for the chocolate coating. In a microwave-safe bowl, combine the semi-sweet chocolate chips and the vegetable shortening or coconut oil. Microwave in 30-second intervals, stirring well after each one, until the chocolate is completely melted and smooth. Be careful not to overheat it! You can also do this in a double boiler on the stovetop. Once smooth, carefully dip each cooled peppermint patty into the chocolate, using a fork or a toothpick to help coat it completely. Let any excess chocolate drip back into the bowl. Place the chocolate-coated patties back onto the parchment-lined baking sheet to set. This usually takes about 30 minutes in a cool place, or you can pop them in the fridge for about 15 minutes to speed things up.
Step 9: Slice & Serve
Once the chocolate has hardened, your beautiful peppermint patties are ready! You can serve them immediately. They are best enjoyed at room temperature, where the chocolate is crisp and the filling is soft and minty. If you made them thicker, you might even want to slice them in half before serving for a lovely layered look.
What to Serve It With
These homemade peppermint patties are so versatile, they fit in perfectly at any occasion! For a simple morning coffee break, just one or two alongside your favorite hot beverage is pure bliss. The crisp chocolate and cool mint are surprisingly invigorating, making it a perfect start to the day, especially if you have a sweet tooth like me. For a more elaborate brunch, I love arranging them artfully on a platter with some fresh berries and a dollop of whipped cream – it looks so elegant and guests are always impressed. As a post-dinner treat, they are simply divine. I like to serve them with a small glass of port or a rich espresso; the intensity of the drink really makes the mint and chocolate flavors pop. And for those cozy, quiet evenings when you just need a little something sweet to curl up with, a couple of these with a mug of Hot Chocolate are just perfection. My family also loves them around the holidays; we’ll often have a little “dessert bar” with these alongside cookies and brownies, and these peppermint patties are always the first to disappear!
Top Tips for Perfecting Your Peppermint Patties
Over the years, I’ve picked up a few tricks that I think really elevate this peppermint patties recipe from good to absolutely stellar. For the filling, the key is getting the consistency just right. If it’s too soft, the patties will be messy and might not hold their shape. If it’s too stiff, it can be hard to work with and might result in a crumbly texture. My tip is to add the liquid ingredients gradually. You’re aiming for a dough that’s firm enough to roll and flatten, almost like playdough, but still smooth and pliable. Don’t be afraid to adjust slightly with a tiny bit more powdered sugar or a whisper more milk if needed. When it comes to the peppermint extract, trust your nose! Peppermint oils can vary wildly in strength. Always start with the lower recommended amount and taste a tiny bit of the raw dough (just a pinhead size) to gauge the flavor. You can always add more, but you can’t take it out! For the chocolate coating, the secret to a smooth, glossy finish is the addition of a little shortening or coconut oil. It lowers the melting point and makes the chocolate more fluid, allowing for a thinner, more even coating. And please, please, please don’t overheat your chocolate in the microwave! Short bursts and constant stirring are your best friends here. If you’re dipping, use a fork or a dipping tool and let the excess chocolate drip back into the bowl before placing them on the parchment paper. This creates a nice, clean edge. Finally, make sure those peppermint centers are completely cool and firm before dipping. If they’re still warm or soft, the chocolate will melt right off and create a mess. Patience is key here, but the results are so worth it!
Storing and Reheating Tips
Storing these delicious peppermint patties is pretty straightforward, and they keep remarkably well, which is always a bonus! At room temperature, if they are properly set and completely coated in chocolate, they can last for about a week to 10 days in an airtight container. Just make sure they’re not stacked too high or they might stick together, especially if the weather is warm. If it’s really hot where you live, I’d suggest refrigerating them. In the refrigerator, they’ll keep for about two weeks. Just pop them into an airtight container. When you take them out, they might have a little condensation on the chocolate for a few minutes, but it usually dries off without issue. For longer storage, you can absolutely freeze them! Wrap them individually in plastic wrap, then place them in a freezer-safe bag or container. They’ll stay good in the freezer for up to three months. To thaw, simply take them out of the freezer and let them come to room temperature in their container, still wrapped, to prevent condensation. For the glaze timing, it’s best to glaze them only when you’re ready to store or serve them. If you’re freezing them, I would suggest glazing them *after* thawing them from the freezer, or just before you’re ready to eat them if they’ve been stored at room temperature. This ensures the chocolate coating stays as pristine as possible.
Frequently Asked Questions
Final Thoughts
Honestly, making these homemade peppermint patties is such a joy. It’s more than just following a recipe; it’s about creating something truly special that brings a smile to everyone’s face. The way that cool minty center meets the crisp chocolate shell is just perfection, and knowing you made it yourself adds an extra layer of deliciousness. They’re the perfect little treat to have on hand for when a sweet craving strikes, or to share with loved ones. If you enjoyed this recipe, you might also like my recipe for Classic Chocolate Chip Cookies or my Fudgy Brownies – they’re other family favorites that always get rave reviews! I really hope you give this peppermint patties recipe a try. I can’t wait to hear how yours turn out and if you discover any new favorite ways to enjoy them. Don’t forget to leave a comment below with your thoughts or any fun twists you added! Happy baking!
peppermint patties recipe
Ingredients
Peppermint Filling
- 1 jar marshmallow cream (7 ounce)
- 10 Tablespoons unsalted butter softened
- 1.5 teaspoon vanilla extract
- 1 teaspoon peppermint extract
- 5.5 cups powdered sugar
Chocolate Coating
- 1 package Ghirardelli dark chocolate melting wafers (16 ounce)
- 8 ounce Ghirardelli white chocolate melting wafers optional for footballs
Instructions
Preparation Steps
- In a large mixing bowl, beat marshmallow cream, butter, and extracts until fully combined. Add in powdered sugar and mix on medium speed until well blended (may take a couple minutes for it to come together).
- Line a large baking sheet with parchment paper. Using about 1 Tbsp of filling, shape into a ball, then flatten it for the traditional shape. If wanting to make footballs, shape into a ball and then pinch the ends. Continue until all filling is used. Cover with saran wrap and freeze for about 2 hours (or overnight).
- Melt Ghirardelli chocolate wafers according to package directions. Using a toothpick, dip frozen peppermints into the chocolate. Tap until all the excess has dripped off and place back on the parchment paper. Repeat until all peppermints have been coated. These should be set within minutes, because you are doing them while still cold.
- If making footballs, melt white chocolate according to package directions. Pour into a small ziploc bag and cut the corner off. Pipe laces onto footballs. Sets within minutes!
- Store at room temperature in a covered container!