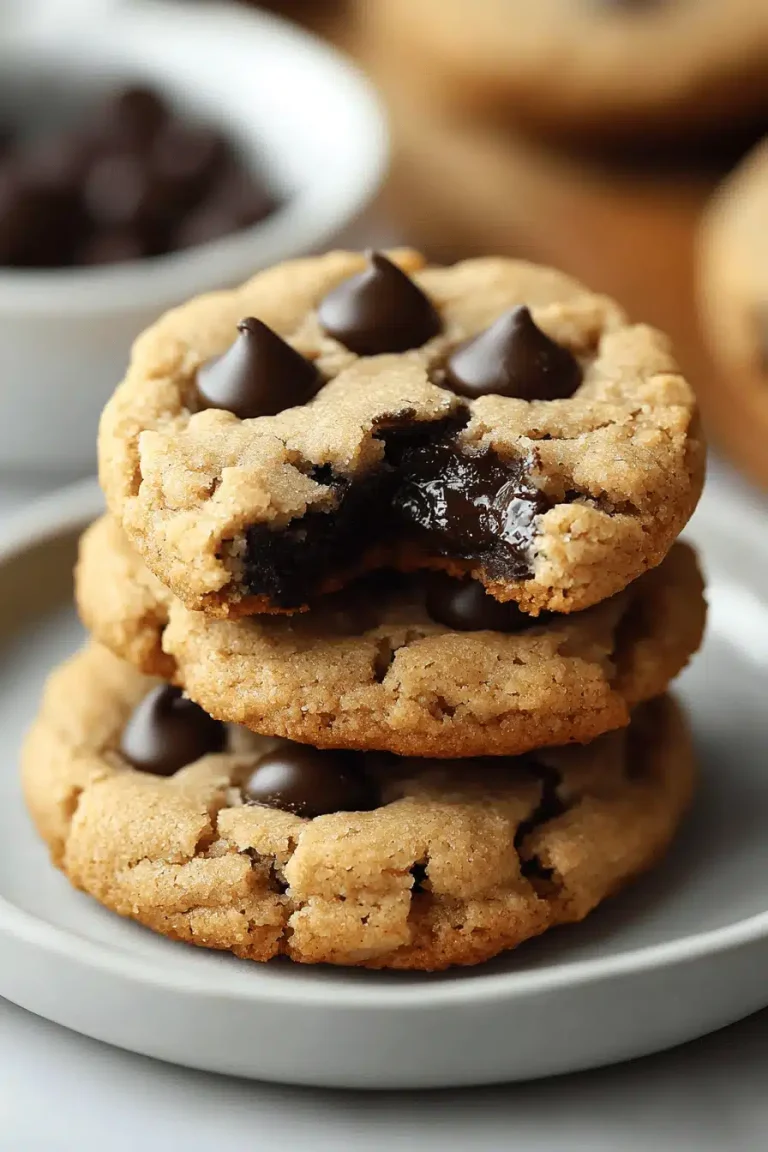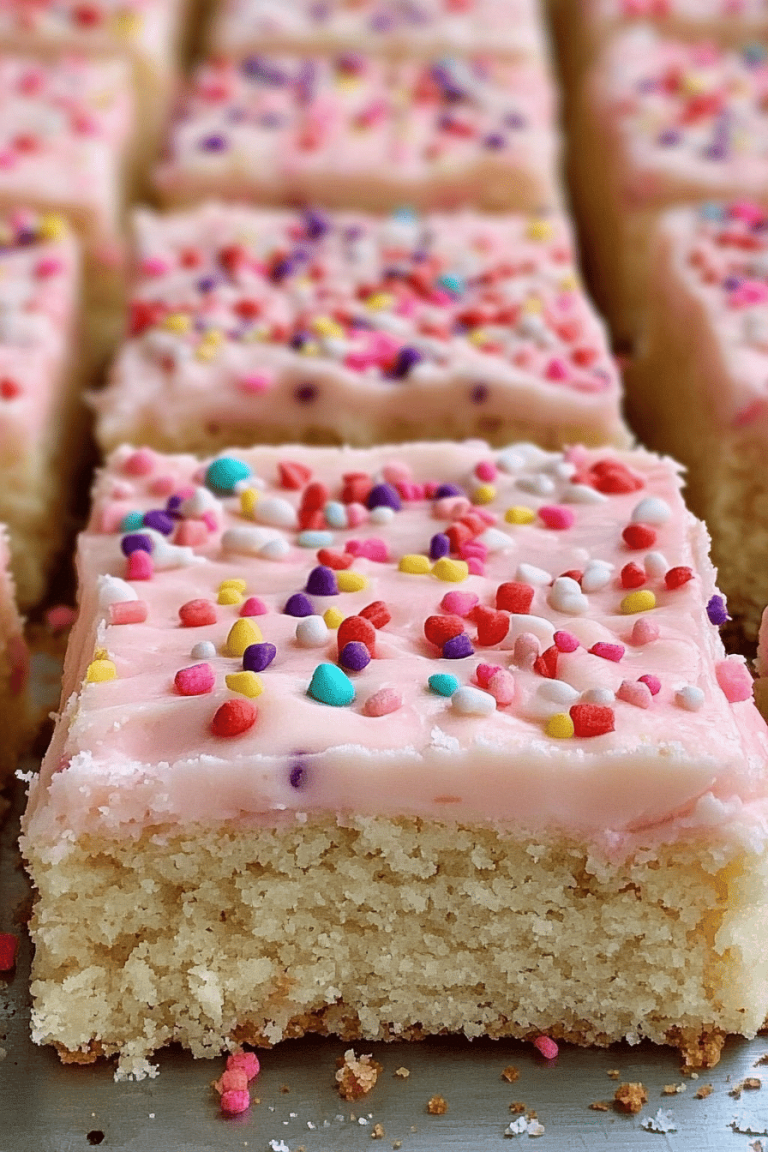
There are some recipes that just *feel* like home, aren’t there? The ones that bring a little wave of comfort just thinking about them. For me, this peanut butter brownie swirl bar recipe is absolutely one of those. I remember the first time I made these for my family; it was a chaotic Saturday afternoon, and I needed something decadent but surprisingly easy to whip up. The smell that filled the kitchen as they baked was pure magic – that intoxicating blend of rich chocolate and sweet, nutty peanut butter. My kids, who can usually be found underfoot asking “Are we there yet?” when anything goes into the oven, were suddenly glued to the kitchen door, their noses twitching. When they finally cooled enough to cut, they disappeared in a matter of minutes. Seriously, these are my go-to when I need a crowd-pleaser, a little treat for myself, or just a reminder of how good simple, homemade goodness can be. They’re like a hug in dessert form, and honestly, who doesn’t need more of those? If you love a good chewy brownie but want to add that extra layer of nutty indulgence, you are in for a real treat. These are, without a doubt, the best Peanut butter brownies I’ve ever made.
What are Peanut Butter Brownie Swirl Bars?
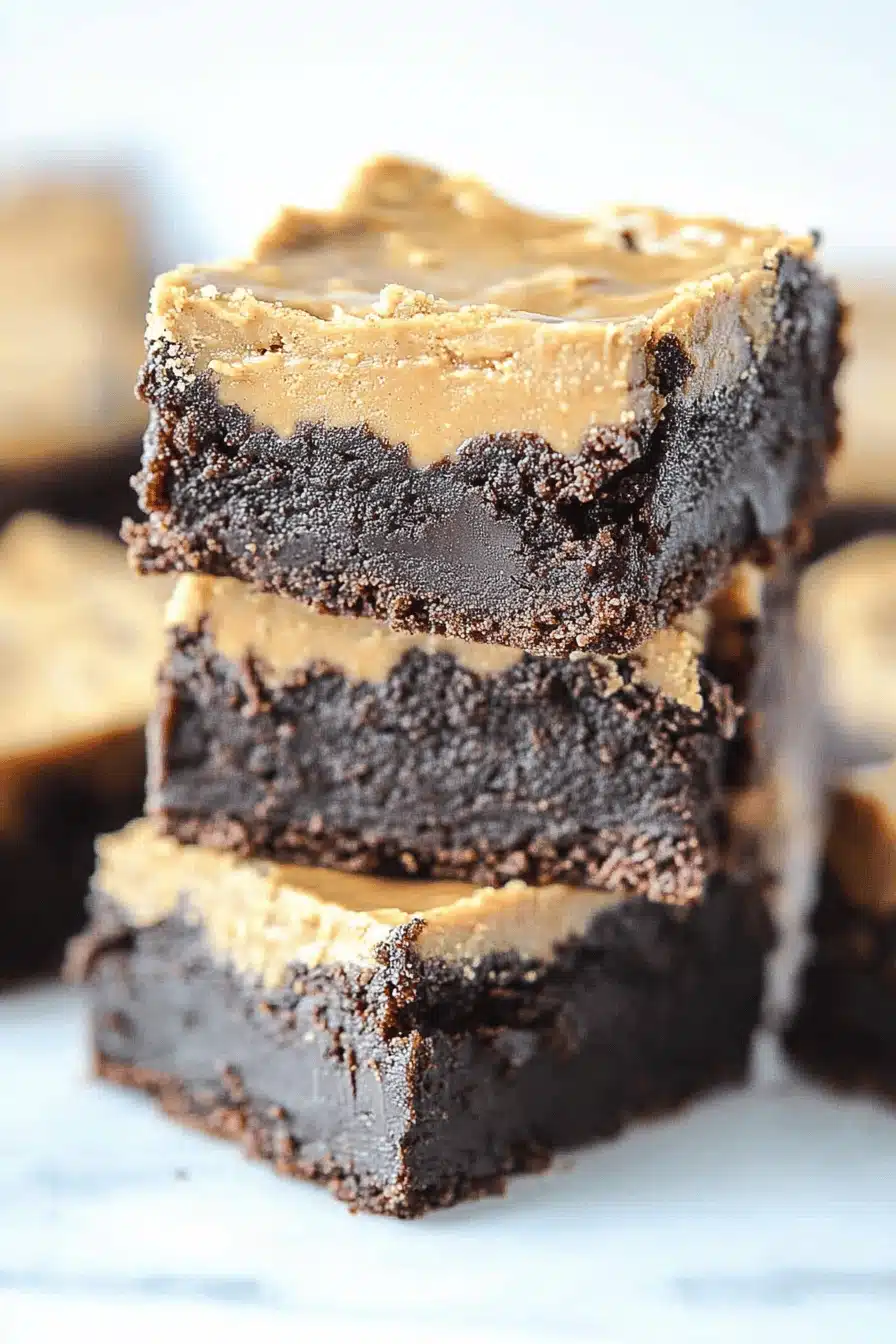
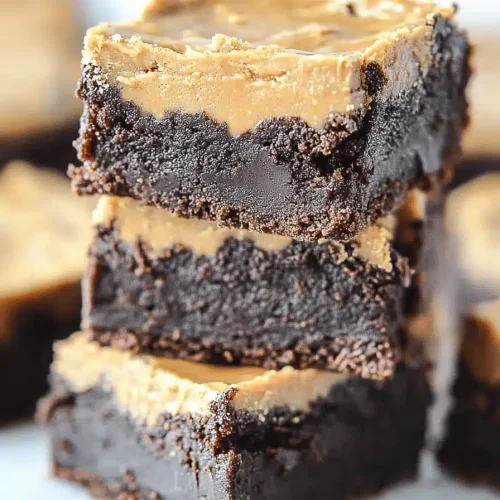
So, what exactly are these glorious creations? Think of them as your favorite fudgy brownie, but with an incredibly delicious, creamy Peanut Butter ribbon woven all throughout. It’s not just a smear on top; the peanut butter is part of the baking magic, creating these beautiful swirls and pockets of pure nutty bliss that make every bite an adventure. The base is a deep, dark chocolate brownie batter – rich, dense, and wonderfully chewy. Then, we swirl in a luscious peanut butter mixture that bakes right alongside the brownie, creating this perfect marriage of flavors and textures. It’s essentially two amazing desserts in one pan! They’re not overly cakey, nor are they dry and crumbly. They hit that perfect spot of moist and fudgy, with the peanut butter adding this incredible depth and a slightly different, almost creamy contrast. It’s the kind of dessert that makes people ask, “What *is* this? It’s amazing!”
Why you’ll love this recipe?
Oh, where do I even begin with why you’ll absolutely adore these peanut butter brownies? First off, the flavor explosion is just out of this world. You get that intense, classic chocolate brownie taste, but then the peanut butter swoops in, adding this warm, nutty dimension that takes it to a whole new level. It’s not too sweet, either; the balance between the rich dark chocolate and the salty-sweet peanut butter is just perfect. What I also love is how surprisingly simple this recipe is. Even if you’re not a seasoned baker, you can totally nail this. The steps are straightforward, and the ingredient list is pretty standard, so you probably have most of it in your pantry right now. And talk about cost-effective! Brownies are inherently budget-friendly, and this recipe uses everyday ingredients. Plus, the versatility is fantastic. You can serve these warm with ice cream, at room temperature with a glass of milk, or even packed into lunchboxes. They’re a lifesaver on busy weeknights when you need a sweet treat without a lot of fuss. Honestly, compared to other brownie recipes I’ve tried, these peanut butter swirl bars are special because of that incredible flavor combo and the gorgeous marbled look you get. They’re always a hit!
How do I make Peanut Butter Brownie Swirl Bars?
Quick Overview
This recipe is all about creating two distinct batters – a rich chocolate brownie base and a creamy Peanut Butter swirl – and then artfully combining them in the pan before baking. You’ll mix your dry and wet ingredients separately for each, then gently combine the brownie batter, pour half into your prepared pan, dollop the peanut butter mixture over, add the remaining brownie batter, and swirl! It’s a simple layering and swirling process that results in a stunning marbled effect and incredible flavor in every bite. The whole thing comes together quickly, making it perfect even when you’re short on time.
Ingredients
For the Main Batter:
You’ll need about 1 cup (2 sticks) of unsalted butter, melted. I always use unsalted so I can control the saltiness of the final product. For the chocolatey goodness, we’re going with 1 ½ cups granulated sugar, and for that deep flavor, 1 cup of unsweetened cocoa powder. Trust me, using a good quality cocoa powder makes a difference! Two large eggs, at room temperature, will help bind everything together. And for that classic brownie texture and flavor, 1 teaspoon of pure vanilla extract and ½ cup all-purpose flour. A pinch of salt, about ½ teaspoon, balances the sweetness. Finally, ½ cup of semi-sweet chocolate chips are optional but highly recommended for extra chocolatey pockets!
For the Filling:
This is where the Peanut Butter magic happens! You’ll need 1 cup of creamy peanut butter. Natural peanut butter works great here, but make sure it’s well-stirred. If you’re using natural, you might want to add a tiny pinch more salt to the filling. Then, we’ll add ½ cup of granulated sugar, 1 large egg, and ½ teaspoon of pure vanilla extract to make it rich and smooth.
For the Glaze (Optional, but oh-so-good!):
If you want that extra touch of decadence, whip up a quick glaze. You’ll need 1 cup of powdered sugar, 2-3 tablespoons of milk (or almond milk for a creamier texture!), and ½ teaspoon of vanilla extract. You can also stir in a tablespoon or two of extra peanut butter for a peanut butter glaze, or even some melted chocolate!
Step-by-Step Instructions
Step 1: Preheat & Prep Pan
First things first, preheat your oven to 350°F (175°C). Grab a 9×13 inch baking pan. I like to line mine with parchment paper, leaving some overhang on the sides. This makes lifting the brownies out so much easier later, and cleanup is a breeze! Lightly grease the parchment paper and the exposed sides of the pan with a little butter or cooking spray. This ensures your beautiful bars won’t stick.
Step 2: Mix Dry Ingredients
In a medium bowl, whisk together the all-purpose flour, unsweetened cocoa powder, and salt. Whisking them together well ensures that the cocoa and salt are evenly distributed throughout the batter, which is key for consistent flavor and texture. You don’t want pockets of salt or dry flour!
Step 3: Mix Wet Ingredients
In a separate large bowl, whisk together the melted butter and granulated sugar until well combined. Then, beat in the two large eggs, one at a time, until fully incorporated. Stir in the vanilla extract. The mixture should look smooth and glossy.
Step 4: Combine
Gradually add the dry ingredients to the wet ingredients, mixing with a spatula or wooden spoon until *just* combined. Be careful not to overmix! Overmixing can develop the gluten in the flour too much, leading to tougher brownies. A few streaks of flour are okay; they’ll disappear during baking. If you’re using the optional chocolate chips, gently fold them in now.
Step 5: Prepare Filling
In another medium bowl, whisk together the creamy peanut butter, granulated sugar, large egg, and vanilla extract until smooth and creamy. If your peanut butter is very stiff, you might want to microwave it for about 10-15 seconds to make it easier to stir. This filling should be pourable but not runny.
Step 6: Layer & Swirl
Pour about half of the brownie batter into your prepared baking pan and spread it evenly. Then, dollop spoonfuls of the peanut butter filling over the brownie batter. It doesn’t have to be perfect! Next, carefully spread the remaining brownie batter over the peanut butter filling, covering most of it. Now for the fun part! Take a knife or a skewer and gently swirl the peanut butter and brownie batter together. Don’t over-swirl, or you’ll lose the distinct layers. Aim for beautiful marbled patterns. A few gentle twists and turns are all you need!
Step 7: Bake
Bake in your preheated oven for 25-35 minutes. The exact time will depend on your oven and how gooey you like your brownies. You’ll know they’re done when the edges are set and a toothpick inserted into the center comes out with moist crumbs attached, but not wet batter. If you see a lot of wet batter, give them another 5 minutes. I usually check around the 25-minute mark.
Step 8: Cool & Glaze
This is crucial for perfect texture! Let the brownies cool completely in the pan on a wire rack. I know it’s tempting to dive in while they’re warm, but they’ll be too fudgy and might fall apart. Patience is a virtue here! Once completely cooled, you can prepare your glaze. In a small bowl, whisk together the powdered sugar, milk, and vanilla extract until smooth. Drizzle the glaze over the cooled brownies. Let the glaze set for about 15-20 minutes before slicing.
Step 9: Slice & Serve
Once the glaze is set (or if you skipped the glaze!), use the parchment paper overhang to carefully lift the entire slab of brownies out of the pan. Place it on a cutting board and slice into squares using a sharp knife. For cleaner cuts, you can wipe your knife between slices. These are delicious served at room temperature, but they’re also fantastic slightly warm with a scoop of vanilla ice cream or a dollop of whipped cream!
What to Serve It With
These peanut butter brownie swirl bars are so wonderfully versatile, they fit into almost any occasion! For a delightful breakfast treat, especially on a weekend, I love serving a warm square with a strong cup of coffee. The richness of the brownie is cut perfectly by the bold coffee flavor. It’s a little bit of indulgence to start the day, and they hold up wonderfully at room temperature if you want to pack a piece to go. For a more elegant brunch spread, I like to cut them into smaller, bite-sized squares and arrange them on a platter with fresh berries and maybe some mini muffins or scones. They add a touch of decadent chocolatey goodness that guests always rave about. As a dessert, they truly shine. Serve them warm (pop them in the microwave for 15-20 seconds if they’ve cooled down) with a generous scoop of good quality vanilla bean ice cream, maybe a drizzle of extra chocolate sauce, or even a dollop of freshly whipped cream. The combination of warm brownie, cold ice cream, and the peanut butter swirl is just heavenly. And for those cozy, no-fuss snack moments? They’re perfect on their own, perhaps with a tall glass of cold milk. My family often requests these as a “movie night” treat, and they disappear so fast!
Top Tips for Perfecting Your Peanut Butter Brownie Swirl Bars
I’ve made these bars so many times, and over the years, I’ve picked up a few little tricks that I think make all the difference. First, about the flour and cocoa: Make sure you measure your flour correctly. Spoon it into the measuring cup and level it off with a straight edge, don’t scoop directly from the bag, or you’ll end up with dry, tough brownies. And for the cocoa, use a good quality unsweetened cocoa powder – it really impacts the depth of flavor. For the swirl, don’t go crazy! Over-swirling can make the peanut butter and chocolate colors blend too much, losing that beautiful marbled effect. Gentle, shallow swirls are best. I’ve learned that after ruining a few batches by overdoing it! For ingredient swaps, if you don’t have all-purpose flour, you can try a good quality 1-to-1 gluten-free baking flour, but you might notice a slight change in texture. I’ve also experimented with different nut butters; almond butter works beautifully in place of peanut butter for a slightly different nutty flavor. For baking, ovens can be tricky, so always do the toothpick test. If it comes out with wet batter, they need more time. If it’s completely clean, they might be a little overbaked and could be on the drier side. Aim for moist crumbs! My kids actually prefer them slightly underbaked for extra fudginess, but you do you! For the glaze, if it’s too thick, add a tiny bit more milk, a teaspoon at a time, until you reach your desired drizzling consistency. If it’s too thin, add a bit more powdered sugar. I love adding a tiny pinch of sea salt on top of the glaze right after drizzling for a sweet and salty crunch that’s just divine.
Storing and Reheating Tips
Knowing how to store these beautiful bars is key to enjoying them at their best. At room temperature, they’ll stay fresh for about 3-4 days, especially if you keep them in an airtight container. I usually don’t even need a container; just wrapping the cooled, glazed slab tightly in plastic wrap or foil is enough to keep them from drying out. If you’ve glazed them, make sure the glaze is fully set before wrapping. For longer storage, the refrigerator is your friend. They’ll keep well for up to a week in an airtight container. I find that the peanut butter swirl actually gets even more fudgy and delicious after a day or two in the fridge! To reheat, you can either enjoy them cold from the fridge (my personal favorite way!), or pop a square into the microwave for about 15-20 seconds. It brings out that fudgy, gooey texture beautifully. For freezing, these bars are absolute champions. Wrap individual bars or the whole slab tightly in plastic wrap, then in aluminum foil, and they can last in the freezer for up to 2-3 months. To thaw, transfer them to the refrigerator overnight, or let them come to room temperature on the counter for a few hours. The glaze might get a little sticky when thawing, but that’s a small price to pay for having these on hand!
Frequently Asked Questions
Final Thoughts
So there you have it – my absolute favorite peanut butter brownie swirl bars. I truly hope you give these a try. They’re more than just a dessert; they’re a little slice of happiness that brings people together. The way the rich chocolate and creamy peanut butter play off each other is just something special, and the fact that they’re so easy to make makes them a winner in my book. If you love a good brownie, I have a feeling these will become a staple in your baking rotation, just like they have in mine. For those who enjoy this flavor combination, you might also want to check out my recipe for [link to another relevant recipe, e.g., Chocolate Peanut Butter Cookies] – it’s another crowd-pleaser! I can’t wait to hear how yours turn out, so please leave a comment below and let me know your thoughts, or share your own tips and tricks. Happy baking, my friends!
Peanut Butter Brownies
Ingredients
Brownie Batter Ingredients
- 0.75 cup all-purpose flour spooned and leveled
- 0.5 cup unsweetened cocoa powder
- 0.5 teaspoon baking powder
- 0.5 cup chocolate chips your choice of milk, semi sweet or dark chocolate chips
- 0.5 cup salted butter melted and cooled
- 0.75 cup granulated sugar
- 0.75 cup light brown sugar
- 2 large eggs room temperature
- 2 teaspoons pure vanilla extract
- 0.5 teaspoon kosher salt
Peanut Butter Swirl Ingredients
- 1 cup creamy peanut butter Divide 2/3 cup for body of brownies and 1/3 cup for peanut butter swirls
Instructions
Preparation Steps
- Preheat oven to 350°F. Line a 9x9 baking dish with parchment paper, leaving a slight overhang to help lift the brownies out of the pan. You can use small binder clips to fasten the top edge of the parchment paper to the baking dish to prevent it from folding over onto the brownies as they bake. Lightly spray the parchment paper with nonstick cooking spray.
- In a small bowl, whisk together the flour, unsweetened cocoa powder, baking powder, and chocolate chips.
- In a medium-sized mixing bowl, add the melted and cooled butter.
- Add the granulated and light brown sugar, room temperature eggs, vanilla extract and kosher salt to the butter and stir just until combined.
- Stir in the flour mixture and chocolate chips just until combined. It’s very important to not overmix the brownie batter which would make tough textured brownies.
- Use a silicone spatula or an offset spatula to spread half of the brownie batter evenly into the prepared baking dish.
- Dollop teaspoons of the 2/3 cup creamy peanut butter on top of the brownie batter. You can add the creamy peanut butter to a piping bag for more control.
- Spread the remaining brownie batter over the top of the creamy peanut butter dollops.
- Heat the 1/3 cup of peanut butter in a microwave-safe bowl for about 10 seconds and stir well.
- Drizzle the heated creamy peanut butter over the top of the brownie batter. Use the tip of a knife to create a swirl pattern.
- Bake for about 30 minutes, or until a toothpick inserted comes away with a few moist crumbs.
- Allow the brownies to cool completely at room temperature for 2 hours before cutting into 4 slices x 4 slices and serving.