There are certain treats that just evoke pure joy, aren’t there? For me, it’s those moments when the house is filled with the comforting aroma of something baked, something sweet, something that just whispers “cozy.” This recipe for Nutella rollups is one of those magical things. I remember the first time I whipped these up, mostly out of desperation on a rainy afternoon when the kids were practically bouncing off the walls. I had a jar of Nutella staring at me, some basic pantry staples, and a vague idea. What came out of the oven was nothing short of a miracle – these ridiculously simple yet utterly decadent Nutella rollups that disappeared faster than I could blink! They’re like a hug in pastry form, and honestly, they’ve become my go-to when I need a quick win in the kitchen. Forget complicated desserts, these little beauties are the answer to every sweet craving, and they’re incredibly forgiving, even for novice bakers.
What is Nutella Rollup?
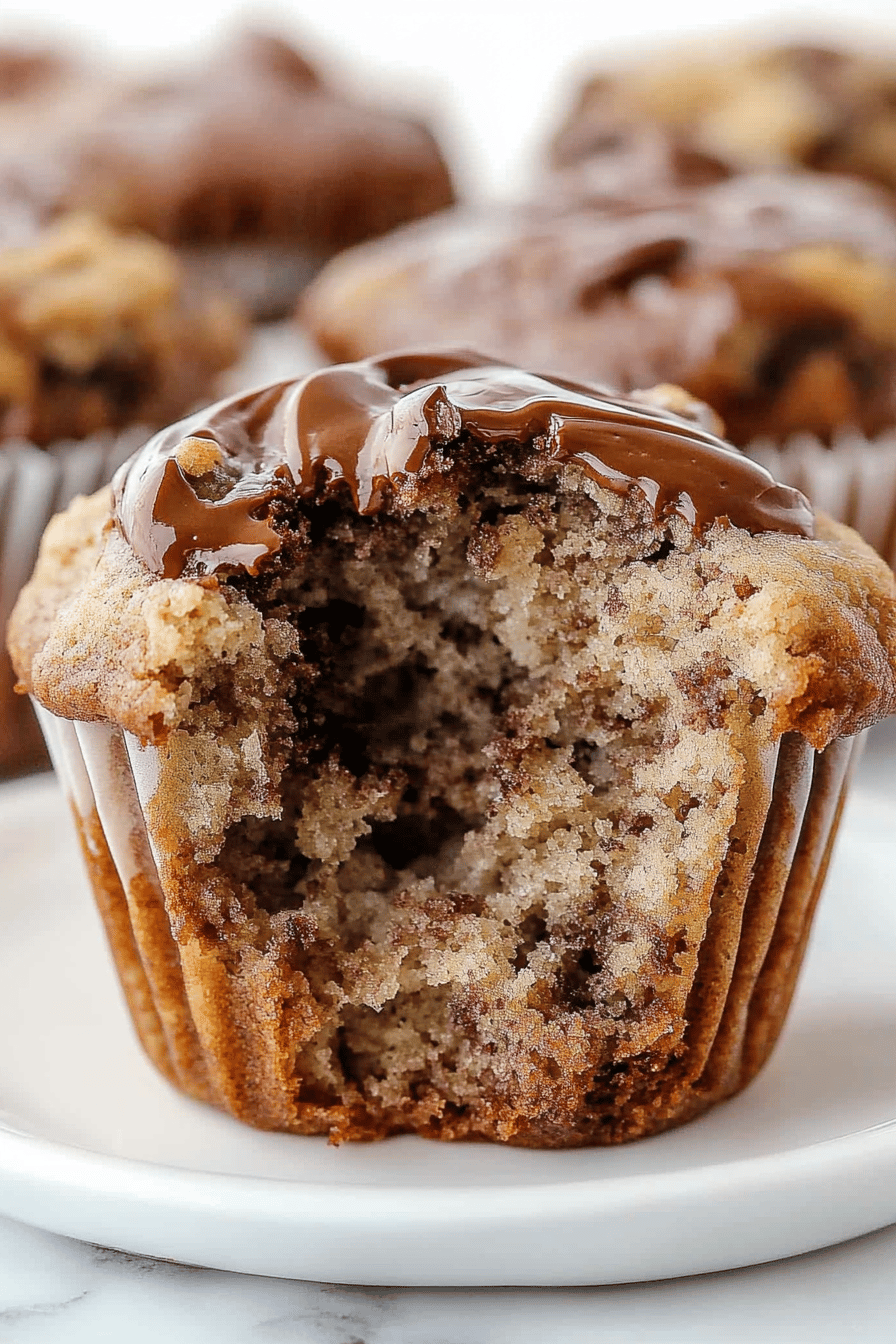
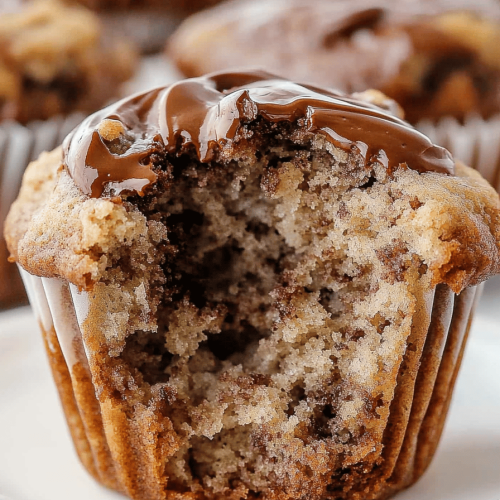
So, what exactly are these delightful little things we call Nutella rollups? Think of them as a sort of sweet, soft pastry or a wonderfully tender quick bread, swirled with a generous ribbon of that iconic hazelnut chocolate spread. It’s not quite a cookie, not quite a cake, but something wonderfully in between. The “rollup” part comes from how we assemble them: a simple batter is spread into a rectangle, then generously slathered with Nutella, and finally rolled up like a jelly roll. Once baked, they develop this irresistible soft interior with slightly crisp edges, and that unmistakable hazelnut-chocolate goodness is marbled throughout. It’s essentially a fuss-free way to get that beloved Nutella flavor into a portable, shareable, and utterly addictive form. I love that the name itself just tells you exactly what you’re getting – pure, unadulterated Nutella rolled up into a dream!
Why you’ll love this recipe?
Let me count the ways! First off, the FLAVOR. Oh my goodness, the flavor. It’s that creamy, dreamy, slightly nutty, intensely chocolatey taste of Nutella that everyone adores. It’s amplified by the tender crumb of the baked good itself, creating a perfect harmony. Then there’s the SIMPLICITY. Seriously, this recipe is a lifesaver on busy nights or when unexpected guests pop by. You likely have most of the ingredients already, and the hands-on time is minimal. I’ve actually timed it – you can have them mixed and ready for the oven in under 15 minutes! And let’s talk COST-EFFICIENCY. Compared to buying fancy pastries or desserts, these Nutella rollups are incredibly budget-friendly. A jar of Nutella and some pantry staples go a long way. What I love most, though, is the VERSATILITY. They are fantastic warm, straight from the oven, but they’re also delightful at room temperature. They’re perfect for a quick breakfast treat, a mid-afternoon snack, or even a simple, crowd-pleasing dessert. They remind me a bit of a swirled Cinnamon roll, but with that magical chocolate-hazelnut twist, and let me tell you, they don’t last long on a plate. My kids ask for these all the time, and honestly, so do I!
How do you make Nutella Rollups?
Quick Overview
Making these Nutella rollups is surprisingly straightforward. You’ll whisk together a few simple wet and dry ingredients to form a batter, spread it into a prepared pan, generously coat it with Nutella, roll it up, and bake until golden and delicious. That’s it! The magic happens during the baking, where the Nutella creates those beautiful swirls and the batter bakes into a soft, cake-like texture. It’s a foolproof method that guarantees a delightful outcome every single time, perfect for those moments you need a sweet fix without the fuss.
Ingredients
For the Main Batter:
- 1 and 3/4 cups all-purpose flour: Make sure it’s fresh! This forms the base of our tender crumb.
- 1 teaspoon baking soda: This gives our rollups a lovely lift.
- 1/2 teaspoon salt: Crucial for balancing the sweetness and enhancing flavors.
- 1/2 cup unsalted butter, softened: I always use unsalted so I can control the saltiness perfectly. Make sure it’s soft, not melted, for the best texture.
- 3/4 cup granulated sugar: For that touch of sweetness.
- 1 large egg: Room temperature is best for easier incorporation.
- 1 teaspoon vanilla extract: The classic flavor enhancer that rounds everything out.
- 1/2 cup milk (any kind works!): I’ve tested this with almond milk and it actually made it even creamier! Dairy or non-dairy, it all works.
For the Filling:
- 1 cup Nutella: This is the star! Use your favorite brand. No need to warm it up, just spread it straight from the jar.
For the Glaze:
- 1 cup powdered sugar: For that sweet, smooth finish.
- 2 tablespoons milk: Just enough to get the right drizzling consistency. Add more or less as needed.
- 1/2 teaspoon vanilla extract (optional): A little extra flavor boost.
Step-by-Step Instructions
Step 1: Preheat & Prep Pan
First things first, get your oven preheated to 350°F (175°C). This is crucial for even baking. Next, you’ll need a 9×13 inch baking pan. I like to grease it really well with butter or cooking spray, and then line it with parchment paper, leaving some overhang on the sides. This overhang acts as handles for easily lifting the baked rollups out later. Trust me, this step makes life so much easier!
Step 2: Mix Dry Ingredients
In a medium bowl, whisk together your flour, baking soda, and salt. Give it a good whisk until everything is evenly distributed. This ensures your leavening agent and salt are spread throughout, leading to a uniform texture. It’s a small step, but it makes a difference!
Step 3: Mix Wet Ingredients
In a separate, larger bowl, cream together the softened butter and granulated sugar until light and fluffy. You can use an electric mixer for this, or a whisk and some elbow grease! Then, beat in the egg and vanilla extract until well combined. This mixture should be smooth and pale yellow.
Step 4: Combine
Now, we’re going to add the dry ingredients and the milk to the wet ingredients. I like to do this in alternating additions, starting and ending with the dry ingredients. So, add about a third of the dry mixture, mix until just combined, then add half the milk, mix, then another third of the dry, the rest of the milk, and finally the last of the dry ingredients. Mix until just combined. Be careful not to overmix here! Overmixing can lead to tough baked goods, and we want these to be super tender. A few small lumps are perfectly okay.
Step 5: Prepare Filling
This is the fun part! Take your jar of Nutella. You don’t need to do anything special to it. Just open it up, and it’s ready to go. The texture is perfect for spreading right out of the jar.
Step 6: Layer & Swirl
Spoon your batter into the prepared 9×13 inch pan. Using a spatula, gently spread the batter evenly into the pan, all the way to the edges. Now, dollop spoonfuls of Nutella all over the top of the batter. You want it pretty generously coated! Then, using a butter knife or offset spatula, gently swirl the Nutella into the batter. You don’t need to go crazy here; just a few swirls will create those beautiful marbled patterns when it bakes. I always do this with a light hand, making sure not to dig all the way to the bottom.
Step 7: Bake
Pop that pan into your preheated oven. Bake for about 20-25 minutes, or until a toothpick inserted into the center comes out clean (or with moist crumbs, not wet batter). The edges should be lightly golden. Keep an eye on it towards the end, as oven temperatures can vary. If it seems to be browning too quickly on top, you can always loosely tent it with foil.
Step 8: Cool & Glaze
Once baked, let the Nutella rollups cool in the pan on a wire rack for about 15-20 minutes. This is important for them to set up. While they’re cooling, whisk together the powdered sugar, milk, and vanilla extract for the glaze until you have a smooth, pourable consistency. If it’s too thick, add a tiny bit more milk; if it’s too thin, add more powdered sugar. Once the rollups have cooled slightly, drizzle the glaze all over the top. I love seeing the glaze cascade down the sides!
Step 9: Slice & Serve
Let the glaze set up a bit, then using the parchment paper overhang, lift the entire slab out of the pan onto a cutting board. Cut them into squares or rectangles – whatever you prefer! They are absolutely divine served warm, but they’re also wonderful at room temperature. Enjoy the pure bliss!
What to Serve It With
These Nutella rollups are so wonderfully versatile, they fit into almost any meal or craving! For a cozy BREAKFAST, they’re incredible alongside a steaming mug of coffee. The rich chocolate and hazelnut flavors are the perfect wake-up call. I like to cut them into smaller squares for a less-is-more morning treat. For BRUNCH, they add a touch of indulgence to the spread. Imagine them nestled amongst fruit salads and quiches, with a lovely glass of orange juice or even some sparkling rosé. For an elegant presentation, dust them lightly with powdered sugar before serving. As a DESSERT, they’re a simple yet satisfying end to any meal. They pair beautifully with a scoop of vanilla bean Ice Cream or a dollop of whipped cream. The warm, gooey Nutella inside is simply divine after dinner. And for those COZY SNACKS when you just need a little pick-me-up, these are your answer. I love just grabbing a square (or two!) with a glass of cold milk. My personal family tradition is to have them on movie nights, cut into bite-sized pieces – they disappear way too fast!
Top Tips for Perfecting Your Nutella Rollups
I’ve made these Nutella rollups more times than I can count, and over the years, I’ve picked up a few tricks that I think make them even better. For the batter, my biggest piece of advice is **don’t overmix**. Seriously, this is the golden rule for tender baked goods. Mix the wet and dry ingredients until they’re just combined. A few small lumps in the batter are a good sign that you haven’t overworked the gluten, which keeps them wonderfully soft. When it comes to spreading the batter, make sure it’s an even layer. I find a silicone spatula works best for getting it right to the edges without making it too thin. For the Nutella swirl, you don’t need to go overboard. Spoon it out and then use a knife or offset spatula to make gentle, swooping motions. You’re aiming for beautiful marbling, not a fully blended mixture. I learned this lesson after one batch where I swirled too vigorously, and it just became a chocolate blob – still tasty, but not as pretty! If you’re feeling adventurous with your swirl, try using a piping bag with a wide tip to draw lines of Nutella, then swirl those. It gives a slightly more defined pattern. When it comes to baking, ovens can be quirky, so I always recommend the toothpick test. If it comes out with wet batter, give it another few minutes. If it comes out clean, they’re ready! For ingredient swaps, I’ve actually experimented with using a good quality almond butter instead of Nutella once when we ran out, and it was surprisingly delicious, with a deeper, nuttier flavor profile. For the glaze, consistency is key. You want it thick enough to coat but thin enough to drizzle. I always start with less milk and add more gradually until I achieve that perfect ribbon-like pour. If your glaze accidentally gets too thin, just whisk in a little more powdered sugar. And if you want to make these gluten-free, I’ve had success using a 1:1 gluten-free baking flour blend – it usually turns out pretty similarly, though sometimes it might need an extra minute or two in the oven.
Storing and Reheating Tips
One of the best things about these Nutella rollups is how well they store. If you happen to have any leftovers (a rare occurrence in my house!), you can keep them at ROOM TEMPERATURE for up to two days. Just make sure they’re covered tightly with plastic wrap or in an airtight container to keep them from drying out. If you need them to last a bit longer, they’ll be perfectly happy in the REFRIGERATOR for up to four days. Again, an airtight container is your best friend here to maintain freshness. They’re actually quite delicious cold straight from the fridge, which is great if you’re looking for a quick, cool treat. For longer storage, these Nutella rollups freeze beautifully! Once they’ve cooled completely and the glaze has set, wrap them very well in plastic wrap, then in aluminum foil, or place them in a freezer-safe container. They’ll keep for up to 2-3 months. To thaw, simply take them out of the freezer and let them come to room temperature, or gently reheat them. If you’ve frozen them with the glaze on, they’ll be just fine. If you plan on freezing before glazing, you can easily make a fresh batch of glaze when you’re ready to serve. Reheating is simple: you can pop a square in the microwave for about 10-15 seconds for a warm, gooey treat, or warm them gently in a low oven (around 300°F or 150°C) for a few minutes until just heated through.
Frequently Asked Questions
Final Thoughts
There you have it – my go-to recipe for Nutella rollups! I truly hope you give these a try. They are such a simple yet incredibly satisfying treat that brings a little bit of everyday magic to your kitchen. They remind me that sometimes, the best things in life are also the easiest to make. If you love this recipe, you might also enjoy my recipe for [Link to another relevant recipe, e.g., ‘Fudgy Brownie Cookies’] or my quick and easy [Link to another relevant recipe, e.g., ‘No-Bake Chocolate Peanut Butter Bars’]. They share that same spirit of deliciousness without fuss. I can’t wait to hear how your Nutella rollups turn out! Don’t be shy about leaving a comment below with your own tips, variations, or just to tell me how much you loved them. Happy baking, my friends!
Nutella rollups
Ingredients
Main Ingredients
- 0.25 cup milk
- 0.25 cup heavy cream
- 1 teaspoon pure vanilla extract
- 12 slices sandwich bread Whole Wheat recommended
- Nutella
- 4 tablespoons butter divided
- 0.25 cup vanilla sugar or powdered sugar for dusting
Instructions
Preparation Steps
- Make the custard. In a medium bowl whisk together the milk, heavy cream, egg, and vanilla. Set aside.
- Prepare the bread slices. Cut the crust from the bread. Flatten the bread slices with a rolling pin; make them as flat as possible.
- Roll them up. Spread Nutella on each bread slice and roll up the bread, lightly pinching the seam to secure.
- Cook. Place 2 tablespoons butter in a frying pan and melt over medium heat. Dip the rollups in the egg mixture, and place in the frying pan. Cook until golden brown, about two minutes; flip to the other side and cook for another minute or so. You will most likely have to do this in batches. Add the rest of the butter, and continue to cook until all rollups are done.
- Roll in sugar. If you have vanilla sugar, put it in a shallow dish, and once the rollups are done cooking, roll them in the sugar until covered. If you do not have vanilla sugar, dust the rollups with powdered sugar instead. Serve immediately.